
Introduction
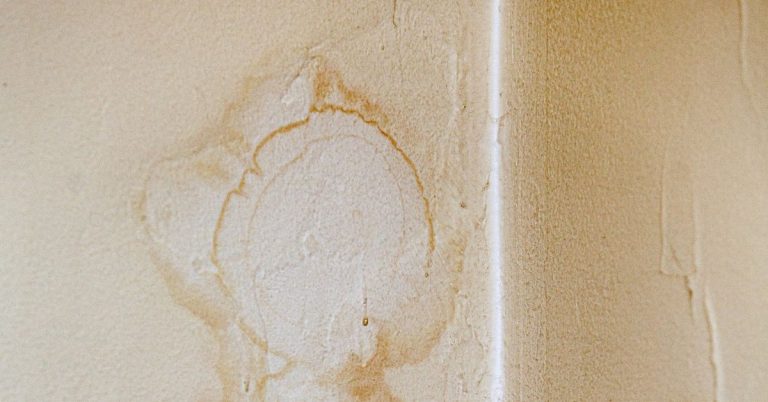
Water stains on plaster indicate moisture and mineral salts that have bled into the surface.
Address the source and let the area dry before patching, and remove any loose or damaged plaster you can see. Choose a stain-blocking product and patch material based on the area, and always check the label for compatibility and drying times.
If staining persists after drying and the plaster or lath is deteriorated, cut out the damaged section and re-plaster. Apply a stain blocker as directed, then skim coat or patch with material suited to your wall, and seal before painting. When in doubt, review manufacturer instructions, local rules, and safety practices to decide what to replace and how to finish.
Key takeaways
- Inspect water stains for spreading, check for active leaks before plaster work.
- Ventilate area, wear eye protection and mask; avoid dust inhalation.
- Salt migration requires cleaning and inactivating salts prior to patching.
- Use compatible stain-blocking primers; test on a small area first.
- Cut out severely damaged plaster to stable edge; feather edges for repair.
- Monitor for recurring stains after repair and address underlying moisture.
Table of Contents
- Introduction
- Key takeaways
- Assessing the Damage and Diagnosing the Stain
- Understanding Salts (Efflorescence) and Their Effects on Plaster
- When to Cut Out Plaster Vs. When to Repair
- Preparing the Area and Safety Precautions
- Treating Salts and Preparing the Surface for Repair
- Stain-Blocking Products and Choosing the Right Primer
- Repairing and Re-Plastering Techniques Step-by-Step
- Preventing Recurrence, Monitoring, and When to Hire a Pro
- Conclusion
- FAQ
Assessing the Damage and Diagnosing the Stain
Start with a thorough visual inspection of the affected area. Look for signs of water intrusion, salt deposits, mold, or other contaminants on both plaster and nearby surfaces. Document locations and progression over time to determine if the issue is ongoing or from a past incident.
Follow a logical inspection sequence: check for leaks, observe moisture, and test for salt efflorescence if indicated. Before deciding on repairs, verify whether stains appear with moisture or remain when dry. If in doubt, reference product labels, instructions, or local code guidance to interpret findings safely.
Identifying stain type visually and by smell
First, look at the stains. Clean water leaves no residue, just a mark that fades over time. Salts leave a powdery residue called efflorescence. It’s usually white or gray, sometimes pink (from rust). Mold has a musty smell, grows in patches, and can be green, black, or orange.
For salts, scratch the surface gently. If it’s salty under your nail, that’s salt staining. For mold, smell is key. If it’s musty, suspect mold. Use a black light to confirm – mold glows blue in the dark.
Remember: Some stains look alike. Always check smell and do simple tests to be sure.
Locating the moisture source
Find active leaks by checking pipes, roof, windows, and walls. Look for water stains, damp patches, or mold growth. Follow stains to their source.
Check condensation points: cold surfaces (like exterior walls) meeting warm air can drip. Inspect plumbing and roof regularly – they’re common culprits.
Tip: Use a flashlight to inspect hard-to-reach areas. Keep an eye out for signs of water damage, like warped wood or rusted metal.
Measuring moisture and salt presence
Use a moisture meter to check walls, floors, and ceilings. It shows moisture content as a percentage. Ideal is below 15%. Above 20%, you’ve got a problem.
For salts, do an efflorescence test: dampen the stain with water, then apply a drop of clear hydrochloric acid (from your hardware store). If it bubbles or fizzes, that’s salt. Rinse off the acid afterwards.
Caution: Always follow product/manufacturer limits when using meters and chemicals. Safety first!
Understanding Salts (Efflorescence) and Their Effects on Plaster
Soluble salts exist in many building materials and can migrate with moisture. As water moves, salts are dissolved and carried to the surface where they re-crystallize and leave a visible stain. This cycle can repeat if moisture continues to travel through the wall.
Their presence can cause ongoing staining and may undermine finish adhesion. Rely on manufacturer data or local guidelines to confirm how salts behave with your substrate and climate. Plan repairs with this recurring potential in mind.
How salts form and travel in walls
Salts in your walls come from the concrete, mortar, or bricks themselves. They’re soluble, meaning they dissolve in water.
Here’s how they move:
Capillary action pulls water up through tiny pores in your walls. This water carries dissolved salts with it. As the water evaporates at the surface, it leaves the salts behind. That’s how you get those white deposits – efflorescence.
This process repeats whenever there’s moisture present. So, if you don’t fix the source of that moisture, the stains will keep coming back.
Long-term damage salts cause to plaster and finishes
Salts do more than just stain your walls. They can cause serious damage over time:
1. Plaster delamination: Salts push their way out of the wall, forcing off paint or plaster. You’ll see cracks and flaking.
2. Powdering: The salts eventually dry out and turn into a fine powder. This can crumble your plaster and make it look like sandpaper.
3. Paint failure: Even if you manage to paint over salt stains, the salts will keep pushing through, causing your paint to peel or crack.
That’s why it’s so important to deal with salt problems early – before they cause major damage and costly repairs.
Simple on-site salt tests and when to call a specialist
Before you start any work, do some quick tests to confirm it’s salts causing your problem:
Wipe test: Wipe the affected area with a damp cloth. If it leaves a white residue, that’s efflorescence.
Scrape test: Scrape at the surface gently. If it crumbles easily, that could be salt powdering.
Poultice test: Apply a mixture of water and a poultice powder to the area. If it turns pink or red after 24 hours, that’s a positive test for salts.
If your tests are inconclusive, or if you suspect there might be other issues at play (like mold), don’t hesitate to call in a specialist. They have the tools and knowledge to give you a definitive answer.
When to Cut Out Plaster Vs. When to Repair
Use a clear set of criteria to decide whether cleaning and patching is enough. If stains extend beyond a small area or show signs of bedding instability, plan partial removal. If the plaster is hollow, cracked, or severely delaminated, removal may be required.
Document the extent of the damaged layer and compare it to the anticipated repair. Check guidance from product labels or professional recommendations to determine whether a patch or full replacement is indicated. When in doubt, err on the side of removal to stop recurring issues.
Cosmetic vs structural failure indicators
The first step is to understand what you’re dealing with. Not all stains mean the same thing.
Cosmetic staining might just need a good clean and some stain blocking primer before repainting. But if it’s efflorescence, that white salt crust, you’ll need to deal with the moisture source first.
If plaster is loose or crumbling, it could be due to poor original workmanship or hidden damage. Check for compromised lath by gently tapping – a hollow sound means trouble. And if there’s structural rot, you’ll see warping, cracking, or even large holes. That’s a job for a pro.
How much plaster to remove — patching, partial cut-out, or full replacement
The amount of plaster you need to remove depends on the damage. For minor stains and cracks, a small patch might do. Feather the edges for a smooth blend.
If there’s extensive damage or hidden issues, you might need to remove plaster down to the sound substrate. This means taking out all damaged material, back to where it’s solid and stable.
In severe cases, like when lath is compromised or framing is affected, you’ll have to remove entire panels to reach and repair the underlying structure. It’s messy but necessary.
Risks and consequences of delaying cut-out
Delaying plaster removal can let problems escalate. Moisture leads to mold growth, which is bad for your health. It also weakens the structure, leading to more damage.
Rusted metal lath won’t support new plaster well. And if there’s hidden rot, it’ll spread, affecting more of your home’s structure. Delays can turn a simple repair into a major project.
So, weigh the risks. If you’re not sure about your skills or the extent of damage, call in a pro. It’s better to be safe than sorry.
Preparing the Area and Safety Precautions
Clear the work zone and protect floors with drop cloths. Gather essential tools, containers, and disposal bags before you start. Keep a tidy workspace to prevent cross-contamination and trips.
Set up containment if dust or mold is present and wear appropriate PPE. Use eye protection, gloves, and a respirator or mask as needed. Always check local rules on containment and disposal for your area.
Tools and materials checklist
Before you start, make sure you have all the necessary tools and materials to ensure a smooth job. Here’s a checklist to help you.
- Moisture meter: Essential for measuring moisture levels in plaster. Skipping this can lead to ineffective repairs due to hidden moisture.
- Scrapers: To remove loose and damaged plaster. Without these, prep work will be slow and inefficient.
- Stiff-bristle brushes: For scrubbing surfaces before applying primers or new plaster. Neglecting this can result in poor adhesion.
- Cleaners: To remove dirt, dust, and stains. Without proper cleaning, repairs won’t last.
- Primers: To seal the surface and prevent further moisture absorption. Skipping primer can lead to recurring issues.
- Plaster mixes: Choose the right type for your repair – new plaster or skim coat. Using the wrong mix can cause cracks or crumbling.
- Trowels: For applying and smoothing plaster. Without these, application will be difficult and results may be uneven.
- Safety glasses: To protect your eyes from debris during scraping and sanding. Neglecting eye protection can lead to injuries.
Quick rule: Always double-check your checklist before starting any repair work.
Personal protective equipment and dust/mold control
Safety is paramount when working with plaster, especially when dealing with water stains that could indicate mold. Here’s what you need to protect yourself and contain dust and spores.
- Respirator: A P100 or N95 respirator is recommended for protection against dust and mold spores. Using a lower-rated mask can expose you to harmful particles.
- Gloves: Disposable gloves are essential for protecting your hands from plaster, chemicals, and potential contaminants like mold. Without gloves, you risk skin irritation or infection.
- Eye protection: Safety glasses with side shields can protect your eyes from debris. Consider goggles if there’s a risk of liquid splashing.
- Containment/tarping: Use plastic sheets to contain dust and prevent it from spreading to other areas. Without containment, you may end up cleaning more than necessary.
- HEPA vacuum: Optional but highly recommended for thorough cleanup. A HEPA vacuum can help remove fine dust and mold spores that regular vacuums might miss (around $100-$200 to rent).
Protecting floors, fixtures, and finishes
Before you start working on the plaster, take steps to protect your floors, fixtures, and finishes from damage. This will save you time and money in the long run.
Masking: Use painter’s tape and drop cloths to cover and protect adjacent walls, floors, and furniture. Without proper masking, you may end up with unwanted marks or stains.
Temporary removal of trim or fixtures: If the water stain is near baseboards, trim, or light switches, consider temporarily removing them. This will give you better access to the affected area and prevent damage to these items during repair work.
Drop cloths: Lay down drop cloths on the floor to protect it from plaster dust and debris. Without drop cloths, you may end up with a messy cleanup job and potential damage to your flooring.
Treating Salts and Preparing the Surface for Repair
Begin by removing loose material and any damp, soft plaster. Rinse or wipe surfaces to reduce surface salts and allow the area to dry as directed by instructions. Use a method compatible with your plaster type to avoid pushing salts deeper.
Apply appropriate cleaners or inhibitors according to label directions, then test the surface for stability. Ensure the substrate is dry and sound before applying primer or plaster. When in doubt, verify steps against manufacturer instructions or local guidance.
Washing, brushing, and poultice methods
Start by gently scrubbing the affected area with a soft-bristled brush and warm water. Be careful not to damage the plaster.
Rinse thoroughly with clean water. Let it dry for 24 hours. If salts persist, apply a poultice or commercial salt remover following the manufacturer’s instructions. Repeat if necessary.
Handling corroded metal lath or fasteners
Inspect your walls for any signs of rust on the metal lath or screws. If found, clean the area with a wire brush to remove loose rust.
Apply a rust converter to stabilize and convert the rust into a paintable surface. Replace any severely compromised lath or fasteners with new ones.
Drying and verifying readiness for repair
Allow the area to dry naturally, or use fans to speed up the process. Ensure no moisture remains behind, as it can cause further damage.
Use a moisture meter to confirm the substrate is dry (below 16%). If readings are high, wait longer before priming or plastering. Patience here pays off.
Stain-Blocking Products and Choosing the Right Primer
Compare primers by their ability to seal salts, withstand moisture, and resist mold. Shellac and oil-based options often provide strong stain blocking, while acrylics offer easier cleanup. Alkali-resistant products are important on surfaces with active salt movement.
Match the primer to the stain source you identified and to your plaster surface. Read product data sheets or label instructions to confirm suitability for salts, water exposure, and any mold concerns. If unsure, consult the manufacturer or a local pro for guidance.
When to use shellac or oil-based block primers
Shellac and oil-based primers are great for severe stains and tannin bleed-through. They seal the surface, preventing further absorption.
Advantages: Excellent sealing properties, quick drying times.
Considerations: Shellac can yellow over time. Both may not be ideal in high-moisture areas due to solvent concerns.
Alkali-resistant and breathable solutions for plaster
For alkaline substrates, choose alkali-resistant primers. They won’t break down like other primers might.
Benefits: Tolerates high pH levels, prevents flash rust on metal lath.
Breathable options: Acrylic or latex primers allow moisture vapor to escape, preventing trapped moisture issues.
Application tips and compatibility with topcoats
Apply stain-blocking primers in thin, even coats. Too thick can cause peeling or cracking.
Drying: Allow proper drying time between coats (usually 24 hours).
Compatibility: Always check paint compatibility with your chosen block primer to avoid adhesion issues or discoloration.
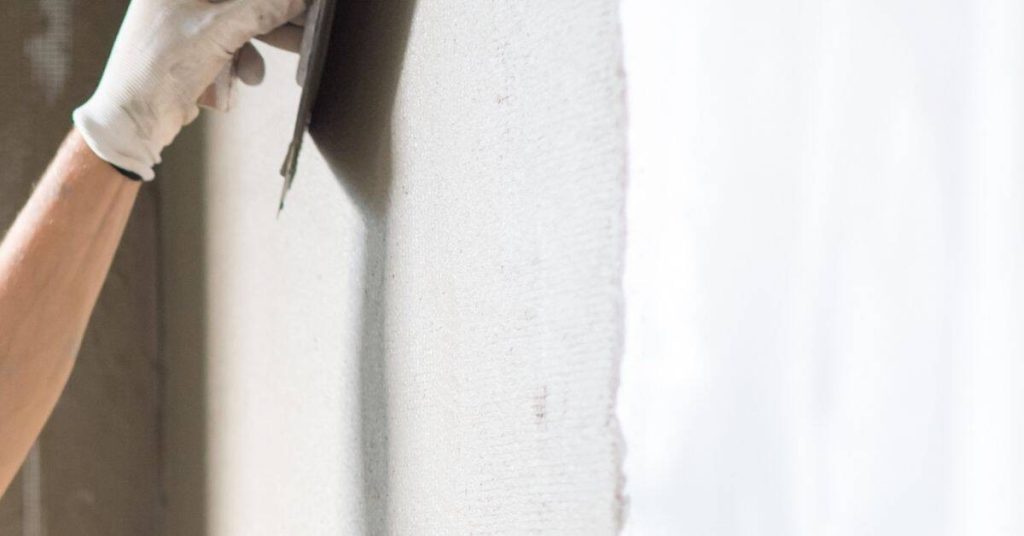
Repairing and Re-Plastering Techniques Step-by-Step
Start with small patches to verify adhesion and drying behavior before larger work. Mix plaster or patching compound to the recommended consistency and apply in thin coats. Build up to the correct thickness with attention to feathering edges for a seamless finish.
For larger areas, consider a skim coat and bonding method suitable for your substrate. Allow proper curing and follow any specified temperatures or humidity guidelines. Check labels or instructions for exact ratios, curing times, and application tips.
Step-by-Step Repair Process
Follow these practical steps to repair and re-plaster your walls like a pro.
- Preparation: Clear the area, put on PPE, cover floors and fixtures. Check for safety – no live wires or hazards.
- Surface Prep: Remove loose material, treat salts, wash, brush, and dry. Use poultice if needed (refer to earlier sections).
- Main Repair: Apply bonding agent, mix plaster, apply in thin layers, let set. Feather edges for a smooth finish.
- Sanding & Finishing: Lightly sand after each layer, wipe clean. Final sanding before priming.
- Final Checks & Cleanup: Inspect work, touch up if needed. Clean tools and area. If unsure, consult a pro.
Small patch repairs and feathering methods
Fix small plaster holes with these simple steps:
Use a bonding agent on the hole’s edges. Mix joint compound, apply thinly, let set.
Feathering: Apply compound wider than the hole, tapering to nothing at the edges. Sand lightly after setting.
Repeat for second coat if needed, feathering again. Final sand before priming.
Re-skim vs replaster vs using drywall over plaster
Choose the right method based on your wall’s condition:
Re-skim: For minor damage, apply a thin skim coat. Labor-light, finish OK.
Replaster: For extensive damage, remove old plaster, reapply. More labor but best finish.
Drywall over plaster: If substrate is solid, drywall can be used. Easier install but changes wall structure and finish.
Finishing, texture match, and paint prep
Complete your repair with these final steps:
Skim-coat: Apply a thin layer to smooth walls. Sand lightly after setting.
Match texture: Use a texture spray or comb to mimic existing finish. Practice first on scrap.
Sand & Prime: Final sanding, wipe clean. Apply primer suitable for plaster (refer to earlier sections). Let dry before painting.
Preventing Recurrence, Monitoring, and When to Hire a Pro
Implement long-term fixes to limit moisture intrusion, such as addressing leaks and improving ventilation. Schedule regular checks for new stains, dampness, or salt movement. Create a simple monitoring plan to catch issues early.
Know when to bring in an expert: persistent staining, structural concerns, or uncertain material conditions warrant professional assessment. Rely on clear criteria from product instructions, labels, or local codes to decide if a contractor or specialist is needed.
Fixing the moisture source and improving ventilation
The first step to prevent water stains from returning is to fix the root cause. Here’s what you should look for:
Roofing issues: Inspect your roof for damaged or missing shingles, tiles, or flashing. Water can seep in through these openings and cause stains on your plaster.
Plumbing problems: Check for leaks around pipes, under sinks, or behind appliances. Even a small leak can lead to significant water damage over time.
Ventilation and humidity control: Ensure that your home is properly ventilated to prevent excess moisture from building up. This might involve installing exhaust fans in bathrooms and kitchens, or running a dehumidifier if necessary.
Monitoring, maintenance schedule, and visual checkpoints
Regular inspections are key to catching new moisture or salt activity early. Use this checklist every six months:
- Check for water stains: Look for any new discoloration on your plaster.
- Inspect plumbing: Check under sinks, behind appliances, and around toilets for leaks.
- Examine roofing: Inspect your roof for damaged or missing shingles, tiles, or flashing.
- Check ventilation: Ensure that exhaust fans in bathrooms and kitchens are working properly.
- Humidity levels: Use a hygrometer to measure indoor humidity. Ideal levels should be between 30-50%.
- Grout and caulk: Inspect sealant around showers, tubs, and countertops for cracks or gaps.
- Baseboards and trim: Check for warping, buckling, or discoloration, which could indicate water damage.
- Window frames and sills: Look for signs of water intrusion around windows.
Quick rule: If you notice any new stains, leaks, or other signs of moisture, address them immediately to prevent further damage.
Hiring a professional: what to expect and questions to ask
If the water stains are extensive or you’re unable to fix the problem yourself, it’s time to hire a pro. Here’s what to look for and some key questions to ask:
Key competencies: Look for professionals with experience in water damage restoration and plaster repair. They should be able to diagnose the source of the problem and recommend appropriate solutions.
Diagnostic tests: A good professional will perform thorough diagnostic tests to identify the exact cause of the moisture problem. This might involve using infrared cameras or moisture meters.
Questions to ask: Before hiring, ask about their guarantee on workmanship, what materials they plan to use, and whether they’ll provide a detailed scope of work. Also, inquire about any additional services they offer, such as mold remediation if necessary.
Conclusion
The key is to control what you can see and what you can’t: prevent further moisture, stop the salts from ruining new work, and finish with plaster that lasts. When you handle stains and salts carefully, you protect durability and appearance without pulling everything apart again.
First, check in this order: confirm the stain is still active, test for efflorescence and moisture, decide whether you need to cut out the damaged plaster or can repair, then set up and protect the work area, treat any salts, prime, and follow the repair steps with steady, patient progress. Do a small test patch first, then scale up to the full area, and always monitor after it dries to catch any sign of movement or new staining.
Common mistakes to avoid are rushing the diagnosis, skipping tests, or using the wrong primer and sealer on damp surfaces. Do not skip safety gear, and never work on a surface you haven’t tested for moisture or salts. Don’t over-wet plaster during repair, and don’t neglect proper containment and ventilation when working with primers and finishes.
If the moisture source isn’t controlled, or you’re unsure about cutting out versus repairing, or you’re dealing with complex wiring, framing, or a large area, call a pro. When you press ahead, stay disciplined: test first, document what you find, follow a proven sequence, and finish with a solid primer and proper patching. You’ve got this—stay steady, stay safe, and you’ll reclaim a clean, durable finish.
FAQ
Should I prime over the plaster after repairing, or do I need to wait for full cure first?
Prime once the surface is clean, dry, and dust-free. Follow the product label for recoat times and cure guidance. If you’re unsure, ask the manufacturer or test a small area first.
How can I tell if salts are still active after I treat the area?
Look for new staining after a few days or after a rain. If the stains reappear, the salts may still be migrating. Re-check the surface for moisture and re-treat as needed per product instructions and local guidance.
What should I look for when choosing a stain-blocking primer for plaster with prior water stains?
Choose a product labeled for porous surfaces and for blocking stains. Check the label for suitability on plaster and any salt-related bleed. If in doubt, compare options by reading the manufacturer instructions or asking a hardware pro.
What steps help prevent stain bleed from salts after the repair is done?
Keep the area dry and use a compatible primer before paint. Repair thoroughly, seal any leaks, and monitor the area for moisture. If stains recur, re-evaluate moisture sources and consult the product label or a pro for next steps.