

Introduction
To fix bulged plaster, you can flatten the bulge or replace the affected section if the damage is severe.
The guide walks through practical steps to assess the damage, choose between patching or replacing, and apply safe, durable techniques you can use in your own space.
Key takeaways
- Identify bulged plaster early to prevent wall cracks and moisture damage.
- Assess severity before cutting or removing; minor bulges may respond to re-tacking.
- Gather patched plaster screws, backing, patch compound, bonding agent, damp cloth.
- Use controlled pressure behind bulge with drywall knife to flatten.
- For moderate bulges, apply mesh or fiberglass patch before mud coats.
- Re-check visually after drying; recoat and finish to blend with surrounding.
Table of Contents
- Introduction
- Key takeaways
- Quick overview and when to read this guide
- Common causes of bulged plaster
- Inspecting and assessing damage severity
- Tools and materials checklist
- Techniques to flatten bulged plaster without full replacement
- When to replace the section (full or partial)
- Step-by-step DIY flattening project plan
- Cost, time, and when to call a pro
- Finishing touches and visual checkpoints
- Preventing future bulges and long-term care
- Conclusion
- FAQ
Quick overview and when to read this guide
This guide helps you decide whether bulged plaster should be flattened or replaced. It’s aimed at homeowners, DIYers, and contractors assessing bulged plaster in walls or ceilings. The goal is to give practical, step-by-step options you can follow on site.
You’ll get clear guidance on common causes, risk factors, and when delaying work hurts. Following the hands-on steps saves time, money, and future headaches by avoiding bad fixes. No hype, just straight choices you can act on today.
What “bulged plaster” means
Bulged plaster isn’t just a crack; it’s when your wall surface starts to buckle outwards. Unlike cracking, which is usually just a hairline split in the drywall or plaster, bulging shows up as a noticeable lump or wave on the wall. This can happen due to poor base compaction under concrete slabs or moisture issues behind walls.
Don’t confuse it with delamination, where layers of plaster peel off like pages in a book. That’s more about adhesion problems between materials, not structural movement. Also, avoid mistaking bulges for oil-canning, which is when thin metal panels ripple due to unsupported spans.
To fix bulged plaster, you’ll need to address the underlying issue first—like checking base compaction or fixing water leaks—and then plan a proper repair. Patching over it without solving the root cause will just waste your time and money.
Safety and skill level required
Before you start pouring concrete, make sure you have the right safety gear. Hard hats, gloves, steel-toed boots, and eye protection are non-negotiable. If you’re a beginner, stick to smaller projects like patios or walkways until you get comfortable with the process.
Concrete work isn’t just about mixing cement; it’s also about knowing when to call in pros for tricky parts. For instance, if your project involves complex forms or deep foundations, leave that to the experts who have the experience and equipment to handle such tasks safely.
Check base compaction before you pour concrete. A poorly compacted base can lead to settlement issues down the line, causing cracks and bulged plaster in walls nearby. If you’re unsure about how to do this properly, it’s better to hire a professional than risk doing it wrong.
Common causes of bulged plaster
Bulged plaster points to a root problem behind the wall. The usual culprits are moisture, structural movement, poor original installation, and thermal expansion.
It matters because patching the surface without fixing the cause means the bulge will come back. Tackle the leak, brace the frame, or redo the install so you don’t waste time and money on repeated repairs.
Moisture-related causes
Leaks from the roof, pipes, or windows can cause plaster to bulge and peel. Water seeps into cracks and weak spots, weakening the bond between plaster and wall. Check for water stains, mold growth, or dampness around fixtures.
Humidity is another sneaky culprit. High moisture in the air makes plaster swell and crack over time. Use a dehumidifier if you notice condensation on windows or musty smells in your home.
Plumbing issues like leaky pipes can also damage walls from behind, causing bulges without obvious surface water marks. Listen for dripping sounds or check under cabinets for signs of wetness. Fixing these leaks early saves plaster and prevents bigger problems down the line.
Structural and movement causes
If your walls are bulging, it could be due to the building settling. This happens when the ground beneath shifts over time, causing gaps where plaster meets wood or metal supports. Check base compaction before starting any project to avoid future issues.
Vibrations from heavy machinery nearby can also shake things loose and create movement in your walls. Loose lath or nails behind the plaster will show up as cracks and bulges over time, especially if there’s been a lot of foot traffic or construction activity around your home.
Ignoring these signs can lead to bigger problems down the road. Addressing structural issues early is key to keeping your plaster in good shape without major repairs later on.
Inspecting and assessing damage severity
Start with a clear inspection checklist to judge severity. If the damage is minor and spread is manageable, flattening may work. If there are deep cracks, rot, or hidden issues, replacement is wiser.
A proper assessment saves time and money and prevents safety risks on the job. Following a simple checklist helps you avoid wasted repairs and costly mistakes.
Size, location, and pattern checklist
This checklist helps you quickly assess the extent of damage to concrete surfaces. Use it when inspecting walls or ceilings for cracks, spalling, or other issues.
- Small crack width: Measure less than 1/8 inch wide. Confirm with a ruler. Skip this and risk overlooking minor repairs.
- Broad area damage: Check if more than 2 square feet are affected. Visual inspection confirms. Omitting broad areas can lead to structural issues.
- Isolated cracks: Look for single, distinct lines not spreading widely. Confirm by tracing with a pencil. Skip and you might miss localized repairs needed.
- Widespread cracking: Observe if multiple small cracks form a network. Visual check confirms. Misidentifying as isolated can cause incomplete fixes.
- Ceiling damage: Look for signs on the ceiling, like drooping or flaking paint. Confirm by checking above walls too. Skip and you may miss roof leaks affecting concrete.
- Wall damage: Check if cracks run vertically along walls. Visual inspection confirms. Omitting vertical cracks can lead to water penetration issues.
- Pattern consistency: Note if the pattern repeats across similar surfaces. Confirm by comparing different areas visually. Skip and you might miss systemic damage.
- Foundation impact: Look for signs of movement or shifting at base levels. Visual check confirms. Omitting foundation issues can lead to major structural problems later.
Quick rule: If in doubt, measure and mark it; better safe than sorry with concrete repairs.
Tap, probe, and moisture testing methods
When you’re checking your concrete for damage, start with a hammer. Tap the surface lightly; if it sounds hollow, there’s likely delamination underneath. This means the top layer is separating from the base. Check base compaction too—loose ground can cause this issue.
Next, use an awl or probe to dig into any spots that sound off. If you hit soft areas easily, it’s a clear sign of damage. Don’t just guess; get in there and see what’s really going on under the surface.
Finally, grab a moisture meter. High readings mean water is seeping through cracks or poor sealants. Wet concrete can weaken quickly, so address this fast to prevent bigger problems down the line. Thermal clues also help—look for damp spots that stay cool longer than dry areas in shady conditions.
Tools and materials checklist
Here’s a practical checklist of tools, safety gear, and materials you’ll need for flattening a surface and doing partial or full replacement. Buy what you need, but know there are cheap tools that work and better options that last longer. Decide what fits the job and your budget without cutting corners.
Having the right kit keeps work fast and safer, and it reduces rework on a critical job. A solid setup also helps you finish with a clean, durable result and less frustration on the stack. Skipping essential PPE or using poor-quality fasteners invites failure and unsafe conditions.
Tools for flattening and reattachment
This checklist covers the essential tools needed to flatten surfaces and reattach fixtures or panels. Use it before you start any work that involves removing old materials or setting new ones.
- Pry bar: Ensure it’s at least 18 inches long for leverage. Check by attempting to pry up a small piece of wood; if it doesn’t move easily, the bar is too short.
- Hammer: Confirm it has a claw and is not too heavy (about 2 pounds). Test by hammering in a nail with ease without straining your wrist.
- Plaster trowel: Should be flat and smooth, about 6 inches wide. Check by running your hand over the surface; it should feel even and free of cracks or dents.
- Plaster washers: Verify they are clean and undamaged. Inspect each washer for any signs of rust or deformation.
- Adhesive cartridges: Ensure they’re within their expiration date, and the nozzle is clear. Test by squeezing a small amount to see if it flows smoothly without clumping.
- Cordless drill: Check battery charge before use; should last at least 30 minutes on high power setting. If batteries are dead, you’ll waste time changing them mid-job.
- Level: Confirm it’s accurate by placing it against a known straight edge or wall. A misaligned level can lead to crooked installations and wasted materials.
- Screwdriver set: Include both flathead and Phillips head sizes (2, 3, and 4 inches). Test each screwdriver in the screws you plan to use; it should fit snugly without slipping.
- Utility knife: Ensure blade is sharp. Check by cutting through a piece of cardboard smoothly without tearing or skipping.
- Caulking gun: Make sure it’s clean and has no cracks in the handle. Test by squeezing out some caulk to ensure smooth operation.
- Measuring tape: Confirm it measures accurately up to at least 25 feet. Check against a known measurement; if off, your cuts will be inaccurate.
- Circular saw: Verify blade is sharp and properly aligned with the guide rail. Test by making a cut; if the blade binds or wobbles, it’s not set up correctly.
- Paint scraper: Ensure it has a sturdy handle and a sharp edge. Check by scraping along an old paint surface; it should remove flakes without bending.
Quick rule: Always double-check tools before starting work to avoid costly mistakes on-site.
Materials for patching and finishing
This checklist covers the materials you need to patch damaged concrete and finish it smoothly. Use this when preparing your site for repairs.
- Plaster: Choose a high-quality plaster that’s suitable for concrete surfaces. Check its consistency by applying a small test batch; it should be smooth without lumps.
- Joint compound: Ensure the joint compound is specifically designed for concrete repair. Apply a thin layer to check if it adheres well and dries evenly.
- Bonding agent: Verify that the bonding agent is compatible with both plaster and concrete. Test its effectiveness by applying it to a small area; it should create a strong bond upon drying.
- Mesh: Use galvanized or stainless steel mesh for reinforcement. Check if the mesh size fits your repair area without gaps.
- Sandpaper: Have various grits from coarse to fine. Test by sanding an inconspicuous area; it should smooth out rough patches effectively.
- Primer: Choose a primer that’s suitable for concrete and matches the paint you plan to use. Apply a small test patch to ensure good coverage and adhesion.
- Paint: Select a high-quality, durable exterior or interior paint based on your project needs. Test its color match by applying it next to an existing area; it should blend seamlessly.
Quick rule: Always test materials in small areas before full application to avoid costly mistakes.
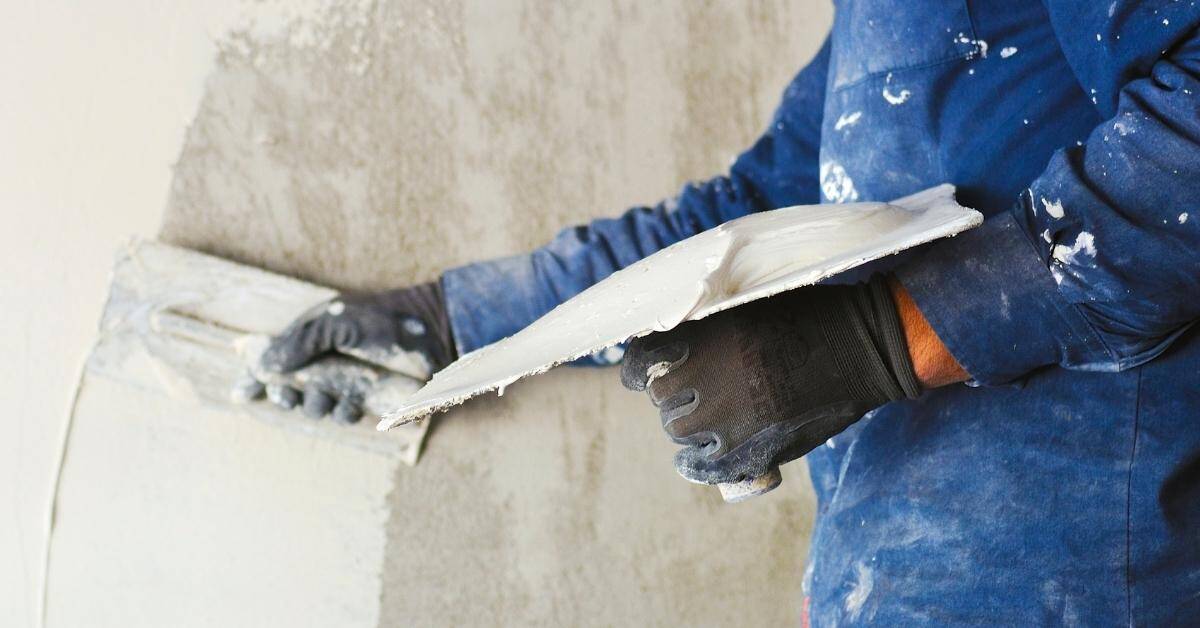
Techniques to flatten bulged plaster without full replacement
For small to moderate bulges, you can flatten the plaster without ripping out a wall. Clean the area, knock off loose material, dampen the surface, and apply a patching plaster or bonding-compound. Spread it smooth and feather the edges so it blends with the surrounding wall.
This approach saves time and money and keeps the job moving. But only when the backing is solid and moisture or movement isn’t ongoing—otherwise the patch will fail and you’ll be back to square one.
Re-tacking and plaster washer method
To flatten a bulge in your plaster, start by removing loose material from the area. Use a scraper to gently chip away any cracked or flaking bits until you hit solid plaster. Next, install plaster washers over the bulged spots. These washers are metal rings that grip the lath behind the wall and help pull the plaster back into place.
Once your washers are in, re-secure them to either the lath or framing with new nails. Make sure each washer is firmly attached but avoid hammering too hard as this can cause more damage. Check base compaction by lightly tapping around the area; if it feels solid and doesn’t give way under pressure, you’re good to move on.
This method works best for smaller bulges where you can still access the lath behind the plaster. For larger areas or when there’s no lath left, consider consulting a professional before proceeding with this DIY fix.
Injected adhesive and suction methods
If you have access to the wall cavity behind a bulged plaster, consider using injected adhesives like epoxy or polyurethane. This method can re-bond loose plaster without needing full replacement. Check base compaction first; if it’s solid, proceed with injecting adhesive.
To apply suction, use a vacuum to remove air and moisture from the cavity before injecting adhesive. This ensures better bonding of the plaster to the wall surface. Remember, this technique requires precision and patience to avoid damaging surrounding materials.
While these methods can be effective, they’re tricky for DIYers due to the need for precise application and equipment. If unsure or dealing with extensive damage, it’s best to consult a professional who has the right tools and experience.
Surface leveling and skim-coat approach
If you’re dealing with plaster bulges that aren’t severe, a surface-leveling technique can save the day. Start by checking base compaction. If the wall behind is solid, you can proceed to skim coat. Use a bonding agent on the old plaster before applying a thin layer of new plaster over it.
Avoid going too thick with your skim coat; aim for no more than 1/8 inch. This keeps things flat and smooth without risking further bulges or cracks. Remember, this method works best when you’re okay with slight hollows under the plaster—full reattachment isn’t necessary if perfection isn’t critical.
For deeper hollows, consider using a light filler before skim coating to ensure better adhesion and a smoother finish. Always test small areas first to see how they hold up over time.
When to replace the section (full or partial)
If damage reaches a certain size, depth, or is driven by persistent moisture, replace the section rather than patch it. Consider replacement when you see more than a third of the section damaged, moisture keeps returning after repairs, or there are multiple failure points. Structural issues like sagging, bowing, or rusted connections should seal the decision to replace. Quick degradation, drywall or plaster delamination behind the surface, or hollow-sounding patches are warnings that patching may be insufficient.
- More than one-third of the section is damaged or crumbling.
- Moisture intrusion recurs after patching or sealing efforts.
- Visible structural movement (sagging, bowing) or rusted metal connections.
- Electrical or plumbing behind the plaster shows signs of compromise or corrosion.
- Wiring or piping updates are planned, making a full or partial replacement more cost-effective in the long run.
- Reinforcement or insulation needs are substantial enough to warrant starting from a solid base.
Partial removal and patching
If you’ve got a small area of lath and plaster that’s gone bad, don’t tear out the whole wall. Just cut it out and patch it up. First, check base compaction to ensure your new concrete will stay put. Mark the edges with chalk lines where the old stuff needs to go.
Cut out the damaged area carefully using a chisel or angle grinder. Make sure you get clean edges for the patch to stick right. Mix up some fresh concrete in small batches and pour it into place, tamping it down well. Smooth it off with a float and let it cure properly before moving on. Seal joints with appropriate patching material to reduce future moisture intrusion. Consider applying a waterproof membrane where moisture has been a repeated issue.
Blend your repair work with the old by matching textures and colors as best you can. This isn’t about perfection; it’s about making sure no one notices unless they’re looking for it. A little extra effort here will save you headaches later when the patch holds up just like the rest of the wall.
Full strip and new substrate options
If you’re dealing with a full slab replacement, consider stripping everything down to the base. This means removing old concrete, checking for any underlying issues like base compaction, and laying fresh concrete or another suitable material. Plan for proper curing and moisture control to prevent future issues.
For walls needing an overhaul, installing drywall over resilient channels can be quicker than plastering. It’s also easier to work with if you’re not a seasoned plasterer. Just make sure your insulation is in place before setting up the new wall system. Use fire-rated assemblies where required by code and verify electrical boxes and conduits comply with current standards.
When opting for a full strip and new substrate, think about how this affects existing wiring and plumbing. You might need to reroute or replace these systems, which can add time and cost. Plan ahead to avoid surprises down the line. Obtain any necessary permits, perform a quick moisture assessment, and budget for disposal of old materials and disposal fees.
Step-by-step DIY flattening project plan
Start with prep and protection, then follow a clear sequence: fix the bulge, reattach, patch, sand, and finish. Keep the work steady and pace it so you don’t miss a step.
This plan helps you stay on track and spot problems early. A steady, logical order reduces rework, lowers risk of damage, and lets you see progress fast.
Step-by-Step Process
This sequence will guide you through flattening your concrete surface, ensuring a smooth and even finish.
- Action: Start by checking that all safety gear is on and the work area is clear of debris.
Reason: Safety first to prevent accidents during the process.
Check: Confirm no loose items are around, and you’re wearing gloves and goggles. - Action: Use a concrete grinder or floor scarifier to remove high spots on the surface.
Reason: This step ensures that all uneven areas are leveled before moving forward.
Check: Run your hand over the surface; it should feel smooth and even. If not, continue grinding until it is. - Action: Clean up any dust or debris left behind from grinding.
Reason: A clean surface helps in applying leveling compounds evenly without contamination.
Check: The surface should be free of loose particles and look uniformly gray. - Action: Apply a thin layer of concrete patching compound to any low spots.
Reason: This step ensures that all areas are brought up to the same level as the rest of the surface.
Check: The compound should be spread evenly and slightly raised above the surrounding area. - Action: Allow the patching compound to cure according to manufacturer instructions, typically 24 hours.
Reason: Proper curing ensures that the compound bonds well with the existing concrete.
Check: The surface should feel hard and dry to the touch. - Action: Use a concrete float or trowel to smooth out any raised areas of patching compound.
Reason: This step ensures that all patched sections blend seamlessly with the rest of the floor.
Check: The surface should look and feel uniform, without visible seams. - Action: Clean up your tools and materials, then inspect the entire surface for any remaining imperfections.
Reason: Final inspection ensures that no areas were missed or improperly treated during the flattening process.
Check: The floor should be smooth, even, and free of cracks or uneven patches.
Pro tip: Always double-check your work before moving on to the next step. A quick pass with a straightedge can help identify low spots you might have missed.
Prep and protective measures
Before you start flattening your concrete area, make sure to protect the space around it. Move all furniture and equipment out of the way. If you can’t move something, cover it with thick drop cloths or plastic sheets to keep them safe from dust and debris.
Isolate any utilities in the work zone. Turn off water valves if pipes run under your concrete slab. Mark where electrical cables are buried so you don’t accidentally cut through them while working. This might seem like a hassle, but it’s crucial for safety and to avoid costly repairs later on.
Check base compaction before starting any work. A weak foundation can lead to uneven concrete or cracks down the line. If your ground is soft or unstable, take steps to compact it properly first. This might mean adding gravel layers or using a plate tamper for better support.
Execution: reattachment to finish
Once your base is prepped and compacted, it’s time to get the concrete back in place. Start by reattaching any loose pieces. If you need to inject adhesive, do so now and let it cure according to the manufacturer’s instructions. Don’t rush this step; a solid bond means less hassle later.
Next up is applying your compound or patching material over cracks and gaps. Smooth it out well with a trowel. Once that’s done, give everything a good sanding to ensure a flat surface before priming. A smooth finish here will make painting easier and look better in the end.
After sanding, prime your concrete thoroughly. This step is crucial for paint adhesion. Let it dry completely before you start painting. Choose a high-quality exterior or interior paint depending on where this project’s going down. Two coats are usually best to cover everything evenly.
Cost, time, and when to call a pro
Flattening is usually cheaper and quicker than full replacement, but the right choice depends on how widespread the damage is. For small patches you might spend a few hundred to a couple thousand dollars; for larger areas, replacement can run much higher.
Call a pro when you need permits, the damage covers a large area, or you suspect structural issues or moisture problems. A contractor protects safety, keeps you code-compliant, and helps you avoid costly rework.
Typical cost and time ranges
For a small DIY concrete slab, you’re looking at around $1 to $2 per square foot for materials. Time-wise, prep work can take 4-6 hours, pouring another 2-3 hours, and curing about a week before it’s ready for use.
If you’re replacing an existing slab, costs jump due to demolition and disposal fees. Expect around $5 to $7 per square foot with more labor involved. This job might take a day or two longer than a new pour because of the extra work.
Factors like base compaction, site access, and weather delays can significantly bump up costs and extend timelines. If you hit any major issues during prep, it’s time to call in a pro before things get worse.
Signs you need a professional
If your concrete slab shows signs of serious issues, it’s time to call in the pros. Look out for recurring moisture problems, as this can indicate bigger waterproofing or drainage issues that go beyond simple DIY fixes.
Beware of any cracks or tilting that suggest potential structural damage. These aren’t just cosmetic; they could mean your foundation is compromised, and you need a professional to assess the situation before it gets worse.
Large areas affected by cracking, lifting, or spalling are also red flags. Trying to fix these yourself can be costly and time-consuming, not to mention risky if you’re dealing with structural integrity issues. It’s better to consult an expert who knows how to handle such extensive repairs properly.
Finishing touches and visual checkpoints
Finishing is where the repair looks right. Feather joint edges, matching texture, and a solid coat of primer tie the patch to the room. Use a quick visual checklist to confirm the repair blends seamlessly.
This matters because a sloppy finish shows up in light and traffic. When you feather, streaks, or mismatched texture, you waste effort and invite call-backs. Do the small, steady steps now to avoid bigger fixes later.
Texture and paint matching tips
This checklist helps you ensure that new plaster textures match existing walls and ceilings perfectly. Use it when applying a fresh coat or repairing patches.
- Check texture type: Compare the new area to an inconspicuous spot on the old wall. Confirm they look similar in pattern and depth.
- Test light reflection: Shine a flashlight across both textures at different angles. Ensure no stark differences in how light reflects off them.
- Feel for consistency: Lightly run your hand over both areas to feel if the texture is uniform in thickness and pattern.
- Prime before painting: Apply a coat of primer to new plaster, then let it dry. This helps paint adhere evenly and prevents patching from showing through.
- Match paint samples: Buy multiple small cans of the same paint color and test them on different parts of the wall. Look for consistency in shade and tone.
- Test edges carefully: At the seam where new meets old, check that the paint blends seamlessly without a visible line or shadow.
- Inspect corners closely: Corners often show texture differences more than flat surfaces do. Make sure they match up well visually and tactilely.
- Use same tools: If possible, use the exact same trowel or brush that was used for the original work to replicate the texture accurately.
- Allow full drying time: Don’t rush painting until new plaster is completely dry. Otherwise, you risk uneven paint adhesion and bubbling.
- Check in natural light: View the newly painted area at various times of day to ensure it looks consistent under different lighting conditions.
Quick rule: Always test your materials on a small, hidden section first before applying them widely.
Final inspection and maintenance plan
Use this checklist right after your concrete work is complete but before it fully cures. It helps ensure everything looks good and will last.
- Check corners: Make sure all edges are sharp and clean. Look for any cracks or chips that could cause water damage later.
- Inspect joints: Ensure control joints are straight, evenly spaced, and properly cut to prevent cracking.
- Test levelness: Use a spirit level on several spots across the surface to confirm it’s flat. Uneven areas can lead to water pooling.
- Evaluate texture match: Compare new concrete with existing surfaces for consistency in color and finish. Inconsistent textures stand out over time.
- Check paint adhesion: Gently scrape a small area to see if the paint adheres well without flaking off. Poor adhesion can lead to costly repaints.
- Look for voids: Inspect around edges and corners for any air pockets or hollow spots that could weaken the concrete over time.
- Confirm slope: Ensure proper drainage by checking if water flows away from buildings. Improper slopes can cause flooding issues.
- Verify sealant application: Confirm all necessary areas are sealed to prevent moisture intrusion and corrosion of reinforcing materials.
- Check for cracks: Look closely at the surface for any hairline cracks that might need repair before curing is complete.
- Evaluate aggregate exposure: Ensure no excessive aggregate shows through, which can weaken the concrete’s integrity over time.
- Inspect form lines: Confirm all forms were removed cleanly without leaving marks or indentations on the surface.
- Test for efflorescence: Check if there are any white salt deposits that could indicate moisture issues. Efflorescence can be unsightly and damaging.
- Confirm proper curing time: Ensure you’ve waited long enough before applying finishes or using the concrete surface.
- Maintain cleanliness: Keep the area free of debris to prevent damage from foreign objects during curing.
Quick rule: Always double-check your work for consistency and quality before moving on to the next step. Skipping checks can lead to costly repairs down the line.
Preventing future bulges and long-term care
Prevent future bulges by controlling moisture and keeping plaster in good shape. Use proper ventilation, fix leaks, inspect periodically, and make small repairs early to extend plaster life.
Good habits save you time and cost on a job site. When you keep an eye on moisture and catch problems early, you reduce damage, avoid bigger repairs, and finish projects faster with fewer headaches.
Moisture management and ventilation
To keep your plaster in tip-top shape, you need to tackle moisture issues head-on. Fix leaks as soon as they appear; don’t let them linger because water is the number one enemy of plaster. Use exhaust fans in bathrooms and kitchens to whisk away steam and cooking fumes before they can settle into walls.
Consider adding a dehumidifier if your home feels damp, especially during humid seasons. A dry environment means less chance for mold growth and plaster damage. Regularly check that your ventilation systems are working properly; a clogged or broken fan is as good as none at all.
Routine inspection tips
Use this checklist every season to catch issues early and prevent costly repairs down the line.
- Check corners: Look for cracks or bulges. Measure any changes since last check. Skipping can lead to major structural damage.
- Inspect joints: Ensure they are clean, dry, and free of debris. Confirm by running your finger along them; should feel smooth. Neglecting this lets water seep in.
- Look for stains: Dark spots on concrete can indicate moisture issues. Check after rain or overnight. Ignoring these can lead to mold growth.
- Test ventilation: Open vents and check air flow; should feel strong. Confirm by placing your hand near the vent opening. Poor airflow means potential condensation problems.
- Check for leaks: Look under sinks, around windows, and in corners for water marks or puddles. Use a flashlight to inspect dark areas. Overlooking can cause wood rot and mold.
- Evaluate drainage: Ensure gutters direct water away from the foundation. Check by observing rainwater flow after a storm. Poor drainage leads to pooling near your home’s base.
- Inspect sealants: Look for cracks or gaps in caulking around windows and doors. Feel with your finger; should be smooth and continuous. Missing this can let water seep into the structure.
- Back to top ↑
Conclusion
Resolving bulged plaster is about making it safe, durable, and good-looking again. If you follow solid steps and know when to stop, you protect the structure and your wallet.
Check this like a quick field plan: assess moisture and backing, pull loosest material only if you can do it safely, patch or flatten in small zones, dry and cure fully before load or paint, and reassess visuals after a test pass. Start by confirming the source of the bulge, gather the right tools and patches, and work in a small area first. If the bulge won’t flatten, or you see cracks, exposed lath, or persistent moisture, pause and re-evaluate before continuing.
Common mistakes to avoid are trying to shave or force a bulge flat without addressing moisture or backing, drilling or cutting through lath or wires, and skipping safety steps like shutting power off or wearing eye protection. Safety rules to follow: test in a small area first, work with a buddy when possible, wear eye protection and a dust mask, and never work on a wet or actively leaking patch. Keep the work area clear, and don’t rush through cure times or paint until the plaster is solid and dry.
If the bulge covers a large section, shows structural backing, or moisture remains after repair attempts, it makes sense to call in a pro. A trained tradesperson can evaluate framing and moisture control and prevent pricey repeat fixes. Stay steady, follow the plan, and you’ll finish with a solid, long-lasting repair you can be proud of.
When the bulge is localized and moisture issues are resolved, you have two practical options: repair and flatten within the existing plaster system, or replace the affected section entirely to restore long-term integrity. Use this quick guide to decide:
- If backing shows rot, rusting, or significant deterioration, or if the bulge reappears after patching, replacement is usually the safer, more durable choice.
- If the plaster is sound, cracks are minor, and the bulge is shallow, patching and flattening with proper bonding agents and reinforcement (like fiberglass mesh) can restore strength at a lower cost.
- Moisture control must be addressed first. Even with replacement, you need proper vapor barriers, improved drainage, or correcting leaks to prevent recurrence.
- Cost considerations: patching small areas may run from a modest amount for materials to several hundred dollars depending on patch size and labor; full or partial replacement ranges higher if framing or lath work is involved.
- Maintenance: after repair, monitor for new moisture signs, repaint with breathable primers, and consider sealing adjacent areas to prevent future moisture ingress.
If the bulge covers a large section, shows structural backing, or moisture remains after repair attempts, it makes sense to call in a pro. A trained tradesperson can evaluate framing and moisture control and prevent pricey repeat fixes. Stay steady, follow the plan, and you’ll finish with a solid, long-lasting repair you can be proud of.
FAQ
What causes bulged plaster in a wall?
Water gets behind the plaster. The damp weakens the plaster and it starts to push outward. Poorly sealed corners or damaged drywall can also bubble up.
Can I flatten the bulge without replacing the section?
If the bulge is small and the backing is solid, you might skim coat and reseal. But if the bulge is thick or the backing is soft, replacement is the honest fix. Don’t chase a quick patch that will fail later.
What should I expect when replacing the section?
You’ll remove the damaged plaster and the weak backing, then install new drywall or plaster, plus proper moisture barriers. The area must dry fully before finishing to avoid repeats. A proper cure and paint job will hold up longer.
How do I decide to flatten or replace?
If you see more than a small bump or see new bulges after patching, replace. If the backing is intact and the bulge is shallow, you can flatten and recoat. When in doubt, test for moisture and choose the safer option.