

Introduction
Feathering plaster repairs means blending new patch material into the surrounding plaster so there’s no raised ridge under paint. It’s a hands-on fix that helps avoid a visible edge where paint can lift. The goal is a smooth transition that you can sand and feather with basic tools.
Start by assessing cracks and holes to decide if you need small patches or bigger repairs. Gather simple tools and materials, like patch compound, plaster scrap, and a damp sponge, and check the product label for mixing guidance. For small cracks, you can skim and feather the edges; for larger openings, build up with multiple thin coats and blend into the surrounding plaster.
Key takeaways
- Assess plaster damage first to decide feathering scope and approach.
- Gather essential tools and materials for feathering repairs and patching.
- Clean, dampen, and prime surface before feathering to improve adhesion.
- Small cracks: use compatible patching compound and patch flush to surface.
- For larger cracks/holes: backer/support, build feather, blend edges carefully.
- Painting strategy to hide feathered edges and avoid picture-frame effect; wear eye protection and mask.
Table of Contents
- Introduction
- Key takeaways
- Assessing the Damage and Deciding Whether to Feather
- Tools and Materials Checklist
- Surface Preparation Before Feathering
- Feathering Techniques — Step-by-Step
- Choosing and Applying Patching Compounds Correctly
- Reattaching Loose Plaster and Adhesives
- Painting Strategy to Hide Feathered Edges and Avoid the Picture-Frame Effect
- Common Mistakes, Troubleshooting, and Prevention
- Conclusion
- FAQ
Assessing the Damage and Deciding Whether to Feather
Start by sizing up the crack and coating history. Note whether it’s a hairline crack or a wider fissure and check for hollowness behind the plaster. Take photos to document condition and help decide if feathering will blend edges without creating a ridge.
Perform a hollowness test by tapping and listening for sound changes, and probe gently to find loose material. Assess substrate integrity to determine if feathering is viable or if replacement is required. Review prior coatings and bond quality to gauge moisture or adhesion problems that could trap under feathered edges.
Types of defects (hairline cracks vs larger cracks and holes)
Feathering is best suited for minor defects. Start by inspecting the damage.
Hairline cracks, typically less than 1/8 inch wide, can usually be feathered without creating a ridge. They’re thin enough to blend into the surrounding plaster.
Larger cracks, wider fissures, or holes need more extensive repair. Feathering these may result in a visible ridge under paint. Consider full re-plastering or drywall replacement for such defects.
Detecting loose or separated plaster
Before feathering, ensure the plaster is securely attached to its backing. Perform a simple tap test:
Gently tap the wall with your knuckles or use a soft mallet. Listen for a hollow sound. This indicates that the plaster may have detached from its lath or backing.
Look for visible signs too, like cracks at joints or around openings. If you find any loose areas, do not attempt to feather over them. Replacement is required.
Locate likely problem areas (joints, openings, high-humidity zones)
Feathering mistakes often occur around specific areas. Inspect these zones carefully:
1. Joints: Cracks often start at joints between walls and ceilings. Check these areas for any hairline cracks or loose plaster.
2. Openings: Around doors, windows, and other openings, look for cracks or signs of separation due to movement.
3. High-humidity zones: Bathrooms, kitchens, and laundry rooms are prone to moisture damage. Inspect these areas thoroughly before feathering.
Tools and Materials Checklist
Core edge-adhesion tools include putty knives, a long-blade drywall knife, sanding sponges or blocks, and a foam brush for priming feathered edges. Have a patching compound rated for plaster and a compatible bonding agent or primer handy. A small amount of skim coat material helps blend edges.
Keep a scraper, stiff brush, damp sponge, vacuum, and tack cloth for prep. Bring a mixing pail, stirring sticks, and a mixer if needed, plus masking tools to control dust and keep surroundings clean. Include fine sanding sponges and a quality topcoat for after feathering.
Recommended tools
Before you start, ensure you have the right tools. This checklist helps avoid common mistakes.
- Knives: Slim and flexible putty knives (1/8″ to 1/4″) for detail work, a long-blade drywall knife (6″ to 12″) for spreading compound.
- Drywall taping knives: Narrower blades (4″ to 6″) for tight spots, wider ones (10″ to 12″) for larger areas. Skipping this can lead to uneven coverage.
- Sanding tools: Sanding sponges or blocks with fine grit (220–320) for smooth finish. Overlooking this step leaves rough edges.
- Mixing bucket: A large, sturdy plastic pail for mixing compounds. Using a small container makes mixing difficult.
- Hawk or board: For holding and transferring compound from the pail to your knife. Missing this can cause messy application.
- Light source: A bright, portable light for inspecting work. Skipping this might hide imperfections until it’s too late.
Quick rule: Having the right tools ensures a smooth, efficient repair.
Materials and product types to choose
Selecting the right materials is crucial for a successful feathered plaster repair. Here’s what to consider.
- Flexible patch compounds: Ideal for hairline cracks, they blend well but may not be suitable for larger holes or gaps.
- Setting-type joint compounds: Great for filling large voids and creating a smooth finish. However, they can shrink if not properly mixed or applied.
- All-purpose compounds: Versatile but may lack the flexibility needed for feathering or the strength required for deep holes.
- Fiberglass tape: Strong and flexible, it’s excellent for reinforcing large cracks or holes. Skipping this can lead to recurring damage.
- Primers that improve adhesion: Essential for better compound bonding. Omitting this can result in delamination over time.
Quick rule: Match the material to the defect’s size and type for best results.
Cost-estimating guidance and shopping tip
Before you shop, estimate your needs and compare prices. Here’s how:
- Measure the area: Calculate square footage for large repairs or length for cracks.
- Estimate compound needed: Generally, 1 sq ft per 8 oz of compound. Adjust for deep holes.
- Check local prices: Compare home improvement stores and online retailers. Prices can vary significantly.
- Read product datasheets: They provide coverage rates and usage instructions, helping you buy the right amount.
Quick rule: Accurate estimating saves money and reduces waste.
Surface Preparation Before Feathering
Identify the substrate type and check for moisture, efflorescence, or prior damage that could affect bonding. Confirm plaster type such as hair-lath or cement plaster and note any high-moisture areas. Understand the surface before committing to feathering.
Clean thoroughly to remove dust, oils, and contaminants. Scuff-sand glossy areas and remove flaking paint to create a uniform profile. Consider a bonding agent or primer for difficult substrates to improve adhesion.
Cleaning and degreasing
Start by washing the surface with a mild detergent solution to remove dust, dirt, oils, and chalking residues. Use two cloths – one for washing and another for wiping with a solvent-specific cleaner like denatured alcohol or mineral spirits.
Never mix cleaning solutions. Rinse thoroughly with clean water and let it dry completely before proceeding.
For mold, use a solution of bleach and water (1 part bleach to 3 parts water), then rinse and allow to dry. Always wear gloves and eye protection when handling chemicals.
Scuffing and sanding for adhesion
Glossy surfaces need scuff-sanding to create a uniform, matte profile. Use fine-grit sandpaper (120 or 150 grit) and lightly sand in the direction of the plaster lines.
Avoid creating new ridges or deep gouges. Feather the edges of your repair area with low-grit sanding to ensure smooth blending under paint.
Wipe off dust with a damp cloth, then let it dry before applying any patch or plaster materials.
Priming old coatings and stains
Seal stains or previously painted glossy surfaces with an appropriate primer to prevent bleed-through and adhesion failure. Use a primer that matches the substrate – oil-based for oily surfaces, water-based for water-based paints.
Never prime over efflorescence (white salt deposits) without removing them first. They can cause peeling later on.
Apply primer evenly with a brush or roller, following the manufacturer’s instructions. Let it dry according to the recommended time before proceeding with patching or plastering.
Feathering Techniques — Step-by-Step
Define the goal as a seamless transition where paint reads uniformly and there is no visible ridge. Plan a staged approach with multiple ultra-thin coats that progressively widen the feather. Prep the surface by removing loose material and readying edges for bonding.
Use thin fills with a clean knife and an appropriate trowel, applying minimal product per pass. Let each layer dry, then lightly damp-sand before applying the next, widening the feather with finer grit. Finish with a primed, paint-ready area and test for invisibility under the finish coats.
Step-by-Step Process
The following steps guide you through feathering plaster repairs, ensuring a seamless transition between the repaired area and the surrounding surface.
- Assess and prep the surface: Remove loose material using a scraper or putty knife. Scuff the repair edge with sandpaper to improve adhesion. Clean dust and contaminants with a damp cloth. Check for moisture or bonding issues that could cause failure.
- Plan your layering strategy: Outline a staged workflow with multiple ultra-thin coats, each coat feathered wider than the previous one to gradually blend the edge.
- Mix filler to correct consistency: Follow manufacturer’s instructions to mix plaster patch or plaster-approved compound to a smooth, spreadable consistency.
- Apply the first feather coat: Use a wide taping knife or tloat to apply the first thin layer, keeping the taper long and thin. Allow it to dry fully before proceeding.
- Damp-sand or lightly sand between passes: Once the coat is completely dry, use a sanding block with fine-grit sandpaper to lightly sand the surface. Wipe away dust with a damp cloth before applying the next layer.
- Gradually widen feathered edge: With each subsequent pass, use a wider knife and increase the length of the taper to gradually blend the repair into the surrounding surface.
- Final sanding and touch-up: Once all layers are dry, lightly sand the entire area with progressively finer grits. Wipe away dust thoroughly before priming.
- Prime the repaired area: Apply a stain-blocking or bonding primer to seal the repaired area and prepare it for painting.
- Test paint edge: Apply a small patch of paint to the repair edge to ensure invisibility under finish coats. If visible, repeat feathering steps until satisfied.
Applying the first feather coat
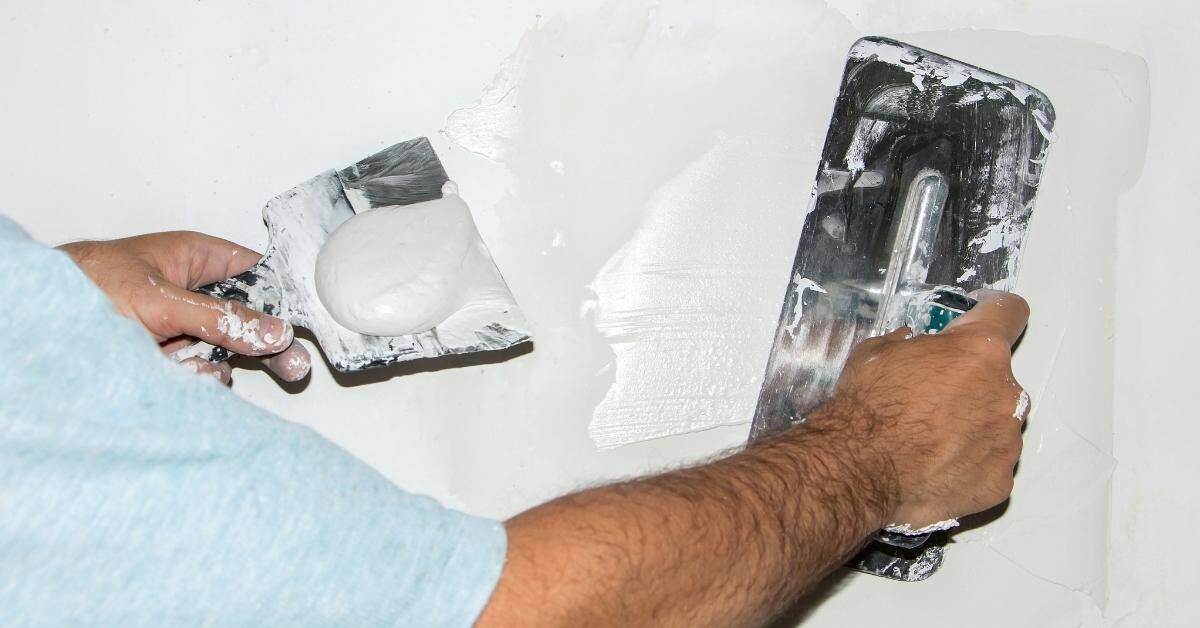
Mix your plaster patch or compound according to the manufacturer’s instructions, aiming for a smooth, spreadable consistency. Using a wide taping knife or tloat (at least 6-12 inches), apply the first thin layer onto the repair area.
Start at one edge of the repair and work towards the other, applying the compound in a thin, even layer. As you reach the feathered edge, use long, smooth strokes to taper the compound into the surrounding surface, keeping the taper long and thin to minimize ridges.
Tip: Work quickly but carefully, as plaster compounds dry relatively fast. If you’re using a slower-drying compound, consider working in sections to maintain consistency.
Building and tapering multiple thin passes
Rather than applying one thick fill, opt for multiple thin coats with feathered edges. This technique minimizes shrinkage and reduces the likelihood of ridge formation under paint.
After allowing the first coat to dry completely, lightly sand the surface using a fine-grit sandpaper and a sanding block. Wipe away dust thoroughly before proceeding with the next pass.
For each subsequent pass, use a wider taping knife or tloat (increase by 2-4 inches) and extend the length of your feathered taper to gradually blend the repair into the surrounding surface. This staged approach ensures a seamless transition between the repaired area and the existing plasterwork.
Final sanding and touch-up before priming
Once all layers are completely dry, lightly sand the entire repaired area using a sanding block with progressively finer grits (e.g., 120-grit to 220-grit). This helps to ensure a smooth, even surface ready for priming.
Work in small sections, applying gentle pressure and maintaining a consistent angle. Be sure to sand the feathered edges carefully to avoid removing too much material or creating new ridges.
Thoroughly wipe away dust using a damp cloth after each pass. This step is crucial to prevent dust from becoming trapped under your primer or paint, which can lead to poor adhesion and an uneven finish.
Choosing and Applying Patching Compounds Correctly
Choose between a flexible patching compound for movement areas and a setting-type joint compound for rigid patches. Explain how this choice affects feather length and sanding behavior. Plan edge priming needs for plaster and painted surfaces.
Cover mixing details and consistency, noting pre-mixed versus powder options and the impact on sagging or extended feathering. Outline application technique with the right tools and thin layers to blend patches without ridges.
Flexible Patching Compounds for Hairline/Stress Cracks
For fine hairline cracks or static stress cracks, use flexible patching compounds. These are ideal for areas with movement or thermal cycling like bathrooms and kitchens.
Benefits include:
- Elasticity: They stretch and contract with the wall, preventing new cracks from forming.
- Easy application: Apply thin layers to avoid a raised edge.
To apply, use a 6-inch flexible taping knife. Work in thin layers, feathering out to blend with surrounding texture.
Setting-Type vs Ready-Mix Joint Compound for Larger Repairs
For deep fills and larger repairs, use setting-type compounds. They set quickly, reducing the risk of sagging or shrinkage.
Ready-mix compounds are great for finish coats. They provide a smooth, stable surface to feather into.
Choose based on:
- Repair size: Setting-types for deep fills, ready-mixes for final coats.
- Working time: Ready-mixes give more working time for larger areas.
Use a 10-12 inch taping knife for application. Work in thin layers to avoid creating ridges.
Skim Coat vs Spot Patch Approaches
To reduce the visibility of a ‘picture-frame’ ridge, consider skim coating an extended area instead of just spot patching.
A skim coat involves applying a thin layer of compound over a larger area. This evens out texture and reduces the appearance of repair lines.
Spot patching is quicker but may result in visible ridges if not feathered properly. Skim coating takes longer but provides better overall coverage.
Decide based on:
- Time: Spot patches are faster, skim coats take longer.
- Appearance: Skim coats provide a more uniform finish.
Reattaching Loose Plaster and Adhesives
Assess how far the plaster has separated and check for moisture or behind-wall damage. Identify the substrate type to choose the right repair method. Document the condition to guide the feathering approach.
Prepare the surface by removing loose material and drying out moisture, then gently scuff the back of the plaster edge. Choose between mechanical retention and adhesive bonding based on the lath type and severity.
Adhesive injection and plaster washers/screws
When your loose plaster needs extra grip, use compatible adhesives injected behind it. This fills voids and creates a strong bond.
For severe cases or metal lath, add mechanical fasteners like washers and screws. Drill pilot holes, insert the screw with washer, then press the plaster back into place.
Pro tip: Use a screwdriver with a magnetic tip to easily pick up and place screws.
When to replace lath or use backing reinforcement
If plaster is fully detached, crumbling, or falling off in chunks, it’s time for lath repair. Remove damaged pieces and replace with new wood or metal lath.
For large gaps or weak spots, apply a backing of mesh or plywood patches before reattaching the plaster. This provides extra support.
Signs to watch: Cracks at corners, bulging walls, or sagging ceilings may indicate structural issues needing professional attention.
Curing time and movement considerations
After reattaching plaster, let adhesives and compounds fully cure. This could take days to weeks. Follow product instructions for exact times.
Before painting, account for structural movement. Plaster can shrink or expand with temperature changes. Allow it to stabilize before feathering in repairs.
Tip: Use a damp cloth to lightly tap the repaired area after curing. This helps check for any remaining ridges or weak spots.
Painting Strategy to Hide Feathered Edges and Avoid the Picture-Frame Effect
Select a primer designed for plaster or patch compound that blocks stains and matches porosity. Consider tinted primers to help even color and reduce edge highlight. Plan for uniform adhesion across the repair.
Use a sealer over feathered edges to prevent differential paint absorption. Apply a light mist coat before full coats and maintain even roller pressure to blend edges. Check sheen consistency and test color under room lighting for a seamless look.
Primer and Sealer Choices for Repaired Plaster
A good primer is your first line of defense against a visible ridge at the repair edge. Choose one designed for plaster or joint compound, like an acrylic or latex-based primer.
These primers block stains, improve adhesion, and match the repair’s porosity. They help paint go on evenly and hide feathered edges better. Consider tinting your primer to match the wall color. This can help even out the color and avoid edge highlights.
After priming, apply a sealer or shellac-based primer over the repaired edge. This seals the porous feathering and prevents paint from soaking differently at the edge, creating a halo effect. One or two coats should do the trick.
Paint Application and Blending Techniques
Start with a light mist coat or thinned initial pass to minimize edge buildup. This helps hide the repair and prevents a visible ridge.
Use a roller with even pressure for full coverage, then switch to a fine brush to blend edges rather than stopping abruptly. This technique, called ‘feathering’, helps create a smooth transition between the repaired area and the surrounding plaster.
Employ a cross-coating method – paint perpendicular to the first coat’s direction – for better coverage and less visible edges. Be patient; it might take a few coats to get it right.
Visual Checkpoints and Test Patches
Before painting the entire room, do a small test patch with full primer and topcoat. This helps you catch any issues early.
- Check under natural light: See how the repair looks in different lighting conditions to ensure no halos or ridges are visible.
- Inspect at an angle: Look at the edge from various angles to spot any unevenness or highlights.
- Test color match: Make sure your paint matches the surrounding plaster under room lighting and tile/paint reflections.
- Check sheen consistency: Ensure the repaired area has the same sheen as the rest of the wall to avoid a visible ridge.
- Feel for texture: Run your hand over the surface to ensure it’s smooth and even.
- Look for missed spots: Check for any areas you might have missed during sanding or painting.
- Inspect after drying: Wait until the paint is fully dry before making any judgments. Some issues may only be visible when dry.
- Compare to untouched area: Hold your test patch up against an untouched part of the wall to see if they match.
Quick rule: If you spot any issues during your inspection, address them immediately. It’s easier and cheaper to fix problems now than after painting the whole room.
Common Mistakes, Troubleshooting, and Prevention
Identify frequent causes of ridges, including uneven feathering, dust contamination, and premature painting. Watch for moisture effects and delamination behind the patch. Use light scuffing and progressive thinning if a ridge appears.
Troubleshoot by re-feathering in thinner layers and validating bond with a test coat. Prevent recurrence with proper substrate prep, correct mix, and a staged feathering technique. Keep tools and materials on hand for quick fixes and touch-ups.
Why a picture-frame ridge forms and immediate fixes
A ‘picture frame’ ridge often appears when feathering plaster repairs due to uneven patch application, wrong compound choice, or insufficient sanding. Here’s how to identify the cause and fix it:
Too-thick feather: If you see a visible contour after painting, your patch was likely too thick at the edges. Lightly scuff-sand the ridge with fine-grit sandpaper, then recoat with a thin layer of joint compound.
Wrong compound: Using the wrong type or consistency of plaster or joint compound can cause bonding failures and ridges. Ensure you’re using the right product for your repair size and substrate.
Insufficient sanding: Not properly sanding between coats leaves residual dust or compounds that can create a ridge under paint. Always lightly sand with fine-grit paper, then dust off before applying the next coat.
When a repair needs to be redone rather than patched
Sometimes, a patch job isn’t enough. Here are signs that indicate you need to redo the repair:
Adhesion failure: If paint peels or flakes off, or if the patch feels loose when pressed, there’s likely an adhesion problem between the patch and substrate. Reattach any loose plaster using adhesive injection or screws, then reapply your patch.
Repeated cracking: Cracks reappearing after repair indicates underlying issues like movement in the wall or moisture damage. Address these problems before attempting another patch.
Visible contour after paint: If you can still see a ridge or indentation after painting, your patch wasn’t feathered properly or has settled unevenly. Scrape off the old patch, prepare the surface again, and try reapplying with proper feathering technique.
Preventing future damage (environmental and maintenance tips)
Preserving your plaster repairs starts with controlling environmental factors that cause stress on walls. Here are simple measures to prevent future damage:
Control humidity: Maintain consistent indoor humidity levels between 40-50% to prevent expansion and contraction of plaster, which can lead to cracking.
Fix leaks: Water damage is a common cause of plaster problems. Inspect your home for leaks regularly, and address any issues promptly to prevent further damage.
Stabilize substrates: If your walls have movement due to settling or other factors, stabilize the substrate before attempting repairs. This may involve using backing reinforcement or replacing damaged lath.
Conclusion
The core idea is simple: feathered plaster repairs must be solid, invisible, and safe to live with. Take your time, test what you plan in a small area, and don’t skip surface prep or proper patching steps—the ridge you’re trying to hide will stay hidden only if the work is durable and well sealed.
Check in this order as you finish: verify damage is stabilized and proper feathering decisions are made, confirm you have the right tools and materials, clean and prime the area, apply patches or plaster in thin layers, reattach loose pieces if needed, and test a small paint patch to ensure the edges disappear when you roll on color. If any step seems risky, pause and reassess before moving forward.
Two common mistakes to avoid are rushing the feathering process and skipping testing of the color match near the edge. Avoid these by working in thin layers, letting each layer dry fully, and painting a concealed test area to confirm the edge blends. Always wear eye protection and a mask when sanding, and work with good ventilation to keep dust down.
If the plaster is severely loose, or you notice significant cracking, or you’re unsure about adhesive integrity, it’s wise to call a professional rather than push on. A good call now can save costly corrective work later. Stay steady, follow the steps, and you’ll finish with a durable repair that looks like it was never damaged. You’ve got this.
FAQ
How do I quickly tell if plaster damage is superficial or needs bigger repair?
Look for loose or crumbling edges and any soft spots behind the wall. Tap lightly and listen for hollow sounds. If the damage runs behind multiple layers or pokes through, plan for more patching and feathering.
What tools and materials should I have on hand for common plaster repairs?
Keep a hammer, chisel, utility knife, putty knife, mixing pail, mixing blade, sandpaper, and a level. For materials, have patching compound, bonding agent, and finishing plaster or skim coat. Have masking tape, drop cloths, and a damp sponge ready as you work.
What are the best repair methods for small cracks?
Clean the crack and remove loose material. Apply a thin patching compound with a putty knife, then smooth and feather the edges. Lightly mist the surface as it dries to prevent cracking.
How do I fix larger cracks or holes without pulling off more plaster?
Stabilize the area if needed, then apply a backing material or mesh if the patching compound suggests it. Build the repair in layers, letting each layer set before the next. Feather the edges into the surrounding surface to minimize ridges. Check that the patch is flush with the surrounding wall before painting.