
Introduction
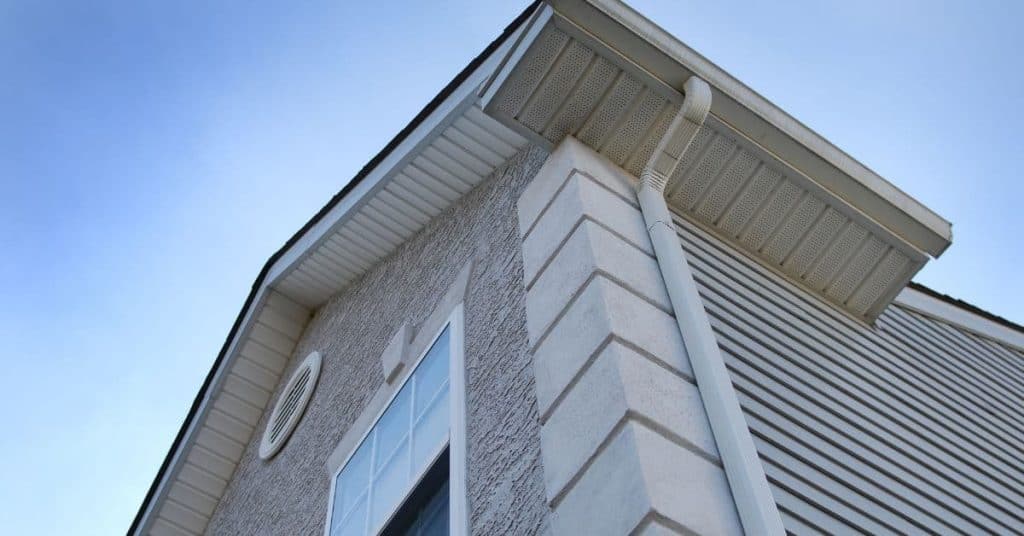
Drip edge is the metal or flashing that directs roof runoff into the gutter and protects the fascia. Fascia is the board along the roof edge that the gutter hangs from. Common failures include loose or bent drip edge, corroded metal, gaps at corners, and damaged fascia that lets water behind the gutter.
To diagnose problems, look for gaps where water runs behind the gutter, rust or bending in the drip edge, and sagging or detached fascia. Repairs that last involve securing or replacing damaged drip edge and fascia, sealing joints as required, and ensuring proper overlap with the gutter system. Always check the product label or manufacturer instructions and follow local rules for flashing and weatherproofing.
Key takeaways
- Drip edge directs water into gutters; fascia supports siding and carries load.
- Choose drip edge profiles and fascia materials based on design, climate, and exposure.
- Common installation mistakes include improper overhang, fastener gaps, and failed sealant.
- Diagnose leaks with visual checks, probe damp wood, and observe water tracking.
- Repairs that last use precise flashing, proper backer, and compatible materials.
- Safety first: secure ladders, guard edges, and avoid working over wet surfaces.
Table of Contents
- Introduction
- Key takeaways
- Quick Definitions: What a Drip Edge and Fascia Are, and Why They Work Together
- Types of Drip Edge Profiles and Fascia Materials — Choosing by Design and Climate
- Common Failures and Installation Mistakes That Lead to Leaks and Rot
- How to Diagnose Issues — Visual Checkpoints, Simple Tests, and Probes
- Repairs That Last — Step-by-Step Approaches and Upgrade Options
- Tools, Materials Checklist and Material Specs to Verify Before You Start
- Safety, Access, and Timing — How to Plan a Safe Repair or Inspection
- Costs, Consequences of Delay, and Decision Framework: Repair Vs Replace
- Conclusion
- FAQ
Quick Definitions: What a Drip Edge and Fascia Are, and Why They Work Together
A drip edge is a metal flashing installed at the roof edge to direct water away from the fascia and into the gutter. Fascia is the vertical finishing board that panels and trim rest against, providing a clean edge and a backing for gutters. Together they form a water-shedding system that protects the deck, soffit, and interior spaces from moisture damage.
Key cues of proper function include a clean overlap where the flashing sits above the underlayment and behind the gutter, with the fascia receiving a solid edge that supports the roof trim. Visible rust, curling metal, gaps, or misaligned drip edge signal potential problems. If you see water staining behind the fascia or recurring leaks, recheck flashing, gutter alignment, and material compatibility with the roof system. Quick checks include confirming flashing overlaps the gutter correctly, ensuring the gutter is seated, and noting any signs of water infiltration behind the fascia. When in doubt, verify product labels, installation instructions, and local requirements to guide repairs or professional help.
Drip edge — purpose and basic design
The drip edge is your roof’s first line of defense against water damage. It’s a metal flashing strip that installs at the edges of your roof, both on the eaves (where it hangs over the walls) and the rakes (the sloped edges).
Here’s why you need it:
Protects your roof and walls from water damage. Without a drip edge, rainwater could run down your roof and behind your siding or fascia, causing rot. The drip edge directs water away from these areas.
Supports the lower edge of your roofing material. It provides a secure edge for your shingles or other roofing to rest on, preventing them from curling up or being blown off by wind.
Metal is used instead of roofing material because it won’t degrade like asphalt shingles or wood. Plus, it can be formed into the right shape and thickness to do its job effectively.
Fascia — role and common materials
The fascia board is your roof’s finishing touch, keeping out rain while giving a neat look. Picking the right material ensures durability and appearance.
- Pine Fascia Board: Cheap but soft, prone to rot if not treated. Use for budget builds or where maintenance is easy.
- CEDAR Fascia Board: Naturally resistant to rot, lasts longer than pine. More expensive but worth it for longevity.
- Vinyl Fascia Board: Low-maintenance, won’t rot or warp. Check UV resistance and color fastness before buying.
- Aluminum Fascia Board: Durable, won’t rust or rot. Lightweight but strong. More expensive than wood.
- Fascia Paint/Stain: Protects and finishes your fascia. Choose exterior-grade, check UV resistance and color match.
Pro tip: Buy materials from the same batch to ensure consistent color. Store undercover to prevent moisture damage before installation.
How they interact to protect the roof system
The drip edge and fascia are like a tag team protecting your home. Here’s how:
Drip Edge: This is your first line of defense. It extends over the edge of your roof, catching water that runs off and directing it into your gutters. If not installed properly, water can run behind your fascia, causing rot and damage.
Fascia: Think of this as your home’s protective shield. It covers the ends of your rafters, preventing water from getting in behind them. But without a drip edge, water can still sneak in at the edges, leading to fascia rot and pest entry.
Together, they form a barrier that keeps water out, prevents rot, stops pests from moving in, and protects your gutters from damage. So, make sure both are installed correctly and in good repair for a happy, healthy roof system.
Types of Drip Edge Profiles and Fascia Materials — Choosing by Design and Climate
Common drip-edge profiles include standard, boxed, stepped, and inverted shapes, each designed to interface with fascia and eave layouts in different roof types. Fascia materials span wood, metal, vinyl, and composites, with durability and finish considerations varying by climate. Matching the right profile to your roof type helps ensure effective water deflection and a clean look at the eave.
Climate factors like exposure to salt spray, wind, sun, and moisture influence both profile and material choice. When selecting, consider corrosion resistance, UV aging, and maintenance needs for your area. For roof type, align fascia width and drip-edge height with the existing decking and gutter system, then verify compatibility with underlayment and flashing. Always check manufacturer guidance and local codes before buying any combinations.
Metal types and coatings (aluminum, galvanized, copper, coated finishes)
Choosing the right metal for your drip edge is crucial. Aluminum is lightweight and affordable but can dent easily. Galvanized steel offers better strength and durability, making it a good choice for coastal areas due to its corrosion resistance. Copper is high-end, durable, and resistant to salt and acid, ideal for severe environments.
Coated finishes like Kynar or Hylar provide excellent UV protection and corrosion resistance. They’re worth considering in hot, sunny climates or where salt spray is an issue. Pre-painted metals can fade over time, so consider their long-term appearance.
Profile shapes and functional differences (narrow vs wide, L-shape, channel)
Drip edge profiles vary in width. Narrow profiles are cheaper but may not control water as well. Wider profiles offer better water management but can be more expensive. They’re ideal for heavy rainfall areas.
The L-shape profile is common and works well with most roof types. It provides good water control and accommodates shingle overhangs. The channel profile is deeper, offering enhanced water control and snow/ice performance in harsh climates.
Fascia materials (wood, PVC, composite, metal) and compatibility notes
Your fascia material choice impacts durability, maintenance, and compatibility with your drip edge.
- Wood: Durable but requires regular painting/staining. Avoid in humid climates due to rot risk.
- PVC: Low-maintenance, won’t rot or warp. Look for UV protection. Can become brittle over time.
- Composite: Resistant to rot and insects. Check for fade resistance in sunny climates.
- Metal (aluminum, steel): Durable, low-maintenance. Avoid mixing metals without proper corrosion inhibitors.
Common Failures and Installation Mistakes That Lead to Leaks and Rot
Most failures start with improper placement or misalignment of the drip edge and fascia relative to the roof, underlayment, and gutters. Poor fastening practices, such as wrong fastener type or driving too deep, invite loosening and leaks. Overlaps and flashing joints that don’t seal correctly are common trouble spots that invite water intrusion.
Material choices and compatibility matter too; incompatible metals can corrode or trap moisture against wood fascia. Pay attention to roof slope, ventilation, and ice dam risk, which influence how the drip edge and fascia shed water. Regular post installation checks, water testing, and inspection for gaps or rust help catch issues before rot or leaks take hold.
Improper placement and inadequate shingle overhang
If your drip edge is too flush with the fascia, or your shingles don’t extend properly, you’re asking for trouble. Water will find its way back under the roof edge, causing leaks and rot.
Check this: From the ground, look at your roof’s edge. If the drip edge is barely sticking out or not visible at all, it’s too flush. Shingles should overhang the edge by about 1/2 to 3/4 inch.
If you’re installing a new roof, make sure your contractor knows the right placement for drip edges and shingle overhang. If you’re doing it yourself, take your time and get it right. A little extra effort now can save you big headaches later.
Incorrect Fastening, Gaps at Joints, and Missing Overlaps
Loose fasteners are like an open invitation to water. They let it seep in, rot your roof from the inside out, and before you know it, you’re looking at a costly repair job.
Check your nails or screws. Make sure they’re driven in tight, flush with the surface. Don’t leave any gaps between the nail head and shingle. If there’s room for water to get in, it will find its way.
Gaps at corners and joints are like highways for water. It’ll race right in, soak your underlayment, and before long, you’re dealing with leaks and mold.
Inspect all corners and joints. Make sure they’re properly sealed with flashing or caulk. Don’t forget to check the valleys too. And remember, overlap your shingles at least 1/2″ on each side of the joint. No gaps, no overlaps, no leaks.
Material mismatches and corrosion (dissimilar metals, poor coatings)
Choosing the wrong materials can lead to leaks, rot, and costly repairs down the line. Here’s what you need to know about material pairings and coatings.
- Galvanized vs Stainless Steel: Galvanized is cheaper but rusts faster when exposed to moisture. Use stainless for areas prone to water damage, like roof flashing or window frames.
- Zinc Coated vs Hot-Dipped Galvanized Nails: Zinc coated nails are cheaper but corrode quicker. Spend a bit more on hot-dipped galvanized for longer life and better resistance to rust stains.
- Acrylic Paint vs Oil-Based Paint: Acrylic is water-based, dries faster, and is easier to clean up. Use oil-based for better adhesion and durability in high-moisture areas, but expect slower drying time and harsh cleanup.
- Type N Mortar vs Type S Mortar: Type N is more flexible, making it ideal for bricklaying on wood foundations or where movement is expected. Type S is stronger but less flexible, suitable for concrete foundations with minimal movement.
- Asphalt Shingles vs Fiber Cement Siding: Asphalt shingles are cheaper but have a shorter lifespan and require more maintenance. Fiber cement siding is pricier but lasts longer, requires less upkeep, and looks like real wood.
Pro tip: Always check product labels for compatibility and manufacturer recommendations. Buy materials in quantities that can be used within their shelf life to avoid waste. When mixing mortars or paints, follow the manufacturer’s instructions to ensure proper curing and adhesion.
How to Diagnose Issues — Visual Checkpoints, Simple Tests, and Probes
Start with a walkaround that includes exterior fascia, drip edge, gutters, and soffit, plus attic access if available. Look for misalignment, gaps, torn or bent metal, loose fasteners, and staining that hints at leaks. Note any soft or sagging wood as a potential sign of underlying rot.
Simple checks can reveal hidden problems: shine a light from the attic to spot daylight at edges, perform a cautious water test on a low-risk area, and gently probe for softness in the fascia with a screwdriver. Document defects with photos and keep a prioritized list based on risk to the roof deck. If you find active moisture or large gaps, plan repairs or consult a pro per manufacturer guidance and local requirements.
Step-by-Step Process
Before you start, ensure safety by wearing appropriate gear and checking weather conditions. Use this checklist to efficiently diagnose fascia and drip edge issues.
- Preparation: Gather flashlight, screwdriver or awl, ladder, and camera for documentation.
- Safety first: Secure ladders properly, wear non-slip shoes, and use safety harness if necessary.
- Start at the exterior: Inspect fascia, drip edge, gutters, and soffit visually.
- Check for misalignment or gaps: Look where drip edge meets roof. Gaps can cause leaks.
- Inspect metal components: Check for torn, bent, loose, or missing parts. Rust around nails indicates corrosion.
- Look for water trails/staining: These indicate hidden leaks that may have caused rot.
- Access attic if possible: Look for daylight through edges and check nail heads/ sealant lines for movement.
- Perform simple tests: Use flashlight to spot daylight, perform a small water test, and probe suspect areas gently with a screwdriver or awl.
- Document findings: Take photos, note defects, prioritize repairs based on risk, and outline repair paths.
Quick rule: Always prioritize safety. If you’re unsure about any aspect, consult a professional.
Visual checkpoints at the roofline, gutters, and attic
Use this visual checklist to spot common signs of fascia and drip edge failure during your walkaround.
- Rust: Check for rust on metal components. It indicates corrosion and potential leaks.
- Bent or missing drip edge: Inspect the roof edge for bent, torn, or missing sections that can cause water intrusion.
- Paint failure: Peeling or chipping paint may indicate underlying rot or moisture issues.
- Wet or rotted fascia: Look for soft, spongy, or discolored wood. These are signs of rot.
- Staining: Water stains onfascia, roof deck, or ceilings indicate leaks that may have caused rot.
- Gutter overflow: Check gutters for overflow indicators like water marks or soil erosion. This can cause fascia damage.
- Misaligned or loose components: Look for gaps between fascia and roof, or loose/missing fasteners that can cause leaks.
- Attic access: If possible, check for daylight through edges, nail head movement, or water stains on the underside of the roof deck.
Quick rule: Regular visual checks help catch issues early. Don’t ignore small problems; they often grow bigger over time.
Simple functional tests (controlled water run, probe tests)
Use these simple tests to confirm suspected issues without causing extra damage.
- Controlled water run: On a small, low-risk area, simulate rain using a hose. Observe for dripping or seepage.
- Probe tests: Gently probe suspect areas with a screwdriver or awl to check for soft wood, rot, or delamination.
- Avoid active water: If you encounter active water intrusion, stop probing and repair immediately to prevent further damage.
- Test edges and corners: Fascia integrity can be compromised at edges and corners. Probe these areas carefully.
- Check nail heads and sealant lines: Movement or cracking here indicates potential leaks or structural issues.
- Inspect under flashing: Lift flashing gently to check for corrosion or lift on drip edge metal.
Quick rule: Always test carefully. Poking holes in fascia can cause further damage if not done right.
When inspection findings mean you should call a pro
Certain findings indicate structural involvement, active leaks, or unsafe access conditions. In these cases, consult a licensed professional.
- Structural issues: Sagging fascia, large gaps, or extensive rot may indicate structural problems that require a carpenter.
- Active leaks: Water intrusion causing immediate damage (e.g., wet insulation, active dripping) needs prompt attention from a roofer.
- Unsafe access: If you can’t safely reach an area or feel uncomfortable performing repairs, call a professional.
- Mold or mildew: Presence of mold or mildew indicates moisture intrusion and may require professional remediation.
- Complex repairs: Repairs involving multiple trades (e.g., roofing, siding, carpentry) are best left to professionals.
Quick rule: When in doubt, consult a pro. It’s better to be safe and get expert advice than risk further damage or injury.
Repairs That Last — Step-by-Step Approaches and Upgrade Options
Begin with a quick diagnostic framework that identifies loose or bent drip edge, rust, gaps at corners, and water staining. Assess gutter sag and signs of deck dampness to gauge scope. Use this to guide whether you need a quick fix or a larger repair plan.
Tiered options start with simple fixes like sealant or temporary shims, then move to replacing damaged drip-edge sections and resealing joints. For lasting results, choose corrosion-resistant materials, maintain a continuous drip edge, and match fasteners to the substrate. Plan upgrades that improve drainage and ventilation, such as reinforced fascia or integrated flashing, and keep maintenance steps simple to prevent recurrence.
Step-by-Step Repair Process
Follow these practical steps to ensure your fascia and drip edge repairs last.
- Safety first: secure the work area, wear appropriate PPE, and use safe ladders.
- Inspect and diagnose issues as outlined earlier. If in doubt, call a pro.
- Main repair: replace damaged sections, seal joints, and ensure flashing continuity.
- Use durable materials: corrosion-resistant metals, roof-rated sealants, and appropriate fasteners.
- Clean up, inspect your work, and schedule regular maintenance checks.
Short-term repairs: fastening, realigning, patching
Tighten or replace loose fasteners to secure drip edge. Realign bent sections and reseat them properly.
Seal minor gaps with roof-rated sealant. Note: These are temporary fixes; address underlying issues for long-term solutions.
If rust is present, remove it completely before applying any sealant or paint. If the damage is extensive, consider a full replacement.
Full replacement of drip edge sections and fascia boards
Remove failed sections carefully to avoid damaging surrounding areas. Use a reciprocating saw or utility knife for metal, and a circular saw for wood.
Install continuous drip edge with proper overlaps. Ensure the lip height is adequate to shed water effectively.
Replace rotted fascia with compatible materials. Ensure proper nailing or screws length and pattern, and seal joints to prevent future leaks.
Upgrades for longevity: wider profiles, flashing, underlayment, and ventilation
Consider wider drip-edge profiles to improve water shedding. Ensure proper overlaps and a continuous drip edge.
Integrate weatherproof flashing at corners and transitions. Use durable underlayment beneath roofing materials to prevent moisture intrusion.
Ensure eave ventilation to keep the roof deck dry. This can extend the life of your fascia, drip edge, and entire roof system.
Tools, Materials Checklist and Material Specs to Verify Before You Start
Prepare a practical tools and PPE list that covers hand tools, power tools with guards, ladders, fall protection, and weather-appropriate gear. Gather fasteners and sealants with attention to coating, corrosion resistance, head type, and compatibility with the roof system. Have product data sheets on hand for reference.
Confirm material specs with manufacturers and local codes: metal thickness, drip-edge profile and coating, fascia material compatibility, and required wind and corrosion ratings. Use a pre-work verification section to check code requirements, placement rules, and warranty terms. Keep records of supplier specs and substitutions that meet code.
Essential tools and personal protective equipment
Before you start any fascia or drip edge work, ensure you have the right tools and safety gear to protect yourself and get the job done right.
- Ladder: A sturdy extension ladder with non-slip feet for safe access to your roof.
- Roof jacks: To support you while working on the edge of the roof.
- Fall protection harness: Mandatory when working at heights. Ensure it’s properly fitted and secured.
- Hard hat: Protects against falling debris or impact with structures.
- Safety glasses: Essential for eye protection from dust, debris, and sharp edges.
- Work gloves: To protect your hands from cuts, scrapes, and heat.
- Hearing protection: Use when operating power tools like nail guns or saws.
- Weather-appropriate clothing: Dress in layers for changing temperatures and wear non-slip boots for grip on the roof.
Quick rule: Always prioritize safety. Never work at heights without proper fall protection, and always use ladders safely.
Materials to buy and what to verify with suppliers
Before purchasing materials, confirm key attributes with your supplier to ensure compatibility and durability.
- Metal type: Confirm if it’s aluminum, steel, or another metal suitable for your roof.
- Finish/coating: Check if the coating is compatible with your existing roofing materials (e.g., galvanized, stainless, or painted).
- Profile size: Ensure the fascia and drip edge profiles match your roof’s dimensions.
- Fasteners: Verify compatible fasteners are available (e.g., nails, screws, or staples) with matching drive types (e.g., Phillips, flathead).
- Sealant/caulk: Confirm a suitable sealant is available for your metal roofing runs (e.g., urethane, polyurethane, butyl).
- Underlayment: Check if the underlayment is compatible with your roofing system and meets local code requirements.
- Flashing: Ensure flashing materials are available to integrate with your drip edge and fascia.
- Installation recommendations: Ask for manufacturer’s installation guidelines to ensure correct application.
Quick rule: Always confirm material specs with suppliers. Guessing can lead to incompatible materials, poor performance, or voided warranties.
What to check in product specs and standards (coatings, warranties)
Review product specifications and standards before purchasing to ensure they meet your needs and comply with local codes.
- Corrosion resistance: Check the metal’s corrosion resistance rating to prevent premature failure.
- Finish warranty: Confirm the finish warranty covers your area’s climate and weather conditions.
- Compatible substrates: Ensure the fascia and drip edge materials are compatible with your existing roofing substrate (e.g., wood, metal, or composite).
- Local building code: Verify the materials comply with local building codes and standards.
- Wind uplift ratings: Check if the materials meet required wind uplift resistance for your area.
- Manufacturer installation requirements: Review manufacturer’s guidelines to ensure correct installation and warranty compliance.
Quick rule: Always check product specs and standards. Skipping this step can lead to material failure, voided warranties, or even structural damage.
Safety, Access, and Timing — How to Plan a Safe Repair or Inspection
Plan safe access with appropriate ladder setup, stabilizers, and roof edge protection. Identify when fall protection is needed and select the proper gear and anchors. Consider whether weather or daylight limits the work window.
Assess scope and risk before starting, and outline a clear workflow with required materials and safety gear. If the task involves fragile substrates or high risk, plan to call a pro. After work, complete a quick post-inspection to confirm all connections and fasteners are secure and the area is clean.
Fall protection, ladders and PPE basics
Before you start any work on your roof, ensure you’re well-equipped and protected.
- Ladder angle: Keep it at a 75-degree angle to the wall. Too steep or shallow can cause instability.
- Stabilizers: Use them on both sides for extra support, especially on soft ground.
- Roof edge walk boards: Secure them along the roof’s edge to prevent damage and maintain footing.
- Securing anchors: Use them to secure your ladder at the top. Never rely solely on friction.
- Hard hat: Protect against falling debris or impact with other objects.
- Safety glasses: Shield your eyes from dust, dirt, and small particles.
- Work gloves: Protect your hands from cuts, scrapes, and heat.
- Harness and lanyard: Wear them when working at heights over 6 feet. Ensure they’re properly adjusted and secured.
Quick rule: Always prioritize safety first. If you’re unsure, don’t proceed until you are confident in your setup and protection.
Best times to inspect or repair (weather and seasonal considerations)
Timing is crucial for safe and effective fascia and drip edge work.
- Calm conditions: Aim for days with little to no wind. High winds can cause falls or damage materials.
- Dry weather: Avoid working in rain, snow, or ice. Wet surfaces are slippery and dangerous.
- Mild temperatures: Extreme heat or cold can affect both your safety and the materials’ performance.
- Avoid peak sun hours: Work early morning or late afternoon to prevent heat exhaustion.
- Spring and fall: These seasons offer ideal temperatures for most repairs. Summer can be too hot, and winter brings ice and snow.
- Check forecasts: Plan your work around the weather. Don’t start a job if rain is expected.
Quick rule: Never rush into a repair when conditions are unsafe. Wait for better weather to ensure your safety and the quality of your work.
Hiring pros: qualifications and questions to ask
When you need professional help, make sure you hire a qualified roofer.
- Experience: Ask how long they’ve been in business. More experience often means better quality work.
- Licensing and insurance: Ensure they’re licensed to work in your area and have liability insurance to protect you from damages.
- References: Ask for references from past clients. Contact them to verify the roofer’s quality of work and professionalism.
- Metal flashing experience: Ensure they’re familiar with metal flashing installation, as it’s crucial for fascia and drip edge work.
- Soffit/fascia work history: Ask about their experience with soffit and fascia repairs or installations.
- Written estimate: Get a detailed, written estimate outlining the work to be done, materials to be used, and total cost.
Quick rule: Never hire a roofer based solely on price. Quality and experience are crucial for lasting repairs.
Costs, Consequences of Delay, and Decision Framework: Repair Vs Replace
Understand the potential costs of delaying repairs, including escalating minor fixes and hidden moisture damage that can affect insulation and interior finishes. Consider how moisture risk translates to longer-term spend and insurance implications. Gather local guidance to price out options accurately.
Use a simple decision framework to weigh repair versus replacement: assess the extent of rot or damage, roof accessibility, and the compatibility of the existing drip edge. Compare short-term repair costs to the long-term durability of replacements, and factor warranty terms and future maintenance into the plan. A clear path helps avoid ongoing leaks and performance gaps.
Risks and hidden costs of delaying repair
Ignoring fascia and drip-edge failures can lead to a domino effect of damage. Water intrusion causes rot in sheathing, leading to structural compromise. This can result in costly repairs like replacing entire sections or even full walls.
Mold growth is another hidden cost. It thrives in damp environments and can spread quickly, causing health issues and further damaging your home’s interior. Mold remediation alone can cost thousands.
Delaying repair also puts your gutters at risk. As fascia rots, it can no longer support the gutter system, leading to damage or collapse. This redirects water away from the wall, causing foundation issues and exterior damage.
Interior leaks are another sign of delayed repairs. Water may not always show visible signs but can cause damage to insulation, drywall, and ceilings. These hidden costs add up quickly, making a simple repair job much more expensive.
Warranty, insurance, and documentation tips
Keep records of all home maintenance and repairs. This includes photos, receipts, and any communication with contractors or manufacturers. These documents can help you prove damage and make claims under warranties or insurance.
Check your homeowner’s insurance policy for coverage on fascia and drip-edge damage. Some policies cover sudden accidents while others may require additional riders for full protection. Always review your policy before making a claim.
If you suspect damage is covered, contact your insurance provider immediately. They can guide you through the claims process and provide written estimates for repairs or replacement. Keep these records with your other home maintenance documents.
Warranties are another important aspect to consider. Many manufacturers offer warranties on their products. If your fascia or drip edge is still under warranty, contact the manufacturer directly to see if they cover repair or replacement costs.
Simple decision checklist: repair now, upgrade, or full replacement
Use this checklist when deciding whether to repair, partially replace, or fully replace your fascia and drip edge. It helps you prioritize actions based on the extent of damage and long-term durability.
- Extent of rot: If damage is localized (less than 10%), consider a repair. Widespread damage (more than 30%) may require full replacement.
- Active leaks: Multiple active leaks suggest widespread damage and may warrant full replacement.
- Age of materials: If your roof is over 20 years old, consider upgrading to longer-lasting materials during repair or replacement.
- Compatibility issues: Ensure any new materials match the existing ones in style, color, and functionality. Incompatibility can lead to further damage or aesthetic issues.
- Budget vs. long-term durability: While repairs may be cheaper initially, they might not last as long as a full replacement. Consider future maintenance costs when making your decision.
- Accessibility for repair: If the damage is hard to reach or requires specialized equipment, consider hiring a professional.
- Roof condition: Check your roof’s condition before deciding on repairs. A failing roof may require replacement along with fascia and drip edge.
- Future plans: If you plan to sell your home soon, repairs might be sufficient. However, if you plan to stay long-term, consider full replacement for durability.
Quick rule: If more than 30% of your fascia or drip edge is damaged, it’s usually best to replace the entire section or board for optimal performance and longevity.
Conclusion
The bottom line is to fix with a plan, not a guess, so you protect the structure, keep water out, and avoid costly fixes later.
Do a simple, honest check in this order: scope out the fascia and drip edge from ground level first, confirm fasteners and sealant are intact, look for signs of rot or corrosion, test for leaks with a small controlled water test or moisture probe, verify the surrounding siding and roof edge are solid, and finally confirm you have the right tools and materials for the exact profile and climate you’re working in before you pace into a full repair.
Avoid common mistakes like skipping a proper moisture assessment, tearing out damaged wood without stopping the water source first, and using improper fasteners or flashing that don’t match the profile; always keep safety gear on, work from a stable ladder or scaffold, and test in a small area before wide-scale work to prevent accidental damage.
If you encounter widespread rot, uncertain framing, or unfamiliar profiles, don’t push ahead alone—call a pro for a proper assessment. Stay deliberate, follow your plan, and you’ll finish with a durable, water-tight edge that looks right and lasts.
FAQ
What exactly is a drip edge and how does it work with fascia?
A drip edge is a small metal strip that channels water away from the fascia and into the gutter or off the edge of the roof. It protects the fascia from water damage and helps prevent rot and peeling paint. Look for a simple bend that directs water outward and downward.
What materials are commonly used for drip edges and fascia, and how do I choose?
Drip edges are usually metal (galvanized or aluminum) and fascia can be wood, PVC, or metal. Pick materials that resist weather and match your roof and gutter system. Read the product label and install instructions to confirm compatibility with your climate and trim.
What are common installation mistakes to avoid with drip edge and fascia?
Common mistakes include misplacing the drip edge so water can pool, skipping underlayment or flashing, and attaching fascia fasteners where water can seep behind. Poor sealing at joints or gaps lets water creep behind and cause rot. Double-check ensure the edge directs water outward and fasteners don’t trap moisture.
How can I identify problems with drip edge in my home, and what maintenance helps prevent failures?
Look for rusty edges, loose or bent metal, and signs of water staining at the fascia. Check for peeling paint or soft spots on the fascia boards. Regularly clean debris, seal exposed ends, and tighten loose screws to keep the system draining properly.