
Introduction
Epoxy crack injection is a method that bonds and restores load-bearing concrete when a crack is clean, stable, and dry, while flexible sealants are better for cracks that move or need to keep out water without carrying structural loads. Think of epoxy like a hard glue for structural repair and polyurethane or silicone as stretchy patches for movement and sealing. On a DIY job you need to assess whether the crack is active, whether reinforcement is exposed, and whether the surface can be prepared—check product labels and manufacturer instructions for allowable crack width, moisture limits, and mixing/application steps.
Epoxy injection can reunite concrete faces and transfer load but requires good access, clean joints, and the right conditions to cure; it’s not forgiving of ongoing movement or wet conditions. Flexible injections or sealants handle movement and water better but won’t restore structural capacity, so use on-site checks like monitoring for change over time and looking for rust, settlement, or leaks to decide which route; when in doubt, ask a structural pro or follow manufacturer guidance.
Key takeaways
- Begin with evaluation: structural cracks require epoxy injection only after assessment.
- Epoxy works where bonding strength is needed; use flexible sealants for movement.
- Polyurethane injections fill dynamic cracks better; consider limitations on containment.
- On-site evaluation techniques: crack width, direction, loading, and exposure guide choice.
- Plan project timelines with cure and ventilation needs; safety gear mandatory.
- Document findings, test results, and follow-up maintenance to avoid future failures.
Table of Contents
- Introduction
- Key takeaways
- Structural Vs. Non-Structural Cracks — Deciding When Epoxy Is Required
- How Epoxy Crack Injection Works and Where It Excels
- When Flexible Sealants (Polyurethane, Polyurea, Hybrids) Are Better
- Advantages and Limitations of Epoxy Injection
- Equipment, Materials, and Practical Injection Methods
- Costs, Timelines, and Project Planning
- Safety, Material Specs, and Applicable Standards
- Common Mistakes, Visual Checkpoints, and Follow-up Maintenance
- Conclusion
- FAQ
Structural Vs. Non-Structural Cracks — Deciding When Epoxy Is Required
Structural cracks interrupt the load path or show displacement, depth, or ongoing movement; non-structural cracks are surface or shrinkage cracks without load-path disruption. Use observable criteria—active leaks, width change over time, dampness, spalling, tile or masonry movement, and whether the crack follows beams/columns or appears in non-critical areas—to classify each crack.
That classification directs the material choice because epoxy injects a stiff, high-bond repair suited to restoring load transfer, while flexible sealants tolerate moisture and movement. In the field, check product data sheets and perform simple moisture tests and movement checks; base the repair on crack history, environmental conditions, and whether on-site testing shows active leakage or load-related movement.
Identifying Structural Crack Signs
Structural cracks are serious business. They disrupt your concrete’s load path, letting forces move where they shouldn’t. Here’s how to spot ’em:
Load-path disruption: Cracks following structural elements like beams or columns? That’s a red flag.
Movement and displacement: Repeated opening and closing of cracks under load, or visible displacement at the crack face? Time for action.
Width and depth: Hairline cracks (less than 0.2mm) are usually non-structural. Wider ones (>0.5mm), especially deep ones, need attention.
Non-Structural and Cosmetic Cracks
Not all cracks are created equal. Some are just surface stuff, no structural harm done:
Shrinkage cracks: These happen when concrete dries out. They’re usually hairline, random, and don’t follow patterns.
Thermal cracks: Temperature changes can cause concrete to expand and contract. Result? Fine, wavy cracks at the surface.
For these, flexible sealants or surface treatments often do the trick. But remember, even non-structural cracks can let in water, so don’t ignore ’em.
When to Consult a Structural Engineer
Some crack situations need pro help. Here’s when to call in the experts:
Progressive movement: Cracks that keep getting bigger, or show signs of fresh spalling? That’s a job for an engineer.
Multiple affected elements: If several structural elements are cracked, it’s time for a pro opinion.
Safety concerns: Any sign of imminent failure, like large pieces falling off, or cracks under heavily loaded areas? Evacuate, then call an engineer ASAP.
How Epoxy Crack Injection Works and Where It Excels
Epoxy injection combines a resin and hardener that chemically cure to form a rigid, continuous bond inside the crack; viscosity and pot life affect penetration and working time. Mechanically, the cured epoxy bridges the crack to re-establish shear and tensile transfer paths, effectively restoring continuity across structural cracks when conditions permit.
Epoxy performs best in structural or load-bearing cracks that are dry or only slightly damp and not actively leaking; check manufacturer instructions and datasheets for allowable surface moisture and temperature ranges. Planning steps include assessing width and orientation, preparing and cleaning the surface, laying out injection ports, choosing resin viscosity and injection method, and allowing required cure and post-injection protection; if movement or seepage is present, consider flexible alternatives.
Low-pressure vs. high-pressure epoxy injection
Epoxy crack injection methods differ based on pressure applied during the process. Understanding these differences helps you choose the right method for your repair.
Low-pressure injection is typically used for foundation repairs and smaller cracks. It’s preferred because it allows better control over epoxy flow, ensuring it reaches deep into the crack. This method is ideal for narrow hairline cracks where precision is crucial.
High-pressure injection, on the other hand, is reserved for thicker structures or high-flow situations. It forces epoxy deeper into the concrete, making it suitable for wider cracks or when significant flow is required. However, it’s less precise and can lead to over-injection if not monitored carefully.
Surface prep and moisture considerations for epoxy
Proper surface preparation and moisture control are crucial for successful epoxy crack injection. Epoxy needs a dry or slightly damp surface to bond effectively with the concrete.
Before injecting, test your surface for moisture using a simple moisture meter. Ideal readings should be below 15%. If it’s higher, allow the area to dry further before proceeding. Inadequate drying can lead to poor epoxy adhesion and reduced performance.
Ensure the crack face is clean by removing any loose debris or contaminants. Lightly abrade the surface with sandpaper or a wire brush to improve epoxy bonding. Keep in mind that excessive moisture or wet conditions can cause epoxy to fail, making it essential to address any underlying water issues before injection.
Crack width and geometry — narrow and hairline treatments
Epoxy crack injection is often the go-to method for narrow or hairline cracks in concrete. These are typically structural cracks that need repair to prevent further deterioration.
Hairline cracks, measuring less than 0.1mm wide, can be challenging to treat with other methods like caulking or sealants due to their small size. Epoxy’s ability to penetrate deep into the crack and form a strong bond makes it ideal for these situations. It restores load transfer and prevents water intrusion.
However, epoxy isn’t suitable for all narrow cracks. If the crack is too narrow (<0.05mm), it may be difficult for epoxy to penetrate and fill effectively. In such cases, other repair methods might be more appropriate. Always assess crack width and geometry before deciding on a repair method.
When Flexible Sealants (Polyurethane, Polyurea, Hybrids) Are Better
Flexible materials shine where active leaks, ongoing movement, or thermal/vibration cycling exist—situations where a rigid epoxy would crack or trap water. Products such as polyurethanes, polyureas, and hybrids offer greater elongation and can bond to damp concrete, so they accommodate ongoing movement and low-pressure seepage better than epoxy.
Use flexible sealants on damp or actively leaking cracks, wider joints, or non-structural areas after confirming surface prep and any primer requirements per the product label. Remember that these materials do not restore structural strength like epoxy; perform quick field tests for leak/no-leak and movement, sequence work appropriately, and monitor the repair over time for compatibility and performance.
Active water leaks and hydrophobic polyurethanes
Polyurethane foams and hydrophobic systems are your go-to for actively leaking cracks. Epoxy struggles here because it’s not designed to handle flowing water.
These flexible sealants expand, filling gaps and stopping water flow. They’re hydrophobic, meaning they repel water, unlike epoxy that can be washed out by constant leaks.
Tip: For active leaks, always use hydrophobic polyurethane systems for best results.
Movement tolerance and dynamic joints
Flexible sealants like polyurethanes and polyureas excel in moving or settlement-prone substrates. Their elasticity allows them to stretch and compress, accommodating joint movement without breaking.
Epoxy, being rigid, can’t handle this movement well. It may crack or pull away from the substrate over time.
When to use: If you see signs of movement—like hairline cracks reappearing after repair—or know your structure is prone to settlement, opt for flexible sealants.
Limitations and trade-offs of flexible materials
While flexible sealants are great for non-structural repairs and dynamic joints, they don’t restore structural capacity like epoxy. They’re more about stopping leaks and accommodating movement than strengthening the structure.
- Strength restoration: Limited. Flexible sealants won’t reinforce your structure like epoxy can.
- Durability: Depends on the specific product. Look for UV and chemical resistance ratings to ensure longevity.
- Adhesion: Can be a challenge, especially with damp or porous surfaces. Priming helps, but it’s not as reliable as epoxy’s adhesion.
- Service life: Generally shorter than epoxy. Expect 5-10 years, depending on conditions and maintenance.
- Compatibility: Not compatible with epoxy injections or anchors. Using them together can cause issues like weak bonds or staining.
Advantages and Limitations of Epoxy Injection
Epoxy injection can provide a high-strength bond that restores structural continuity and serves as a permanent seal when the crack and environment meet product requirements. It’s appropriate where the crack is dry or only slightly damp and where movement is minimal, but verify cure characteristics and allowable substrate conditions on the product data sheet.
Key advantages are superior bond strength and mechanical resistance; limitations include sensitivity to moisture, poor tolerance for ongoing movement, and the risk of trapping moisture that causes debonding. Before choosing epoxy, confirm crack type and movement history, substrate moisture and temperature ranges, and consider inspection or testing to ensure epoxy is the correct solution.
Structural bonding and long-term rigidity
Epoxy injection excels at restoring structural integrity to cracked concrete. Once cured, epoxy forms a strong bond with the surrounding substrate, transferring loads across cracks just like the original concrete.
This is crucial for: columns, beams, and foundation walls that bear significant weight or forces. Epoxy’s rigidity helps maintain these elements’ stability over time.
Remember, epoxy doesn’t flex or stretch like some sealants. It provides a permanent, rigid repair once cured. This makes it ideal for preventing further crack propagation in structural elements.
Limitations: moisture, movement, and access
Epoxy injection has its limits. Moisture is a big one. Wet or damp cracks can reduce epoxy’s effectiveness and even cause debonding if trapped moisture expands during curing.
Active movement in the crack can also spell trouble. Epoxy doesn’t accommodate much movement, so widening cracks may lead to re-cracking or failure of the repair.
Access is another consideration. If you can’t reach the entire length of a crack, you won’t be able to inject epoxy into it. This leaves uninjected sections vulnerable to further damage and propagation.
Repair lifecycle and future interventions
Epoxy repairs are inspectable, allowing you to monitor their condition over time. If a repair shows signs of deterioration or new cracks appear nearby, rework may be necessary.
In some cases, additional stabilization might be needed after epoxy injection. For instance, stitching can reinforce cracked elements further, while helical ties can help stabilize foundation walls.
Cost-benefit considerations come into play here too. While epoxy injection is often more affordable than other repair methods or replacement, it might not always be the final solution. Weigh your options based on the specific needs of your project and structure.
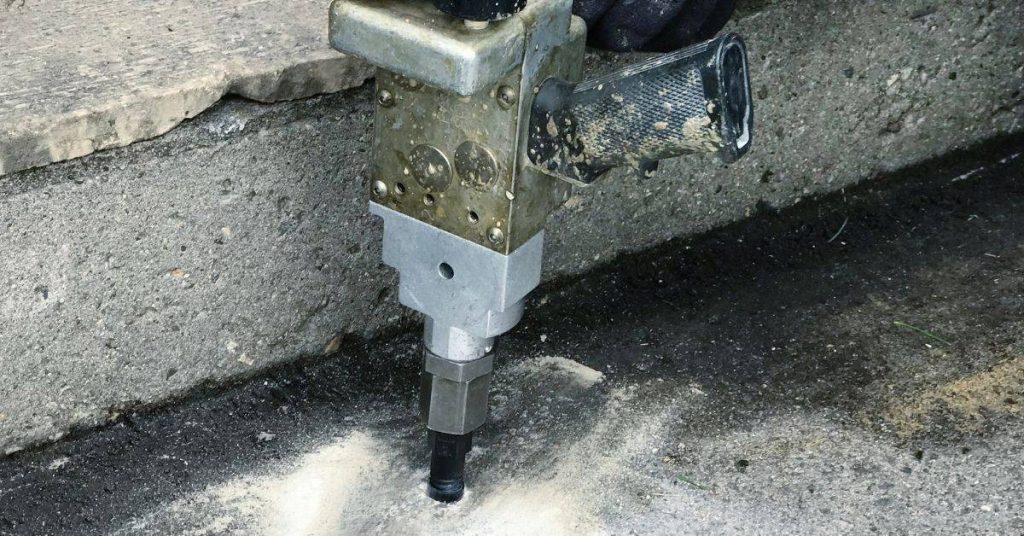
Equipment, Materials, and Practical Injection Methods
Pick equipment and packaging to match the job: cartridges or bulk epoxy for volume, appropriate pump or dispenser, injection ports/packers, mixing nozzles, and a compatible surface sealant. Follow manufacturer instructions for product viscosity and pot life, and verify those specs before mixing or loading dispensing equipment.
Site prep and PPE are essential—eye and respiratory protection, good ventilation, and surface cleaning to remove contaminants and moisture as required by the product. Place ports at regular intervals for even distribution, seal the surface around the crack, inject in a planned sequence to avoid pressure spikes, monitor flow to confirm filling, and allow proper cure times while watching for leaks or voids for troubleshooting.
Tools and materials checklist
Before you start your epoxy crack injection job, make sure you have all the necessary tools and materials. This checklist will help you ensure a successful repair.
- Injection ports: Check quantity and size to match your crack geometry.
- Seal paste: Ensure it’s compatible with your epoxy and can fill gaps before injection.
- Dispensers/pumps: Confirm they’re suitable for your chosen packaging (cartridge or pail).
- Mixing nozzle: Check it fits your dispenser and can handle your epoxy’s viscosity.
- PPE (Personal Protective Equipment): Include safety glasses, gloves, and respiratory protection.
- Ventilation equipment: Ensure you have adequate ventilation for dust control and fume removal.
- Surface cleaning tools: Check you have brushes, scrapers, and compressed air to clean the crack surface.
- Moisture meter: Confirm it’s working properly to check for hidden moisture before injection.
Quick rule: Skipping any of these can lead to poor penetration, leaks, or even failed repairs.
Packaging and dispensing
Epoxy comes in various packaging options. Understanding each has its pros and cons will help you choose the right one for your job.
Dual-cartridge systems: These are convenient for small to medium-sized jobs. They ensure accurate mixing ratios at the nozzle. However, they can be less cost-effective for larger repairs.
Bulk pails: Ideal for large repairs, bulk packaging is more economical. But you’ll need a specialized mixer and pump to ensure proper mixing and dispensing.
Specialized pumps or mixers may be required depending on the epoxy’s viscosity and your job size. Always check the manufacturer’s recommendations before starting.
Injection sequencing and quality controls
Proper injection sequence ensures even penetration and prevents pressure spikes. Here’s how to do it:
1. Seal the crack ends: Prevent epoxy from leaking out during injection.
2. Space ports evenly: Ensure consistent pressure distribution along the crack. For structural cracks, space ports 6-8 inches apart; for non-structural, space them 10-12 inches apart.
3. Ramp up pressure gradually: Start with low pressure to allow epoxy to penetrate deep into the crack. Gradually increase pressure as the crack fills.
Quality controls: After injection, perform a flow check or dye test to confirm full penetration. Monitor for leaks and ensure proper curing before applying final surface care.
Costs, Timelines, and Project Planning
Budgeting should compare material and labor factors for epoxy injection versus flexible sealants and account for crack length, prep work, and any moisture control required; check current local rates and product usage rates rather than assuming fixed numbers. Timeframes run from site prep through cure and can be extended by drying times, weather, and multiple or complicated crack networks—verify cure and handling times on product documentation.
Pre-inspection should record crack type, width, moisture level, access for ports, and surface condition to guide method selection and sequencing. Plan contingencies for hidden damage, movement, or moisture control issues, phase work where helpful to manage costs and equipment use, and keep deliverables like crack maps, moisture readings, and cure timelines documented for stakeholders.
Cost comparison and budgeting considerations
Epoxy injection and flexible sealants differ in cost, driven by materials, labor, access, and pressure method. Here’s a breakdown:
Epoxy Injection: Materials ($10-$25 per linear foot), Labor ($40-$80 per hour). Surface prep or moisture control can add $50-$300.
Flexible Sealants: Materials ($5-$15 per linear foot), Labor ($30-$70 per hour). No additional costs for surface prep, but access and pressure method may impact labor.
To budget, estimate materials needed by crack length, add labor (2-4 hours per 10ft), and include contingencies (10-20%).
Typical project timeline and permit considerations
Planning steps from inspection to cure time:
1. Inspect (1 hour), Plan (2 hours), Prep site (2-4 hours).
2. Injection (1-4 hours per 10ft), Cure (24-72 hours).
Permits: Check local codes. Contractor availability may impact scheduling.
Factors extending timelines: drying/curing times, weather, multi-crack scenarios. Emergency leaks may expedite work or alter sequencing.
Impact on warranties and insurance claims
Document repairs with crack maps, moisture readings, cure timelines, and photos. Keep records for future reference.
Repairs may affect home warranties if not done properly or if they cause further damage. Contact warranty provider before starting work.
Insurance claims: Document active leaks, structural implications, and repair costs. Present repair reports or engineer letters to support your claim.
Safety, Material Specs, and Applicable Standards
On-site safety requires appropriate PPE—gloves, eye protection or face shield, and respirators for vapor-prone products—plus good ventilation, dust control, and spill procedures; check product SDS for specific requirements. Verify datasheet properties such as viscosity, pot life, cure time, bond strength, elongation, and moisture tolerance to ensure the product fits the intended structural or sealing use.
Look for applicable standards referenced by the product or project spec and confirm test reports or certifications where required; consult relevant standards and building code references noted by the manufacturer. Maintain documentation—SDS, batch numbers, expiry dates, and supplier attestations—and follow storage, handling, and disposal guidance from the manufacturer to remain compliant and safe.
Safety precautions and PPE
Working with epoxies and polyurethanes requires careful handling to protect yourself and your workspace. Here’s what you need:
Respiratory protection: Use a respirator with organic vapor cartridges when mixing or applying these products. They emit harmful vapors that can cause health issues.
Gloves: Wear chemical-resistant gloves to protect your hands from skin irritation and burns. Change them if they become contaminated.
Always work in a well-ventilated area, and keep the workspace clean to minimize dust and spills. If you spill material, flush it immediately with plenty of water. Before starting, check the on-site atmosphere for carbon monoxide or other harmful fumes, especially when using epoxy or polyurethane products.
What to check on product datasheets
Before purchasing, review the product datasheet to ensure it meets your job’s requirements. Here’s a checklist:
- Viscosity/Pot Life: Check if it matches your injection equipment’s capabilities and the crack size.
- Cure Time: Ensure it fits your project timeline, especially for critical areas like structural repairs.
- Heat Resistance: Confirm it can withstand the expected temperature range in your application area.
- Compressive/Tensile Strength: Verify they meet or exceed the required strength for your repair.
- Elongation: Check if it’s suitable for the expected movement of the substrate.
- Bond to Concrete: Ensure it adheres well to concrete, especially in wet conditions.
- Moisture Tolerance: Confirm it can cure properly in the existing moisture levels.
- Shrinkage: Check if it’s minimal to prevent new cracks from forming after curing.
- Structural/Sealing Rating: Ensure it’s rated for structural repairs or crack sealing, as needed.
Quick rule: If you’re unsure about any property, ask the manufacturer or consult a professional. Skipping this step could lead to failed repairs and costly rework.
Applicable standards and code references
Before starting any repair, ensure the products you’re using comply with industry standards and local building codes. This is crucial for structural repairs to maintain safety and avoid legal issues.
Epoxy injections: Look for ASTM C881 compliance. This standard covers the application of epoxy compounds for crack injection in concrete structures.
Polyurethane standards: Check relevant ASTM or ISO standards, such as ASTM D6416 for polyurethane grouts and sealants. Always consult local building codes and project-specific specifications to ensure compliance.
Certifications and VOC limits: Verify that the products have the necessary certifications (ISO/UL listings) and meet or exceed VOC emission limits. Confirm test reports and batch qualifications with the manufacturer before starting work.
Common Mistakes, Visual Checkpoints, and Follow-up Maintenance
Frequent errors include poor surface preparation, choosing the wrong material for the crack, failing to control moisture, incorrect injection sequencing, and trapping air that leaves voids. During the job, verify a clean surface, properly seated ports, visible resin flow, and no surface bleeding or unexpected movement as visual checkpoints of correct application.
After injection, document crack characterization, venting, cure times, and perform inspections at set intervals—look for ongoing leakage, re-opening, or incomplete fills and plan rework if necessary. Keep a repair log with photos, dates, product specs, and follow a maintenance schedule to re-check bonds after seasonal shifts and prevent future moisture intrusion.
Common installation mistakes to avoid
Before you start injecting, review this checklist. It’ll help you steer clear of common pitfalls.
- Surface prep: Skipping this step leaves residue and traps moisture. Result? Poor adhesion.
- Wet cracks: Injecting into wet cracks traps water, leading to weak bonds and voids.
- Port spacing: Too close or too far apart? Both can cause air entrapment and incomplete filling.
- Over-pressurizing: Too much pressure can force resin out of the crack, wasting material and causing surface staining.
- Wrong resin type: Using epoxy where polyurethane is needed (or vice versa) leads to poor performance and failure.
- Improper drying: Not controlling moisture lets water interfere with curing, weakening the repair.
- Injection order: Starting in the wrong spot can trap air and prevent proper filling.
- Rushed curing: Skipping the recommended cure time leaves you with weak bonds or voids.
Quick rule: Take your time, follow the steps, and double-check your work. It’s worth it in the long run.
Visual and performance checkpoints during and after repair
Throughout the process, use this checklist to ensure your repair is on track.
- Clean, dry surface: Before injecting, confirm the crack is clean and dry. Any residue or moisture can cause failure.
- Ports seated flush: Check that injection ports are level with the surface. If not, resin may leak out.
- Proper filling: Watch for uniform resin flow along the crack. Incomplete filling means air is trapped or the crack isn’t sealed.
- No bleeding: After injecting, check that there’s no resin seeping out of the crack. Bleeding indicates over-pressurizing or improper surface prep.
- Consistent color/sheen: Once cured, the repaired area should match the surrounding concrete in appearance. Any variation could indicate incomplete filling or poor adhesion.
- No sudden movement: After injecting, check that the crack isn’t moving or widening suddenly. This indicates ongoing structural issues.
- Bond at ports: Inspect injection ports to ensure a strong bond has formed. A weak bond can lead to leakage and failure.
- Cured appearance: After the recommended cure time, check that the repair looks fully cured. If not, it may not be performing as expected.
Quick rule: Regular checks ensure you catch any issues early, saving you time and money in the long run.
Monitoring, maintenance, and when to re-evaluate
After your repair is complete, follow this checklist to ensure it’s performing as expected.
- Inspect at 3-6 months: Check for any signs of leakage or movement. Early detection helps prevent major issues.
- Re-check at 1 year: Concrete can shift over time, so it’s important to re-evaluate the repair after a full year.
- Document crack behavior: Keep notes on any changes in the crack’s appearance or behavior. This helps you track trends and identify potential issues early.
- Monitor moisture levels: Regularly check for excess moisture, which can weaken the repair and cause failure.
- Re-check bonds after seasonal shifts: Concrete expands and contracts with temperature changes. Re-check bonds to ensure they’re holding up.
- Establish maintenance plan: Apply a protective coating or sealant to prevent future moisture intrusion and prolong the life of your repair.
- Consider additional stabilization: If movement is detected, consider further stabilization measures to address underlying structural issues.
- Structural review: If cracks are recurring or worsening, it may be time for a professional structural review. Safety first!
Quick rule: Regular monitoring and maintenance keep your repair in top shape and help you catch any issues early.
Conclusion
You now know when to use epoxy injection and when a flexible sealant makes more sense, so you can protect the structure, keep a clean look, and avoid costly do-overs. The key is choosing the right method for the crack type and sticking to tested steps with proper safety.
Proceed with a simple, practical check before you sink a dime: inspect crack depth and openness, confirm load area and movement, verify material specs and curing times, test a small patch first, and plan work in a dry, well-ventilated window. Start with surface preparation, follow the chosen method steadily, inject or seal in the correct sequence, and monitor for changes after the job cures. If anything looks off, pause, re-check the crack, and adjust your plan before continuing.
Common mistakes to avoid are over-packing epoxy into a crack that can still flex, skipping surface prep, and rushing without testing a small area first. A solid safety rule is to wear eye protection, gloves, and a respirator when needed, keep a clean work area, and never work in standing water or on a compromised structure. If the crack shows ongoing movement, or if you’re unsure about load-bearing implications, call a pro before you push ahead. With careful steps, clear planning, and patience, you can finish with a durable, professional result that stands up to time.
FAQ
How do I tell if a crack is structural or non-structural?
If the crack keeps growing, runs through major joints, or aligns with structural elements, treat it as structural. Measure widening over time and note its orientation; if in doubt, stop and get an on‑site evaluation from a pro.
Epoxy injection: what are the requirements and why is it advantageous?
Epoxy works best on cracks that can bond with the concrete and carry load again. Surfaces must be clean and dry before injection, and follow the manufacturer’s instructions for prep and curing. It restores stiffness where the crack is structural, but won’t seal moving joints.
Polyurethane injection: when should I use it and what are its limits?
Use polyurethane for cracks that leak or move, and where a flexible seal is needed. It tolerates damp surfaces and fills gaps well, but it won’t restore structural strength like epoxy. Check compatibility with the substrate and the expected movement you’re treating.
What on-site evaluation techniques and moisture testing should I use?
Inspect crack patterns, measure widths, and monitor movement over time. Do a simple moisture check near the crack and note any active leaks before sealing or injecting. Always confirm moisture handling with the product label and local guidance or a professional if moisture is present.