

Introduction
Drywall anchors are devices that let you attach items to drywall when you can’t hit a stud. They come in several types, like toggle bolts, Molly bolts, and plastic expansion anchors, each with its own mounting method. Load limits vary by type and by wall material, so always check the product label or manufacturer instructions before hanging something heavy.
Choose stud mounting when possible for heavier loads, and use anchors only for items that are light to medium in weight. Follow proper installation techniques: drill a hole the right size, insert the anchor fully, and tighten as directed without overdriving. Decide how far apart anchors should be based on the item and wall, and avoid spacing that leaves weak spots or excessive leverage.
Key takeaways
- Choose anchors based on load and wall material; studs for heavy items.
- Toggle bolts, molly bolts, and screws each have different load limits; verify.
- Attach to studs when possible; use drywall anchors only for light loads.
- Follow installation spacing guidelines to avoid nail shear or drywall failure.
- Inspect anchorage after heavy use and replace compromised anchors promptly.
- Document procurement tips and check labels for weight, material, and mounting methods.
Table of Contents
- Introduction
- Key takeaways
- How Drywall and Anchors Work — Basics and Failure Modes
- When to Anchor to Studs Instead — Advantages and Techniques
- Installation Best Practices to Prevent Premature Failure
- Tools, Materials Checklist and Visual Checkpoints
- Inspection, Maintenance, and When to Reinforce or Replace
- Cost, Purchasing Tips, and Best Anchor Choices by Project
- Advanced Safety Measures and Environmental Considerations
- Conclusion
- FAQ
How Drywall and Anchors Work — Basics and Failure Modes
Drywall is a layered sheet material that relies on the structure behind it for most heavy loads. Anchors create a path for that load to reach solid backing or to grip the drywall itself depending on design. Performance depends on anchor design, wall condition, and installation quality.
Common load transfer routes include direct contact with studs via screws or toggles, and anchors that grip the drywall substrate for lighter loads. Failure modes include pullout, flange or screw head pull-through, rotation, back-out, and substrate damage. Verify wall type and installation method from the product label or manufacturer instructions, and check for conditions that could reduce holding power such as moisture or prior repairs.
Common failure types (pull-out, shear, drywall crumble)
Drywall anchors can fail in several ways. Understanding these failure modes helps you spot issues early and prevent accidents.
Pull-out is the most common. It happens when the anchor’s holding power is exceeded, and it’s pulled right out of the wall. You’ll see this if your anchor suddenly gives way under load.
Shear failure occurs when the anchor or screw shears off due to excessive torque. This usually happens during installation if you overtighten. Signs include stripped screws or broken anchors.
Another common issue is drywall crumble. This happens when the anchor’s holding power exceeds the wall’s strength, causing it to crumble around the anchor. You’ll see cracks or chunks of drywall falling off near the anchor.
Key factors that influence performance
Drywall anchors’ performance depends on more than just their design. Several factors can affect how well they hold:
Drywall thickness matters. Thicker drywall provides more material for the anchor to grip, increasing holding power.
Backing materials also play a role. Anchors perform better in solid, undamaged walls with no previous repairs or textured surfaces.
Vibration and moisture can weaken drywall over time, reducing the anchor’s holding power. Proper installation is crucial too. Pre-drilling, tapping, and seating anchors correctly ensure they perform as intended.
When to Anchor to Studs Instead — Advantages and Techniques
Solid wood studs offer superior holding power for heavy or safety-critical loads, so prioritize stud mounting whenever feasible. Stud presence changes anchor type and layout planning, reducing reliance on drywall alone. Review stud location and feasibility before choosing an anchor strategy.
To assess the wall structure, locate studs with a stud finder, probing as needed, and avoid metal plates and wiring. Plan load distribution across multiple fasteners and favor vertical loads over lateral ones when possible. Depending on the situation, use heavy-duty toggles, lag screws, or direct-to-stud bolts, and supplement with wall anchors only where studs are absent.
Finding and confirming studs
Studs are typically spaced 16″ or 24″ on center. Use a stud finder to locate them, but don’t rely solely on it. Probing with a screwdriver helps confirm their position.
Watch out for metal plates and wiring. Drilling into these can cause damage or injury.
Once you’ve found the studs, mark their centers lightly with a pencil. This will guide your drilling.
Fastening into studs and combining methods
For heavy loads, use lag screws or direct-to-stud bolts. Drill pilot holes to prevent splitting. The hole should be about 1/4″ smaller than the screw’s diameter.
Tighten screws carefully. Over-tightening can strip the wood fibers and weaken the hold.
When combining methods, space your stud screws evenly with drywall anchors to distribute load. Prioritize vertical loads over lateral ones.
Installation Best Practices to Prevent Premature Failure
Start with planning and site assessment to match wall material and backing to the mounting plan. Prepare holes and spaces to prevent material damage and ensure proper seating. Always follow the manufacturer instructions for each anchor type.
Determine the correct screw depth and torque to achieve proper thread engagement without over-tightening. Outline the step-by-step sequence with clear decision points to re-check alignment and integrity. If conditions feel uncertain, stop and consult a professional.
Hole size, anchor depth, and correct torque
The hole’s diameter is crucial. Too small, the anchor won’t fit. Too big, it’ll wobble. Use a drill bit matching your anchor’s shank.
Drill to the right depth. Anchors need space to expand and grip. Don’t stop too early or you’ll lose holding power.
Torque matters. Too little, it won’t hold. Too much, you might strip the screw head or damage the anchor. Follow manufacturer’s torque limits.
Spacing, fastener placement, and load distribution
Spread out your anchors. Clustering them puts too much stress on one spot. Aim for even spacing.
Use multiple fasteners when possible. This distributes the weight across more points, reducing stress on each one.
Avoid placing heavy loads at the top of a wall or cabinet. The weight can pull down and cause failure over time.
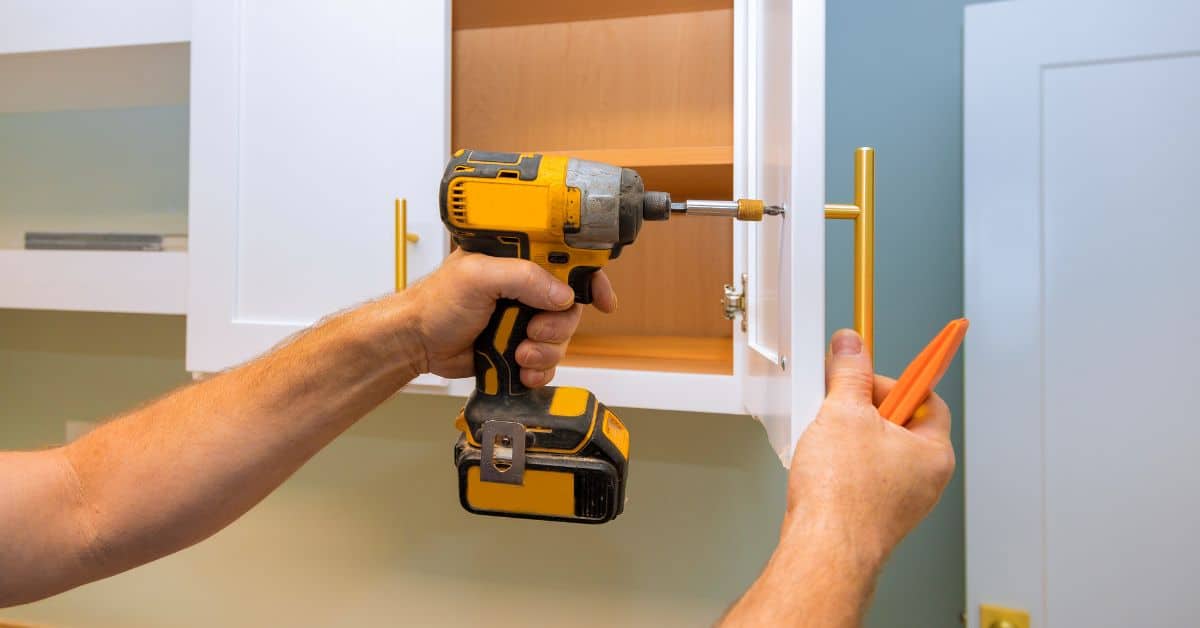
Tools, Materials Checklist and Visual Checkpoints
Assemble a concise tools list including hand tools, drill bits, safety gear, and measuring devices. Have a small selection of replacement anchors on hand for quick swaps. Keep a simple repair kit handy for on-site fixes.
Check visual cues such as pre-drill hole size, depth markers, anchor alignment, flush seating, and correct load orientation. Maintain backup fasteners and replacements to avoid project delays. Perform quick sanity checks like dry-runs before applying any load.
Essential tools and materials
Before you start, ensure you have the right gear to get the job done safely and efficiently.
- Hammer: For tapping toggles into place and setting drywall screws.
- Drill (cordless): Essential for creating pilot holes and driving fasteners.
- Drill bits: Set of masonry, wood, and metal bits to match your anchor types.
- Safety glasses: Protect your eyes from debris during drilling and hammering.
- Measuring tape: To ensure accurate hole placement and proper spacing.
- Pencil: Mark where you’ll drill for precise anchor placement.
- Drywall anchors (various types): Molly, toggle, sleeve, etc. – choose based on load needs (light, medium, heavy).
- Fasteners (screws/nails): Match the type and size to your chosen anchor.
- Stud finder: To locate studs for added support when needed.
- Level: Ensure your anchors are level for proper load distribution.
- Vacuum or broom: Keep your workspace clean to prevent accidents and ensure accurate drilling.
Quick rule: Having the right tools and materials ensures a smooth, safe installation. Skipping essentials can lead to improperly set anchors and potential failures.
Visual and tactile checkpoints during and after install
Inspect your work as you go to ensure proper installation and prevent future issues.
- Pilot hole size: Ensure it matches the anchor’s required diameter. Too small or too large can cause failure.
- Depth marking: Use a pencil line to mark the correct depth for your toggle anchors.
- Anchor alignment: Check that your anchor is straight and level before driving in the screw or nail.
- Toggle expansion: Feel for resistance as you drive in the screw. If it’s too easy, the toggle may not have opened fully.
- Flush seating: Ensure the head of your anchor is flush with the wall surface once tightened. Too proud or sunken can cause issues.
- Load orientation: Check that the load will be applied perpendicular to the anchor for optimal strength.
- Wobble test: Gently tug on the fastened item. If it wobbles, your anchor may not be secure or fully expanded.
- Screw/nail tightness: Ensure fasteners are securely tightened but not overtightened, which can strip the anchor.
Quick rule: Regular visual and tactile checks during installation help catch potential issues early, preventing costly rework or failures down the line.
Inspection, Maintenance, and When to Reinforce or Replace
Set a practical inspection schedule that fits high-use versus occasional load scenarios. Perform visual, tactile, and functional checks on anchors, screws, and substrate during each inspection. Keep notes of any changes to guide maintenance decisions.
Look for signs of looseness, movement under load, or substrate deterioration. Decide between reinforcement and replacement based on substrate integrity and load history. Document actions and consult the manufacturer guidelines or a licensed professional when in doubt.
Warning signs and quick tests
Regularly inspect your drywall anchors to catch any issues early. Here’s a quick checklist for warning signs.
- Loose or wobbly anchor: Gently pull or push the anchor. If it moves, it might be failing.
- Cracks around the anchor: Look for hairline cracks in the drywall near the anchor. They could indicate a problem.
- Sagging or bowed wall: Check if the wall is sagging or bowing under the weight of the item it’s supporting.
- Rust on metal parts: Rust can weaken metal anchors and cause them to fail.
- Rust stains: Stains around the anchor could indicate rust behind the wall, which needs immediate attention.
- Pullout clues: If you see drywall dust or debris around the anchor, it might be pulling out of the wall.
- Substrate deterioration: Check for softened drywall or crumbling masonry behind the anchor. This could indicate a serious problem.
- Movement under load: Try to move the item supported by the anchor. If it moves easily, the anchor might be failing.
Quick rule: If you notice any of these warning signs, inspect and address the issue immediately to prevent further damage or failure.
Reinforcement and repair options
When anchors show signs of wear or damage, reinforce them before they fail. Here’s how:
- Minor issues (sound substrate): Retighten the anchor if it’s loose. Add a secondary anchor nearby for extra support.
- Upgrade to higher-rated anchor: If the load is too heavy, upgrade to a heavier-duty anchor.
- Use concrete-compatible epoxy: For anchors in concrete, use an epoxy that’s compatible with concrete to secure them.
- Install backing or plywood: If the substrate is weak, add a piece of plywood behind the drywall for extra support.
- Replace panel or anchors: If there’s significant wear, damage to the substrate, excessive movement, or if the load already exceeds the rating, replace the anchor or even the entire panel.
Quick rule: Always reinforce or repair anchors as soon as you notice any issues. Don’t wait until they fail.
Cost, Purchasing Tips, and Best Anchor Choices by Project
Think in cost tiers that reflect value factors like capacity, reusability, and ease of installation. Compare how each tier suits light, medium, and heavy tasks without tying advice to specific prices. Verify product suitability for drywall with the packaging or datasheet.
Choose anchors by project type and expected load: light décor, medium loads, or heavier fixtures. Review packaging for dry-wall suitability, required tools, and warranty policies. Check local listings and manufacturer guidance before buying to balance cost and quality.
Matching anchors to project types
When choosing drywall anchors, consider the weight and type of item you’re hanging. Here’s a quick guide:
Light-duty items (under 10 lbs): Plastic expandables or self-drilling drywall anchors are usually sufficient for pictures, small shelves, or lightweight mirrors.
Medium loads (10-50 lbs): Opt for metal hollow-wall anchors or toggle bolts to support cabinet supports, towel bars, or heavy mirrors. These can handle more weight and distribute it better.
Heavy loads (over 50 lbs): For TV mounts, ceiling fixtures, or other heavy items, go with long-span toggles or sleeve anchors. They have the highest load capacity and can span wider gaps between studs.
What to look for on packaging and specs
Before buying, check these key details on anchor packaging and spec sheets:
Rated pull strength: This tells you the maximum weight an anchor can hold. Make sure it’s rated for your item’s weight.
Material: Check if the anchor is made of metal (for heavier loads) or plastic (for lighter items).
Recommended wall types: Ensure the anchors are suitable for drywall, hollow-core, or plaster walls. Some anchors may not work with all wall types.
Included hardware and tools needed: Check if screws, bolts, or other hardware is included. Also, note what tools you’ll need (like a drill bit of specific size).
Advanced Safety Measures and Environmental Considerations
Use reinforcement techniques for critical loads, including redundancy and load-sharing patterns. Plan for distributed loads rather than relying on a single point. Calculate practical safety factors within what you can reasonably achieve on site.
Account for humidity, temperature, wall composition, and surface treatments that affect longevity. Consider consulting a structural professional for high-risk installations or unusual walls. Maintain a routine for inspections and note environmental changes that may require reanchoring or reconfiguration.
Reinforcement, redundancy, and backing options
For heavy loads or critical installations, reinforcement is key. Here’s how:
Backing Plates: Use when anchors can’t penetrate deep enough. They distribute load over a larger area.
Plywood Strips: For masonry, attach strips to wall before anchoring. This spreads load and prevents cracking.
Redundant Anchors: Use multiple anchors in staggered patterns or load-sharing designs for distributed loads. Calculate safety factors based on total load.
Environmental impacts and mitigation
Moisture, temperature changes, and vibration can degrade anchors over time. Here’s how to mitigate these effects:
Moisture: Keep walls dry. Seal cracks, use moisture-resistant anchors in damp areas.
Temperature Changes: Avoid extreme temperatures. They can cause expansion/contraction, stressing anchors.
Vibration: Minimize vibration where possible. It can fatigue anchors over time. Use anti-vibration pads if necessary.
Conclusion
Choose the anchor system that fits the load, the wall, and the look you want, then test small sections first and work steadily to avoid cracks, pulls, or loose fittings. Safety, durability, and appearance depend on sticking to proven methods and knowing when to reinforce or replace.
As you move forward, verify in this order: pick the right anchor or stud, confirm the drywall condition, follow the installation steps exactly, and check each connection after installation. Match the project type to the anchor choice, inspect for movement or cracking, and recheck after a couple of days of use or after any impact. Keep measuring, testing, and adjusting before committing to a full load.
Common mistakes to avoid: overloading an anchor beyond its rated limit, skipping the inspection after installation, and using the wrong anchor for a soft or damaged drywall area. Safety rules are simple: test in a quiet, controlled spot first, tighten to the recommended torque or depth, and never exceed labeled limits. If anything wobbles, cracks, or pulls with light pressure, stop and fix it before continuing.
If you’re unsure about the wall quality, load, or fastener choice after a couple of attempts, call in a pro. They can verify stud locations, correct anchor sizing, and ensure long-term safety. Stay focused on the task, work methodically, and you’ll finish strong with a secure, clean result you can trust.
FAQ
What are the main types of wall anchors and when should I use them?
Toggle bolts, molly bolts, and plastic self-drilling anchors are the common types. Use toggles for heavy loads in hollow drywall, molly bolts for medium loads where you still want a secure pull, and plastic self-drilling for light to moderate loads in clean holes.
How do I know the load limits for different anchors?
Always check the label or datasheet from the manufacturer for the exact load rating. If you can’t find it, assume lighter loads and distribute weight with multiple anchors or switch to a stud mount for higher strength.
When should I mount to studs versus using drywall anchors?
Mount to studs for heavy items or anything that will be pulled or jerked. For items that sit flush and aren’t stressed, drywall anchors are acceptable but plan on smaller loads and more anchors spaced out.
What installation practices help prevent premature anchor failure?
Follow manufacturer instructions for hole size and installation method. Use proper spacing from edges and between anchors, then test the load with gradual pressure before fully loading the item.