
Introduction
Compaction checks before pouring concrete means testing how tightly the soil is packed and how wet it is to see if it’s ready for formwork. Getting this right helps prevent settling, cracks, and uneven slabs. In this article, we’ll cover moisture checks, visible pass counts, and quick field tests you can do on site.
One classic method is the Proctor test, which helps gauge how dense the soil should be at a given moisture level. In practice, you’re aiming for soil that holds its shape but still drains reasonably; check moisture from the site soil and follow project guidance from the supplier or local rules. Always follow the label instructions, and if you’re unsure, test a small area and observe how it compacts when you tamp and rake.
Key takeaways
- Understand moisture influence on compaction to avoid weak or segregated slabs.
- Plan pre-work checks: moisture, pass counts, and layering strategy before pour.
- Proctor test basics: definition, purpose, and how it guides field density targets.
- Use simple field tests and watch consistency across layers to catch faults.
- Safety: wear eye/ear protection, check equipment timing, and halt work if unsure.
- Documentation and final acceptance rely on consistent readings and clear records.
Table of Contents
- Introduction
- Key takeaways
- Why DIY Compaction Checks Matter
- Planning and Pre-Work Considerations
- Tools and Materials Checklist for DIY Checks
- Simple Field Moisture Tests Anyone Can Do
- Pass Counts, Layering, and the Compaction Process
- Simple Field Density Tests and How to Read Them
- Troubleshooting Low or Excessive Compaction
- Costs, Documentation, and Final Acceptance Checklist Before Pouring
- Conclusion
- FAQ
Why DIY Compaction Checks Matter
Compaction checks protect the integrity and durability of slabs and pavements. They help ensure the structure will perform as designed under load and over time. Proper checks reduce the risk of settlement, cracking, and unexpected movement after concrete is placed.
Field density and moisture should line up with target Proctor curves and acceptance criteria from the project data. Understanding how lab results relate to the field helps you plan moisture control and compaction. When readings drift, you’ll know what actions to take before pouring.
Purpose of the Proctor Concept
The Proctor test, done in a lab, tells us about soil’s moisture-density relationship. It finds the maximum dry density and optimum moisture content (OMC) for your base material.
Max dry density is the heaviest your soil can get without losing stability. OMC is when soil has just enough water to reach this max density.
These targets guide field compaction. You want to hit these numbers on-site to ensure a solid, stable base for your concrete.
Benefits for Concrete Projects
Proper compaction boosts bearing capacity. That’s how much weight your slab can handle without settling.
It also reduces settlement risk. Less compacted soil has voids that can fill with water, leading to settlement over time.
Uniform support is key for slabs. Compaction ensures a level, consistent base, preventing differential heave and cracking.
Planning and Pre-Work Considerations
Clarify the project scope, including concrete type, thickness, and expected loads. This sets the right moisture control and compaction targets from the start. A solid plan prevents last-minute changes at the job site.
Review all available documentation, such as project specs and soil or geotechnical reports, and note any design tolerances. Safety, permits, and utility locates should be in place before work begins. Assess site access, staging, drainage, and potential weather impacts to shape your checks and scheduling.
Review Project Specs and Soil Info
Before you start, grab your project specs. They tell you what kind of concrete you’re using, how thick it needs to be, and what loads it’ll bear. This helps you set compaction targets.
If you’ve got soil or geotechnical reports, review them too. They might have soil classifications or lab test results that affect your moisture control strategy. Match your DIY checks with these requirements to ensure you’re on track.
Don’t forget design tolerances. They’ll guide you in setting pass counts and simple field tests.
Site Prep and Safety Precautions
Before testing, prep your site. Clear debris, level the ground, and ensure there’s enough room for equipment and materials.
Safety first: Wear appropriate PPE, follow local safety guidelines, and keep an eye out for any hazards. If you’re using compaction equipment, make sure it’s in good working order and operators are trained.
Arrange utility locates to avoid damaging underground lines. Check permits and local codes too. Lastly, plan for weather contingencies – you don’t want rain ruining your work.
Tools and Materials Checklist for DIY Checks
Core tools include a moisture meter or oven-drying reference, a compact tamping tool or rod, a level, a straightedge, a small shovel or bucket, a clean moisture container, and a timer. These support quick, repeatable checks on site. Have spare batteries and cleaning brushes ready as well.
Optional items like basic field density methods, a calibration plate, and a field notebook can improve accuracy. Rent or borrow most moisture meters and tamping tools if possible; purchases are common for frequent use. Set up a simple pre-check checklist so everything is ready at the job site.
Essential Tools
Before you start your DIY compaction checks, make sure you have these must-have tools and equipment.
- Hand Tamper or Plate Compactor: To compact soil in lifts. Skip this, and your base will be weak.
- Shovel/Bucket: For handling samples and moving materials around.
- Straightedge and Level: To check surface flatness before compaction.
- Sample Bags: Sealable bags to collect soil samples for moisture tests.
- Moisture Meter (Pin-type or Non-contact): To quickly check soil moisture. Don’t skip, as excess moisture can cause issues later on.
- Clean Container: For collecting and transporting soil samples to a lab if needed.
- Stopwatch or Timer: To ensure consistent test durations for pass counts.
- Temporary Marking Tools (Chalk or Spray Paint): To mark out your test grid layout.
Quick rule: Having these essential tools ensures you can perform basic checks and maintain quality control at your job site.
Optional Testing Equipment
For more advanced DIY compaction checks, consider renting or purchasing these optional tools.
- Field Density Gauge (Nuclear or Non-nuclear): To measure soil density in the field. This helps ensure your base meets project specs.
- Quick Moisture Testers: For instant moisture readings, useful when time is of the essence.
- Small Field Oven or Scales: For determining moisture content by weight loss after drying. This method provides a reliable reference for your moisture meter.
- Calibration Plate or Known-Density Reference Block: To verify and calibrate your field density gauge.
- Field Notebook or App: To log moisture readings, pass counts, test locations, and other relevant data. This helps keep track of your checks and identify trends.
Quick rule: Optional tools like these can help you achieve a higher level of accuracy and detail in your DIY compaction checks.
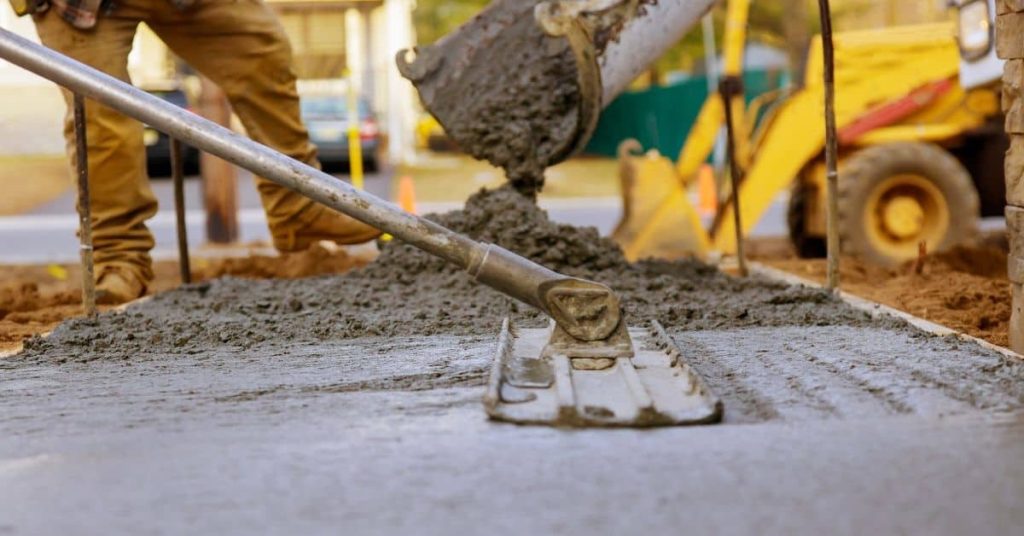
Simple Field Moisture Tests Anyone Can Do
Look for surface dampness, dark patches, efflorescence, or moisture movement in forms or subgrade as quick visual cues. These signs help gauge whether the area is within an acceptable moisture balance. Use them as a first-pass screen before more precise tests.
Feel the surface for temperature, tack, and stickiness to assess moisture balance. A quick finger test can flag areas that need further testing or adjustment. When visual and tactile checks clash with meter readings, use a more accurate method and document discrepancies.
Visual and Squeeze (Ball) Test
Before you start compacting, check your soil’s moisture. It’s quick and free.
Look for these signs:
- Surface dampness or darkened patches.
- Efflorescence – a white, powdery substance on the surface.
- Granular dust moving around, indicating moisture.
Feel the soil. Too wet? It’ll be cool and tacky. Too dry? It’ll be crumbly and warm. Squeeze a handful – if it sticks together, it’s too wet.
Quick Measurement Options
Need more accuracy? Use these simple tools:
- Pin-type meters: Stick ’em in the soil. Read the needle.
- Portable moisture testers: Press against the surface. See the digital readout.
- On-site oven or alternatives: Take a sample, heat it, weigh it. Calculate the moisture content.
For critical projects, consider lab testing. It’s more accurate but takes time and costs money.
Interpreting Moisture for Compaction
Moisture affects compaction. Too wet, it’s soupy. Too dry, it won’t compact.
Check your project specs. They’ll tell you the optimum moisture content (OMC).
Adjust as needed:
- Too wet? Let it dry out a bit before compacting.
- Too dry? Add water, mix well, let it sit to absorb.
Remember, compaction is best at OMC. Aim for that sweet spot.
Pass Counts, Layering, and the Compaction Process
Outline the workflow for compacting fills or subbases in lifts, including lift thickness and where to pause for measurements. Clear sequencing helps you catch problems early. This keeps the process predictable and avoids missed readings.
Define pass counts per layer and adjust for moisture and material type. Use simple field checks like test strips and in-situ density to validate compaction. Record equipment settings and ambient conditions for traceability.
Layering and Lift Control
Working in lifts is crucial for effective compaction. It allows you to control the thickness of material being compacted, ensuring even density throughout.
Lift Thickness: Aim for 6-12 inches thick lifts. This range provides enough material for the compactor to work with while keeping it manageable and preventing over-compaction.
Before starting a new lift, ensure the previous one is fully compacted and stable. Check for any soft spots or variations in surface level. Address these issues before proceeding to maintain uniform lift thickness.
Evaluating Pass Counts and Equipment Use
The number of passes needed varies based on material type, moisture content, and equipment used. Here’s how to determine sufficient passes:
- Observe Density Change: Keep an eye on the material’s behavior under compaction. As it becomes denser, it will hold its shape better and show less deformation.
- Manufacturer Guidance: Consult your equipment’s manual for recommended pass counts based on material type and lift thickness.
- Spot-Testing: Conduct simple field tests like the squeeze test or use a nuclear density gauge to check compaction progress.
- Rentable Tools: Consider renting a nuclear density gauge (<$100/day) for accurate, non-destructive density readings.
- Equipment Settings: Adjust roller/plate compactor settings based on material type. For example, use more vibrations and less pressure for cohesive soils.
Trial Sections and Incremental Approach
Before starting full-scale compaction, create a small trial section to establish the best moisture content and compactive effort for your material.
Moisture Content: Conduct simple field moisture tests (like the visual or squeeze test) to find the optimal moisture level for compaction. This is typically around the Proctor’s maximum dry density point.
Once you’ve determined the ideal conditions, replicate these procedures across your site in incremental sections. This approach allows you to maintain consistent compaction quality while minimizing waste and rework.
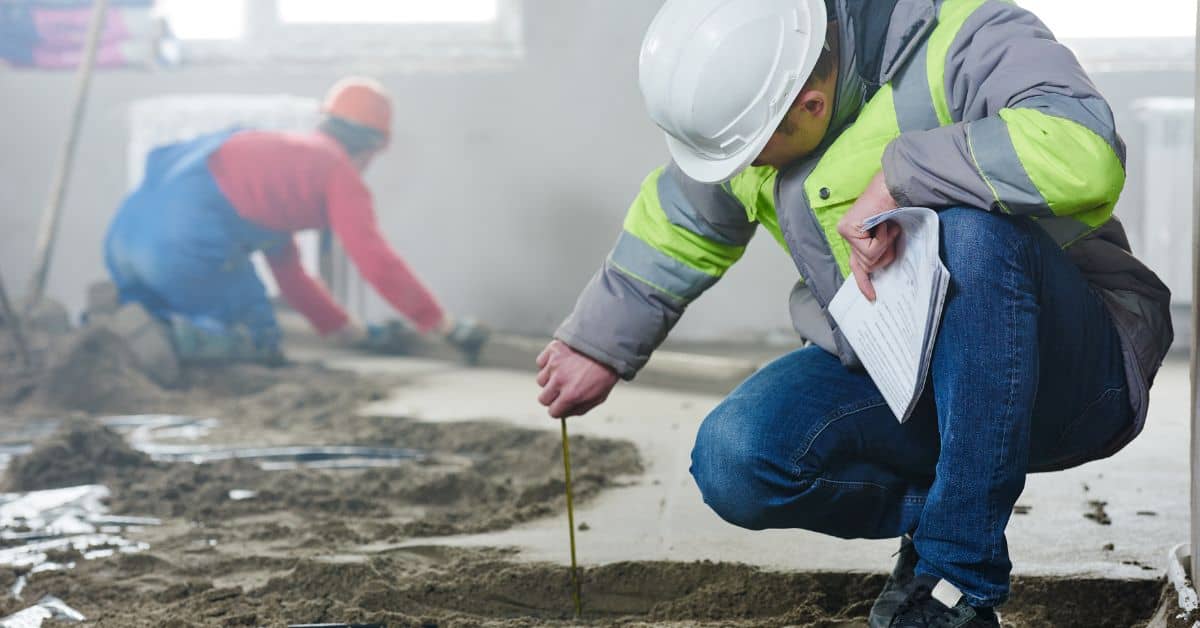
Simple Field Density Tests and How to Read Them
Describe DIY-friendly density options and safety notes, including when to use a nuclear gauge, sand cone equivalents, or cross-checks with moisture. Be mindful of permitting and site rules. Match testing methods to project requirements.
Provide step-by-step mini-procedures for each method, covering setup, tools, surface prep, and timing. Learn how to interpret results and compare them to project specs or lab curves. Include notes on allowable variances and how weather affects readings.
Sand-Cone and Balloon Methods Overview
The sand-cone method is a simple, DIY-friendly way to estimate field density. It’s great for homeowners as it doesn’t require any special permits or safety precautions. Here’s how it works:
You’ll need a sand cone (available at rental stores), a tamping rod, and some fine sand. First, clear the test area of loose materials. Then, place the sand cone on the ground and fill it with sand. Lift the cone straight up, allowing the sand to form a small pile. Use the tamping rod to compact the sand in 25-tamp layers until you’ve reached the desired depth.
The balloon method is similar but uses a rubber balloon filled with water instead of sand. It’s less accurate but still useful for quick checks. Both methods give you an idea of field density, but they won’t replace professional testing for critical projects.
Using Field Gauges and Alternatives
Field gauges like nuclear or non-nuclear densometers provide accurate density readings. Nuclear gauges are the most precise but require special licensing and safety measures. Non-nuclear alternatives, like the sand-cone method, offer a good balance between accuracy and accessibility for homeowners.
Rental stores carry non-nuclear gauges that can be used with minimal training. However, always follow manufacturer instructions and local regulations. For critical projects or complex soil types, consider hiring a professional engineer or testing lab.
Before you start, ensure your gauge is calibrated correctly. Check the manual for specific procedures. Also, keep in mind that field density readings can be affected by moisture content, so it’s crucial to perform moisture tests first (as discussed earlier).
Interpreting Field vs. Lab Results
Field density results are compared to lab-provided maximum dry density values, not wet densities. The lab determines these values using Proctor tests (ASTM D698 or D1557). To compare your field readings:
1. Convert your field density (in pcf) to percent of the maximum dry unit weight: (Field Density / Maximum Dry Unit Weight) x 100.
2. Compare this percentage to the project specifications or lab-provided Proctor curves. Acceptable variance depends on the project’s criticality and local codes, typically around 95% for residential work.
Remember, field tests are approximations. They’re subject to variability due to factors like moisture content, surface conditions, and equipment calibration. Always document your results and keep records for future quality assurance checks.
Troubleshooting Low or Excessive Compaction
Identify whether moisture is the root cause—under, over, or inconsistent moisture—and perform quick checks to confirm. Use calibrated gauges and tactile tests to guide adjustments. Quick checks help you decide if you need to rework before pouring.
Relate compaction results to lift thickness and layering, ensuring the chosen equipment and technique match the soil type. If needed, adjust moisture, lift depth, or equipment settings and re-test. Document the steps and outcomes for QA.
Common Causes and Quick Fixes
When compaction goes wrong, it’s usually due to a few common culprits. Let’s tackle them one by one.
Moisture: Too dry or too wet soil affects compaction. Use your moisture gauge or the squeeze test to check. Add water if it’s crumbly, or let it dry out if it’s mushy.
Lift thickness: Lifts that are too thick or too thin can lead to poor energy transfer and consolidation. Aim for 4-6 inches for most compactors. If your lifts are off, adjust them before proceeding.
Equipment: If you’re not getting the desired results, consider adjusting roller vibrations, travel speed, or passes per layer. If the material is too cohesive or granular, switch to a different compaction method.
When to Escalate to a Professional
While DIY efforts can save you money, there are times when it’s best to call in the pros. Here are some signs to look out for.
If your densities keep coming up low despite your best efforts, it might be time to bring in a geotechnical engineer or testing lab. They have specialized equipment and knowledge to get to the root of the problem.
Another reason to escalate is if you’re seeing unclear soil behavior. If your simple field tests aren’t giving consistent results, it’s wise to seek professional help before proceeding with your project.
Remember, prevention is better than cure. Don’t wait until things go wrong before seeking expert advice.
Common DIY Mistakes to Avoid
Even with the best intentions, it’s easy to make mistakes when doing compaction work yourself. Here are some common pitfalls to steer clear of.
- Skipping documentation: Keep records of your moisture checks, pass counts, and density tests. This helps you track progress and identify trends.
- Not checking moisture: Moisture is key to good compaction. Always check it before starting work and throughout the process.
- Assuming pass counts: Just because a certain number of passes worked on another job doesn’t mean it’s right for this one. Always validate your pass counts with density tests.
- Ignoring safety: Compaction work can be dangerous. Always wear appropriate PPE and follow safety guidelines.
- Rushing curing: Concrete needs time to cure properly. Don’t rush it or you’ll end up with a weak slab.
By avoiding these mistakes, you’ll set yourself up for success in your compaction projects.
Costs, Documentation, and Final Acceptance Checklist Before Pouring
Evaluate rent versus hire options for equipment and labor, and weigh the ongoing costs such as fuel and downtime. Keep a simple cost log to support decisions. This helps you avoid surprise expenses at pour time.
Gather and maintain pre-pour documentation, including estimates, rental agreements, permits, calibration certificates, and weather notes. Use a concise final acceptance checklist to verify formwork, rebar, grade, drainage, moisture, and compaction status. Have a clear sign-off flow for approvals and store all records in a central location.
Cost Considerations and Tool Rental vs. Hire
Before you start, consider the costs of renting equipment versus hiring a contractor.
- Rent vs. hire: Weigh the cost of renting tools against buying them if it’s a one-time job.
- Equipment costs: Compare prices for rentals and purchases, including any delivery fees.
- Labor costs: Consider hiring labor to operate equipment you can’t handle yourself.
- Fuel fees: Some rentals include fuel; others don’t. Check the fine print.
- Potential downtime: If equipment breaks, you may face delays and extra costs for repairs or replacements.
- Contractor quotes: Get quotes from contractors to compare with your DIY costs.
- Insurance: Check if rentals include insurance. You’ll need it for hired labor.
- Taxes and permits: Factor in any additional fees or permits required for your project.
Quick rule: Always get quotes when unsure about DIY costs versus hiring a contractor.
Field Records and What to Document
Keep clear records of your compaction process for future reference and troubleshooting.
- Moisture tests: Log dates, locations, and results. Keep track of any trends or issues.
- Density results: Record field test results, including method used (sand-cone, balloon, etc.).
- Pass counts: Document each layer’s pass count to ensure uniform compaction.
- Trial sections: Note conditions and results of trial sections for future reference.
- Photos: Take pictures of the site, forms, and tests. They can help diagnose issues later.
- Weather conditions: Record daily weather to track any effects on compaction.
- Permits: Keep copies of all permits related to your project.
- Equipment calibration: Maintain records of equipment calibration certificates.
Quick rule: Regularly update and organize your records for easy access and review.
Final Pre-Pour Acceptance Checklist
Before placing concrete, ensure everything is ready with this final checklist.
- Moisture consistency: Confirm soil moisture content is within acceptable limits (typically 12-18%).
- Density confirmation: Verify field test results match lab standards for your material.
- Uniform compaction: Ensure all layers have consistent pass counts and density.
- Documented tests: Gather all records of moisture, density, and pass count tests.
- Formwork and bracing: Check forms are secure, level, and properly braced.
- Rebar placement: Confirm rebar is correctly placed and secured with proper spacers.
- Grade and elevation: Verify grades and elevations meet project specifications.
- Drainage and slope: Ensure proper drainage paths are established, and slopes are correct.
Quick rule: Double-check all items on this list before giving the go-ahead for concrete placement.
Conclusion
You now have a practical path to verify compaction before you pour, so the floor stays flat, durable, and safe. If you test early, you avoid costly rework and crack-prone concrete. Stay deliberate, follow the checks, and document results so nothing is left to guesswork.
Make the next move by treating it as a natural sequence: check prep and moisture first, confirm pass counts and layering, run the simple field density tests, and read the results against your plan. Confirm the area is clean, the moisture is within range, the base is layered correctly, and each pass is finished before moving on. If any test is outside the acceptable range, stop, correct the base, re-test, and only proceed when you have a solid pass.
Common mistakes to avoid are skipping the moisture check, rushing the layering, and ignoring repeat tests or readings that don’t match the plan. Safety matters: wear boots, eye protection, and hearing protection where needed; keep a clear work zone and verify your equipment is in good working order. If you’re unsure about readings, or the numbers don’t line up with your plan after two tries, back off and reassess before pouring. For most DIY projects, a small-scale trial area helps you dial in the method without risking the full job.
If the scope feels beyond you—unexpected subgrade issues, significant moisture movement, or inconsistent readings—call a qualified pro. You’ll save time, avoid damage, and still keep control of the process. Stay methodical, document every step, and you’ll pour with confidence and accuracy.
FAQ
What is the Proctor Compaction Test and why does it matter for DIY concrete projects?
The Proctor test finds the moisture level where soil packs the most densely. It helps you estimate the right moisture and compaction effort before pouring concrete. Use it as a guide, not a guaranteed value, and compare with what your mix and site need.
What’s the difference between Standard Proctor and Modified Proctor tests?
The Standard Proctor uses lower compaction energy and works best for general soils. The Modified Proctor uses higher energy for tougher soils. For DIY projects under typical conditions, follow the tester’s instructions on which method to use.
What equipment do I need to run a Proctor test in the field?
You’ll need a soil mold and rammer or mechanical compactor, a precise scale or balance, a way to oven-dry soil samples, and a clean bucket or tray. Have a method to control and record moisture, dry mass, and the number of layers you compact per test run.
Can a DIYer perform a Proctor test at home, and what should I check on my instructions?
yes with the right safety and instructions. Check the manufacturer or supplier instructions for the mold size, hammer energy, and moisture handling. If you’re unsure, confirm the steps and limits with a local supplier or a qualified professional before proceeding.