

Introduction
Soft, carbonated surface paste is the chalky, weakened layer on concrete that needs removal or stabilization before finishing. Start with a small test spot to gauge how deep you’ll need to grind, and avoid taking off more than necessary. Always check the tool’s pad wear and the manufacturer or local rules for safe grind depth and dust control.
Use a densifier only after you’ve cleaned and profiled the surface, and follow label directions to see if it’s suitable for your concrete. Always test a small area with the densifier and the coating you plan to use to verify compatibility and curing behavior. Common issues include dusting, uneven texture, and coatings that don’t bond; if in doubt, check product instructions and local rules.
Key takeaways
- Test carbonation depth before grinding to set safe grind depth limits.
- Choose a densifier compatible with your concrete type and condition.
- Grind progressively, monitor dust, and stop if paste exposure worsens.
- Ensure coatings suit densified or paste-affected surfaces per manufacturer guidance.
- Wear PPE, maintain ventilation, and control dust during all grinding steps.
- Document conditions, follow a structured workflow, and verify compatibility before coating.
Table of Contents
- Introduction
- Key takeaways
- Understanding Soft, Carbonated Surface Paste
- Assessing the Surface: Diagnosis and Decision Criteria
- Grind Depth Strategies and Practical Techniques
- Densifiers — Types, Selection, and Application Methods
- Coating Selection and Compatibility with Densified or Paste-Affected Surfaces
- Preparation Workflow and Tools & Materials Checklist
- Troubleshooting, Case Studies, and Avoiding Common Mistakes
- Safety, Cost Considerations, and Long-Term Maintenance
- Conclusion
- FAQ
Understanding Soft, Carbonated Surface Paste
The soft, carbonated surface paste is a fragile cap that forms on some concretes after finishing and exposure to moisture and CO2. This paste can crumble under grinding and may trap voids that affect adhesion later. Carbonation depth and finishing practices create a weak, powdery layer that matters for grinding, densifying, and coating performance.
Causes include cement carbonation, trowel or sealer use, curing conditions, and environmental exposure. The presence of this paste influences how aggressively you grind, how dust is generated, and how heat develops during removal. Identifying the paste early helps plan a safer, more effective workflow for densifiers and coatings.
Causes and formation mechanisms
The soft, carbonated surface paste is a result of several factors. First off, carbonation, that’s when CO2 in the air reacts with the cement in your concrete. This forms a weak, powdery layer on top.
Overworking the surface during finishing can also cause this. If you trowel too much or for too long, you push fine cement paste to the surface, creating a weak cap.
Bleed water can contribute too. When water rises to the surface during curing, it leaves behind a layer of fine cement particles that’s easy to damage.
Moisture and CO2 in the air speed up this process. So does exposure to weathering, especially if your concrete wasn’t cured properly.
How paste changes performance expectations
The soft paste affects how your concrete behaves under grinding and coating. Abrasion resistance is poor, so it’ll crumble under grinding or heavy foot traffic.
Stains and coatings won’t penetrate well either. The powdery surface just wipes them off instead of absorbing them.
Adhesion risk is high too. Sealers and floor coatings won’t stick properly to the weak, porous layer. They’ll peel or flake off over time.
Assessing the Surface: Diagnosis and Decision Criteria
Begin by distinguishing surface paste from solid substrate using visual cues, texture, and simple scratch tests. Practical methods include gentle scraping and basic depth estimation to gauge how thick the paste is. These observations guide whether repair or full removal is warranted.
During inspection look for color changes, halos, dusting, or edges that crumble. Quick tests help differentiate paste from cured concrete and inform the decision to grind, densify, or strip. Document findings to support a clear repair plan or contractor handoff.
Visual and tactile checkpoints
Before you start grinding, use these checks to confirm soft paste. It’s quick and helps avoid surprises.
- Powdering: Gently rub the surface with a gloved hand. Soft paste feels like fine powder.
- Uneven sheen: Look for dull or shiny spots. Paste can’t polish evenly.
- Light color or dust: Freshly exposed paste is lighter and may have a dusty appearance.
- Scrape test: Use a putty knife to scrape the surface. Soft paste scrapes off easily.
- Scratch test: Try scratching with a coin or key. Paste scratches easily, unlike solid concrete.
- Water absorption: Splash water on the surface. Paste absorbs quickly and may darken.
- Carbonation halos: Look for white rings around cracks or joints. This indicates carbonation.
- Crumbling edges: Check corners and edges. Soft paste can crumble when touched.
Quick rule: If you skip these checks, you might grind too deep or not enough.
On-site and lab tests to quantify condition
Before you grind, test the depth and severity of paste. This helps plan your work and avoid surprises.
Start with small grind probes. Use a diamond blade on an angle grinder to cut into the surface at various spots. Look for the change in color and texture from paste to solid concrete.
Use phenolphthalein or similar carbonation indicators. Spray it on the surface. It turns pink where there’s carbonation, showing you where to grind.
Adhesion test patches: Apply a small patch of your chosen coating. Let it cure, then try to scratch or peel it off. If it lifts easily, the paste is too soft for good adhesion.
Grind Depth Strategies and Practical Techniques
Adopt a diagnostic-driven framework that segments removal needs into shallow, moderate, or deep, with a conservative bias. Plan staged passes and verify bonding with tests before proceeding to the next step. This keeps you from over-grinding while ensuring the surface is ready for densifiers or coatings.
Use a controlled grinding approach with calibrated depth checks and dust control. Choose disc grits that suit the task and follow a testing sequence to confirm removal of soft paste and exposure of sound substrate. Maintain a steady pace and document progress for consistency.
Determining target grind depth
Start by making probe grinds at various points on the surface. Use a sharp chisel or a small angle grinder with a diamond blade to chip away at the paste. This helps locate the boundary between the soft paste and the sound concrete matrix.
Next, perform light test passes using a floor grinder with progressively coarser discs. The goal is to remove the soft paste without exposing the aggregate or cement matrix below. Stop when you see dusting reduce significantly and the surface feels more solid underfoot.
Mark these points and measure the depth removed. This will give you your minimum safe removal depth. Always err on the side of caution and plan for a slightly deeper grind to ensure all soft paste is removed.
Grinding methods and equipment selection
Choose your grinding approach based on the depth and extent of the damage. Aggressive grinding removes more material quickly but increases the risk of over-grinding. Progressive grinding is slower but safer.
- Aggressive Grinding: Use a heavy-duty floor grinder with coarse discs (e.g., 30 or 40 grit). This method is fast but requires careful monitoring to prevent over-grinding.
- Progressive Grinding: Start with medium grit discs (e.g., 60 or 80 grit) and progress to finer ones. This method is slower but safer, allowing you to remove material in controlled layers.
- Tool Selection: Rent a heavy-duty floor grinder for deep grinding. For shallow grinding, a smaller, lighter grinder may suffice.
- Pad/Diamond Choice: Start with medium or coarse diamond pads or blades for aggressive grinding. Progress to finer ones as you near the desired depth.
- Test Patches: Always make test patches before full production. This helps confirm the chosen method and equipment work as expected.
Visual checkpoints during grinding
Use this checklist once you’ve started grinding to ensure you’re removing all soft paste without over-grinding or exposing the aggregate prematurely.
- Texture Change: Look for a change in texture. The surface should feel smoother and more consistent as you remove the soft paste.
- Exposure of Aggregate/Cement Matrix: Watch for exposed aggregate or cement matrix. This indicates you’ve reached sound concrete.
- Reduced Dusting: Notice a significant reduction in dusting. This is a good sign that you’re nearing the end of the soft paste layer.
- Color Change: Observe any change in color. The surface should become more uniform as you remove the affected areas.
- Consistency: Check for consistency across the entire surface. If some areas are grinding faster or slower, adjust your technique or equipment accordingly.
Quick rule: If in doubt, stop and test the surface with a simple bond test using a small piece of tape. If the paste comes off easily, you’ve not gone deep enough. If it sticks firmly, you’re likely at the right depth.
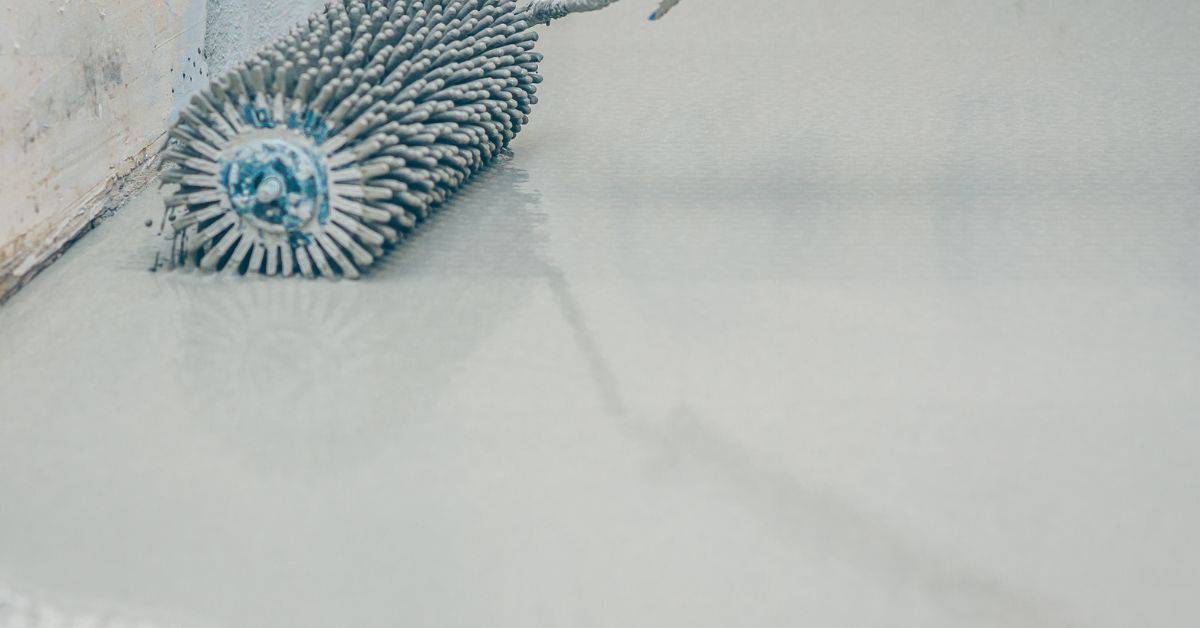
Densifiers — Types, Selection, and Application Methods
Densifiers work by altering surface chemistry and microstructure to reduce porosity and increase hardness, which can help a carbonated or weak surface paste. They interact with the surface differently depending on the chemistry chosen, so understanding the substrate helps prevent post-treatment issues. The goal is improved durability and smoother bonding for subsequent coatings.
Consider sodium silicate, potassium/lithium silicate, and calcium silicate systems, noting how each may perform on carbonated or soft surfaces. Selection should account for carbonation level, moisture, and compatibility with coatings. Apply according to manufacturer guidelines and verify penetration depth with simple tests before moving forward.
Types of densifiers and selection criteria
Densifiers alter concrete surface chemistry by filling micro pores, improving hardness, and reducing water absorption. Here’s what you need to know about common types:
Silicate-based: These are the most common. They work by reacting with calcium hydroxide in the concrete to form calcium silicate hydrate, similar to the process that occurs during concrete curing.
Silane/Siloxane blends: These offer hydrophobicity, repelling water and reducing water absorption. They’re great for surfaces exposed to de-icing salts or frequent wetting.
Colloidal products: These contain finely dispersed particles that fill micro pores. They can be used on soft or carbonated surfaces but may not provide the same level of penetration as silicate-based densifiers.
Application timing and best practices
Timing is crucial for effective densifier application:
1. Test patch: Always perform a small test area first to ensure compatibility with your surface and desired outcome.
2. Moisture considerations: Apply densifiers when the surface is dry but not bone-dry. Too much moisture can dilute the densifier, while too little can cause poor penetration.
3. Re-application: If the first application doesn’t achieve the desired results, reapply after 24 hours and follow up with a test patch to ensure improvement.
Verifying effectiveness
After applying the densifier, it’s crucial to verify its effectiveness:
Hardness tests: Use a concrete test hammer or similar tool to tap the surface. A successful densification will result in a higher-pitched sound and less ‘give’.
Water absorption test: Sprinkle water on the treated area. If it beads up and doesn’t absorb, the densifier has worked.
Visual inspection after curing: After the recommended curing time (usually 24-72 hours), check for any signs of discoloration or cloudiness, which could indicate an issue with the densifier or surface preparation.
Coating Selection and Compatibility with Densified or Paste-Affected Surfaces
After grinding and densifying, assess the substrate for remaining paste, surface profile, and microvoids that influence adhesion. These observations guide whether a coating system will bond reliably or require additional steps. The goal is a cohesive multi-layer system without weak interfaces.
Compare epoxy, polyaspartic, urethane, and acrylic options in terms of adhesion, chemical resistance, and UV stability on densified or paste-affected concrete. Use adhesion tests and proper surface prep to validate suitability before full coating applications.
How coating chemistries bond to treated concrete
Coatings stick to concrete through two main mechanisms: penetration and mechanical keying.
Penetration is when the coating’s liquid state allows it to seep into the concrete’s pores. Densified surfaces have fewer pores, so penetration might be reduced. This can affect adhesion, especially with coatings like acrylics that rely heavily on penetration.
On the other hand, mechanical keying is when the coating grips onto the surface’s texture. Epoxies and urethanes are good at this. Densified surfaces have a smoother profile, so mechanical keying might be less effective here too. But, if grinding has created a suitable profile, these coatings can still perform well.
Compatibility testing and primer strategies
Before applying any coating, test for adhesion. Pull-off adhesion tests and crosshatch/ISO 2409 tests are reliable methods.
Set up mock-ups to evaluate different coatings under your specific conditions. This helps you see how they perform with residual moisture or densifier derivatives.
Primer or bonding agents can help, especially on marginal surfaces. But remember, a primer alone might not be enough if the surface isn’t properly profiled. Always consider full mechanical profile before relying solely on primers.
Preparation Workflow and Tools & Materials Checklist
Start with a thorough surface assessment, including carbonation depth and moisture risk, plus any current coatings. Use simple field tests to establish a baseline for compatibility and bonding potential. This sets the stage for a controlled remediation plan.
Define grind depth, choose compatible densifiers, and outline a patch remediation workflow. Include cleaning, neutralizing if needed, drying, and moisture checks before priming or sealing. Finish with a test patch to verify finish and adhesion before full-scale work.
Step-by-Step Prep Workflow
Before you start grinding and applying densifiers, follow this step-by-step workflow to ensure a successful outcome.
- Inspect & Test Surface: Assess carbonation depth, paste integrity, moisture risk, and current coatings. Perform simple field tests like scratch/adhesion, moisture presence, and porosity checks.
- Define Grind Depth: Specify acceptable grinding depth to remove compromised paste without exposing substrate, creating a profile that promotes bonding for densifiers, patches, and topcoats.
- Plan Densifier & Chemical Compatibility: Confirm densifier type (sodium silicate or lithium-based) and ensure compatibility with anticipated coatings and patch systems. Note dwell times, ventilation needs, and waste handling steps.
- Patch Remediation Plan: Outline when to patch, choose appropriate materials (cementitious vs epoxy), consider aggregate size, and describe feathering technique. Define curing windows and success criteria for patch adhesion and color uniformity.
- Clean & Neutralize Surface: Specify cleaning methods like dust extraction, vacuum, or wash-down. If required, neutralize the surface before applying primer or sealer.
- Moisture Mitigation: Perform moisture tests and follow drying protocols to ensure a dry surface for primer or sealer application.
- Perform Test Patch: Apply a small test patch to verify grind depth, densifier performance, and coating bond. Document results, color match, and adhesion before full-scale remediation.
Quick rule: Skipping any step can lead to poor bonding, delamination, or accelerated deterioration of the surface.
Tools, Consumables, and Testing Kit Checklist
Gather these essential tools, consumables, and testing kits to ensure a well-equipped jobsite for paste remediation and coating application.
- Grinders & Pads: Select appropriate grinders (angle or floor) with suitable pads (metal, diamond, or resin) based on the required cut depth and surface profile.
- Dust Mitigation Equipment: Include dust extractors, vacuum cleaners, and proper ventilation to maintain a safe working environment.
- Densifiers: Choose sodium silicate or lithium-based densifiers suitable for your substrate and coating system. Follow manufacturer guidelines for application rates and dwell times.
- Adhesion Test Kit: Purchase an adhesion test kit to perform pull-off tests, ensuring proper bonding of coatings and patch materials.
- Cleaning Agents: Select appropriate cleaners (acids, alkalis, or neutral) based on the surface contamination and manufacturer recommendations for your chosen coating system.
- PPE & Safety Equipment: Ensure you have proper personal protective equipment (PPE), including safety glasses, gloves, ear protection, and respiratory masks.
Quick rule: Always validate tools, consumables, and testing kits with manufacturer data to ensure they meet your project’s specific requirements.
Troubleshooting, Case Studies, and Avoiding Common Mistakes
Identify failure signatures such as shallow grinding, dusting, or unexpected bonding issues after densifier treatment. Use quick diagnostic checks to determine whether the cause lies in paste softness, carbonation pockets, or substrate contamination. This guides corrective actions.
Real-world scenarios illustrate how insufficient grind depth or improper sealer choices lead to problems, and how moisture or dew point can affect curing. Build a compact avoidable-mistakes list and a quick-reference guide to map symptoms to fixes and outcomes.
Troubleshooting common issues
After grinding and densifying, you might face some problems. Here’s how to tackle them:
Delamination: If your coating is peeling off, it could be due to improper surface preparation or incompatible products. Check if the grind depth was sufficient and test compatibility again.
Ongoing dusting: If dust keeps coming off even after grinding, you might have over-etched the surface or not used a densifier. Regrind lightly and apply a densifier.
Discoloration: If your concrete has changed color, it could be due to improper cleaning or staining. Identify the cause and clean or stain again accordingly.
Inconsistent coating appearance: This could be due to variations in surface profile or application. Ensure even grinding and apply coatings consistently.
Short case studies and lessons learned
Here are a couple of real-life examples:
Garage floor with thin paste: We found that insufficient grind depth left the paste too thick for densifier penetration. We had to regrind deeper, apply densifier again, and extend cure time.
Decorative patio with carbonation: Carbonation pockets were causing issues. We used a more aggressive grinding method, applied a deep-penetrating densifier, and tested coating compatibility before applying.
In both cases, we learned that thorough diagnostics, proper grind depth, correct densifier use, and testing are crucial for successful outcomes.
Common mistakes to avoid
Here are some frequent errors you should steer clear of:
- Skipping test patches: Always do test patches to ensure compatibility and effectiveness.
- Overgrinding or undergrinding: Both can lead to issues. Ensure you’re following the recommended grind depth for your situation.
- Ignoring manufacturer cure/timing: Follow the recommended cure times to let products set properly.
- Failing to control dust or moisture: Excess dust can affect grinding and densifying. Moisture can cause issues with coatings. Keep both in check.
By avoiding these mistakes, you’ll save time, money, and effort in the long run.
Safety, Cost Considerations, and Long-Term Maintenance
Outline essential safety and regulatory precautions for grinding and chemical handling, including PPE and ventilation. Reference SDS and local codes, and plan for proper dust management and waste disposal. Prepare a safe, compliant worksite from start to finish.
Estimate project costs and labor needs, then plan maintenance for long-term performance. Explain how grind depth and densifier choices influence future resealing, cleaning, and wear resistance. Include practical checks and field steps to support ongoing upkeep and assessment.
Safety and Environmental Precautions
Dust control is crucial when grinding concrete. Use a respirator rated for silica dust, eye/face shield, and hearing protection.
Ventilation is key. Set up fans to blow dust away from work area. Keep windows open if possible.
Chemical PPE includes gloves, apron, and safety shoes. Always consult SDS before handling chemicals. Follow local codes and waste disposal protocols.
Contain wash water and use filter dust collection. Vacuum or broom cleanups should be wet to minimize dust.
Cost Drivers and Budgeting Tips
Major costs include grinder rental/purchase, densifiers, coatings, consumables, and labor. Plan for downtime and potential rework.
Budget tip: Phase your work. Test a small area first to ensure desired results before committing to full-scale grinding and coating.
Set clear acceptance criteria. This helps avoid costly overruns due to unclear expectations or misunderstandings about the project’s goals.
Consider hiring professional help if DIY proves too complex or time-consuming, factoring in their costs into your budget.
Post-Coating Maintenance and Monitoring
Maintenance schedule: Inspect annually. Clean with mild detergent and water. Reapply sealers or coatings every 5-7 years, depending on traffic and weather.
Check for wear, staining, or chemical resistance. Address minor issues promptly to prevent major repairs.
Monitor porosity by performing moisture and pH tests periodically. This helps ensure your coating’s longevity and performance.
Document outcomes. Keep records of maintenance work done, reapplication dates, and any issues encountered. This guides future maintenance and helps track the surface’s condition over time.
Conclusion
Dealing with soft, carbonated paste at the surface is about making the material move in the right direction without wrecking the substrate. Do careful diagnosis, match grind depth to the paste condition, and choose compatible densifiers and coatings so the finish lasts and looks right.
First, assess the surface, plan your grind depth, test a small area, and document the results before you commit. Start with conservative grind steps, verify the paste density and bonding, apply a compatible densifier in small batches, and confirm coating compatibility on test patches before full-scale work. Keep tools clean, use PPE, and work in well-ventilated areas. If you see unexpected reactions, back off and re-evaluate rather than pushing ahead.
Common mistakes to avoid include grinding too deep and sealing or coating a damp or incompatible surface, skipping small-area tests, and rushing the densifier or coating steps. Safety rules are simple: never grind or densify on a visibly unstable surface, always test first, and follow manufacturer guidance for any material you use. If the surface shows persistent softness, bubbling, or cracking after a test patch, or if you’re unsure about coating compatibility, call a professional before you damage the surface or waste material. Stay focused, work methodically, and you’ll finish strong with a durable, safe result.
FAQ
What grind depth is appropriate for carbonated surface paste and how do I verify it?
) Start with a light pass to remove the loose paste, then do a deeper pass if the surface still shows soft spots. Check by test grinding small areas and inspecting for a consistent hardness and dust; if you can’t flatten the surface easily, you’re not deep enough. Verify any recommendations on the grinder’s tool, the pad, and the surface by reading the tool and abrasive manufacturer instructions.
Which densifier should I consider and how do I decide if it’s right for my surface?
) Densifiers can help harden softened concrete, but they must suit the mix and the surface condition. Check the product label or datasheet for compatibility with carbonated or paste-affected surfaces and follow manufacturer guidelines for application and cure. If in doubt, ask the supplier or a concrete pro for your exact conditions and local rules.
Are coatings compatible with surfaces treated by densifiers or with paste-affected concrete?
) Compatibility depends on the coating type and the densifier or paste condition. Read the coating’s label for approved surface prep, cure times, and compatibility notes. If you can’t confirm, test a small area and consult the coating manufacturer instructions before full application.
What practical equipment and materials should I have on hand for this work?
) You’ll want a grinder with the right diamond cup or grinding discs, edger for corners, dust collection, densifier (if chosen), pH-neutral cleaner, etch or prep product if recommended, and coatings that match the prep results. Always verify tool specs, product labels, and local guidelines before mixing or applying anything.