
Introduction
Fire-damaged structural concrete is not a DIY repair project. Do not enter an unstable area, load the structure, chip or drill concrete, remove spalled material, or install temporary supports unless qualified professionals have approved the site and procedure. Structural assessment, shoring, utility isolation, hazardous-material controls, and repair design require appropriately qualified professionals.
This guide explains the safe owner or facility-manager role: secure the area, document visible conditions from a safe location, understand what tests may be used, and obtain an engineering decision before repair or replacement. Concrete repair is a linked process of condition assessment, cause and residual-capacity evaluation, repair selection, installation, and quality assurance—not a surface patching decision alone. ACI’s concrete repair guidance describes that assessment-first process.
Ground-supported patio slabs, decorative flatwork, and finishes may be nonstructural, but do not assume that from appearance alone. Columns, beams, load-bearing walls, suspended slabs, elevated decks, foundations, retaining walls, prestressed or post-tensioned members, and concrete supporting masonry or steel are structural. A slab can also become structural through settlement, reinforcement, or its connection to the building.
Key takeaways
- Keep people out of suspect areas; do not load, clean, chip, drill, core, or shore fire-damaged concrete without professional direction.
- Smoke, ash, hot spots, unstable debris, exposed energized utilities, gas odor, and suspected asbestos, lead, or chemical residues are stop conditions.
- Visible cracking, discoloration, hollow areas, and spalling identify places to investigate; they do not establish residual strength or safety.
- Rebound hammer and ultrasonic pulse velocity are comparative screening tools, not standalone capacity tests.
- An engineer selects sampling and testing, determines repair versus replacement, and specifies any repair system, curing, testing, and acceptance criteria.
Table of Contents
- Introduction
- Key takeaways
- How Fire Affects Concrete: Mechanisms and Visible Indicators
- Safety, Access and Initial Triage After a Fire
- Two-Stage Condition Assessment: Preliminary Then Detailed
- Nondestructive Testing (NDT) Methods and Interpretation
- Destructive Testing and Laboratory Analyses
- Repair Decision-Making and Intervention Strategies
- Materials, Specifications, and Tools for Post-Fire Repairs
- Long-Term Performance, Monitoring and Common Mistakes to Avoid
- Conclusion
- FAQ
How Fire Affects Concrete: Mechanisms and Visible Indicators
Fire heats concrete unevenly. Moisture movement, pore pressure, thermal expansion, microcracking, dehydration of cement paste, aggregate behavior, member geometry, restraint, and the fire’s heating rate can combine to cause material loss and reduced durability or strength. The amount and depth of damage are mix- and exposure-dependent; surface appearance cannot reveal the residual capacity of a member.
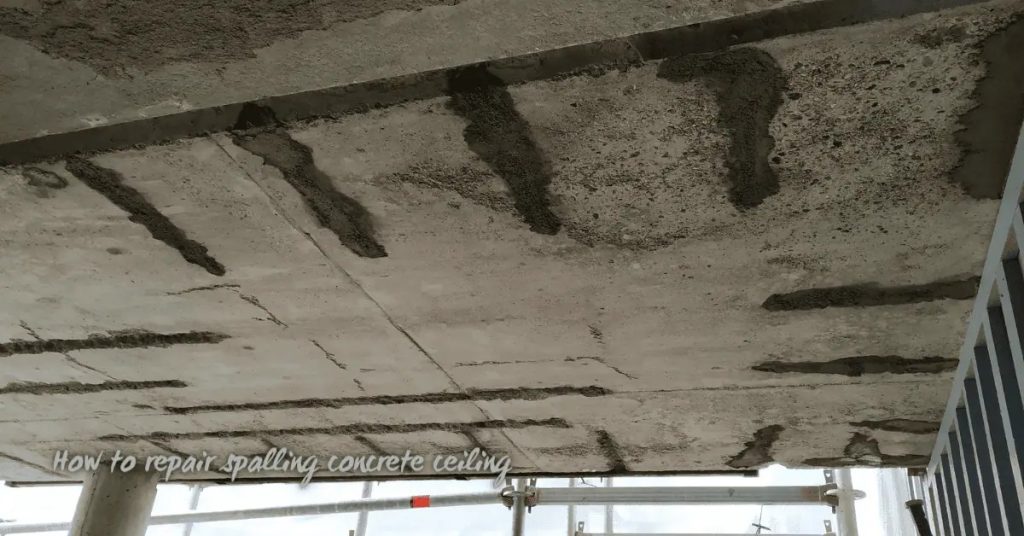
Spalling is loss or separation of concrete from the surface. It can expose aggregate or reinforcement and can leave a delaminated layer behind. Low permeability and high moisture can contribute to pressure-related spalling, but permeability alone is not a reliable predictor: moisture condition, heat flux, concrete strength, aggregate, restraint, and other factors interact. Likewise, no general conclusion about fire performance should be drawn from cement type or supplementary cementitious materials without mix-specific evidence.
Thermal and moisture-driven mechanisms
Rapid heating vaporizes water in the pore system and creates thermal gradients through the member. These effects can produce cracking and surface loss; heat can also alter the paste and the bond between paste and aggregate. Damage may extend beyond the visibly discolored or spalled face.
Role of aggregates, cement type, and permeability
Aggregate mineralogy and thermal expansion, concrete moisture, strength level, pore structure, curing history, geometry, and restraint all influence fire response. An investigation may use fire records, drawings, visual mapping, and laboratory work to determine the affected depth rather than applying a visual or mix-based rule. NIST’s research on fire-affected concrete illustrates why residual properties must be evaluated in the context of the actual mix and exposure.
Visual signs: color, spalling, cracking and surface deposits
Record discoloration, pop-outs, scaling, cracks, powdery surfaces, exposed reinforcement, rust staining, deformation, and locations that appear hollow or loose. These are useful mapping observations, not temperature readings or strength values. Crack geometry alone does not diagnose explosive spalling, and crack width alone does not establish whether a member is safe.
Safety, Access and Initial Triage After a Fire
Follow directions from fire, building, and utility officials first. Restrict access and do not disturb ash, dust, damaged finishes, unknown containers, or loose concrete. Suspected gas leaks, exposed electrical equipment, active hot spots, smoke, falling debris, leaning or sagging construction, crushing, or continuing spalling require immediate restriction of access and qualified assistance.
Do not improvise shoring or demolition. Temporary works can change load paths and trigger failure if they are not designed and installed for the condition found. Utilities must be isolated through the appropriate provider or qualified professional.
Quick triage checklist for inspectors
Use this only after access is authorized and from a location that does not require touching, loading, or entering a suspect area.
- Restrict access: Keep people and stored loads away from affected members.
- Check stop conditions: Smoke, hot spots, gas odor, electrical damage, unstable debris, or hazardous residues mean stop and obtain specialist help.
- Document remotely: Photograph and sketch each affected member, including spalls, cracks, exposed reinforcement, soot and water damage.
- Identify the member: Note its location, apparent support role, dimensions, and nearby bearing points; gather drawings and pre-fire records where available.
- Record fire information: Preserve fire reports, witness accounts, and known duration or locations of intense heating without trying to estimate temperature from color.
- Escalate structural concerns: Columns, beams, load-bearing walls, suspended slabs, foundations, and any uncertain member require an engineer before further work.
When to stop and demolish vs continue evaluation
Do not decide demolition from a crack width, a percentage of spalled area, or exposed steel alone. These observations may warrant urgent action, but repairability depends on the member’s role, loads, reinforcement or prestressing, affected depth, residual capacity, and the building’s design requirements.
Stop work and obtain an urgent structural evaluation when there is sagging, leaning, bulging, crushing, loss of bearing, extensive falling concrete, exposed or deformed reinforcement, suspected tendon damage, or continued movement. The engineer determines whether the area needs shoring, further investigation, controlled demolition, repair, replacement, or occupancy restrictions.
Two-Stage Condition Assessment: Preliminary Then Detailed
A safe assessment proceeds in stages. The preliminary survey documents what is visible and identifies immediate hazards. A detailed, engineer-directed investigation answers the specific decisions that remain: affected depth, reinforcement condition, residual capacity, durability, and whether repair is feasible.
Preliminary Inspection Items and Documentation
- Photographic log: Photograph affected areas and member connections from safe locations, with a scale where possible.
- Damage map: Mark spalls, cracking, discoloration, moisture, exposed reinforcement, and loose material on a sketch or drawing.
- Records review: Collect drawings, reinforcement information, prior repairs, fire records, and pre-fire photographs if available.
- Structural role: Identify members that carry or support loads; treat uncertain classification as structural until assessed.
- Access and hazards: Record unsafe routes, falling-debris risks, damaged utilities, and possible contamination.
Planning a Detailed Inspection
The engineer or qualified investigation team should define the question each test must answer, select representative locations, locate reinforcement and tendons before invasive work, and establish worker protection, permits, temporary works, and reporting requirements.
- Use visual mapping and appropriate scanning or sounding to target suspect zones.
- Select NDT to compare areas or locate discontinuities, then use cores or laboratory analysis only where the investigation plan calls for them.
- Assess reinforcement, anchors, cover, bond, corrosion risk, and prestressing where applicable.
- Use the results with structural analysis to determine loading restrictions and repair versus replacement.
Reporting and Decision Criteria
A preliminary report should identify hazards, access limits, affected members, available records, and recommended next steps. The detailed report should map findings, state testing limitations, interpret results in relation to the design and loads, and specify the approved repair, replacement, or stabilization path. Conflicting observations or test results are a reason to refine the investigation—not to average them into reassurance.
Nondestructive Testing (NDT) Methods and Interpretation
NDT can help map relative differences, locate delamination or voids, and guide sampling. It does not independently establish residual compressive strength, reinforcement capacity, or whether a heat-damaged structural member may be repaired or loaded. Fire-altered surfaces, cracking, moisture, aggregate, geometry, and test path can materially affect readings.
Rebound hammer — uses and limits
A rebound hammer is a near-surface hardness screening tool. It may compare similar areas when surface condition and test setup are controlled, but it cannot detect deep damage and should not be converted into a capacity decision without an appropriate investigation and correlation. The FHWA discussion of rebound testing likewise treats rebound number as a relative indicator affected by the tested surface.
Ultrasonic pulse velocity, GPR and thermography
UPV may indicate relative changes associated with cracking, voids, or discontinuities, but readings are affected by moisture, aggregate, path length, and member geometry. GPR can help locate reinforcement and embedded features before sampling; thermography can identify temperature-related surface patterns under suitable conditions. Each method needs a qualified operator and an interpretation plan. None is a standalone strength or capacity test.
Moisture mapping and chloride/alkalinity screening
Moisture information may matter when selecting a repair system. Chloride testing may be appropriate when a credible contamination source exists, but do not infer chloride contamination from fire alone. A surface alkalinity or pH kit cannot determine fire temperature, carbonation depth, residual strength, or structural capacity. Chemical and petrographic analyses should be selected and interpreted by qualified personnel.

Destructive Testing and Laboratory Analyses
Cores and other invasive tests are professional work. Drilling can cut reinforcement, tendons, embedded utilities, or critical cover and can further weaken a damaged member. The engineer specifies locations, quantity, diameter, orientation, depth intervals, handling, conditioning, laboratory procedures, and how results will be used in structural analysis.
Core sampling best practices and compressive testing
Core locations should represent the fire exposure and the decision to be made while avoiding reinforcement and tendons. A single core is not a member-capacity verdict, and there is no universal number or diameter for fire assessment. A qualified laboratory prepares and tests samples under the applicable procedure; the engineer interprets the results with the core’s location, condition, moisture, geometry, original design information, and other evidence.
Petrographic and microscopic examination
Petrography and specialized microscopy can help identify microcracking, paste alteration, aggregate response, and affected depth. Depending on the question, the laboratory may use complementary methods rather than relying on one observation. These analyses support an enginee