

Key Takeaways
- A wide-bristled broom is essential for creating a swept finish on concrete, with a smaller broom recommended for detailed work on edges and corners.
- Proper timing for the broom finish is crucial; it should be done after bleed water evaporates but before the concrete hardens completely.
- Initial site preparation, including leveling and drainage checks, should be completed a day before pouring concrete to ensure a successful project.
Introduction
A swept finish on fresh concrete is a practical technique that enhances slip resistance while adding a subtle texture to the surface. This method is particularly favored for outdoor spaces such as driveways, walkways, and patios, where safety and durability are paramount.
By employing a wide-bristled broom, you can achieve a uniform texture that not only provides a stylish appearance but also improves traction, making it an ideal choice for both residential and commercial projects.
Essential Tools You’ll Need
To create a swept finish on fresh concrete, having the right tools is crucial for achieving a professional and effective result. Whether you’re a seasoned DIY enthusiast or tackling this project for the first time, equipping yourself with the right toolkit will make the process smoother and more efficient.
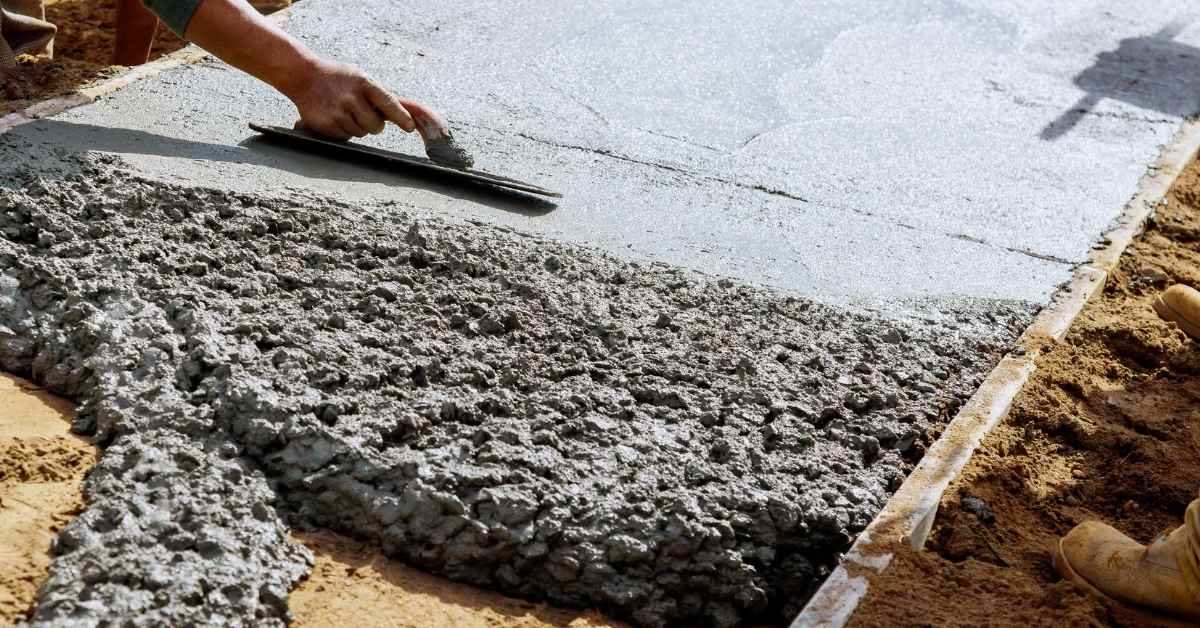
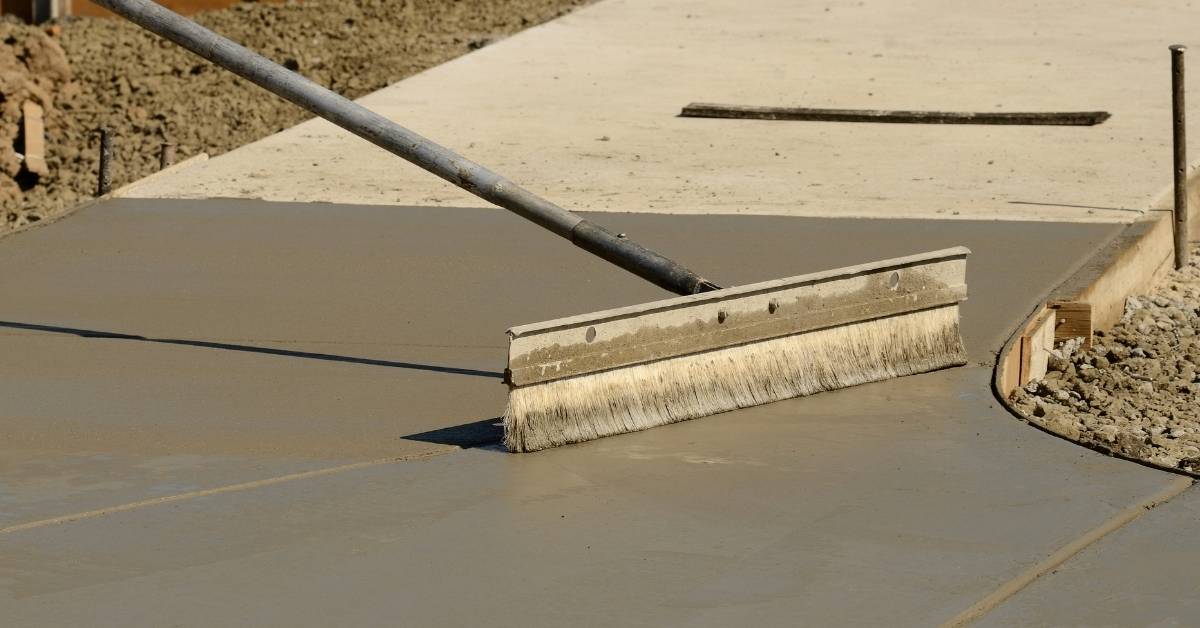
- Broom: The star of the show is undoubtedly the broom. Opt for a wide-bristled, sturdy broom that can withstand the weight and texture of wet concrete. For detailed work, consider a smaller broom for edges and corners.
- Concrete Float: A float is essential for smoothing the concrete surface before using the broom. Magnesium floats are highly recommended for their lightweight and durable properties.
- Edging Tool: This tool helps define the edges of your concrete slab, giving it a finished look and preventing chipping.
- Groover: If your project includes expansion joints, a groover will help create clean and precise lines.
- Water Source: Keeping the concrete hydrated as it cures is fundamental. Ensure you have access to a hose or spray bottle.
- Protective Gear: Safety should never be overlooked. Wear gloves, safety glasses, and appropriate footwear to protect against splashes and debris.
- Measuring Tools: A tape measure and level will help ensure your project is accurately laid out and even.
By preparing these tools in advance, you’ll set yourself up for success, allowing you to focus on the task at hand and achieve the desired swept finish that combines functionality with aesthetic appeal.
Key Points
- Broom: Opt for a wide-bristled, sturdy broom for sweeping wet concrete; use a smaller broom for edges and corners.
- Concrete Float: Essential for smoothing the concrete surface; magnesium floats are recommended for their lightweight and durable properties.
- Edging Tool: Helps define the edges of the concrete slab, preventing chipping and providing a finished look.
Quick Facts
- Approx. Time: The preparation and use of these tools can vary depending on the size of the concrete project, but typically, setting up and using these tools can take several hours to a full day.
- Potential Pitfalls: [‘Using an inappropriate broom can result in uneven textures or damage to the concrete surface.’, ‘Neglecting protective gear can lead to injuries from concrete splashes or debris.’]
- Best Practice: [‘Select a high-quality, wide-bristled broom for even sweeping and a smaller broom for detailed work on edges and corners.’, ‘Ensure all tools, especially the concrete float and edging tool, are prepared and accessible before starting to maintain a smooth workflow.’]
- Working with precast concrete elements where finishing is not required.
- Projects involving stamped or patterned concrete where a broom finish is not desired.
- Situations where the concrete is already set and cannot be worked on.
- Environments where water use is restricted, making it difficult to keep the concrete hydrated.
- Projects in extremely cold or hot weather conditions that affect concrete curing.
Step-by-Step Plan and Schedule
Crafting a swept finish on fresh concrete involves a series of carefully timed steps. Planning your schedule around these stages ensures the concrete sets correctly while allowing ample time for finishing touches.
- Initial Preparation: Begin by preparing the site where the concrete will be poured. This includes setting forms, ensuring the ground is level, and checking for proper drainage. Allocate a day for this preparation.
- Pouring the Concrete: On the day of the pour, aim for early morning to take advantage of cooler temperatures. Have your tools ready and your team briefed on their roles. Pour the concrete evenly, using your float to smooth the surface.
- Timing the Broom Finish: Timing is critical. Wait until the bleed water has evaporated from the surface, but before the concrete sets too hard. This usually occurs a few hours after pouring. Test by lightly pressing your finger on the surface; it should leave a slight impression.
- Creating the Swept Finish: Once the timing is right, use the broom to lightly drag across the surface, applying even pressure to create uniform texture. Work in sections to ensure consistency across the entire slab.
- Detail Work: Use edging tools to refine the edges and a groover to create expansion joints. This should be done shortly after the broom finish while the concrete is still workable.
- Curing: After finishing, cover the concrete with a curing compound or plastic sheeting to retain moisture. This process should last at least a week to ensure the concrete reaches its full strength.
By adhering to this schedule, you’ll achieve a high-quality swept finish that not only enhances the slip resistance of your concrete surface but also adds a touch of style and durability.
Key Points
- Initial preparation includes site setup, leveling, and drainage check, taking about a day.
- Pour concrete in the early morning, ensuring tools and team are ready, and smooth the surface with a float.
- Timing the broom finish is crucial; wait for bleed water to evaporate but before concrete hardens, then create texture with a broom.
Quick Facts
- Approx. Time: The entire process from initial preparation to curing can take over a week. Initial preparation takes about a day, pouring and finishing the concrete should be done in a day, and curing lasts at least a week.
- Potential Pitfalls: 1. Misjudging the timing for the broom finish can lead to an uneven texture or a finish that doesn’t adhere properly. 2. Failing to prepare the site adequately might result in poor drainage or an uneven surface.
- Best Practice: 1. Schedule the concrete pour for early morning to avoid high temperatures and ensure a more manageable setting time. 2. Use a consistent approach when applying the broom finish to maintain uniform texture across the entire surface.
- Cold weather conditions where concrete may freeze before setting.
- Extremely hot and dry climates where concrete may set too quickly.
- Rainy conditions that could wash away the surface before it sets.
- High wind conditions that could cause rapid evaporation and uneven setting.
- Pouring concrete on unstable or improperly compacted ground.
- Situations where local building codes require different curing methods or times.
In-Depth Guide to Achieving a Swept Finish
The swept finish technique is a classic approach to enhancing the slip resistance of concrete surfaces. This in-depth guide will walk you through the nuances of this method, ensuring your project not only meets safety standards but also boasts a professional appearance.
Surface Preparation: Before applying the broom finish, ensure your concrete surface is adequately prepared. Use a float to smooth out any imperfections, starting from the center and working your way outwards. This ensures an even base for the broom pattern.
Timing the Broom Strokes: The key to a successful swept finish lies in timing. The surface should be firm enough to hold the bristles’ imprint but not so hard that it becomes unworkable. When a light touch with your finger leaves a slight impression, it’s time to start.
Brooming Technique: Hold the broom handle at a slight angle, allowing the bristles to just touch the surface. Apply consistent pressure as you pull the broom across the concrete, maintaining a straight line. Overlap each stroke slightly to avoid gaps and ensure a uniform texture.
Pattern Consistency: The aesthetic appeal of the swept finish comes from its consistency. Whether you choose straight lines or a fanned pattern, maintain the same pressure and speed throughout the process. Consider using a guide or marking tool to keep lines parallel and evenly spaced.
Finishing Touches: Pay special attention to edges and corners, where the broom might not reach as easily. Use a smaller hand broom or edging tool to complete these areas, ensuring the texture matches the main surface.
By following these detailed steps, you can achieve a swept finish that enhances both the safety and visual appeal of your concrete surface, providing a lasting and functional addition to any space.
Edge cases
- Wet or rainy conditions: Applying a broom finish in wet conditions can lead to an uneven texture and compromised slip resistance.
- Extremely hot or windy conditions: These can cause the concrete to set too quickly, making it difficult to achieve the desired texture.
- Inadequate curing time: If the concrete hasn’t cured properly, the broom finish may not adhere well, leading to a weak surface.
- Incorrect concrete mix: Using a mix not suitable for broom finishing can result in poor texture and durability.
- Structural concrete surfaces: For structural elements, a broom finish may not be appropriate or necessary.
- Decorative concrete applications: Where a smooth or polished finish is desired, a broom finish would be inappropriate.
Common Mistakes and How to Avoid Them
Achieving a flawless swept finish on fresh concrete can be challenging, especially for beginners. Here, we’ll explore some common pitfalls and how to avoid them, ensuring a successful and aesthetically pleasing outcome.
Starting Too Early or Late: Timing is everything in concrete finishing. Starting the broom strokes too early can cause the bristles to sink excessively, while starting too late might not imprint at all. Test the surface readiness frequently and start brooming as soon as your touch leaves a light impression.
Inconsistent Pressure: Uneven pressure can lead to an irregular texture that detracts from the overall appearance. Maintain consistent pressure throughout each stroke, and practice on a small section if needed to get a feel for the right amount.
Ignoring Weather Conditions: Environmental factors like wind, sun, and humidity can accelerate or delay the setting process. Monitor weather conditions closely and adjust your timing and technique accordingly. On hot, windy days, consider using a curing agent to slow the drying process.
Overlapping Strokes Poorly: Incorrectly overlapping broom strokes can create visible lines and disrupt the uniformity. Overlap each stroke slightly, and ensure your broom path is straight and even. Use a guide if necessary to keep lines parallel.
Neglecting Edges and Details: Focusing solely on the main surface and neglecting edges can leave your project looking unfinished. Use appropriate tools to finish these areas with care, ensuring they match the texture and appearance of the rest of the slab.
By being aware of these common mistakes and taking proactive measures to avoid them, you can ensure a professional-quality swept finish on your concrete project, enhancing both its functionality and aesthetic appeal.
Edge cases
- Working with specialized concrete mixes that require different finishing techniques.
- Situations where a non slip surface is not desired or required.
- Projects involving decorative concrete finishes that do not use a broom finish.
- Environments with extreme weather conditions that make outdoor concrete work unsafe.
- Projects with specific architectural or engineering specifications that dictate alternative finishing methods.
The Science Behind the Swept Finish Method
The swept finish method is not just an art but a science that involves understanding the properties of concrete and how they interact with environmental factors. Here, we delve into the scientific principles that make this technique effective for slip resistance and durability.
Concrete Composition: Concrete is a composite material made of cement, water, and aggregates like sand and gravel. The chemical reaction between cement and water, known as hydration, forms a hardened matrix that binds the components together. This reaction is sensitive to temperature and moisture, which influences the setting time and final strength.
Surface Texture and Friction: The primary purpose of a swept finish is to increase surface friction, reducing the risk of slips. The broom’s texture creates small grooves and ridges that enhance grip, especially when the surface is wet. These grooves disrupt water film on the surface, allowing for better traction.
Hydration and Curing: Proper curing is crucial for the longevity and performance of concrete. Curing maintains adequate moisture content and temperature, allowing the hydration process to continue. This is vital for achieving the desired hardness and durability. A swept finish can aid curing by reducing the rate of moisture evaporation.
Thermal and Moisture Considerations: Environmental conditions play a significant role in the setting and curing process. High temperatures can accelerate hydration, leading to premature setting, while cold temperatures can slow it down. Similarly, humidity levels affect moisture retention, impacting the texture and strength of the finished surface.
Understanding these scientific principles helps in planning and executing a swept finish that not only enhances safety but also contributes to the structural integrity and longevity of the concrete surface.
Edge cases
- Extremely cold environments where concrete may not set properly.
- High temperature conditions causing rapid evaporation and improper curing.
- Situations where a smooth finish is required for aesthetic or functional reasons.
- Environments with chemical exposure that may degrade concrete.
- Areas where heavy machinery or equipment may damage the textured surface.
Additional Advice and Variations
Once you’ve mastered the basics of creating a swept finish on concrete, you might want to explore additional tips and variations to customize your project further. Here are some ideas and advice to enhance your technique and adapt it to different needs.
Experiment with Broom Textures: Different brooms can create varying textures. Coarse bristles produce a more pronounced texture, while finer bristles create a subtler finish. Experiment on a test slab to find the texture that best suits your project’s aesthetic and functional requirements.
Direction and Patterns: While straight lines are the most common, consider using diagonal or circular patterns for a unique appearance. These variations can add visual interest and make the surface stand out while maintaining slip resistance.
Color Additives: Incorporating color into the concrete mix or applying a stain can enhance the visual appeal. This allows you to match the concrete to existing structures or landscape features, creating a cohesive look.
Sealing for Protection: Applying a sealant after the concrete has cured can protect it from stains and weathering. Choose a sealant that is compatible with broom-finished surfaces to maintain texture while enhancing durability and appearance.
Maintenance Tips: Regular cleaning with a mild detergent and water will help maintain the surface’s appearance and slip resistance. Avoid using harsh chemicals that could degrade the concrete or the broom finish.
By considering these variations and additional techniques, you can customize your swept finish to meet specific functional and aesthetic needs, ensuring a unique and effective result for any concrete project.
Edge cases
- Indoor Applications: Broom finishes are typically used for outdoor surfaces due to their slip
- resistant properties. Indoors, a smoother finish is often preferred for ease of cleaning and aesthetics.
- High Traffic Commercial Areas: In areas with heavy foot or vehicle traffic, a broom finish might wear down quickly, requiring more frequent maintenance or resurfacing.
- Extreme Weather Conditions: In regions with severe freeze thaw cycles, a broom finish might not be sufficient to prevent surface damage without additional protective measures.
Creative Techniques for a Non-Slip Concrete Surface
While the swept finish is a tried-and-true method for enhancing slip resistance on concrete, there are other creative techniques you can explore to achieve a similar effect, each offering unique benefits and aesthetics.
Exposed Aggregate Finish: This method involves removing the top layer of cement paste to reveal the underlying aggregates. It provides a natural, textured surface that is both visually appealing and slip-resistant, ideal for driveways and patios.
Stamped Concrete: Using patterned mats, you can imprint designs onto fresh concrete. While typically used for decorative purposes, choosing patterns with textured surfaces can also improve slip resistance.
Salt Finish: Sprinkling coarse rock salt on fresh concrete and washing it away after the concrete sets creates small pits and voids. This technique offers a rugged texture that enhances traction, especially around pool decks.
Brushed and Scored Patterns: Similar to broom finishes, these techniques involve using tools to create lines and patterns on the surface. Scoring can be done with a groover or saw, adding both texture and visual interest.
Coatings and Additives: Non-slip coatings or additives like silica sand can be applied to finished concrete to enhance friction without altering the surface appearance significantly. These are suitable for interior spaces or areas requiring additional safety measures.
By exploring these creative techniques, you can achieve a non-slip concrete surface that meets your specific needs for safety, durability, and design, ensuring a functional and stylish addition to any environment.
Edge cases
- Indoor Spaces with Specific Aesthetic Requirements: Techniques like exposed aggregate or salt finish may not be suitable for indoor spaces where a smooth, polished look is desired.
- High Precision Industrial Areas: Environments requiring extremely flat and smooth surfaces for machinery may find these techniques inappropriate.
- Areas with Frequent Heavy Machinery Use: Some finishes might not withstand the wear and tear from heavy machinery, leading to quicker degradation.
- Historical or Heritage Sites: Altering the surface with these techniques might not be permissible due to preservation regulations.
- Surfaces Requiring Chemical Resistance: Some finishes may not provide the necessary resistance to chemicals used in certain industrial settings.

Conclusion
In conclusion, achieving a professional swept finish on fresh concrete requires a careful selection of tools and adherence to a well-planned process. The crucial tools include a wide-bristled broom for even textures, a concrete float for initial smoothing, and edging tools to define the slab’s boundaries, ensuring a polished final appearance. By preparing these tools in advance and understanding their specific roles, you can ensure a smoother workflow and a more satisfactory result.
Potential challenges in this process include selecting inappropriate tools that could lead to uneven textures or damage and neglecting safety gear, which can result in injuries from concrete splashes or debris. Timing is also critical; misjudging when to apply the broom finish can affect the texture and adherence of the finish. Adequate preparation of the site is equally important to prevent issues like poor drainage or an uneven surface.
By following a step-by-step plan, you can tackle these challenges effectively. Start with site preparation and ensure that all tools and team members are ready for the concrete pour, ideally scheduled for early morning to avoid high temperatures. Proper timing for the broom finish is key; wait for the bleed water to evaporate before applying the broom, ensuring a consistent texture.
This meticulous approach will help achieve a high-quality finish that enhances both the functionality and visual appeal of the concrete surface.
Additionally, be mindful of environmental factors such as weather conditions and local building codes, which can impact the project. Cold or hot weather, as well as windy or rainy conditions, can affect the concrete’s setting and curing times, requiring adjustments in your approach. Always adhere to safety codes and licensing requirements, ensuring your project complies with local regulations and standards.
With these considerations in mind, take the next step in your concrete project by gathering the necessary tools and planning your schedule. This preparation will set the foundation for a successful outcome, combining safety, durability, and aesthetics in your finished concrete surface. Embrace the challenge and transform your space with a professional, slip-resistant swept finish.
Quick Facts
- Time Needed: Approximately one to two days, including preparation, pouring, and finishing.
- Common Pitfalls: Incorrect timing for the broom finish can lead to poor texture; using the wrong broom type may result in an uneven surface.
- Best Practice: Use a high-quality, wide-bristled broom for even sweeping and ensure all tools are prepared and accessible before starting.
FAQ
Question 1 What are the essential tools needed to create a swept finish on fresh concrete?
To achieve a swept finish on fresh concrete, you’ll need a variety of tools including a wide-bristled broom for sweeping, a concrete float for smoothing the surface, and an edging tool to define the slab’s edges. Additionally, a groover is useful for creating expansion joints, and a water source is necessary to keep the concrete hydrated while curing.
Question 2 Why is timing important when applying a broom finish to concrete?
Timing is crucial because the broom finish must be applied after the bleed water has evaporated but before the concrete sets too hard. This typically occurs a few hours after pouring. Proper timing ensures that the broom creates a uniform texture without damaging the surface.
Question 3 What are some potential pitfalls when creating a swept finish on concrete?
Common pitfalls include using an inappropriate broom that can lead to uneven textures or damage, and neglecting protective gear, which can result in injuries from concrete splashes. Another issue is misjudging the timing for the broom finish, which can result in an uneven or improperly adhered texture.
Question 4 How long does the entire process of creating a swept finish on concrete take?
The entire process, from initial preparation to curing, can take over a week. Initial site preparation typically takes about a day, while pouring and finishing the concrete should be completed in a single day. The curing process then lasts at least a week to ensure the concrete reaches its full strength.