
Introduction
Concrete set too slow means the concrete is taking longer to gain strength and stiffen than expected. This can happen from cold weather, too much water, high cement paste, or placement delays, and it leaves you with a soft, workable pour longer. For a DIY job, you need to check the mix label, the site conditions, and follow the manufacturer’s guidance for cure and additives.
Starting pours slowly is common as we age, so plan for longer, steadier sessions. Use a simple hard/easy/easy workflow to pace the work and aim for gradual progress over months. If you notice slow set, check the mix instructions, the product label, and local rules, and adjust expectations to match conditions and safety.
Key takeaways
- Plan for slower set times on hot or moist days and adjust schedules.
- Check weather forecast and shade/cover to regulate curing and release risks.
- Document symptoms of slow set early; act with proper safety gear.
- Consider accelerating admixtures only after manufacturer guidance and local code checks.
- Adjust mix design or placement practices cautiously; avoid drastic changes mid-pour.
- Budget enough contingency and schedule buffers to prevent costly delays.
Table of Contents
- Introduction
- Key takeaways
- Why Concrete Sometimes Sets Too Slowly
- How Weather and Site Conditions Influence Set Time
- Early Signs a Pour Is Setting Too Slowly and Immediate on-Site Troubleshooting
- Accelerating Admixtures and Additives: Options and Selection
- Adjustments to Mix Design and Placement Practices to Speed Set Time
- Safety Protocols and Quality Control When Modifying Mixes on-Site
- Cost Implications and Scheduling Strategies to Avoid Delays
- Common DIY Mistakes and a Pre-Pour Checklist to Prevent Slow Setting
- Conclusion
- FAQ
Why Concrete Sometimes Sets Too Slowly
Slow setting after a pour is usually a mix of chemistry, physics, and materials at the job site. You’ll want to identify hydration behavior, cement composition, and any retarders that could extend the open time. Look for interactions between water content, admixtures, and aggregate that push the set back beyond the expected window.
On site, ambient temperature, moisture, wind, and shading all steer how fast concrete develops strength. Heat transfer to and from the substrate, as well as formwork constraints, can delay curing if the mass cannot shed heat or stay evenly moist. Mixing practices, slump, aggregate size, and improper initial curing all influence early strength and finish readiness, sometimes in combination.
Chemical causes (cement type, additives, retarders)
The chemical makeup of your concrete mix plays a significant role in how quickly it sets. Here’s what to look out for:
Cement Type: Different cement types have varying setting times. For instance, Type I cement sets faster than Type II. Check your product data sheets to ensure you’re using the right type for your project.
Retarders and Admixtures: These additives are used to control set time. Retarders slow down the process, while accelerators speed it up. Make sure you understand their effects before adding them to your mix. Always follow the manufacturer’s recommendations on dosage rates.
Physical causes (temperature, water content, mixing)
Temperature and water content are critical factors that can slow down your concrete’s set time:
Temperature: Concrete sets faster in warm conditions. In cold weather, the setting process slows down significantly. If you’re pouring concrete in cold temperatures, consider using accelerators or heating the materials.
Water Content: Too much water can extend set time and weaken your concrete. Make sure you’re using the correct water-cement ratio for your mix design. Over-mixing can also introduce excess water into the mix, so keep an eye on your mixing times.
Material quality and contamination issues
The quality of your materials directly impacts the performance of your concrete. Here are some common issues to watch out for:
- Old or damp cement: Old cement can have reduced strength, and damp cement can cause delays in setting time. Always check the bag’s age and ensure it’s dry before use.
- Contaminated aggregates: Dirt, clay, or other contaminants in your aggregate can slow down set time and weaken your concrete. Ensure your aggregates are clean and meet the required specifications.
- Improper admixture dosing: Incorrect dosage rates of admixtures can lead to setting delays or premature stiffening. Always follow the manufacturer’s recommendations for accurate dosing.
- Incompatible materials: Some materials don’t play well together. For example, using a high-range water reducer with a cement that doesn’t support it can cause setting delays. Make sure your materials are compatible before mixing.
How Weather and Site Conditions Influence Set Time
Environmental drivers matter a lot, and you should plan around them before you start. Ambient and concrete temperatures, humidity, wind speed, and direct sun exposure each push set time in different directions. The key is to translate forecasts into a realistic pour window with margins that accommodate unexpected shifts.
Site conditions influence curing by controlling moisture loss, shade vs sun exposure, and ventilation in confined spaces. Reflective surfaces, soil moisture, and wind exposure can speed or slow setting, so picture how the whole microclimate behaves during placement. Prepare sheltering, windbreaks, and appropriate moisture management to keep set progression uniform.
Cold weather impacts and mitigations
Low temperatures slow down the hydration process, making concrete set too slow. This is because chemical reactions happen slower at lower temps.
Mitigations: Warm your materials – use heated water, aggregate, or even enclosures. Follow manufacturer guidance for cold weather concreting.
Consider using accelerators like calcium chloride (but beware of corrosion risks).
Hot weather impacts and mitigations
High temps speed up evaporation, reducing working time. Concrete sets too fast, making it hard to finish.
Mitigations: Use cool water, shade the pour, or apply curing compounds to slow down hydration. Adjust your mix design for hot weather concreting.
Consider using retarding admixtures but be mindful of set time extensions.
Wind, sun, and humidity effects
Wind and high humidity increase surface evaporation, causing concrete to set too fast. Direct sunlight also speeds up drying.
Countermeasures: Provide shade using tarps or other materials. Set up windbreaks with barriers like hay bales or boards.
Maintain a consistent moisture level in the concrete by applying curing compounds or misting, especially in dry conditions.
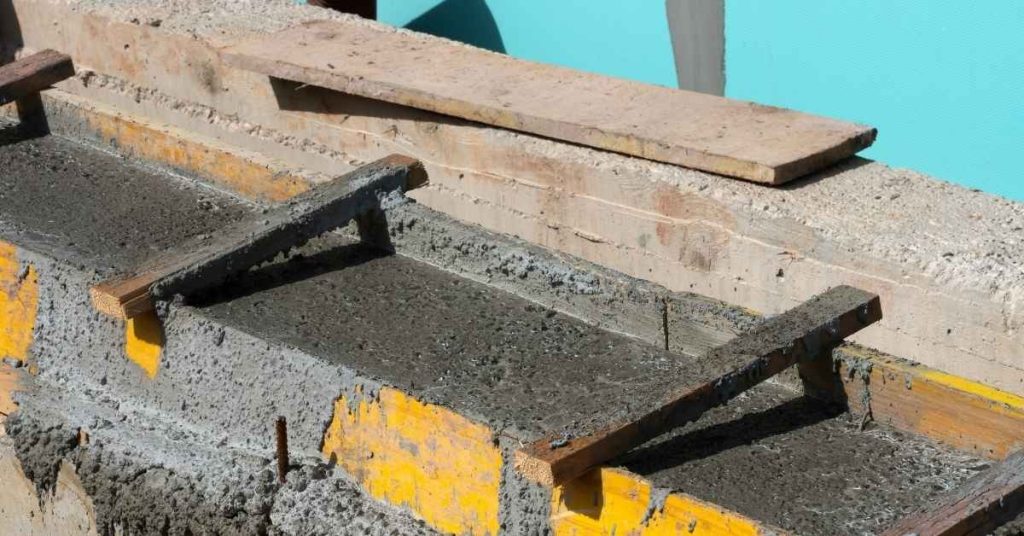
Early Signs a Pour Is Setting Too Slowly and Immediate on-Site Troubleshooting
Look for stalled stiffening, unusually long open time, and a surface sheen that won’t set as expected. A chalky or inconsistent finish, and a temperature swing that doesn’t match ambient conditions, are additional red flags. These symptoms usually point to mix or curing issues that need quick attention.
Run a rapid on-site diagnostic: check the batch ticket, measure concrete temperature, perform a quick slump or air check, verify admixture compatibility, and confirm any water additions. If the mix is suspect, pause the pour, protect from drafts, and reconsider accelerants only if approved by the spec. Document observations to guide the restart and QA follow-up.
Visual and tactile checkpoints to monitor setting
Use this checklist during a pour to keep an eye on your concrete’s progress. Catching issues early helps prevent costly delays.
- Surface sheen: Check for a consistent, matte finish. A glossy or shiny surface might indicate set delay due to excess water or retarding admixtures.
- Bleeding: Look for water rising to the surface. Too much bleeding could mean excessive water content, leading to slow setting and weak concrete.
- Tackiness: Feel the surface with your gloved hands. Tacky concrete is still accepting water, so it’s not setting properly yet.
- Stiffening: Try pushing a trowel or screed into the concrete. If it doesn’t cut easily, the concrete might be setting too fast, not too slow.
- Temperature drop/spike: Feel for any unusual temperature changes. Extreme heat or cold can speed up or slow down setting time.
- Unexpected white/chalky finish: This could indicate set delay due to excess air entrainment or other admixture issues.
- Consistency in mix: Check for variations in color, texture, or consistency. Inconsistencies might point to material quality problems or contamination.
- Setting time: Keep track of how long it takes from when the concrete was placed until it starts to set. This can help you identify trends and potential issues.
Quick rule: If something doesn’t look, feel, or act right, trust your instincts. It’s better to pause and investigate than to push on and risk a failed pour.
Rapid, safe interventions during the pour
If you notice signs of slow setting, act quickly to get your pour back on track. Here are some safe, practical steps:
First, slow or pause the pour. This gives you time to assess and address the issue without wasting more concrete.
Next, protect from drafts/cold. Use windbreaks, tarps, or insulating blankets to shield the pour from cold air. Heat loss can slow setting significantly.
Then, recheck constant agitation in mixer. Insufficient mixing can lead to set delays due to improperly combined materials. Ensure your mixer is working correctly and that the concrete has been mixed long enough.
Avoid adding water, unless absolutely necessary and only after consulting with a professional. Adding water can dilute the cement, leading to slower setting and weaker concrete.
If permitted by spec, consider using approved accelerators. These can help speed up setting time, but be cautious: they must be compatible with your mix design and used according to supplier directions.
When to stop the pour and call for expert help
Sometimes, despite your best efforts, a pour might not be setting as expected. In these cases, it’s crucial to know when to pause work and seek professional assistance.
Loss of control: If you can’t regain control over the pour—despite trying the interventions above—and the situation is worsening, stop the pour immediately. Continuing could lead to a failed pour or structural issues.
Structural risk: If the slow setting poses a risk to the structure’s integrity—for example, if it’s delaying reinforcement placement or causing other safety concerns—stop the pour and contact an engineer or supplier right away.
Ambiguity about materials: If you’re unsure about the cause of the set delay, or if there are questions about material quality or contamination, err on the side of caution. Stop the pour and consult with a professional before proceeding.
Document everything. Keep a running log of times, temperatures, observations, interventions, and any other relevant data. This will help you and your team learn from the experience and improve future pours. It also provides valuable information for quality assurance and client transparency.
Accelerating Admixtures and Additives: Options and Selection
Accelerators modify set time but are not a universal fix, so frame their use around the need for faster formwork removal or specific environmental conditions. They should be chosen with an understanding of the primary goal, whether it is early strength, reduced open time, or improved finish. Check that the accelerator aligns with the overall mix design and project requirements before implementation.
Discuss the main classes of accelerators and their trade-offs: chloride-based options carry corrosion risk with reinforcement, while chloride-free calcium- and formate-based products reduce that risk but may impact workability and heat rise. Cementitious blends and other set-control admixtures offer alternatives, but compatibility with air-entraining agents, fly ash, slag, and superplasticizers must be confirmed through the manufacturer instructions and the project’s mix design.
Types of accelerators and how they work
Accelerators speed up concrete setting. They’re not the same as retarders, which slow it down.
Chloride-based accelerators like calcium chloride are fast but can cause rebar corrosion. Use them in non-reinforced structures or where quick formwork removal is crucial.
Non-chloride alternatives include calcium-based and formate-based accelerators. They’re safer for reinforced concrete, providing early strength gain without the corrosion risk. Use them in hot weather or when high-early-strength is needed.
Specialty products like cementitious blends, e.g., calcium aluminate cements (CACs), offer rapid setting and high early strength but can be more expensive.
Choosing the right product for your mix and structure
First, check your cement type. Some accelerators work better with certain cements.
Consult supplier technical data to ensure compatibility with your admixtures. Some accelerators can react poorly with air-entraining agents, fly ash, or slag.
Before using, conduct small trials. Mix a batch, cast test specimens, and monitor setting time. Adjust dosage if needed.
Consider your structure’s needs. Reinforced structures need corrosion-resistant accelerators. Indoor pours might not require weather-resistance.
Safety and structural considerations for additives
Always review the safety data sheet (SDS) before handling accelerators. Follow storage, ventilation, and PPE guidelines.
Check temperature limits. Adding accelerators in cold weather can cause rapid heat generation, leading to cracking or reduced strength.
Confirm compliance with project specifications and local codes. Some accelerators may not be allowed in certain substrates or structures with coatings.
Be aware of potential adverse effects like increased heat rise, early-age cracking, or finish quality issues. Document compatibility tests before full-scale use to mitigate risks.
Adjustments to Mix Design and Placement Practices to Speed Set Time
Tighten set time targets without sacrificing strength by revisiting the water-to-cement ratio, cement type, and supplementary cementitious materials. Small changes here can influence early strength and long-term durability, but you must stay within approved limits and verify with the specs. Use trial batches to confirm that the adjustments achieve the desired pace before scaling up.
Calibrate accelerators and set-controlling admixtures with care, noting potential impacts on workability and heat generation. Temperature management and consistent placement practices matter, so preheat or insulate where needed, adjust slump with dosing, and maintain proper vibration to avoid surface defects while speeding early set. Plan pour sequence and curing strategies that support faster progress without compromising bond or finish.
Mix-level adjustments (water reduction, cement selection)
To speed up set time, you can tweak your concrete mix at the batching stage. But remember, changing the mix without proper knowledge can mess things up. Always consult your mix designer or supplier before making any changes.
Water reduction: Less water means faster setting. But be careful, too little water and you’ll have a weak, dry mix that won’t set right. Aim for a water-cement ratio between 0.45 to 0.6 by weight. Check your mix design or ask your supplier.
Cement selection: Different cements set at different rates. Type III (high early strength) cement sets faster than Type I (general use). But it’s pricier and might not be necessary for all jobs. Check local availability and costs before deciding.
Placement techniques that maintain momentum
Once you’ve got your mix right – remember, we’re talking about water reduction and cement selection here – it’s time to focus on placement. You want to keep the ball rolling, so to speak, to avoid delays that’ll slow down your set time.
Start at the bottom. Begin placing concrete at the lowest point of your pour. This way, you’re not waiting for lower levels to set before moving up. Check base compaction before you start – it’s crucial for a solid foundation and quick setting.
Next, work in sections. Don’t try to pour the whole slab at once. Divide your pour into manageable sections. This keeps the concrete from drying out too quickly on the surface while the middle is still unset. It’s like Goldilocks – not too fast, not too slow, just right.
Finally, consolidate and finish promptly. Use a vibrator to remove air pockets as you go. Then, once the bleed water has disappeared, start finishing. Don’t wait around, or your concrete will set before you can smooth it out. Remember, time is of the essence here.
Equipment and site setup to avoid hold-ups
Before you start, make sure your equipment is ready to roll. A smooth pour depends on it.
Pump: Check the pump’s condition. It should be well-maintained and capable of handling your concrete volume. Follow the manufacturer’s guidelines for operation and safety.
Chute: Ensure the chute is clean, unobstructed, and properly positioned to reach all areas without spillage or delays. Adjust as needed during the pour.
Tools: Have your tools ready: shovels, rakes, floats, and trowels. Check them for damage before starting. Warm-up any power tools as per their instructions.
Staging is key to keep a steady flow. Stage materials in advance:
- Concrete: Ensure it’s batched and mixed correctly, following the adjustments mentioned earlier.
- Aggregates: Have them nearby but not blocking access or causing trip hazards.
- Water: If using a water truck, ensure it’s filled and functioning properly.
Safety Protocols and Quality Control When Modifying Mixes on-Site
Establish a formal on-site safety and change-control protocol that designates who can approve admixture or process changes and sets a stop-work trigger for safety or compatibility concerns. Use written temporary change orders and keep the crew informed to maintain accountability on the floor. A calm, documented process prevents miscommunications during critical moments.
Handle chemicals safely with proper PPE, access to safety data sheets, labeled containers, and good ventilation for volatile substances. Before pouring, verify batch consistency, perform quick fresh concrete tests, and confirm aggregate moisture and cement content match design targets. Maintain a clear log of adjustments and keep trial samples for traceability and QA follow-up.
Personal protection and chemical handling
Safety first, always. When working with admixtures on-site, you need to protect yourself and your crew.
Read the Safety Data Sheets (SDS) for each product before use. They tell you what PPE to wear – usually gloves, goggles, maybe even a respirator.
Store chemicals properly: keep them in their original containers, label them clearly, and keep them away from heat sources and incompatible substances. If there’s a spill, have a response plan ready with kits nearby.
For volatile substances, ensure proper ventilation to prevent fumes building up.
On-site testing and ongoing monitoring
Quality control is key when modifying mixes. Before pouring, do some quick tests:
1. Slump test: Check the mix’s consistency matches your design.
2. Measure air content and fresh concrete temperature. These affect set time too.
3. Check for potential bleed or segregation, and ensure aggregate moisture and cement content match your design targets.
Record all results. They’ll help you make informed decisions during the pour and later, when reviewing performance.
Documentation, approvals, and regulatory compliance
Every mix change needs a paper trail. Here’s why:
1. Document all adjustments: Note dosage, sequence of additions, mixing duration – everything.
2. Get approval from engineers or owners if required. They’re responsible for the structure’s safety and performance.
3. Confirm you’re complying with specifications and codes. This protects your crew, your project, and your reputation.
Keep records organized and easily accessible. You might need them for future reference or to defend against claims.
Cost Implications and Scheduling Strategies to Avoid Delays
Weigh the upfront costs of accelerators or contingency measures against potential downtime losses from idle labor, equipment rental, and sequencing delays. The balance hinges on reliability of supply, crew coordination, and project deadlines, so map out contingencies early. Consider how often a given pour may require adjustment versus a standard operating plan that minimizes interruptions.
Build a contingency budget with defined slack for weather, supply delays, and pour-size variability, plus costs for storage, waste handling, and rework. Schedule with batch-by-batch planning, secure weather windows, and align material lead times with the critical path. Establish clear decision points for accelerating or delaying pours, and ensure all changes are communicated and documented to protect safety and QA compliance.
Cost vs. delay: evaluating accelerators and extra labor
Accelerators can speed up your pour, but they come at a cost. First, figure out how much downtime you’re facing. Every hour of idle time for your crew and equipment adds up.
Compare:
- Cost of accelerators (additives, extra cement)
- Labor costs for extended work hours
- Equipment rental fees if pours stretch beyond contract times
Remember, accelerators might affect long-term strength. Weigh that against the cost of rework or repairs down the line.
Pre-pour coordination with suppliers and contingency planning
Before you pour, get your ducks in a row. Confirm mix design with your supplier. Make sure they can deliver on time.
Ask:
- What if there’s a delay? Do they have a backup plan?
- Can they adjust the mix for accelerators or weather conditions?
Line up your crew and equipment. You don’t want to be waiting around because your pump truck is stuck in traffic.
When to hire specialized help for large pours
For big, critical pours, consider bringing in the pros. They’ve seen it all and can help you avoid pitfalls.
Bring them in:
- For complex mixes or placements (like tilt-up panels)
- When weather conditions are tough
- If you’re facing tight tolerances or critical path pours
They can help with mix design, placement techniques, and on-site troubleshooting. It’s like having a secret weapon for your pour.
Common DIY Mistakes and a Pre-Pour Checklist to Prevent Slow Setting
DIY pours often stumble on subgrade prep, missing forms or rebar, improper mix or water addition, and rushed form stripping, all of which slow or weaken the set. Understand how these missteps affect curing and plan to correct them before you pour. A calm, methodical approach reduces surprises and helps you stay on track.
Use a concise pre-pour checklist covering site readiness, formwork, grade and subbase compaction, planned joints, and reinforcement. Include a step-by-step mixing protocol, ensure correct water-to-mix ratios, and avoid additives that unnecessarily slow set. On pour day, stagger pours if needed, confirm equipment readiness, and outline finishing versus jointing plans to prevent cold joints.
Typical DIY Pitfalls (Overwatering, Late Admixture Addition, Poor Staging)
Before you mix your first batch, review this checklist to avoid common mistakes that slow set time or weaken concrete.
- Water-to-cement ratio: Too much water weakens concrete. Aim for 0.5-0.6 water per cement.
- Admixtures timing: Add admixtures at the beginning of mixing to ensure even distribution. Late addition slows set time.
- Pour staging: Pour sections in sequence, not all at once. Rushing causes cold joints and delays setting.
- Formwork integrity: Check forms for gaps or leaks before pouring. Leaks cause weak spots and delay setting.
- Rebar placement: Ensure rebar is properly placed and secured. Wrong placement slows set time and weakens structure.
- Subgrade preparation: Compact and grade subbase properly. Poor prep causes weak spots and delays setting.
- Temperature control: Pour when temperatures are between 50-90°F (10-32°C). Extreme temps slow set time.
- Wind protection: Shield pour from strong winds. Wind dries concrete too fast, slowing set time.
Quick rule: Address each issue before pouring to keep your project on track.
Tools, Materials, and Visual Checkpoints Checklist
Before you start mixing, ensure all tools, materials, and visual checkpoints are ready to prevent delays.
- Concrete mix: Have the right amount of cement, sand, and aggregate. Wrong mix slows set time or causes weak spots.
- Water source: Ensure a steady water supply. Insufficient water slows set time.
- Mixing equipment: Check mixer, wheelbarrows, and chutes are in working order. Broken tools cause delays.
- Forms inspection: Inspect forms for cracks or leaks. Damaged forms cause weak spots and delays.
- Rebar/wire mesh: Ensure rebar or wire mesh is on site and ready to place. Missing reinforcement slows set time and weakens structure.
- Control joints planning: Plan where control joints will be cut. Skipping causes cracking and delays setting.
- Weather check: Check weather forecast. Rain or extreme temps can cause issues with setting.
- Safety gear: Ensure hard hats, safety glasses, and gloves are available. Safety first!
Quick rule: Double-check everything before you start mixing to avoid hold-ups.
Post-Pour Curing and Salvage Steps for Marginal Pours
After pouring, follow these steps to protect and cure your concrete, especially if it’s setting slowly.
- Moisture retention: Cover pour with plastic sheeting. Keeping concrete moist speeds set time.
- Shade protection: Shield pour from direct sunlight. Sun dries concrete too fast, slowing set time.
- Fogging/curing compounds: Apply fogging or curing compounds to retain moisture and speed setting.
- Windbreaks: Protect pour from strong winds. Wind dries concrete too fast, slowing set time.
- Temperature monitoring: Keep an eye on temperature. Extreme temps slow set time.
- Jointing plan: Cut control joints as planned. Skipping causes cracking and delays setting.
- Remedial treatments: If pour is marginal, consider surface treatments or overlays to improve strength and appearance.
- Consult a pro: If in doubt, consult with a concrete professional. They can provide tailored advice for your situation.
Quick rule: Protect and cure your pour properly to maximize set time and strength.
Conclusion
Keeping the set time on track protects strength, appearance, and safety. When you stay disciplined now, you avoid cracks, pops, and costly repairs later.
Proceed with a simple, on-site checklist in this order: verify current weather and surface conditions, confirm your exact mix design and batch proportions, test a small trial patch or slab edge at the same consistency you’ll use, adjust only within manufacturer guidelines, then pace the pour and finishing so you don’t overload the mix or trap air. Monitor temperature and flow, apply any approved accelerating additives as directed, and complete curing with proper coverage and protection. Always document what you changed and why so you can repeat or rollback if needed.
Common mistakes to avoid are pushing the finish or removal too soon, overrelying on additives without testing, and changing mix components on-site without a small-area trial. Safety rules are non-negotiable: wear gloves and eye protection, keep ventilation if indoors, and never alter the mix or procedures without verifying with the product specs. If a pour is large, weather is extreme, or you’re unsure about the mix or site conditions, don’t push ahead alone—call a professional and get a second pair of experienced eyes on the job.
When it makes sense to call in a pro, do it early if you face persistent slow set, inconsistent moisture, or suspected bonding issues. With careful steps, clear checks, and a focus on safety, you can finish strong and prevent costly delays. Stay steady, follow the plan, and you’ll come out with a solid, durable result.
FAQ
Can aging of materials or a tired crew slow the set, and what should I check?
Yes, older stock or a fatigued crew can affect how quickly a pour moves along. Check the bag or pallet dates, storage conditions, and whether the crew is following the plan without rushing. Follow label instructions and local rules to ensure the mix is still within its intended use window.
How can I plan for slower-setting pours over months and pace the work accordingly?
Set up a long-term plan with realistic milestones. Break big pours into staged tasks with weather and site readiness in mind. Rely on manufacturer instructions and local guidance to time each stage without compromising strength or safety.
What mix ratios or additive adjustments are reasonable to speed up set, and what should I verify on labels?
There are options to influence set time, but don’t guess. Read the product label or datasheet for compatibility with your cement, aggregates, and formwork. If in doubt, compare options with the manufacturer instructions and local rules before making changes.
What on-site steps help prevent slow set when weather or conditions shift during the pour?
Keep an eye on ambient and substrate conditions and be ready to adapt within safe limits. If conditions change, verify with product guidelines and adjust placement timing or temperature strategies only as allowed by instructions and local rules.