
Introduction
Sealer haze is a cloudy film that forms on concrete when the top layer of sealer dries before the rest of the coating sets. It happens for a few common reasons, like moisture in the slab, temperature swings, or applying too thick a coat. The fix is practical and depends on the product you used and the surface you treated.
Fixes range from re-coating once the surface is dry and properly prepared to light mechanical buffing or washing per product instructions. For water-based sealers, hazing is often tied to moisture or film formation, so ensure the surface is clean and fully dry before any fresh coat. Always follow the sealer label and local rules, and test on a small area before wide application.
Key takeaways
- Learn to distinguish haze from efflorescence or sealer failure by appearance and feel.
- Root causes: poor cleaning, improper curing, solvent incompatibility, moisture.
- Before choosing repair, diagnose severity and sealer type; check label instructions.
- Step-by-step fixes from least to most invasive: clean, neutralize, recoat, remove and reseal.
- Solvent choices: solvents safety, limits, and safer alternatives; water-based versus solvent-based.
- Safety and disposal: PPE, ventilation, and dispose solvents per guidelines; avoid mishaps.
Table of Contents
- Introduction
- Key takeaways
- Quick Identification: Is It Haze, Efflorescence, or Sealer Failure?
- Why Concrete Sealers Turn Cloudy — the Root Causes
- Diagnosing Severity and Sealer Type Before Choosing a Repair
- Step-by-Step DIY Fixes, from Least to Most Invasive
- Xylene, Toluene and Solvent Choices — Uses, Limits and Safer Alternatives
- Safety, Disposal and PPE When Working with Solvents and Strippers
- Preventing Sealer Haze: Best Practices for Selection and Application
- When to Call a Professional and Cost/Decision Considerations
- Conclusion
- FAQ
Quick Identification: Is It Haze, Efflorescence, or Sealer Failure?
A cloudy white film that sits on the surface after sealing is not always the same thing. Look for color, texture, and where the issue appears to tell haze from efflorescence or residue. Note if the whiteness shows up soon after sealing, or only in certain areas.
Run a quick wipe or rinse test to see if the film comes off easily. Check under different lighting and perform a light scrape to gauge whether the surface is the haze or the concrete itself. Link the diagnosis to moisture, application, or contamination to guide the fix.
Visual checkpoints to inspect
Before you start troubleshooting, grab a flashlight and take a close look at the affected area. This checklist helps pinpoint if the problem is on the surface or deeper.
- Color: Haze is usually white or gray; efflorescence is powdery white; discoloration can be various shades.
- Texture: Haze feels smooth; efflorescence is gritty; discoloration may have no texture change.
- Location: Haze often covers large areas evenly; efflorescence follows cracks or moisture paths; discoloration can be random or follow patterns.
- Edges: Haze has clear edges; efflorescence may blur into the surrounding area; discoloration might have distinct borders.
- Appearance after sealing: Haze appears soon after sealing; efflorescence can take days to weeks; discoloration might be immediate or delayed.
Quick rule: If the problem looks like a thin, smooth film covering large areas evenly, it’s likely haze. Anything else needs further testing.
Simple in-place tests to narrow the cause
Grab some rubbing alcohol and a damp cloth for these quick, non-destructive tests. They’ll help you figure out if the haze is on the surface, inside the sealer, or due to moisture.
Solvent wipe test: Lightly rub the affected area with a cloth dampened with rubbing alcohol. If the haze comes off easily, it’s likely surface residue or improperly cured sealer.
Water droplet test: Place a drop of water on the affected area. If it beads up and doesn’t soak in, the sealer is likely intact but has a problem (like solvent entrapment). If it soaks in, the sealer may have failed or not been applied properly.
Edge peel test: Try to gently lift an edge of the haze with a razor blade. If it lifts easily, the haze is likely on the surface and can be removed without damaging the concrete. If it doesn’t lift, the problem might be deeper or inside the sealer.
Why Concrete Sealers Turn Cloudy — the Root Causes
Moisture-related factors include humidity and trapped water returning as white haze after sealing. Application errors cover over-application, uneven coats, and poor surface prep. Sealer chemistry includes hazy film formation or incompatibility, while contamination means dust, curing compounds, or cleaners residue linger on the surface.
Moisture issues often show as white haze or cloudiness, while chemistry problems need a different remedy. Use simple at-home checks like tapping the surface and examining under light to separate causes. A clear diagnostic flow helps you decide whether to clean, reseal, or strip and recoat.
Moisture and Water-Based Sealer Reactions
Water-based sealers are sensitive to moisture. If your concrete has residual moisture, high humidity during application, or you use a water-sensitive formula, expect white spots or haze.
Check for: White haze appearing after application, especially in humid conditions or on green (freshly poured) concrete.
To diagnose, tap the affected area. If it sounds hollow, moisture is likely trapped inside. Differentiate from chemistry issues by inspecting under light. Moisture haze will appear white and cloudy, while chemical reactions often have a yellow or brown tint.
Solvent-Based Sealer Problems and Solvent Entrapment
Solvent-based sealers can appear cloudy due to improper solvent evaporation, trapping of solvents, or reactions with underlying materials.
Look for: Cloudiness appearing after application, often in areas where the sealer was thickest or applied unevenly.
To diagnose, touch the affected area. If it feels sticky or tacky, solvent entrapment is likely. Differentiate from moisture issues by inspecting under light. Solvent haze will appear gray or yellowish, while moisture haze is white.
Application and Environmental Mistakes
Mistakes during application and unfavorable conditions can lead to haze and uneven appearance. Avoid these common pitfalls:
- Overly thick coats: Apply sealers in thin, even coats. Thick coats can trap solvents or moisture, leading to haze.
- Roller lap lines: Maintain a wet edge and overlap evenly to avoid visible roller marks.
- Low temperature: Apply sealers within recommended temperature ranges (usually 50-90°F). Low temperatures can slow evaporation, causing haze.
- High humidity: Avoid applying sealers in high humidity conditions. Moisture in the air can cause water-based sealers to haze or prevent proper curing of solvent-based ones.
- Contaminated surfaces: Ensure your concrete surface is clean, dry, and free from contaminants before sealing.
Proper application technique, respect for cure times, and attention to environmental conditions are key to preventing these mistakes.
Diagnosing Severity and Sealer Type Before Choosing a Repair
Start with a quick decision tree: is the haze cosmetic or a sign of sealant failure that needs repair or stripping? Look for adhesion, peeling, or blistering as strong clues. A few cosmetic spots may be fixed without full removal.
Identify the sealer type by reading labels and noting odor or feel, then perform a small solvent test to test compatibility. Common types to recognize are water-based acrylic, solvent-based acrylic, and epoxy or urethane systems. Use in-place tests to gauge adhesion and plan next steps.
Surface-versus-penetrating haze assessment
First, figure out if the haze is on top of your sealer (surface film) or inside it (penetrating sealer). This helps you decide whether to clean, recoat, or strip.
Surface Film: If you can wipe off some haze with a damp cloth, it’s likely a surface film. Try gently scrubbing a small area with a soft brush and water. If the haze comes off easily, it’s removable.
Penetrating Sealer: If wiping doesn’t help or makes it worse, you’re dealing with a penetrating sealer. The haze is inside, so stripping might be necessary. Try a small test spot with a stripper to see if the haze comes out.
Confirming sealer type (water-based vs solvent-based vs penetrative)
Knowing your sealer’s chemistry helps you choose the right repair method. Start by checking product records or labels.
Water-Based: Look for ‘acrylic’ or ‘latex’ on the label. These sealers usually have a mild, water-like smell and feel slick when dry. They’re easy to clean up with just soap and water.
Solvent-Based: Check for ‘solvent’, ‘alkyd’, or ‘urethane’ on the label. These have strong chemical odors and can be cleaned up with solvents like mineral spirits or acetone. They feel dry and powdery to touch.
Penetrating: If it’s not clear, try a small test spot with a stripper. Water-based strippers work on water-based sealers, while solvent strippers work on solvent-based ones. If the stripper works easily, that’s your sealer type.
Step-by-Step DIY Fixes, from Least to Most Invasive
Begin with a quick cleaning and buffing to establish a baseline. Assess haze severity and set expectations for each method before you start. Don’t overpromise results on a rugged or deeply stained surface.
Move in order from least to most invasive: clean and buff, spot solvent treatment, recoat blending, then full removal if needed. Define success by clarity level and even sheen before proceeding to the next step. Follow safety and prep guidelines for each stage.
Step-by-Step Repair Process
Follow this clear, numbered sequence to tackle concrete sealer haze from least to most invasive. Safety first, then work, and finally clean up.
- Preparation: Safety first! Wear gloves, goggles, and a respirator. Check solvent compatibility with sealer type and substrate.
- Assess Haze: Inspect the haze severity. Test a small area with mild cleaning and buffing to set realistic expectations.
- Main Work: Start with least invasive methods – cleaning/buffing, then spot solvent treatment, followed by recoat blending if needed.
- Check Progress: After each step, inspect the results. If haze persists, move to the next method.
- Clean Up & Final Check: Dispose of materials properly. Inspect the final outcome for uniform sheen and clarity.
Mild fixes: cleaning, buffing and recoat blending
For light, surface-bound haze, start with mild cleaning and buffing. If haze persists, blend a thin compatible recoat.
Use a mild cleaner suitable for your sealer type. Softly scrub the affected area using a non-abrasive pad or brush. Buff gently to remove any remaining residue.
Note: Be patient and persistent but avoid over-scrubbing or buffing, which can damage the sealant.
If haze persists after cleaning and buffing, feather a thin compatible recoat onto the affected area, blending it with the surrounding surface to ensure uniform appearance.
Solvent wipe and targeted removal (xylene/toluene/mineral spirits)
For solvent-based sealer haze, use solvents like xylene, toluene, or mineral spirits. Always test first to ensure compatibility.
Dampen a soft cloth with the chosen solvent. Gently wipe the affected area in small sections. Work quickly and avoid over-saturating to prevent damaging the sealant.
Safety warning: Solvents are flammable. Ensure proper ventilation, use fire-resistant materials, and keep heat sources away.
Monitor results closely. If haze persists or worsens, stop immediately and consider consulting a professional before proceeding with full removal methods.
Stripping and full reseal (chemical or mechanical)
When haze is severe, persistent, or covers a large area, consider stripping and full resealing. This method should be your last resort.
Signs that full removal is required include heavy, stubborn haze that doesn’t respond to mild fixes, or when the sealer has failed completely due to improper application or environmental factors.
Choose between chemical stripper (safe for most sealers) or mechanical abrasion (for tougher cases). Always check compatibility with your substrate and finish. Follow manufacturer instructions carefully during application and disposal.
Pro tip: If in doubt, consult a professional to avoid damaging your concrete surface.
Xylene, Toluene and Solvent Choices — Uses, Limits and Safer Alternatives
Strong solvents like xylene and toluene are typically used for stubborn haze and aged film. Milder options such as mineral spirits or commercial strippers are for lighter issues or fresh sealers. Always weigh the need against the risk to the concrete and surrounding finishes.
Follow a practical decision flow to choose solvent strength based on the haze severity. Check safety and compatibility with your sealer and concrete, and consider test patches before full use. Rely on non-solvent methods when possible to minimize haze risk in future coats.
Pros and cons of strong aromatic solvents
Strong aromatic solvents like xylene and toluene are powerful tools for clearing stubborn haze on concrete sealers. They’re effective, but they come with significant risks.
Pros
- Excellent at dissolving cured solvent-based sealers.
- Penetrate deep into tough, aged films.
- Work quickly to remove haze.
- Widely available and relatively inexpensive.
Cons
- Strong fumes pose serious health risks with improper ventilation.
- Highly flammable, increasing fire risk on job sites.
- Environmentally unfriendly; disposal requires special handling.
- Can damage or soften certain sealers and concrete types if left too long.
Use strong aromatic solvents when you’ve got tough haze that won’t budge with milder options. But always prioritize safety and proper ventilation.
Safer or milder alternatives and when to use them
For light haze, fresh sealers, or touch-ups, consider gentler solvents and mechanical approaches. They’re safer but may take longer.
Mineral spirits, for instance, is a milder solvent that works well on newer sealers and light haze. It’s less harsh than xylene or toluene, with reduced fumes and fire risk.
Commercial strippers can also be effective, especially when combined with mechanical assistance like buffing or scrubbing. They’re designed to break down sealers gently over time. Use them when you want to avoid strong solvents or need a slower-acting solution.
Mechanical methods alone, like buffing or sanding, can also remove haze without chemicals. They’re labor-intensive but safe and effective for light haze or touch-ups. Consider these alternatives when you’re working indoors, with limited ventilation, or want to minimize environmental impact.
Safety, Disposal and PPE When Working with Solvents and Strippers
Safety matters because solvents and strippers pose fire and fume risks. Understand the quick risk snapshot and keep the workspace ventilated. Have a plan to mitigate exposure and accidents on site.
Use chemical-resistant gloves, eye protection, and a respirator rated for organic vapors. Ensure proper handling, storage, spills response, and local disposal rules are followed. Keep PPE in good shape and use common-sense precautions to avoid haze or curing issues.
Preparing the work area and protecting nearby surfaces
Before you start working with solvents and strippers, prep your workspace to keep it safe and clean. Ventilation is key. Open windows and doors if you’re indoors, or work outdoors if possible.
Barricade the area to keep curious bystanders away from fumes and spills. Protect landscaping, metal fixtures, and adjacent materials with plastic sheets or drop cloths. Solvents can damage these surfaces.
Keep a fire extinguisher nearby. Solvents are flammable, so no open flames or heat sources in the work area. And remember, no smoking!
Waste handling and environmental precautions
Proper waste handling is crucial to keep your project green and safe. Used rags, spent solvent, and chemical residues need careful containment.
Keep used rags in a sealed container. They can off-gas fumes for days after use. For spent solvents, use a dedicated container with a tight-fitting lid. Never pour them down drains!
Check your local regulations for hazardous waste disposal. Some areas have specific rules about how to dispose of these materials. Always follow their guidelines. It’s the law and it keeps our planet healthy.
Preventing Sealer Haze: Best Practices for Selection and Application
Start with solid surface prep: clean, remove dust, and ensure a dry substrate before sealing. Address any pores or repairs to minimize diffusion of the film. A clean base helps the film lay down evenly.
Test climate and prepare a plan for moisture and cure times. Choose the right sealer for the job and climate, and apply with proper technique to avoid pooling. Use patches to catch issues early and reduce haze risk on the full project.
Surface prep and moisture control prior to sealing
Before you start sealing, the surface needs to be clean and dry. Here’s how:
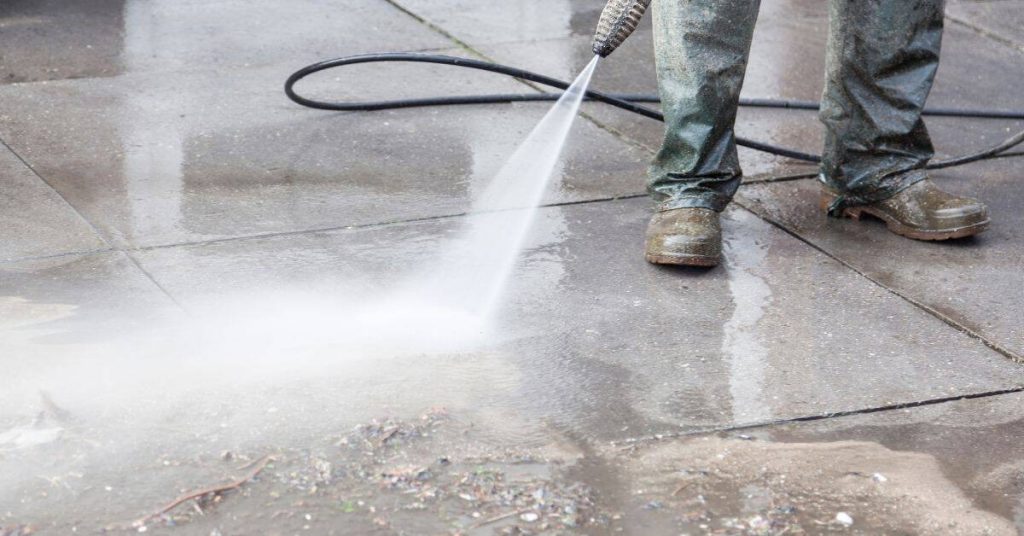
Cleaning: Remove all dirt, grease, and stains using a suitable cleaner. A pressure washer can help, but ensure it’s not too powerful as it might damage the surface.
Salt and release agents: If you’ve used salt or release agents during construction, make sure they’re completely removed. They can react with sealers and cause haze.
Moisture control: Test for moisture using a calcium chloride test. The surface should be within the manufacturer’s recommended range before sealing. If it’s too wet, wait until it dries or use a dehumidifier to speed up the process.
Application technique and weather guidelines
Applying sealer correctly is crucial to prevent haze. Here are some tips:
Thin, even coats: Apply the sealer in thin, even coats using a roller or brush. This helps ensure full coverage without pooling.
Avoid recoat overlap: When applying multiple coats, avoid overlapping the previous coat’s edge. This can cause haze due to over-application.
Temperature and humidity: Apply sealer only within the temperature and humidity ranges recommended by the manufacturer. Too high or too low can lead to haze.
When to Call a Professional and Cost/Decision Considerations
Decide between DIY or professional help based on the haze scale and surface complexity. Small, isolated hazing may be doable DIY, while widespread whitening or substrate damage calls for a pro. Use a quick decision tree to guide the choice.
A professional will handle moisture testing, stripping if needed, and controlled curing. Costs depend on material choice, area, and removal needs, but ensure you understand what a pro will guarantee. Consider timelines and warranties when weighing options.
Red flags that warrant a contractor
If you’re facing any of the following issues, it’s time to call in a professional:
Large-area stripping: If your haze problem covers more than a small section, DIY might not be feasible.
Deep substrate contamination: Persistent haze after multiple cleaning attempts could indicate deep-seated dirt or contaminants that require professional equipment to remove.
Structural concrete damage: Cracking, delamination, or other signs of structural damage need expert assessment and repair before sealing.
What to ask a contractor and how they typically fix haze
Before hiring, ask these key questions to understand their approach:
Methods: Inquire about their preferred method of stripping old sealers (chemical or mechanical) and resealing.
Warranties: Ask about warranties on their workmanship and the products they use.
Surface prep: Ensure they’ll properly prepare the surface, including moisture testing and profiling/sanding if needed.
Disposal: Ask how they plan to dispose of waste materials safely and responsibly.
Professionals typically:
– Thoroughly strip old sealers using appropriate methods.
– Address any underlying substrate issues (moisture, damage).
– Prepare the surface for sealing with proper profiling/sanding and moisture control.
– Apply new sealer in controlled conditions to prevent new haze.
Conclusion
Dealing with a cloudy sealer is a safety and durability issue as much as a look issue. If you test and fix with care, you protect the concrete and save money in the long run.
Start by confirming what you’re dealing with in a small, hidden spot, then follow a simple flow: identify the problem (haze, efflorescence, or sealer failure), choose the least invasive repair that fits the root cause, test the repair in a tiny area, and proceed only after a clean, dry, treated rise in clarity. Keep ventilation, PPE, and disposal rules in mind as you work, and document your results so you know what to repeat or stop.
Common mistakes to avoid include rushing without a test patch, using aggressive solvents without adequate ventilation, and ignoring surface prep or compatibility with the old sealer. Always keep PPE on, work in a well-ventilated space, and wash hands after handling chemicals. If a repair would require heavy removal, unpredictable exposure, or you’re unsure about the sealer type, step back and call a pro rather than risking costly damage.
When the job crosses into uncertain territory—large surfaces, unknown sealer history, or repeated haze efforts—calling a professional can save time and money. Use proper cost/decision considerations to weigh the options, and stay focused on safety, testing, and conservative fixes. With a clear plan and disciplined steps, you’ll restore appearance and protect the concrete for years to come.
FAQ
What causes cloudy sealer haze on concrete?
Most haze comes from moisture trapped under the film, wrong sealer for the mix, or applying a coat over a damp surface. Poor surface cleaning or film defects can also create a cloudy look. Check the sealer label and follow the manufacturer’s guidance for conditions.
How can I fix cloudy sealer on a water-based finish?
First, confirm the surface is fully dry. Lightly scrub the area with the recommended cleaner, rinse well, and let it dry completely. If haze remains, recoat only after the surface meets the label’s drying and temperature requirements.
What are the main types of sealers and how do I choose?
Sealants typically fall into water-based and solvent-based categories. Water-based sealers are easier on indoors and fumes, but require clean, dry surfaces and proper curing. solvent-based sealers can offer different sheen and penetration; always follow the label for application conditions.
What steps should I take to repair haze using solvents like xylene or toluene?
Read the solvent label and your local rules first. Work in a well-ventilated area with appropriate PPE. Apply only as directed for haze removal, test a small area first, and avoid over-wetting. After any solvent use, let the surface dry completely before deciding on a recoat.