
Introduction
Concrete expansion joint sealants are flexible materials used to fill and protect gaps in concrete so they can move without cracking; common DIY choices are urethane, silicone, and self-leveling formulas. Urethane is durable and bonds well to concrete but check the product label for cure time and surface prep; silicone stays flexible and resists moisture but may not bond to some substrates without primer. Self-leveling sealants flow into flat joints and save tooling time, though you should confirm compatibility with your joint depth and expected traffic.
Think of this like picking the right tool for the joint: urethane for tough, bonded joints, silicone where constant water exposure or extreme flexibility matters, and self-leveling for shallow, horizontal gaps. Application steps vary—cleaning, priming if required, using a backer rod, and tooling or letting it flow—so read the manufacturer instructions and follow safe working practices on the job.
Key takeaways
- Cold-applied joint sealants offer fast cure and low odor for indoor work.
- Evaluate urethane, silicone, and self-leveling formulas by site conditions and movement.
- Primary Sidebar references guide selection and tool requirements before sealing concrete.
- Related products include primers, backer rods, and sealant accessories for reliability.
- Properly prepare joints, edgeline, and substrates to maximize adhesion and lifespan.
- Safety: wear PPE, ventilate, and clean spills promptly to avoid skin irritation.
Table of Contents
- Introduction
- Key takeaways
- Overview — Types of Concrete Expansion Joint Sealants
- Cold-Applied Joint Sealants: When and How to Use Them
- Key Properties and Performance Characteristics to Compare
- Typical Applications and Use Cases by Product Type
- Installation Methods, Tooling, and Site Best Practices
- Durability, Lifespan, and Long-Term Performance Indicators
- Cost Considerations, Procurement, and Related Products
- Safety, Maintenance, and Common Mistakes to Avoid
- Conclusion
- FAQ
Overview — Types of Concrete Expansion Joint Sealants
Urethane (polyurethane), silicone, and self-leveling sealants each have distinct chemistries and cure behaviors: urethanes cure to form a tough elastomer with good mechanical strength, silicones cure to a flexible, UV-stable elastomer, and self-leveling formulas are designed to flow and set flat on horizontal joints. Check product labels or technical data sheets for exact cure mechanisms and recommended substrates.
Each material plays different roles in expansion joints — movement accommodation, water and air sealing, and limited load transfer — so pick the type that matches joint movement needs and substrate. Base the decision on expected displacement, joint width and depth, substrate type (concrete, masonry, metal), and exposure (UV, chemicals, moisture); verify compatibility with primers, backer rods, and accessory products listed by the manufacturer.
Urethane (polyurethane) sealants
Urethanes, also known as polyurethane sealants, are a popular choice for concrete expansion joints. They’re made by reacting polyols with isocyanates.
Why choose urethanes? Urethanes offer excellent adhesion to most substrates and can accommodate significant movement. They’re great for wide joints (1/4″ to 2″) expecting high displacement.
Urethanes are typically cold-applied, but some formulations may require heat. They cure by reacting with moisture in the air or substrate. Curing time depends on temperature and humidity, so plan accordingly.
Silicone sealants
Silicones are another common type of expansion joint sealant. They’re made by cross-linking silicone polymers with fillers and additives.
Key traits of silicones: Silicones offer excellent UV resistance, making them ideal for exterior joints exposed to sunlight. They also provide good water and air sealing. However, they have limited movement accommodation compared to urethanes.
Silicones are usually cold-applied and cure by reacting with moisture in the air. They’re best suited for narrow joints (1/8″ to 3/16″) expecting low to moderate displacement.
Self-leveling formulas
Self-leveling sealants are designed for horizontal expansion joints where sagging is a concern. They contain thickeners that prevent the material from slumping after application.
Best uses: Self-levelers are ideal for topping slabs, bridge decks, and other horizontal surfaces. They can accommodate movement in all directions and provide good waterproofing.
Self-leveling formulas are typically cold-applied and cure by reacting with moisture. They may require priming the substrate first to enhance adhesion. Installation involves pouring or pumping the material onto the surface, which requires different equipment than non-sag materials.
Cold-Applied Joint Sealants: When and How to Use Them
Cold-applied sealants are installed without external heat and typically cure by moisture, catalyst, or two-part chemistry; common cold-applied options include many urethanes and silicones as well as some self-leveling compounds. Always consult the manufacturer cure and temperature guidance before starting work so you don’t rely on assumptions about pot life or cure windows.
They’re preferred where flame or heat is a safety concern, in occupied spaces, and for retrofits or narrow joints, offering lower equipment needs and safer handling versus hot-applied systems. Be aware of limits: early strength and temperature sensitivity can constrain use in extreme climates or very wide, highly dynamic joints, so confirm substrate prep, primer needs, and cure characteristics against the project conditions.
Advantages and limitations of cold-applied products
Cold-applied sealants are a breeze to use on-site. No flames or heat needed, just mix ’em up and go. They’re typically moisture- or catalyst-cured, making them easy to handle.
Advantages: Fast setup, lower equipment needs, safer working conditions. Plus, they can flex with joints better than some hot-applied systems.
Limitations: They take longer to gain early strength compared to heat-cured products. Cold temps and high traffic can affect their performance too.
Application tips for cold-applied sealants
Temperature matters with these guys. Too hot, they cure too fast. Too cold, they won’t cure at all. Aim for the manufacturer’s sweet spot.
Prep your substrate right: clean, dry, and neutral pH. Prime if needed. And follow those cure/temperature guidelines like they’re gold.
Curing takes time. Keep joints clear of debris and traffic until they’re fully cured. Check that manufacturer’s guide again for exact times.
When to consider hot-applied or alternative systems
Cold-applied ain’t always the answer. If you’ve got super wide joints, high traffic areas, or extreme temps, think about hot-applied instead.
Special performance specs too? You might need a specialty product. Like something that can handle extreme joint movement or outdoor exposure better.
Remember, every job’s different. What works here might not work there. Always check your options and choose the best fit for your specific needs.
Key Properties and Performance Characteristics to Compare
Important attributes to evaluate include movement capability, adhesion (initial and long-term), elasticity (elastic recovery and modulus), UV and chemical resistance, and cure profile (pot life, tack-free time, and final hardness). For quantitative values like movement range or Shore A hardness, consult product datasheets and avoid relying on marketing language alone.
Expect trade-offs: silicone often scores high on UV stability while urethane commonly offers stronger mechanical resistance, and self-leveling options suit wide horizontal joints; however, actual numbers vary by formulation and substrate. Lay out a side-by-side comparison using datasheet figures, and note where substrate, temperature, or joint design change expected performance.
Movement capability and elasticity
When comparing sealants, consider their ability to handle joint movement. This is measured by percent elongation at break and elastic recovery.
Elongation at break tells you how much the sealant can stretch before tearing. For example, a 200% elongation means the sealant can double its length without breaking. Urethanes typically offer higher elongations than silicones.
Elastic recovery is crucial for dynamic performance. It’s the sealant’s ability to return to its original shape after being stretched and released. Silicones often excel here, making them great for joints with frequent movement.
Adhesion and substrate compatibility
Adhesion is key to a sealant’s longevity. It’s measured by how well the sealant sticks to concrete substrates over time.
Initial adhesion refers to tack right after application, while long-term adhesion considers performance after curing and exposure to elements. Urethanes often provide superior initial adhesion, but silicones can outperform in long-term tests.
Consider your substrate: cast-in-place concrete, precast, or sealant-to-metal interfaces? Primers may be required for better adhesion. Always consult the manufacturer’s recommendations.
Environmental resistance and curing behavior
UV, ozone, chemical, and moisture exposure can degrade sealants over time. Here’s how different types fare:
UV Resistance: Silicones typically offer excellent UV stability, making them ideal for outdoor applications. Urethanes may yellow or degrade under prolonged sun exposure.
Chemical Resistance: Urethanes often perform well against chemicals like oils and fuels but can be susceptible to acids. Silicones generally resist both acids and bases.
Curing Behavior: Cure mechanism affects scheduling. One-part products (like silicones) cure through moisture, while two-part urethanes require mixing before application. Consider your project timeline when choosing a sealant.
Typical Applications and Use Cases by Product Type
Map urethane, silicone, and self-leveling sealants to real jobs — urethane for traffic-exposed, high-movement joints (parking decks, roadways), silicone for long-term waterproofing and UV-exposed vertical joints, and self-leveling for horizontal slabs, sidewalks, and plaza decks where a flat finish is needed. Check manufacturer guidance for the joint width and movement ranges they warranty for each application.
Choose by conditions: chemical or deicing salt exposure, freeze–thaw cycles, substrate type (concrete vs. metal), and moisture; some formulas handle immersion or constant moisture better than others. Follow product-specific prep and priming instructions, use the correct backer rod or bond breaker setup, and plan maintenance intervals based on field history and manufacturer service-life guidance.
Horizontal joints and traffic surfaces (self-leveling)
Self-leveling sealants are often specified for horizontal joints on slab-on-grade, pavements, and parking decks. These areas see heavy foot or vehicle traffic, so durability is key.
Self-leveling formulas flow into shallow joints (< 1/2″ deep) and wide flat surfaces without sagging. They’re great for preventing water intrusion in these large, horizontal expanses.
Installation tip: Ensure the substrate is clean, dry, and free of contaminants. Use a primer to improve adhesion and prevent delamination.
These sealants can handle movement ranges up to 25% and are typically used in joint widths from 1/8″ to 1/2″.
Vertical or overhead joints (non-sag urethane/silicone)
For vertical faces, precast panels, and curtainwall interfaces, non-sag urethanes or silicones are the go-to. They won’t droop under their own weight like some self-leveling formulas.
These sealants are perfect for filling narrow joints (1/8″ to 3/4″) with high movement ranges (up to 50%). They’re also great for waterproofing, thanks to their low permeability.
Installation tip: Use backer rods or bond breakers to maintain a consistent joint width and prevent adhesion to adjacent surfaces. Ensure the substrate is clean, dry, and free of any debris.
They can handle temperature cycles well but may not be suitable for areas with extreme UV exposure or chemical contact without additional protection.
Specialty environments (chemical exposure, extreme UV, high movement)
For environments with chemicals, prolonged UV, or very high movement, you’ll want to prioritize specific product families or features.
Urethanes can handle high movement ranges (>50%) and resist chemical attacks. Silicones excel in long-term waterproofing and UV exposure resistance. Some products even offer a combination of these properties.
Recommendation: For extreme conditions, consider using specialized sealants designed for those specific environments. Always check the manufacturer’s data sheets for compatibility with your site’s unique conditions.
These specialty sealants often come at a premium price but offer superior performance and longevity in harsh conditions.

Installation Methods, Tooling, and Site Best Practices
Start with proper surface prep: remove dust, laitance, and contaminants, control substrate moisture, and verify joint geometry (width-to-depth ratio) so the sealant can perform as intended. Refer to the manufacturer for primer requirements and acceptable surface conditions before applying material.
Match application method to the formula — extrude or gun-apply non-sag urethanes and silicones, pour or rake self-levelers on horizontal joints — and use the correct backer rod size and tooling to shape the fillet. Monitor cure under the site temperature and humidity conditions called out by the product data sheet and perform post-install inspections for adhesion, finish, and proper cure.
Surface preparation and primers
The first step in any successful sealant application is proper surface preparation. Start by removing all dust, laitance, or contaminants using a wire brush or power washer.
Moisture control is crucial. Test surfaces with a moisture meter to ensure they’re dry enough for sealing. Urethanes and silicones can tolerate some moisture, but self-leveling formulas need bone-dry substrates.
Use a surface grinder or scarifier to create a dry profile, enhancing adhesion. Primers are usually required for all formulas. Use manufacturer-recommended primers to ensure compatibility and prevent interference with curing or bond.
Backer rod selection and joint configuration
The right backer rod ensures optimal sealant depth and bond pattern. First, determine the joint geometry: width and depth should be at least 1/4″ to 1/2″ wider than the sealant’s recommended expansion joint width.
Backer rod sizing depends on joint depth. Use a larger diameter for deeper joints, ensuring it fills the void completely but doesn’t exceed joint depth. Place backer rods centrally in the joint to promote even sealant distribution and adhesion.
For urethane and silicone, use closed-cell foam backer rods. Self-leveling formulas require open-cell or fiber backer rods for better adhesion.
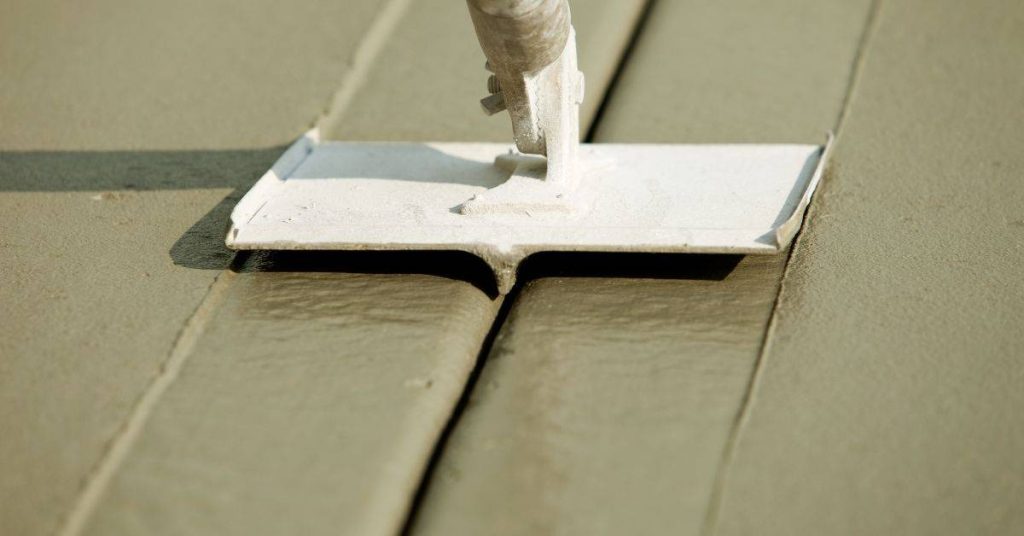
Application technique, tooling, and cure monitoring
Proper application ensures a successful seal. Follow manufacturer guidelines for mixing ratios, pot life, and sag resistance.
- Nozzle size: Match nozzle size to joint width. Larger joints need larger nozzles.
- Gun technique: Apply sealant in a smooth, steady bead along the joint’s bottom. Avoid overfilling or underfilling.
- Tooling finish: Use a trowel or float to tool the sealant, ensuring it fills the joint completely and creates a smooth surface.
- Cure monitoring: Check manufacturer datasheets for cure times. Monitor curing progress visually and by touch. Avoid walking on or disturbing cured sealant until fully set.
- Environmental controls: Maintain recommended temperature and humidity levels during application and cure to prevent premature failure.
Durability, Lifespan, and Long-Term Performance Indicators
Service life depends on movement cycles, UV and chemical exposure, traffic abrasion, and installation quality; verify manufacturer expected service life and cross-check field performance records for similar conditions. Inspect for adhesion loss, compression set, cracking, or discoloration as indicators of aging or failure.
Installation factors that reduce lifespan include incorrect joint geometry, poor substrate prep, wrong backer rod size, or skipped priming steps — all of which you should confirm against the product instructions. Use a documented inspection cadence, log defects, and compare observed failures to the manufacturer’s stated endurance or independent test data when planning reseal or replacement intervals.
Common failure modes and visual checkpoints
Regularly inspect your expansion joint sealants to catch issues early. Here’s a simple checklist.
- Edge debonding: Check if the sealant is pulling away from the substrate at the edges. This could lead to water intrusion and further damage.
- Cracking or filler cracking: Look for hairline cracks or larger ones running through the sealant. These can grow and compromise the joint’s integrity.
- Bleed or fishscaling: Check if the surface of the sealant has small, raised areas (bleeds) or flaking paint-like pieces (fishscale). This indicates poor curing or contamination.
- Excessive softening or hardening: Feel the sealant. If it’s too soft, it might not be able to hold its shape under stress. If it’s too hard, it could crack under movement.
- Discoloration: Look for unusual colors or stains on the sealant. This could indicate chemical exposure or UV damage.
- Uneven surface: Check if the sealant is level with the surrounding surface. Irregularities can trap dirt and water, causing further issues.
- Missing pieces: Inspect for any chunks missing from the sealant. This could be due to improper curing or heavy traffic.
- Moisture or dampness: Feel around the joint for moisture. If present, it could indicate a breach in the sealant, leading to further damage.
Quick rule: Inspect your joints every 6 months to catch issues early and extend their lifespan.
Environmental and load impacts on longevity
Expansion joint sealants face various challenges that can accelerate degradation. Understanding these helps in selecting the right material and maintaining your joints.
Freeze-thaw cycles: Repeated freezing and thawing can cause the sealant to expand and contract, leading to fatigue and failure over time. This is especially true for outdoor applications or areas with high humidity.
Heavy traffic or abrasion: High foot or vehicle traffic can wear down the sealant, reducing its thickness and compromising its ability to protect the joint. This is more pronounced on horizontal surfaces like floors and driveways.
Chemical spills: Exposure to chemicals can soften, harden, or otherwise compromise the sealant’s properties. This is a common issue in industrial settings or areas with chemical usage.
UV exposure: Prolonged exposure to sunlight can cause the sealant to degrade, leading to discoloration, cracking, and loss of elasticity. This is more pronounced on outdoor surfaces or those near windows.
Cost Considerations, Procurement, and Related Products
Cost drivers include material type, joint dimensions, access and labor, surface prep, primers, and backer rods; gather quotes that list these items separately so you can compare apples-to-apples. Ask suppliers for product data sheets and expected coverage rates to verify quantities rather than relying on unit price alone.
Factor lifecycle costs into procurement — expected maintenance frequency, warranty terms, and rework risk can outweigh a lower initial material price. Include compatible primers, backer rods, cleaners, and masking materials on the bill of materials and request trial samples or small field mock-ups when uncertain about performance.
Budgeting and procurement checklist
Use this checklist before buying joint sealants to ensure you get accurate quotes and compatible products.
- Product data sheets: Request these to understand product specs, coverage rates, and color options.
- Lead times: Check delivery dates to plan your project timeline.
- Warranty terms: Review warranties for coverage duration and conditions.
- Joint dimensions: Specify joint size and depth for accurate pricing.
- Performance specs: Define required adhesion, elongation, and cure time.
- Environmental conditions: Consider temperature ranges, UV exposure, and moisture levels.
- Labor access limitations: Inform suppliers about height restrictions, confined spaces, or weather concerns.
- Primers and backer rods: Check if they’re included in the quote or need to be purchased separately.
- Handling and delivery costs: Compare quotes for these additional expenses.
- Site prep requirements: Understand any surface preparation needed before application.
Quick rule: Always request a detailed, standardized bill of materials (BOM) to compare apples-to-apples quotes.
Related products and accessories
These essential companion items ensure your joint sealant performs as expected. Always check compatibility with your chosen sealant type.
Primer: A compatible primer ensures strong adhesion and enhances sealant performance. Some sealants come with a recommended primer, so follow the manufacturer’s guidelines.
Backer rods: These help maintain joint depth and prevent overfilling. Ensure they’re compatible with your chosen sealant and joint configuration.
Tooling and surface cleaners: Use appropriate tools (e.g., trowels, caulking guns) and cleaners to prepare surfaces and apply the sealant correctly. Always follow manufacturer recommendations for tool compatibility and cleaning procedures.
Quick product selector and decision checklist
Use this checklist to shortlist suitable joint sealant families before detailed spec selection.
- Movement range: Consider the expected joint movement (e.g., <10%, 10-25%, >25%) to select appropriate sealants.
- Joint orientation: Choose between horizontal, vertical, or overhead sealants based on your application.
- Exposure conditions: Consider UV exposure, temperature ranges, and moisture levels for optimal product selection.
- Substrate compatibility: Ensure the chosen sealant is compatible with existing substrates (e.g., concrete, metal, wood).
- Maintenance plan: Consider long-term maintenance needs, rework frequency, and replacement cycles.
Quick rule: Always prioritize performance over initial material price to avoid costly reworks and replacements.
Safety, Maintenance, and Common Mistakes to Avoid
Follow SDS and manufacturer safety guidance for PPE, ventilation, spill response, and storage; many products require gloves, eye protection, and adequate ventilation, especially solvent-bearing formulations. Store materials per label instructions and handle waste according to local rules and the SDS.
Common mistakes are inadequate substrate prep, wrong sealant selection for movement or exposure, incorrect joint dimensions, and skipping primers or bond breakers — all fixable by following the product data sheet and a consistent QC checklist. Schedule routine inspections, record findings, and plan reseal timing based on performance trends rather than visual appearance alone.
Safety during application and curing
Your safety is our top priority. Always follow the Safety Data Sheet (SDS) that comes with your product.
Use a respirator or proper ventilation when working with solvent-based products to avoid inhaling harmful fumes. Wear gloves and eye protection to shield your skin and eyes from chemicals.
Be cautious when handling uncured sealants. Follow the SDS guidelines for safe handling, storage, and disposal of materials.
Routine maintenance and repair strategies
Maintaining your concrete expansion joints is crucial to extend their lifespan. Inspect them regularly for any signs of wear or damage.
Clean the joint using a suitable cleaner, then let it dry completely before resealing. If only a small area is damaged, perform a spot repair. For extensive damage, replace the full joint.
Follow your product’s recommended reseal schedule. This could range from every 2 to 5 years, depending on traffic and environmental factors.
Common installation mistakes and prevention
To ensure a long-lasting job, avoid these common mistakes:
- Inadequate substrate preparation: Ensure the surface is clean, dry, and free of contaminants.
- Wrong backer rod depth: Use the right size for your joint width to prevent over- or under-filling.
- Incompatible primer: Use a primer suitable for your substrate and sealant type.
- Applying in wrong temperature: Follow your product’s recommended application temperature range.
Regularly check your work, learn from any mistakes, and always follow the manufacturer’s guidelines to prevent issues down the line.
Conclusion
Choosing the right joint sealant is about safety, durability, and keeping a clean, professional look on your concrete work. Use the type that fits your joint size, movement, and exposure, then follow good installation to prevent leaks and cracks down the line.
To proceed, think like this: confirm the joint width and movement range, decide between urethane for high movement or silicone for smooth, non-staining finishes or self-leveling for wide, flat surfaces; verify surface preparation, clean the joint fully, apply the sealant in the correct temperature window, tool it to a smooth bead, cure undisturbed, and test for movement and leaks after a short cure period.
Common mistakes to avoid are skipping surface cleaning, underfilling or overfilling the joint, and rushing cure times or skipping proper tooling. Safety first means wearing eye protection, gloves, and clean work area, testing a small area before full application, and following manufacturer recommendations for cure temperatures and ventilation to avoid off-gassing or improper adhesion.
If the joint is large, heavily trafficked, or exposed to chemicals or extreme movement, or if you’re unsure about the right product, call in a pro before you push ahead. With the right product and a careful, methodical approach, you’ll seal the joint cleanly and keep water out, appearance sharp, and the pavement durable for years to come.
FAQ
What are the key properties of urethane sealants for expansion joints?
Urethane sealants bend well with concrete movement and stay elastic longer. They usually adhere strongly to clean, prepared joints and resist common chemicals. Check the label for cure time, substrate compatibility, and any surface preparation requirements.
How do silicone sealants differ in performance and application?
Silicone stays flexible in wide temperature swings and resists UV exposure better than urethanes. They’re easy to apply in damp conditions and work well on vertical joints, but adhesion to some substrates can be tricky. Always follow the manufacturer’s surface prep and bonding recommendations.
What makes self-leveling formulas different in installation and use?
Self-leveling sealants flow to fill the joint evenly, which helps with wide, horizontal joints. They cure with a film that’s flexible but can be sensitive to surface prep and joint geometry. Verify compatibility with your substrate and weep hole details before pouring.
Which type is best for exterior joints and UV exposure, and what are the trade-offs?
Urethane is a solid all-around choice for exterior joints with movement, but it can yellow over time and may require more surface prep. Silicone handles UV and weather well but can be harder to bond to some substrates. Self-leveling formulas work well on large, flat exterior joints if you follow prep and curing instructions closely.