

Introduction
Concrete around steel posts with base plates, grout pads, and proper drainage helps prevent rust.
This intro covers practical, hands-on steps you can take to set posts securely and keep moisture away from metal. You’ll want to consider how the post sits in the concrete, how the grout or pad supports it, and how water will drain away.
Base plates and grout pads are options you may encounter; choose what fits your post and site. Decide between grouted bases and standoff setups, and follow the label and local rules for materials and installation. Plan drainage to keep water moving away from the steel and inspect for rust signs, checking manufacturer guidance if in doubt.
Key takeaways
- Properly align base plates with posts and embed in reinforced grout pads to prevent movement.
- Use grouted vs standoff plates based on moisture control and settlement considerations.
- Ensure drainage paths around concrete and steel to minimize water accumulation near posts.
- Follow curing and moisture-control practices to reduce cracking and corrosion risk.
- Verify anchor bolt layout, plate sizing, and embedment depth with drawings and wear PPE during handling.
- Inspect for rust staining after installation and address drainage or coating needs.
Table of Contents
- Introduction
- Key takeaways
- Core Concepts: Base Plates, Grout Pads, Standoff, and Corrosion Mechanisms
- Anchor Bolts and Base Plate Design: Placement, Sizing, and Layout Best Practices
- Preparing the Concrete and Forms for Steel Post Embedment
- Mixing, Placing, and Curing Concrete and Non-Shrink Grout Around Steel
- Drainage and Moisture-Management Strategies to Prevent Rust
- Materials, Codes, and Specifications to Check
- Tools, PPE, and a DIY Planning Checklist
- Common Mistakes, Troubleshooting, Maintenance, and Cost Comparison
- Conclusion
- FAQ
Core Concepts: Base Plates, Grout Pads, Standoff, and Corrosion Mechanisms
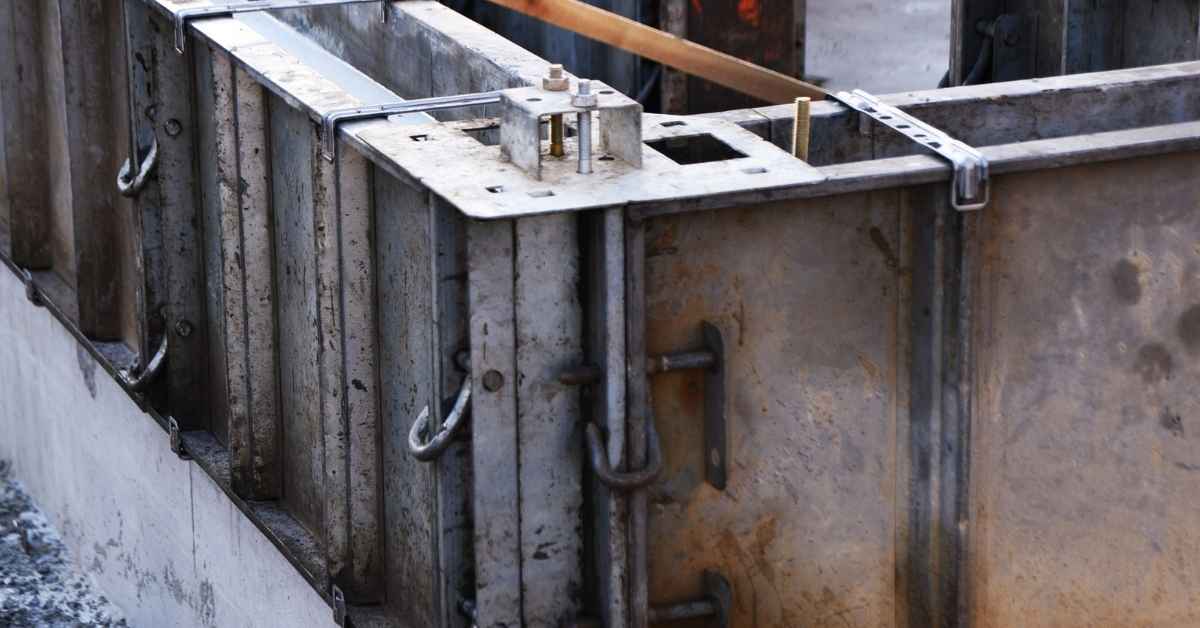
Base plates are steel pads that sit on the concrete and receive bolts or anchors to transfer load into the slab, while grout pads fill the space between the plate and concrete to lock alignment and seal against movement. Standoffs keep the steel away from direct contact with the concrete, creating a ventilated gap, and concrete embedments are the embedded portions that tie the steel assembly into the concrete mass; together they define how moisture and air reach the steel. Moisture, oxygen, salts, and trapped water at the concrete–steel interface accelerate corrosion by creating a wet, conductive path that bypasses protective coatings and concentrates chlorides where the steel is most exposed.
Grout-pad configurations favor a solid, low-permeability bed that can limit drainage and slow initial corrosion, while standoff installations rely on a deliberate air gap to improve drying but may allow more moisture movement if not detailed properly. Key planning checks include ensuring proper embedment depth, alignment, surface prep, and drainage paths so water does not trap in crevices, plus choosing grout mixes and clearances that promote drying and reduce sustained moisture. Understanding these choices helps you plan for durability and serviceability, with safer maintenance access, easier replacement if needed, and practices that slow corrosion through better drainage and inspection-friendly design.
Definitions and functions
Base plates are steel plates that distribute the load of a post into the concrete. They’re usually bolted to the post and embedded in the concrete base.
Grout pads are thickened sections of grout around anchor bolts, providing additional support and preventing stress concentrations at the bolt-concrete interface.
Standoffs are steel spacers that keep the post off the concrete surface, allowing for drainage and preventing moisture buildup. They’re often used with non-grouted connections.
Concrete embedments refer to any steel reinforcement or hardware embedded within the concrete to provide strength and support.
How corrosion starts at concrete interfaces
Moisture from the ground can wick up through capillary action, reaching the steel. Once there, it combines with oxygen and chloride ions to start rusting the steel.
Chlorides from de-icing salts or seawater can also accelerate corrosion. They break down the passive layer on the steel, exposing it to further attack.
Differential aeration occurs when some parts of the steel are exposed to air while others aren’t. The unexposed areas corrode faster due to lack of oxygen.
Trapped moisture in the concrete can also lead to corrosion. It prevents drying, keeping the steel wet and promoting rusting.
When to choose grouted, standoff, or non-grouted methods
Grouted connections are favored for high loads and when the post needs to be securely anchored. They’re also good where drainage isn’t a concern.
Standoffs are used when drainage is important, like in flood zones or areas with high groundwater. They allow water to flow under the post, preventing moisture buildup.
Non-grouted methods with standoffs can be quicker and cheaper to install. They’re good for low loads and where access is limited, but they may not provide the same level of corrosion protection as grouted connections.
The choice also depends on constructability considerations like available equipment, labor skills, and site conditions.
Anchor Bolts and Base Plate Design: Placement, Sizing, and Layout Best Practices
Anchor bolt layout should match the steel posts with careful attention to embedment depth options, sleeve or cast‑in‑place choices, and corrosion protection, all aligned to the post base width and any drainage setups. Plan patterns, edge distances, and base plate bearing to keep the assembly stiff and prevent movement, while coordinating with structural drawings and engineer specifications.
For a DIYer, this matters because proper placement and protection keep joints tight, avoid leaks or corrosion, and simplify future maintenance. Following a practical layout tied to the drawings helps prevent rework, ensures compatibility with coatings and grout, and makes inspection and repairs easier later on.
Anchor bolt placement and layout rules
Anchor bolts are the backbone of your steel post’s support. Here’s how to place them right:
Bolt pattern: Space bolts evenly around the post, following the structural drawings. A common pattern is 4 bolts for posts up to 12″ dia., and 8 bolts for larger ones.
Edge distance: Keep bolts at least 2″ from the edge of the base plate to prevent stress concentrations. For wider plates, follow engineer specs or use 1/3 of the plate width.
Alignment: Ensure bolts are aligned with post holes and maintain a consistent embedment depth. Tolerances vary, so check your drawings.
Base plate thickness, bearing, and stiffness considerations
The base plate’s job is to spread the load from the post to the concrete. Here’s how to size it right:
Thickness: Make sure the plate is thick enough to distribute loads evenly. A good rule of thumb is 1/8″ per foot of post height, but follow engineer specs if provided.
Bearing area: The base plate should cover at least half the post’s cross-sectional area. This ensures even load distribution and prevents overstressing the concrete.
Grout helps create a uniform contact surface between the base plate and concrete, preventing stress concentrations and corrosion.
Grouted vs. standoff detailing for anchor bolts
Both grouted and standoff details have their uses, but they work differently:
Grouted: Grout fills voids between the base plate and concrete, providing full bearing area and preventing water ingress. It’s ideal for high loads or corrosive environments.
Standoff: Standoffs create an air gap, allowing for thermal expansion and contraction of the post. They’re useful where movement is expected but can trap moisture, promoting corrosion if not properly detailed.
Inspect standoff details regularly to ensure they remain dry and free from rust. For grouted details, check for cracks or delamination that could allow water entry.
Preparing the Concrete and Forms for Steel Post Embedment
Before you pour or grout, lock in the post layout with the shop drawings, verify centerlines, setbacks, embedment depth, and required clearances, and then prepare the hole or form to exact dimensions, including bore size, chamfers, wall thickness, and space for grout pads; plan for inspection access and vibration so you can keep the alignment true during placement. Build solid forms for the grout pad and the foundation around the post, apply a proper release agent, add edge supports and temporary bracing, and double-check that the forms won’t distort or leak when concrete or grout goes in.
Subgrade should be properly compacted and a stable base created with drainage so water won’t pool and freeze-thaw cycles won’t push the work out of alignment. Run the reinforcement and embeds exactly as the drawings require, and confirm orientation, spacing, and corrosion protection, plus a grout pad if specified. Do a thorough through-forms check for verticality and alignment, verify embedment depth against the drawings, and document any deviations before you cast or grout.
Excavation, subbase, and formwork setup
Start by digging out the area for your post. The hole should be slightly larger than the post to allow for concrete and grout. Use a post hole digger or an auger bit on a drill to create a clean, uniform hole.
Subbase: Fill the bottom of the hole with a layer of crushed stone or gravel. This provides a stable base that promotes drainage and prevents settling. Compact it well using a plate compactor.
Next, set up your forms. You can use form tubes for round posts or build custom forms for square or odd-shaped posts. Ensure they’re level, plumb, and secure. Use braces to maintain their shape during the pour.
Reinforcement and embedment detailing
Before placing your post, add reinforcement around it. This helps distribute loads and prevents cracking. Use rebar or dowels that match the size specified in your plans.
Positioning: Place reinforcement so it’s centered within the concrete. Avoid cold joints – where concrete meets steel – by ensuring the reinforcement extends into the foundation. Protect steel from corrosion with a coat of rust-inhibiting primer.
If using a grout pad, place rebar or wire mesh on top of it before setting your post. This helps anchor the post and distributes loads evenly.
Setting and securing anchor bolts and posts prior to pour
First, layout and cut your anchor bolts to length. They should extend beyond the base plate by at least 2 inches for threading.
Templating: Use a template or level to ensure your bolts are vertical and at the correct elevation. Brace them temporarily with wooden blocks or metal clamps to keep them in place.
Set your post on top of the anchor bolts, ensuring it’s plumb and level. Secure it with temporary braces or clamps until the concrete sets. Verify verticality and alignment one last time before pouring concrete.
Mixing, Placing, and Curing Concrete and Non-Shrink Grout Around Steel
Proper material selection, mixing, placement, finishing, and curing are key when working concrete and non-shrink grout around steel base plates and embedded posts. Choose options that play well with steel, sealants, and coatings, and always check manufacturer instructions and structural specs for exact mixes and curing times.
Getting this right matters because voids, poor bonding, or exposed steel can lead to rust and leaks. Follow clean-out practices, use the right formwork, and cure correctly to protect the steel and maintain deck integrity—and always read the labels for limits and recommendations.
Choosing concrete vs. non-shrink grout and admixtures
Concrete is typically used for embedding steel posts, but non-shrink grout may be better under base plates due to its flowability and reduced shrinkage. Non-shrink grout can fill voids and prevent cold joints around anchor bolts.
Admixtures like corrosion inhibitors, accelerators, or retarders enhance durability and workability. Always consult manufacturer guidelines for specific admixture types and dosages.
For example, use corrosion inhibitors to protect steel from rust, especially in aggressive environments. Air-entraining agents improve freeze-thaw resistance, while water-reducing admixtures boost concrete’s flowability.
Placement, vibration, and avoiding cold joints
Proper placement and consolidation prevent voids and entrapped air that can lead to rusting. Here’s how:
- Avoid placing concrete too high above base plates to prevent segregation and cold joints.
- Use formwork around posts, ensuring it’s tight-fitting to avoid voids.
- Vibrate or rod the concrete to remove air pockets. Start at the bottom, working up.
- Clean out nests around bolts before pouring to ensure proper bonding.
- Avoid over-vibration, which can lead to segregation and weak spots.
Proper placement and consolidation take time. Don’t rush; quality workmanship pays off in the long run.
Curing and protection to minimize cracking and permeability
Proper curing maintains hydration, reduces shrinkage, and minimizes early-age permeability. Here’s how:
Water curing is the most common method. Keep concrete moist for at least 7 days, following manufacturer guidelines.
Use curing membranes or blankets to retain moisture and heat during cold weather. Remove temporary forms as soon as possible to avoid stress cracks.
After curing, apply a sealant or coating to minimize moisture access to steel. This reduces the risk of corrosion. Always follow manufacturer specs for application and recommended products.
Drainage and Moisture-Management Strategies to Prevent Rust
Effective drainage and moisture-management keep water away from post bases and the concrete-steel interface. Plan for slope grading, drainage channels, sleeves, weep holes, and breathable seals as an integrated system rather than patching later. Aim for designs that direct surface water off the footing and promote airflow to vent moisture.
This matters because good detailing reduces capillary rise and freeze-thaw damage and makes future maintenance easier. Start coordinating early with framing, concrete pours, and site grading so sleeves, seals, and grout pads work together. In climates with salt, heavy rain, or ice, build in drainage paths that stay functional year round and check and maintain them as part of regular site upkeep.
Surface and subsurface drainage techniques
Grade your site to direct water away from post bases. Aim for a 2% slope, minimum, towards the lowest point.
Use trench drains or swales to channel water further away. Permeable backfill around posts helps too – it lets water drain through instead of pooling.
Consider subdrains: perforated pipes that collect and carry water away from problem areas. They’re a must in low-lying spots or heavy rainfall zones.
Details: sleeves, weep holes, and breathable seals
Use PVC sleeves around posts to keep water out. They let you inspect the post too.
Drill weep holes through base plates and grout pads. They should line up with drainage channels below. Water can escape through them.
Seal around posts with breathable, non-occluding materials. They stop water getting in but still let moisture out.
Coatings, barriers, and cathodic considerations
Hot-dip galvanizing protects steel posts. It’s a must for salt exposure zones.
Epoxy primers on bolts and base plates add another layer of protection. They stop moisture reaching the steel.
Physical barriers like plastic wrap or foam can keep water out during construction. Remove them after the pour though – they trap moisture if left in place.
For advanced protection, consult a corrosion specialist. They can advise on cathodic protection methods tailored to your site’s conditions.
Materials, Codes, and Specifications to Check
Whether you’re planning anchors, patches, or a concrete base, this section flags the exact material specs and the papers you must check to stay compliant. You’ll want to verify concrete and grout characteristics, anchor bolt standards, protective coatings, and the local codes that govern the project, ensuring everything works together from mix design to drainage and finishing. Keep in mind compatibility between steel post bases and the surrounding concrete, as well as how surface prep, corrosion protection, and inspection criteria fit into the install sequence.
This matters because the wrong combination of products and missing documents can lead to rust transfer, weak anchors, water drainage problems, or failed inspections. By tracking MSDS, product data sheets, test reports, mix designs, and approved vendor lists, you give inspectors a clear trail and your project a solid safety margin. Check labels and manufacturer instructions, and lean on local rules and drawings to confirm that each item meets the project’s requirements before you commit to the install.
Concrete and Grout Material Specs to Verify
The right materials ensure a strong, durable bond between the concrete and steel posts. Wrong choices lead to cracking, staining, or weak bonds.
- Concrete: Look for 4000-5000 psi compressive strength, durability class 12-15, and good freeze-thaw resistance. Avoid air-entrained concrete for grout pads to prevent honeycombing.
- Grout: Use non-shrink, low-viscosity grout with high early strength (3000+ psi at 24 hours). Check compatibility with anchor bolts and base plates.
- Admixtures: Consider using corrosion inhibitors for added protection. Avoid water reducers that can weaken the grout.
- Cement: Type I or II cement is standard. Special cements may be needed for high heat or sulfate resistance.
- Aggregates: Use clean, well-graded aggregates with a maximum size suitable for your post’s embedment depth and grout pad thickness.
Anchor Bolt and Base Plate Standards
The right anchor bolts and base plates ensure a secure connection between the steel posts and concrete. Check ASTM/EN standards for grade, threads, and steel type.
Anchor Bolts: Common grades are A307 (mild steel) or F1554 (high-strength). Threads should match your post’s base plate. Verify manufacturer certification and installation instructions.
Base Plates: Check for ASTM/EN standards on steel type, thickness, and coating. Ensure they’re compatible with your anchor bolts and posts. Coatings protect against rust transfer from ground moisture.
Coordinate threading and embedment requirements with structural drawings to ensure a proper fit and secure connection.
Local Code, Structural Engineer, and Permit Coordination
Confirming requirements with local authorities and your project’s structural engineer ensures compliance and safety. Here’s what to check:
Foundation Anchorage: Verify anchor bolt spacing, edge distance, and embedment depth meet local codes and the project’s design criteria.
Inspection Checkpoints: Coordinate with inspectors to ensure all materials and installation methods comply with codes and project specs. Regular inspections prevent costly rework.
Special Details: Confirm any seismic or wind-related anchorage details with your engineer. Some areas may require additional reinforcement or special anchor types.
Tools, PPE, and a DIY Planning Checklist
This section outlines a practical tools and materials checklist tailored to base plates, grout pads, and drainage, plus the PPE you must have on hand. Include core tools, optional power tools, and specialty items like a level, straightedge, mallet, grout mixer, and sealing or anti-corrosion products. It also flags a go/no-go point to stop and hire a pro if planning isn’t solid or safety risk is high.
This planning flow keeps you from guessing and helps you stay on schedule. It covers pre-install site checks, surface prep, base plate dimensions, and grout pad thickness, plus corrosion-control measures, and explains when to escalate to a pro for tricky drainage, uncertain soil, or utilities.
Tools and materials checklist
Before you start, make sure you have all the necessary tools and materials to ensure a smooth installation.
- Tape measure: To accurately measure and cut materials.
- Level/laser: For precise alignment of base plates and grout pads.
- Grout mixer: To ensure consistent grout mixture.
- Sealant: To protect against moisture intrusion.
- Shims: To adjust base plate levelness.
- Forms: For shaping and containing concrete.
- Grout pump (optional): For easy application of grout.
- Templating devices: To create accurate patterns for cutting and placement.
Quick rule: Missing tools or materials can lead to improper installation, causing structural issues or rust later on.
Safety, PPE, and structural checks
Prioritize safety and structural integrity with these essential checks before starting work.
- Eye protection: Protect your eyes from debris and chemicals.
- Hearing protection: Reduce noise exposure from power tools.
- Gloves: Prevent cuts, burns, and chemical exposure.
- Respirator/dust mask: Protect against grout and concrete dust.
- Sturdy footwear: Prevent slips, trips, and falls.
- Knee pads: Protect knees from hard surfaces during extended periods of kneeling.
- Shoring/bracing: Stabilize posts to prevent tipping or movement.
- Structural integrity check: Ensure existing structure can support new post and load.
Quick rule: Skipping safety measures or structural checks can lead to injuries, property damage, or structural failure.
When to call a structural engineer or contractor
Certain conditions require professional consultation before proceeding with your installation.
- Unusual loads: If the post will bear an unusual load, consult a pro.
- Uncertain soil conditions: If soil is unstable or unknown, get it tested.
- Code-required inspections: Some installations require permit and inspection; follow local codes.
- Proximity to utilities: If posts are near underground utilities, hire a professional locator service.
- Complex drainage: If drainage is intricate or critical, consult a pro for advice.
- Embedment tolerances: If you can’t guarantee embedment tolerances, get expert help.
- Structural concerns: If you’re unsure about the existing structure’s integrity, hire an engineer.
Quick rule: Don’t risk structural failure or safety issues; consult a pro when in doubt.
Common Mistakes, Troubleshooting, Maintenance, and Cost Comparison
This section covers the most common installation mistakes that cause rust or instability—things like poor grading and drainage, voids under base plates, wrong bolt patterns, too little grout, misaligned posts, and weak drainage around the base. You’ll learn quick ways to diagnose these issues and spot signs like water pooling, efflorescence, or loose posts, plus how to verify grout and bolt security.
You’ll get a practical maintenance plan and a framework to compare grouted, standoff, and advanced protection options. Costs and performance vary a lot by site, so always check project-specific pricing and lifecycle expectations rather than generic figures. Follow a simple decision flow based on load, soil drainage, climate, and your maintenance capacity, and check the product labels or datasheets for limits.
Typical installation errors and field fixes
To ensure your concrete around steel posts lasts, avoid these common mistakes:
- Voids under base plates: Causes – Insufficient grout or void-fill. Fix – Remove any loose material, clean the area, and reapply proper grout.
- Misaligned bolts: Causes – Incorrect bolt pattern or anchor sizing. Fix – Realign bolts during installation or adjust anchor size to match load requirements.
- Cracked concrete: Causes – Inadequate curing, excessive loading, or poor mix design. Fix – Repair cracks with an appropriate concrete patch and follow proper curing procedures.
- Trapped water: Causes – Poor drainage around the base. Fix – Ensure proper grading and install weep holes if necessary to facilitate water drainage.
Regularly inspect your work for these issues and address them promptly to prevent further damage.
Inspection schedule and maintenance tasks
Use this checklist to maintain your concrete around steel posts:
- Visual Inspection: Check for cracks, efflorescence, or signs of corrosion every 6 months.
- Drainage Clearance: Clean drains and trenches annually to prevent blockages that can cause water pooling.
- Grout Joint Resealing: Reapply sealant to grout joints every 2-3 years to maintain moisture barrier.
- Coating Touch-up: Inspect protective coatings or galvanization annually and reapply where needed.
- Corrosion Monitoring: Check post sleeves for signs of corrosion during each inspection.
- Document Findings: Keep records of maintenance tasks and findings to aid future repairs.
Quick rule: Regular inspections help catch issues early, preventing costly repairs down the line.
Cost and lifecycle considerations of anchoring methods
When selecting an anchoring method, consider both upfront costs and long-term maintenance:
Grouted full-bearing bases: Pros – Provides solid support for heavy loads. Cons – More labor-intensive installation, higher initial cost. Lifecycle – Low maintenance, long service life.
Standoff/dry bases (shimmed): Pros – Easier to install, allows for post adjustment. Cons – May not provide sufficient support for heavy loads, increased risk of corrosion. Lifecycle – Higher maintenance due to potential water intrusion, shorter service life.
Coated/galvanized systems: Pros – Enhanced corrosion resistance. Cons – Additional cost for coatings or galvanization process. Lifecycle – Depends on coating quality and application; can extend service life significantly.
Weigh these factors based on your project’s specific needs, local climate, and maintenance capacity to make an informed decision.
Conclusion
Protecting steel posts starts with solid base plates, properly seated grout pads, and good drainage. When you lock these in correctly, you prevent rust, keep the post vertical, and maintain a clean, durable look for years to come. Safety and careful checking at every step are non negotiable.
Check in this order: confirm the layout and anchor bolt positions against the plan, verify the base plate size and standoff are correct, prepare the Form and concrete surface, mix and place the concrete or non-shrink grout with proper curing, and install drainage and moisture-management features before final hardening. Test a small area first, wire brush any rust-prone spots, wear PPE, mix accurately, and cure as specified. Do not rush the pour or skip drainage checks, and recheck codes and specs before proceeding.
Two common mistakes to avoid are rushing embeds without proper standoff and grout support, and neglecting drainage that leads to standing water near the base. A simple safety rule: never drill into an already hardened concrete, and always double-check bolt alignment and level before the concrete grabs. If you feel unsure about layout, bolt length, or the right grout pad thickness, pause and verify a short test section first.
If the project conflicts with local codes, or if you face awkward access, complex backfill, or uncertain soil conditions, call a professional. Otherwise, push ahead with measured steps, document each check, and celebrate a solid, rust-resistant install that will last. You’ve got this—steady work now beats costly fixes later.
FAQ
What’s the right choice between grouted base plates and standoff base plates for steel posts?
Grouted bases fill the space around the post and can help lock it in place. Standoff bases leave a gap for moisture to drain and air to circulate. Check the manufacturer’s instructions and local rules to see what they recommend for your post size and load.
How should anchor bolts be specified for DIY installations?
Anchor bolts should match the base plate holes and the load path from the post. Use hardware that is rated for exterior use and compatible with the concrete mix you’re using. Always read the bolt and base plate labels or instructions for installation details.
What drainage strategies prevent rust around concrete and steel posts?
Provide a clear drain path around the base and avoid creating water traps. Use a base design that allows moisture to escape and inspect areas where water can pool. If unsure, follow the drainage guidance on the product labels and plan for proper slope and ventilation.
What should I look for in a concrete mix for embedment around steel posts?
Use a mix that provides good strength and durability for exterior embeds. Avoid mixes that are too rich in cement or additives unless the product instructions call for them. Always verify with the concrete supplier’s guidance and the project’s local requirements.