
Introduction
ASR is a chemical reaction in concrete between alkalis and reactive silica in aggregates that can lead to slow expansion and cracking. In the field, it can look like cracking, blistering, or powdery patches that mimic other problems. Understanding these symptoms helps you tell whether you might be dealing with ASR or something else.
Spot checks matter because ASR can evolve slowly and resemble other failures you see on a slab or countertop. Lab-style tests and references like the standard mortar bar test exist, but for DIY work you should check the product labels and local rules to know what to look for. If you suspect ASR, follow the instructions on materials and seek professional guidance rather than guessing.
Key takeaways
- Understand ASR basics: alkali-silica reaction causes expansion and cracking in concrete.
- Prioritize testing: spot checks guide maintenance before structural distress appears.
- Field checks should compare surface patterns to known ASR symptoms and other failures.
- Conventional lab methods, including ASTM C1260, provide rapid ASR indicators.
- Petrographic examination confirms ASR mechanisms; request qualified labs to interpret.
- Document sample preparation, monitoring, and measurement; maintain clear audit trails.
Table of Contents
- Introduction
- Key takeaways
- What Is Alkali-Silica Reaction (ASR)?
- Why ASR Testing and Spot Checks Matter
- Field Spot Checks and Visual Checkpoints
- How ASR Symptoms Mimic Other Concrete Failures
- Laboratory Test Methods: Overview and When to Use Each
- Petrographic Examination and Microscopy
- Sample Preparation, Monitoring and Measurement Best Practices
- Mitigation, Prevention, and Program Planning
- Conclusion
- FAQ
What Is Alkali-Silica Reaction (ASR)?
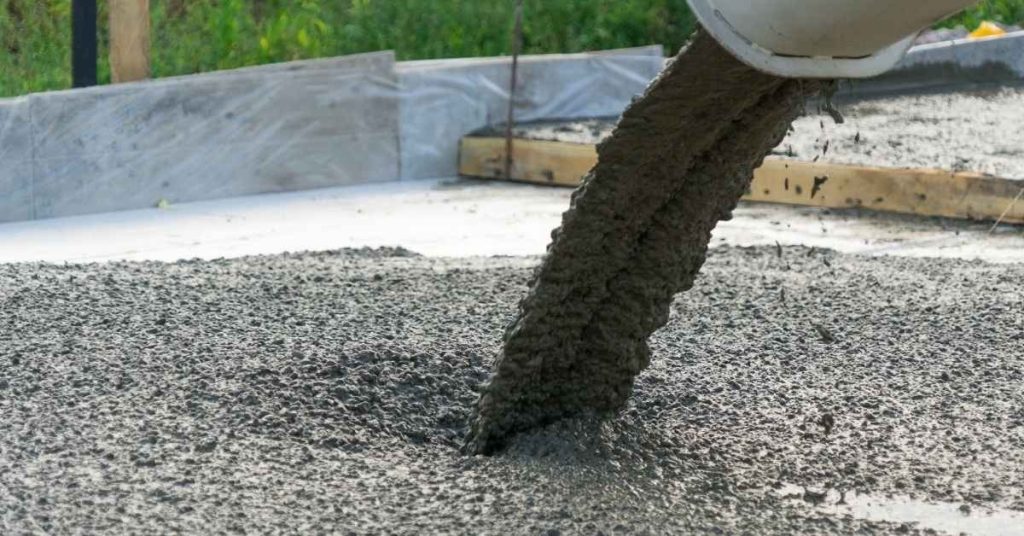
ASR is a chemical reaction that can happen when alkalis in cement meet reactive silica in some aggregates. Over time, this reaction can lead to swelling and cracking in concrete. It matters because the reaction can alter how the concrete behaves under moisture and load.
In plain terms, alkali ions from cement interact with certain silica minerals when moisture is present, forming a gel that expands as it absorbs water. The main factors are cement alkalinity, the presence of reactive silica minerals, and ongoing moisture. You may see ASR-related cracking and gel staining that look different from other deterioration modes, which helps in recognizing the issue on site.
Chemical mechanism and how gel forms
The heart of Alkali-Silica Reaction (ASR) is a chemical reaction. Here’s what happens:
Alkali ions from cement, like sodium and potassium, meet certain silica minerals in aggregates when there’s moisture around. They react, forming a gel.
This gel loves water. It absorbs it, swells up, and puts pressure on the concrete. Over time, that pressure causes cracking and expansion – that’s ASR at work.
Reactive aggregate types and sources
Not all aggregates are created equal when it comes to ASR. Some minerals in them can react with alkalis:
Opal, chalcedony, and some forms of quartz are common culprits. They’re found in sandstones, shales, and other rocks.
Regions where these reactive minerals are prevalent have a higher risk of ASR. It’s like playing geological roulette – you never know when that reactive silica might show up.
Environmental and design triggers
ASR needs the right conditions to start its damaging dance. Here are some key players:
Moisture: ASR loves water. The more there is, the faster it reacts.
Temperature: Warmer temps speed up the reaction. It’s like a slow cooker for concrete.
Mix design and curing: If you’ve got too much alkali in your cement or not enough paste to coat all those aggregates, ASR has an easier time getting started. And if your concrete doesn’t cure right, that leaves moisture hanging around, feeding the reaction.
Why ASR Testing and Spot Checks Matter
The purpose of ASR testing is to detect signs that inform structural safety, durability, and long-term maintenance costs. It helps determine how the concrete may perform in the future. Spot checks provide a quick sense of risk without committing to full laboratory workups.
Misdiagnosis can lead to unnecessary repairs or missed progression of ASR, so early, accurate spotting is crucial. Field indicators can guide where to look more closely and when to bring in lab verification. The results tie into lifecycle economics by guiding timing and type of interventions, and you should consider material sources, regional susceptibility, exposure, structure type, and age when planning tests and checks.
Durability, Safety, and Cost Implications
ASR can silently degrade your concrete over time. It starts with tiny cracks, then expands to cause popouts, map cracking, and even structural distress.
Undetected ASR means accelerated deterioration. You might not notice until it’s serious – costly repairs or even safety risks.
Early detection through spot checks helps maintain durability, ensures safety, and saves money in the long run. It’s like catching a cold early; treatment is easier and cheaper.
When to Escalate from Spot Checks to Full Laboratory Testing
Spot checks are quick, but they’re not definitive. You need lab tests for confirmation.
Escalate when you see multiple signs of ASR or if one sign is severe. Also, consider age and exposure conditions – older concrete or harsh environments might warrant earlier testing.
Don’t wait until it’s obvious. Early intervention saves money and prevents bigger problems down the line.
Field Spot Checks and Visual Checkpoints
Look for clear visual indicators that point toward ASR rather than other issues. Map-like or spiderweb cracking, panelized or random cracking, and any gel pockets or salt staining near joints can be clues. Exudation and honeycombing can also appear in ASR-affected areas.
On site, assess crack width and how cracks distribute across floors, noting if cracks change with moisture or align with joints. Photograph the affected zones and document weather and exposure. Use simple tools like a tape to log widths and keep a photo grid for tracking progression over time.
Visual symptoms that commonly indicate ASR
Before you start any spot check, familiarize yourself with these visual signs. They’re your first line of defense against ASR.
- Map-cracking: Spiderweb patterns radiating from a single point? That’s a red flag.
- Panelized or random cracking: Cracks following no logical pattern? Suspect ASR.
- Brick-shaped or honeycombing appearance: Concrete looks like Swiss cheese? Time for a closer look.
- Exudation or powdery efflorescence: White, powdery stuff coming out of cracks? That’s gel exudate.
- Gel or salt staining near joints or rebar: Stains around reinforcement? ASR might be at work.
- Crack alignment with joints: Cracks following joint lines? Could be a sign of ASR.
- Crack width change with moisture: Cracks open and close with the weather? That’s a warning.
- Panel movement or bulging: Slab moving or bulging? Time to investigate further.
Quick rule: If you spot any of these, don’t jump to conclusions. Use your photos and notes to guide next steps.
Tools and materials checklist for a quick spot check
Before you head out, make sure you’ve got these tools. They’ll help you get the job done right.
- Camera: A good camera (even your phone) to document what you find.
- Hammer and chisel: To gently tap and listen for hollow sounds.
- Moisture meter: To check moisture content in the concrete.
- Sketching tools (paper, pen): To draw a simple map of your findings.
- Tape measure or calipers: To log crack widths accurately.
- Scale-referenced objects: Something to show size in photos, like a ruler or coin.
- Sample bags (optional): For collecting small concrete samples if needed.
- Eye and hand protection: Safety first! Wear gloves and eye protection.
Quick rule: Don’t forget to label your photos and notes clearly. It’ll help you keep track of what you’ve found.
Early warning signs before visible damage
Sometimes, ASR shows up in subtle ways. Keep an eye out for these early indicators.
- Changes in stiffness: Concrete feels less stiff than it should? That’s a sign of trouble.
- Microcracking (felt with tapping): Tapping sounds hollow or different? There might be microcracks.
- Localized moisture patterns: Patches of dampness where there shouldn’t be any? That’s worth investigating.
- Concrete feels warm to touch: Heat can speed up ASR. If it’s warmer than usual, take note.
- Rebar corrosion signs: Rust stains or rebar popping out? That could be ASR at work.
Quick rule: If you spot any of these, don’t ignore them. They’re your early warning system.
How ASR Symptoms Mimic Other Concrete Failures
The ASR symptom set includes visual and structural signs that can overlap with other failures. Understanding the pattern helps frame a diagnosis. This section helps you sort out what you are seeing on the surface and in the structure.
Visual patterns differ among issues: ASR often shows map or net cracking and gel pockets, while shrinkage cracking tends to be more uniform, and freeze-thaw damage can appear layered or compound. Consider environmental context, how the crack changes with moisture, and whether there is nonlinear deformation that points to ASR. Use a field-to-lab approach to confirm with testing when needed.
ASR vs Drying Shrinkage and Restraint Cracking
First, let’s clear up the difference between ASR cracks and those caused by drying shrinkage. ASR typically produces a widespread, map-like or net-like pattern of cracks. These are often random and don’t follow any specific direction or pattern.
Shrinkage cracks, on the other hand, are usually more uniform and parallel to each other. They often align with joints or restraints in the concrete. If you see cracks that seem to line up with where walls meet floors or where slabs join, it’s likely shrinkage.
ASR cracks can also form gel pockets on the surface, which are not typically seen with shrinkage cracking. These gels are a result of the alkali-silica reaction and indicate ASR is at play.
ASR vs Freeze-Thaw, Scaling, and Salt Damage
Freeze-thaw damage leaves distinct clues. You’ll see compound, layered cracking that often follows the surface of the concrete. It’s usually more localized than ASR cracks and can be accompanied by scaling – a flaking or peeling off of the concrete surface.
Salt damage also leaves its mark. Look for white efflorescence on the surface, which is a sign of salt deposits. This isn’t typically seen with ASR alone, but it can be present if there’s a combination of mechanisms at play.
Freeze-thaw and salt damage are often seasonal, worsening in cold weather or when de-icing salts are used. ASR, however, progresses over years with continuous exposure to moisture and alkalis.
ASR vs Corrosion-Related Cracking
Corrosion of reinforcing bars can cause cracks in concrete, but they look different from ASR cracks. Rust staining around the crack is a telltale sign of reinforcement corrosion. You might also see spalling – where chunks of concrete break off over the rebar.
ASR cracks, on the other hand, don’t usually show rust staining or spalling over rebar. They’re more likely to have gel pockets and a map-like pattern.
To check for corrosion, you can perform electrical tests like half-cell potential or linear polarization resistance. These tests measure the likelihood of corrosion in the reinforcement. If you suspect corrosion, consider using a cover meter to check the depth of the rebar from the surface.
Laboratory Test Methods: Overview and When to Use Each
Laboratory methods fall into families like accelerated screening, long-term prism tests, and supportive petrographic work. Each type contributes differently to diagnosing ASR. They help confirm field observations and guide mitigation decisions.
Refer to the standards and test outlines for exact procedures and durations, and decide whether initial screening or full confirmation is appropriate. Consider material type and project stage when choosing methods, and align sample preparation with moisture and curing requirements to ensure meaningful results.
Accelerated laboratory methods (mortars and quick screens)
Accelerated screening tests are your first line of defense against ASR. They’re fast, giving you early indication of aggregate reactivity.
ASTM C1260 is the go-to standard here. It uses mortar bars, exposed to high temperatures and humidity for just 14 days. If expansion exceeds 0.1%, it’s a red flag.
These tests are great for initial screening, but remember, they’re accelerated. Real-world conditions might not match up perfectly.
Long-term concrete prism tests and confirmatory methods
When you need confirmation, turn to long-term concrete prism tests. They mimic real-world conditions better than accelerated tests.
ASTM C1293 is the standard here. Concrete prisms are cured under controlled conditions for 6 to 12 months. Expansion over time tells the story.
These tests take longer, but they provide a more accurate picture of ASR risk in your specific concrete mix.
When to request full lab packages (chemical, mechanical and petrographic)
Sometimes, field signs and initial screening don’t tell the whole story. That’s when you need a full lab package.
This includes expansion tests like ASTM C1293, petrographic analysis (ASTM C295), and chemical analyses (like X-ray diffraction). They provide forensic clarity, helping pinpoint reactive aggregates or other culprits.
Request this when you need to make critical decisions about repair, replacement, or mitigation. It’s a bigger investment, but it can save you from costly mistakes.
Petrographic Examination and Microscopy
Petrography confirms reactive silica, detects ASR gel, and reveals microcracking patterns that distinguish ASR from other distress. These observations are often decisive in the differential diagnosis. Thin sections and polished samples help preserve key features for analysis.
Sampling and preparation involve collecting representative sections, embedding, and preparing appropriate cuts for microscopic work. Polarized light microscopy and, if needed, SEM-EDS can highlight gel morphology, quartz replacement rims, and the cracking networks that signal ASR, while correlating with field history for accuracy.
What Petrographic Examination Reveals
Petrography is like a concrete detective, finding clues to ASR. It looks at thin sections of your concrete under a microscope.
Reactive aggregates are the first suspects. They look gritty or frosty, with sharp edges. If you see these, it’s a red flag for ASR.
Next, petrography hunts for ASR gel. This looks like a jelly-like substance filling cracks or coating aggregate surfaces. It’s colorless and amorphous – no crystal structure like other minerals.
Microcracks are another giveaway. ASR causes tiny cracks that radiate out from aggregates, like spokes on a wheel. These aren’t typical of other distresses.
Microscopy Techniques and Gel Identification
Microscopy is our magnifying glass, letting us see ASR clues up close. We use two types: optical (like a regular microscope) and electron (for extra detail).
Optical microscopy uses polarized light to make ASR gel stand out. It looks like colorful, jelly-like areas. Quartz replacement rims – where quartz turns into gel – also show up as color changes.
Electron microscopy, like SEM-EDS, adds value when we need more detail. It can spot tiny cracks and identify gel chemistry. But it’s usually used to confirm findings from optical microscopy.
Reporting findings is key. We note gel morphology (shape), associations with cracks, and distribution throughout the concrete. This builds a strong case for ASR diagnosis.
Sample Preparation, Monitoring and Measurement Best Practices
Field sampling should capture representative portions of the mixture and exposure to ASR-prone aggregates. Document lot identifiers and exposure conditions to support defensible conclusions. Keep samples intact until they reach the lab or are prepared for testing.
Handling, curing, and conditioning must minimize artificial influences. Use consistent methods and record every step. Plan monitoring approaches that align with the tests you intend to run, and track results over time to support decisions about mitigation or remediation.
Field sampling and chain-of-custody basics
Choosing the right sampling locations is crucial. Take samples from areas suspected of ASR, but also from unaffected zones for comparison.
Dig cores or take breaks from slabs at depths where aggregates are present. Label each specimen with a unique ID, noting lot identifiers, batch dates, and exposure conditions.
Keep specimens moist during transport using sealed bags or containers to prevent drying. Maintain a clear transfer log from field to lab.
Monitoring techniques and observable metrics
Regular monitoring helps track ASR progression. Measure expansions using demountable or embedded strain gauges at regular intervals.
Keep visual logs, noting cracks, map their growth, and document any gel exudations. Use acoustic/ultrasonic checks to detect internal damage. Monitor moisture levels to rule out other causes.
Maintain consistent records using a standard format. Calibrate equipment regularly for accurate readings.
Common testing and interpretation mistakes
Even with the best intentions, mistakes can happen. Here are some to avoid:
- Poor sample preparation: Inadequate curing or improper storage can skew results.
- Misreading visual clues: Cracks due to ASR may resemble those from other causes. Compare with unaffected areas.
- Ignoring combined mechanisms: ASR can combine with other processes, complicating interpretation.
- Not considering variability: Concrete properties vary within a structure; account for this in your sampling strategy.
Regular training and thorough documentation help prevent these errors. Always consider multiple factors when interpreting results.
Mitigation, Prevention, and Program Planning
Prioritize mitigation options such as low-alkali cements and suitable supplementary cementitious materials, while adjusting mix design to reduce ASR risk without hurting performance. Select materials with documented compatibility for your project context. Plan for practical implementation in the field.
Moisture management and curing strategies help slow ASR kinetics, and design choices can reduce reactive aggregate exposure. Establish a simple ASR spot-check program, define roles, and set up data collection and documentation paths. When ASR is suspected, act quickly on moisture control and escalation toward investigation and remediation planning.
Practical mitigation strategies for existing and new concrete
Existing structures with ASR symptoms can be managed through targeted repairs, overlays, or moisture control. For new constructions, prevention is key.
Moisture Management: Control internal and external humidity, seal joints properly, and maintain consistent curing regimes to slow down ASR kinetics.
Supplementary Cementitious Materials (SCMs): Incorporate fly ash, slag, or silica fume at evidence-based dosages in new mixes. SCMs can react with alkalis and reduce the risk of ASR.
Targeted repairs or overlays can help extend the life of existing structures but are not permanent solutions. Regular monitoring is crucial to assess their effectiveness.
Designing a routine ASR spot-check and testing schedule
A regular inspection program helps monitor concrete health and detect ASR early. Here’s how to plan it:
Periodic Inspections: Schedule visual inspections every 6-12 months, depending on exposure conditions. Look for cracks, efflorescence, or other signs of distress.
Trigger-Based Sampling: If unusual cracking occurs between scheduled inspections, trigger immediate sampling and testing. This could be due to ASR or other issues like corrosion.
Laboratory Follow-Up: Budget for laboratory follow-up tests every 2-5 years, depending on risk level. These tests can confirm suspicions of ASR and help track its progression over time.
Conclusion
ASR can quietly undermine durability and appearance if you ignore it. Stay practical: test smart, start small, and protect people and concrete from costly damage.
Follow this practical check in order: inspect for suspicious cracking and efflorescence in a small, accessible area; compare symptoms to known ASR signs and rule out common look-alikes; use field spot checks first, then move to simple lab methods if you need confirmation; document readings and conditions, then plan mitigation or prevention steps based on what you find; finally, implement monitoring and a simple maintenance program to keep an eye on changes over time.
Common mistakes are pushing ahead without a clear diagnosis, skipping small-area tests, and treating symptoms instead of addressing the underlying cause. Always test in a limited, non-critical spot first, wear proper eye and skin protection, and avoid exposing yourself or others to dust or wet concrete surcharges. If you see worsening or uncertain results, pause and reassess before scaling up.
If the situation seems heavy or safety is at stake, bring in a qualified professional to confirm findings, select the right tests, and guide mitigation. When you proceed thoughtfully, you protect safety, save money, and keep the project on track. You’ve got this—steady checks, careful steps, solid results.
FAQ
What is ASR and why should a DIYer care about it?
ASR is a chemical reaction in the concrete mix that can cause expansion and cracking. It matters because damaged concrete can fail sooner than you expect and cost more to fix later. If you’re building or repairing, know if ASR is a risk in the mix you’re using.
Why is ASR testing important for a DIY project, and when should you consider it?
Testing helps confirm if ASR could affect your concrete, especially in high-alkalinity mixes or plants with reactive sands. Do the testing if you’re unsure about materials or if failures appear soon after curing. Follow manufacturer instructions and local guidance for when to test.
What are conventional lab methods like the C1260 mortar bar test and C1293 prism test?
These are standard lab methods that compare expansion behavior in controlled samples. They can indicate potential ASR risk, but results depend on the materials and setup. Always read the label and follow the manufacturer or lab instructions for proper use.
How does petrographic examination help, and what should you check about the lab work?
Petrographic exams look at the concrete under a microscope to find reactive silica and alkalies. They confirm if ASR is actually present. Check the lab’s scope, sample handling, and report details in the instructions or datasheet.