

Introduction
Yes, you can paint over stained wood if the surface is prepared correctly and the right materials are used.
The guide walks through assessing the stain, abrading the surface, applying a stain-blocking primer, and selecting compatible paints to ensure the finish sticks and lasts; you’ll learn practical steps, tips for avoiding common adhesion failures, and real-world scenarios where painting over stained wood makes sense.
Key takeaways
- Paint can work on stained wood with proper prep.
- Clean and degrease the wood to ensure a smooth surface free of debris before painting. Inspect for any imperfections or damage that need repair.
- Sand lightly or use a bonding primer for paint adhesion. Sanding should be minimal to avoid removing the stain layer.
- Apply multiple thin coats of primer to seal the stain and improve paint adhesion. Ensure the primer is compatible with both the stained wood and your chosen paint.
- Fill gaps, caulk, and repair surface issues before painting to create a smooth base for the finish coat.
- Use techniques like back-rolling for a durable painted finish. Back-rolling involves rolling over freshly brushed areas in a perpendicular direction to eliminate brush marks and ensure an even application of paint.
- Maintain painted wood with regular cleaning and touch-ups to preserve its appearance and longevity.
Table of Contents
- Introduction
- Key takeaways
- Quick Answer and Decision Guide
- Tools and Materials Checklist
- Preparing Stained Wood — Cleaning, Degreasing, and Inspection
- To Sand or Not to Sand — Methods That Make Paint Stick
- Primer Selection and Application for Stained Wood
- Filling, Caulking, and Surface Repair Before Painting
- Painting Step-by-step: Techniques for a Durable Finish
- Longevity, Maintenance, Costs, and Common Mistakes to Avoid
- Conclusion
- FAQ
Quick Answer and Decision Guide
Painting over stained wood is a smart move when the wood is sound, the stain is compatible with paint, and you want a uniform finish. Use a quick decision flow—keep the stain if compatible, paint over if adhesion is solid, or refinish if damaged or sealed with a non-adhesive finish.
This matters because it tells you whether to prep, prime, or strip, and it highlights the top factors: wood condition, stain type, and usage. Following a simple, stepwise plan saves time on the job and helps you avoid common pitfalls like over-priming or mismatched sheen.
When Painting over Stain Is Advisible
If your wood surface has a dated look, is damaged and needs repair, or you simply want to change the color without going through extensive refinishing, painting over stain can be a practical solution. This approach works well for indoor furniture or trim where the original finish isn’t of high value.
Painting also offers versatility in terms of protecting wood from wear and tear, especially in areas with high traffic or moisture exposure. It’s an efficient way to cover up minor imperfections like scratches or discoloration without stripping down to bare wood.
However, it’s important to assess the condition of your wood before deciding to paint over a stain. If there are cracks, rot, or peeling layers, these issues need addressing first to ensure the new coat adheres properly and lasts long-term.
When You Should Refinish or Keep the Stain
In certain cases, it’s best to leave a stain untouched. High-value antiques with intricate details and desirable grain patterns should be preserved rather than painted over. The original finish on such pieces often adds significant value and character.
Structural wood elements like beams or columns that showcase natural beauty through their grain also benefit from keeping the stain intact. Refinishing these items can enhance their appearance while maintaining their integrity.
If your existing stained surface is in excellent condition without any signs of wear, it might be better to keep it as-is rather than introducing a new layer of paint. This preserves the original look and feel of the wood, ensuring its timeless appeal remains intact.
Tools and Materials Checklist
This section provides a project-ready checklist of tools and materials you’ll actually use for surface prep, priming, and finishing. It covers surface prep tools, abrasives, cleaners, primers, paints and sealers, brushes and rollers, PPE, and containment and cleanup supplies, with concise usage notes that tell you when to use each item and how to prep properly.
Plan quantities and substitutions so you don’t run short mid-project. Ensure you have the right grit levels for sanding, enough rollers for large areas, and budget-friendly alternates that still deliver solid adhesion. Safe PPE, good ventilation, and a simple adhesion test prevent rework and flaky bonds.
Recommended Primers and Paints (Product Types)
Select the right primer and paint based on surface condition and intended finish:
- Stain-blocking primers: Choose high-quality products designed to cover stained surfaces effectively.
- Bonding primers: Use for rough or uneven surfaces, providing better adhesion between old and new finishes.
- Oil-based paints: Ideal for outdoor durability due to moisture resistance.
- Water-based paints: Suitable for indoor applications with low odor and quick drying time.
- Budget-friendly primers: Look for good coverage at a lower price point without compromising quality.
- Premium paints: Invest in higher-quality paints for better durability and finish longevity.
Test small areas first to confirm primer and paint compatibility before proceeding with larger applications.
Safety Gear and Ventilation Equipment
Protect yourself from harmful chemicals by wearing appropriate safety gear and ensuring proper ventilation:
- Respirator: Use a respirator when working with oil-based products or in enclosed spaces to filter out paint fumes.
- Gloves: Wear durable nitrile gloves for better grip and protection from solvents and paints.
- Eyewear: Use safety goggles to shield eyes from splashes and dust particles.
- Ventilation: Open windows or use fans to circulate air, reducing exposure to fumes.
- Floor coverings: Lay down drop cloths or plastic sheets to protect floors from spills and drips.
- Hazardous waste disposal: Dispose of paint cans and containers according to local regulations.
Stop work if you experience dizziness, headaches, or other symptoms indicating poor ventilation. Adjust your workspace for better air circulation.
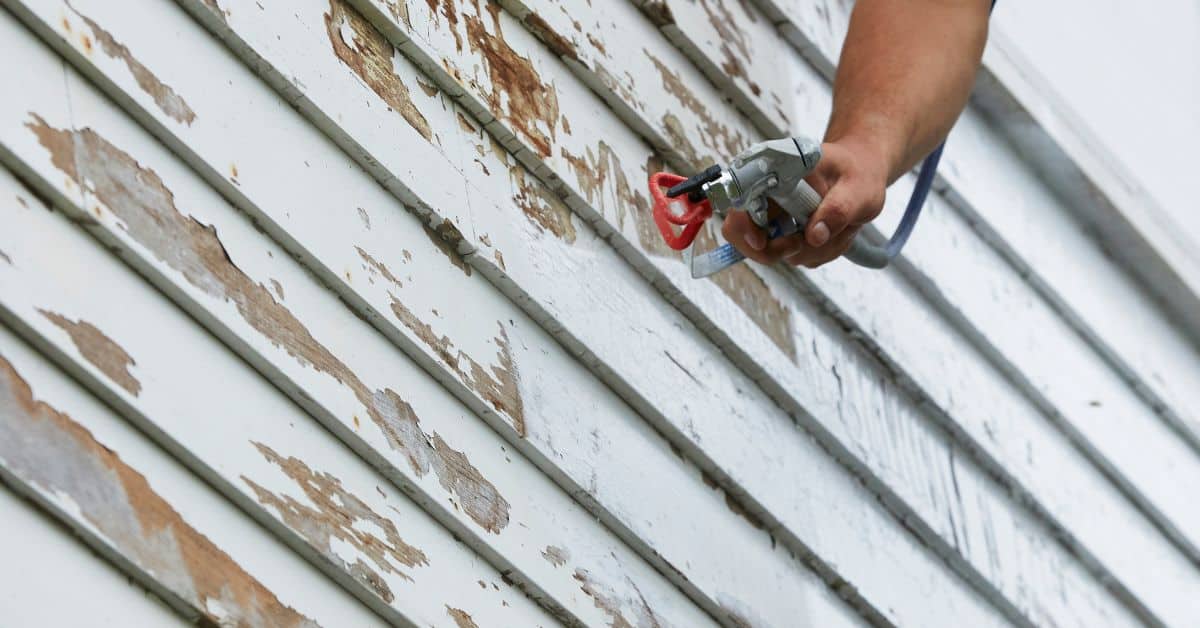
Preparing Stained Wood — Cleaning, Degreasing, and Inspection
Clean the wood thoroughly to ensure proper bonding of any new coating. Use mild soap for general dirt and a degreaser for kitchen oils or outdoor wax. Rinse well and dry completely to prevent water from being trapped under coatings.
Inspect the surface carefully for soft spots, cracks, nail pops, corrosion, peeling finish, and hidden damage. Decide on repair versus replacement before proceeding. Choose mechanical prep (scuffing) or chemical prep as appropriate, and select the right sanding grit based on current finish and wood condition to avoid clogging or tearing the wood.
How to Test for Existing Topcoats and Finish Sheen
To determine if your wood has a topcoat or what kind of finish it is, use simple tests. A solvent test helps identify polyurethane, shellac, varnish, while a water bead test checks for raw stained wood.
- Apply rubbing alcohol to the surface and observe if it beads up or soaks in.
- If alcohol beads up, try mineral spirits instead.
- A water drop should spread out on raw stain but typically beads up on sealed wood.
- Note any sheen levels—flat, satin, semi-gloss, gloss—and document them for reference.
- Test multiple spots since finishes can vary across a surface.
- If unsure, consult the manufacturer’s label or ask an expert.
Dealing with Tannin Bleed and Water Stains
Tannin bleed appears as dark spots or streaks on wood. To address this issue, first identify the type of stain using a water test.
- If tannins are bleeding through, apply a stain-blocking primer over the area.
- For isolated stains, spot prime only those areas rather than the entire surface.
- Bleach can be used for certain types of stains but should be applied carefully to avoid damage.
- Clean and dry the wood thoroughly before applying any treatment.
- Inspect for signs of water damage such as warping or discoloration.
- If extensive, consider replacing damaged sections rather than attempting repair.
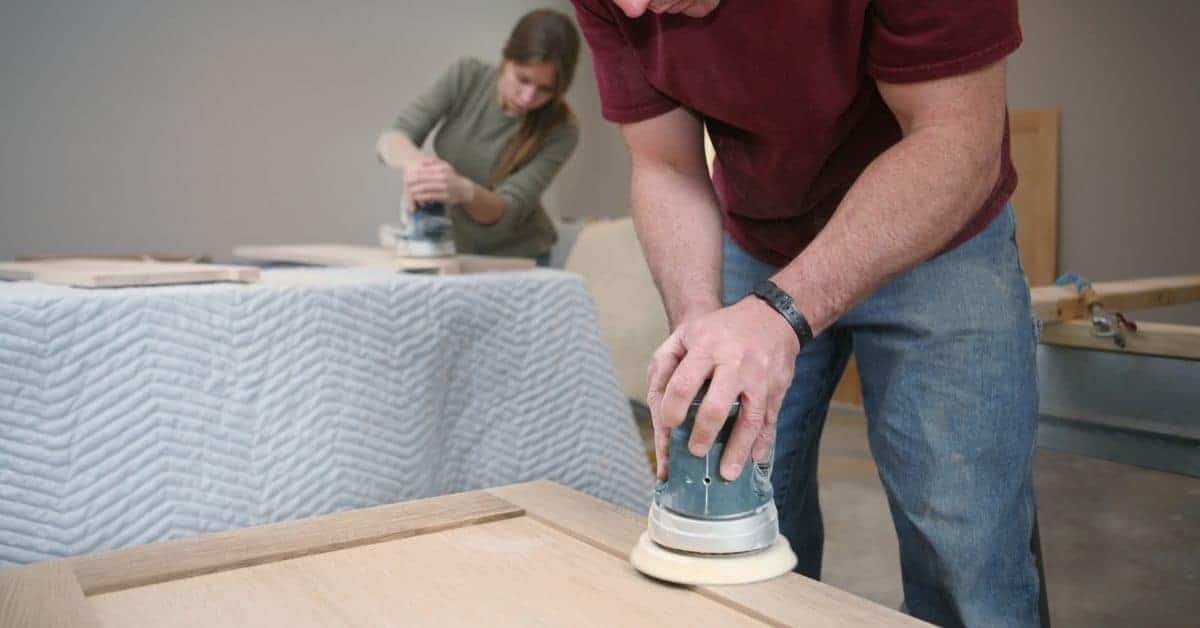
To Sand or Not to Sand — Methods That Make Paint Stick
You decide how to prep based on surface and paint goals: full sanding, deglossing, scuffing, or skipping sanding with a bonding primer. Full sanding removes old finish and exposes a fresh surface but creates dust and can raise grain on wood. Deglossing uses chemicals or light mechanical action to dull sheen and improve grip with less mess.
Scuff-sanding gives a middle ground with a matte grip and less dust, while skipping sanding works only with a compatible bonding primer when the surface is clean, dry, and properly sealed. That choice affects durability, risk of raised grain or poor adhesion, and how many coats you’ll need, so weigh time, dust, and potential rework. Do a quick surface check: stain type, existing finish, moisture, temperature, humidity, and a scratch test, then pick primers and topcoats compatible with latex or oil paints.
Proper Sanding Steps and Grit Recommendations
For doors and cabinets, start with a medium grit around 100 to remove rough spots and old paint. Finish with something finer like 220 for a smooth surface ready for paint.
For furniture, begin at a slightly finer grit such as 150 and finish with 320 grit for a fine, scratch-free finish that won’t show any imperfections when painted over.
Keep dust under control by using a vacuum or damp cloth between sanding stages. It’s crucial to ensure the surface is free of debris before moving to finer grits. Stop and reassess if you notice excessive dust or scratches that won’t smooth out, indicating it might be time to call in professional help.
Chemical Deglossers and Alternatives for Delicate Surfaces
Liquid deglossers are a game changer when dealing with delicate surfaces that can’t handle sanding. They work by breaking down the old paint’s surface, making it rough enough to accept new paint without needing to scratch it up yourself.
When using chemical deglossers, safety comes first. Always wear gloves and goggles, and ensure there’s good ventilation in your workspace. If you’re working indoors, open windows or use a fan to keep the air moving.
If sanding isn’t an option because of surface sensitivity or if it’s too much work, liquid deglossers are your go-to solution. They’re especially handy for furniture and other items where mechanical abrasion could cause damage.
Primer Selection and Application for Stained Wood
Select a stain-blocking primer to seal in tannins, resin, or dye bleed. Use bonding primers on glossy or slick surfaces that won’t adhere well to paint. For tough stains, apply one coat of stain-blocking primer followed by a bonding primer, or two coats of bonding primer for knotty or resinous wood.
Shellac-based primers can be used with water-based topcoats in most cases but avoid using shellac over latex if possible due to potential adhesion issues. Latex-based primers are easier to use and clean up, making them a good choice for most projects.
Clean the surface thoroughly before applying primer. Lightly sand to give the primer grip without removing too much stain color. Watch out for dark stains and knotty areas; apply extra coats or use tinted primer if necessary. Follow drying times strictly and test adhesion before topcoating.
How to Apply Primer Correctly (Technique)
To apply primer correctly, start with a clean surface:
- Mix the primer thoroughly before application.
- Brush in small sections or roll using a 3/8-inch nap roller for smooth finishes. Avoid overspray when spraying.
- Allow the first coat to dry completely as per manufacturer’s instructions—typically several hours but check the label.
- If needed, lightly sand between coats with fine-grit paper (220-320 grit) and wipe down with a tack cloth before applying additional coats.
- Apply at least two thin coats for best results. More may be necessary on dark stains or areas prone to bleed-through.
Ensure the final coat is smooth and free of runs or sags for optimal paint adhesion.
Spot Priming vs. Full-priming Strategies
Spot priming involves applying primer only to areas with bleed-through or dark stains, while full-priming covers the entire surface. Use spot priming when dealing with isolated issues.
For uniform color and adhesion across a large area, especially if there’s significant stain variation, opt for full-priming. This ensures consistent coverage and reduces visible differences in the finished paint job.
Filling, Caulking, and Surface Repair Before Painting
Before painting stained wood, check for cracks, gaps, and raised grain. Fill deep gouges with a suitable filler or epoxy to ensure a smooth base.
Best Practices for Caulking Painted Wood Joints
Select an appropriate caulk that can handle movement without cracking, such as flexible acrylic-latex or silicone-based options. Apply the caulk before painting to prevent paint from seeping into gaps and ensure a good seal. Smooth out excess caulk with a damp finger or specialized tool for an invisible seam. Tape off edges to avoid overspill.
Repairing Veneer and Water-damaged Edges
If veneers are loose, use wood glue to reattach them and follow manufacturer instructions for cure times. For water damage or raised grain, lightly sand rough spots and fill gaps with wood filler. Feather edges for a smooth transition into existing surfaces.
Stop and reassess if repairs do not adhere properly or if damage is extensive; call a professional in such cases.
Painting Step-by-step: Techniques for a Durable Finish
This section guides you through the complete painting process from prep to topcoat, focusing on surface testing, primer selection, and applying even, durable coats. Follow exact coat counts, recoat intervals, and tips to avoid lap marks.
Step-by-step Process
Clean and repair your wood surface before starting. Apply a bonding primer if necessary over stained wood to prevent tannin bleed.
- Inspect and prep the wood for painting. Clean and fix any damages or imperfections.
- Apply a bonding primer as needed, especially on stained wood to prevent bleeding.
- Follow manufacturer instructions for drying times between coats before applying paint.
- Use a brush or roller to evenly spread the paint without leaving lap marks.
- Allow each coat of paint to dry completely before adding another layer. Check for adhesion and smoothness.
After painting, inspect your work for any missed spots or uneven areas.
Brush, Roller, and Spray Tips for Different Projects
A high-quality brush works well on furniture and cabinets to reach tight corners and edges without scratching the surface.
Rollers are ideal for larger flat surfaces like doors or walls. Choose a roller cover with medium nap for even coverage without streaks.
Spraying is best for achieving an ultra-smooth finish, especially on trim and intricate details. Use a spray gun set at low pressure to avoid over-spray and uneven application.
Drying, Curing, and When to Reassemble Hardware
Understanding the difference between dry-to-touch and fully cured paint is crucial. Dry-to-touch means you can lightly handle the surface without smudging it.
Wait at least 24 hours after your final coat before reinstalling hardware or using the painted area extensively.
Longevity, Maintenance, Costs, and Common Mistakes to Avoid
Ensure longevity by preparing the surface well, using appropriate primer, and applying a proper film thickness that can withstand moisture and sun exposure. Different projects have varying wear rates: interior trim may last years with good prep, while exterior siding and decks face more challenges from weather and UV.
Maintain painted wood regularly to prevent issues like peeling or cracking. Inspect annually and clean surfaces before recoating as needed. Set a maintenance schedule that includes cleaning, inspections, and re-coatings based on environmental exposure and material type.
Budget for materials including primer, topcoat, sealer, cleaners, sandpaper, brushes, rollers, tape, and PPE. Costs vary by project size and regional supply availability.
Common mistakes include skipping prep work, using incompatible products, or rushing the drying process. To avoid these issues, clean and de-gloss surfaces thoroughly, choose compatible materials, follow recommended curing times, and address thin or uneven coats with light sanding and spot-priming before recoating.
Cost Estimate and Materials Calculator (Example)
To estimate costs for painting wood, start by measuring the surface area. For a small project like a single door or cabinet, expect to spend around $50-$100 on materials including primer and topcoat.
Larger projects such as an entire room’s interior trim or exterior siding may cost between $200-$400, factoring in additional supplies like sandpaper, brushes, rollers, and protective gear. Account for any surface repairs needed before painting.
Use a materials calculator to determine exact quantities based on project dimensions, ensuring you have enough without overbuying.
Common Failures and Quick Troubleshooting
If paint starts peeling or blistering, it often indicates poor prep work or environmental factors like moisture. Sand the affected area lightly and clean thoroughly before reapplying primer and topcoat.
Brush marks usually result from applying too much paint at once or using an incorrect brush size. Spot-prime and apply a thin coat of paint with proper technique for quick fixes.
If you encounter cracking or chalking, it may be due to aging materials or UV exposure over time. Wet-sand the surface and apply fresh primer followed by your topcoat for best results.

Conclusion
The key to a durable, good-looking finish is solid prep and smart steps that protect the wood and your health. If you do the cleaning, degreasing, inspection, and primer correctly, you’ll get paint that sticks and lasts, with shocks to your wallet kept in check.
To move forward, think in a simple sequence: clean and degrease the surface, inspect for damage and repair or fill as needed, decide whether to sand based on the wood and finish, pick a compatible primer, fill gaps and seal joints, then mask, test a small area, and finally apply the chosen paint with proper technique. Do each task in this rough order, and keep test patches to verify adhesion before committing to the full job.
Common mistakes to avoid are skipping degreasing, skipping or rushing sanding, and using the wrong primer or filler for stained wood. Don’t skip safety gear, and don’t rush the paint cure—let each coat dry fully and ventilate the area. Work in good light, keep a damp cloth handy to wipe drips, and store left-over materials safely away from children and pets.
If the project feels risky or the wood is severely damaged, it makes sense to call a pro rather than fight with unpredictable results. When in doubt, pause, reassess, and get a professional opinion. With careful prep and steady hands, you’ll have a finish that lasts and looks right for years to come.
FAQ
1. Can I really paint over stained wood?
Yes, you can. But there are rules. Stain sits on top of the wood, not in it. So, if your stain is in good shape, painting over it works.
2. How do I know when it’ll stick?
First, inspect your stain. If it’s still shiny or damp-looking, wait till it’s completely cured. Then, wipe the wood with a damp cloth to check if the stain lifts off. If not, you’re good to paint.
3. Do I need to sand before painting?
Yes, absolutely! Sanding gives your paint something to grip onto. Use light-grit sandpaper and wear a dust mask. Thoroughly clean the wood afterward to get rid of any debris.