
Introduction
Position anchor bolts for pergola posts so they stay clear of edges and provide a strong, stable connection.
The article walks through practical layout tips, spacing guidelines, and common-sense rules of thumb you can apply when setting posts.
You’ll learn how to plan bolt patterns, avoid edge proximity, and adjust layouts to fit different post sizes and foundation conditions.
Key takeaways
- Choose sunny, level site with firm soil and clear post layout.
- Mark layout using string, stakes, and compass for true alignment.
- Use correct anchor type per soil and pergola load requirements.
- Pre-drill clearance holes and verify bolt spacing against posts.
- Level posts before tightening, brace temporarily, and protect anchor heads.
- Seal, backfill, and reinstall beams without disturbing anchors.
Table of Contents
- Introduction
- Key takeaways
- Site selection and planning for anchor layout
- Tools, materials, and anchor options
- Measurements, angles, and marking for accurate bolt placement
- Laying out anchor positions on footings and posts
- Installing anchors and setting pergola posts
- Leveling, bracing, and installing beams while protecting anchor placement
- Troubleshooting, safety, costs, and finishing touches
- Conclusion
- FAQ
Site selection and planning for anchor layout
Select a pergola location with soil conditions, drainage, and utilities in mind. Consider setback distances from edges and nearby features to avoid edge conflicts. Gather initial measurements to support a clear anchor layout plan.
Create a grid or diagram that shows pergola footprint, post spacing, and planned anchor coordinates. Document site constraints such as slopes or potential obstructions. This planning helps ensure solid footing and proper edge clearance before drilling begins.
Assessing soil and footing type
The first step in planning your pergola anchor layout is understanding the soil you’re dealing with. Different soils require different footing sizes and bolt embedment depths.
Clay and silty soils need larger footings to spread the load, while sandy soils can support smaller ones. If you’re unsure, consult a geotechnical engineer.
For soft or unstable soil, consider using concrete piers instead of pads. Piers go deeper into the ground and provide better stability for your pergola posts.
Layout relative to property and obstructions
Once you’ve measured out your pergola footprint, it’s time to mark the post grid. But remember, you need setbacks from edges, nearby structures, sidewalks, and underground services.
Mark each post location with a stake or spray paint. Then, step back and visualize how your pergola will sit in relation to these features. You don’t want anchors too close to edges as this can cause splitting or torque transfer.
Stay at least 2 feet away from property lines, and check local codes for setback requirements near structures and sidewalks. Also, mark any underground services so you know where not to dig.

Tools, materials, and anchor options
List the tools and materials needed for each anchoring method you might use. Include post-base anchors, cast-in-place bolts, wedge anchors, and epoxy-set anchors, with notes on edge clearance and sleeve considerations. Check concrete strength requirements and any sleeve needs from manufacturer instructions.
Compare edge clearance, load transfer, and installation complexity for each option. Note curing or setting times and maintenance considerations. Confirm any permits or ratings required for your chosen method with local guidelines and product data sheets.
Tools and materials checklist
Before you start, make sure you have all the right tools and materials. This list will help you stay organized and avoid delays.
- Measuring tape: To ensure accurate measurements for anchor placement.
- Level: To keep your posts plumb and level.
- Pencil: For marking out measurements on the slab.
- Drill/hammer drill: With a suitable masonry bit for drilling through concrete.
- Anchor templates: To ensure consistent anchor placement and size.
- Anchors: Choose the right type based on your chosen method (post-base, cast-in-place, wedge, or epoxy-set).
- Bolt length/diameter: Ensure bolts are long enough to embed properly into the concrete and provide adequate support.
- Washers: To distribute load evenly on the post and prevent damage.
- Grout (if using cast-in-place bolts): To fill around the bolt and provide additional strength.
Quick rule: Always double-check your measurements before drilling. A few extra minutes can save you from costly mistakes.
Material specs and code considerations
The materials you choose will greatly impact the longevity and safety of your pergola posts. Here are some key factors to consider.
- Bolt embedment depth: Aim for at least 5-7 times the bolt diameter for optimal strength. Check local codes for specific requirements.
- Minimum edge distances: To prevent cracking, keep anchors at least 2-3 inches from any edges or faces of the slab. Consult local building codes for precise measurements.
- Hardware material: Use stainless steel or galvanized hardware to resist corrosion and prolong the life of your anchors.
- Concrete strength: Ensure your concrete has a minimum compressive strength of 3000 psi for optimal anchor performance.
- Anchor sleeve size: Match the sleeve size to your chosen bolt diameter to provide a snug fit and prevent movement.
Wrong material warning: Using subpar materials can lead to cracking, staining, or weak bond strength, compromising the safety of your pergola posts.
Measurements, angles, and marking for accurate bolt placement
Confirm the post base plate dimensions and the exact center-to-edge and center-to-center measurements to guide layout. Ensure edge clearances are planned for both footing and post locations. Use reliable reference points for accurate centers.
Outline transfer methods such as chalk lines, templates, or laser references to prevent drift. Document any angles or offsets needed for alignment with base plates. Prepare a repeatable marking sequence for consistency across posts.
Establishing datum lines and squaring the layout
Start by setting your baseline. Use a string line or laser level to create a straight reference from one end of your pergola run to the other.
Next, use the 3-4-5 method or a laser level to ensure your layout is square. Measure three feet along your baseline, then four feet perpendicular to it. If the resulting diagonal measures five feet, you’re square.
Confirm this by measuring both diagonals. In a perfect square, they should be equal in length. If not, adjust your layout until they are.
Templates and offsets for consistent hole placement
Use this checklist when drilling holes to ensure consistency across all posts.
- Check post base plate dimensions: Ensure you’re using the correct size drill bit that matches your anchor bolts.
- Mark edge clearances: Measure and mark the required distance from each edge where you don’t want a bolt. This prevents stress fractures in your posts.
- Measure center-to-edge: From your marked edge clearance, measure to the center of where you want your hole. Mark this point.
- Measure center-to-center: Determine how far apart you want your bolts. Measure and mark this interval from your first center mark.
- Create a template (optional): If you’re drilling multiple holes, consider creating a template using a scrap piece of wood with the hole pattern marked out.
- Use post-base plate as a jig: You can also use the actual post base plate as a guide. Place it on your footing or post and trace around it. Drill through the traced holes.
- Check for level and plumb: Before drilling, ensure your post is level and plumb. Any error here will affect your hole placement.
- Avoid overlaps: Ensure your bolt pattern doesn’t land too close to edges or overlaps with other elements like beams or rafters.
- Document offsets: Note any needed offset or stagger for alignment with base plates. This is crucial for maintaining a consistent layout.
Quick rule: Always double-check your measurements and marks before drilling. It’s easier to adjust now than later.
Laying out anchor positions on footings and posts
Mark anchor positions on footings and at the bottom of posts with a consistent grid. Use a chalk line, string line, or layout template to keep spacing and edge clearances uniform. Verify alignment before any drilling or setting occurs.
Keep embedment depth in mind and account for sleeves or post-base hardware. Double-check form edges to prevent cracking and ensure marks transfer cleanly from footing to post. Plan for quick adjustments if marks drift during form removal.
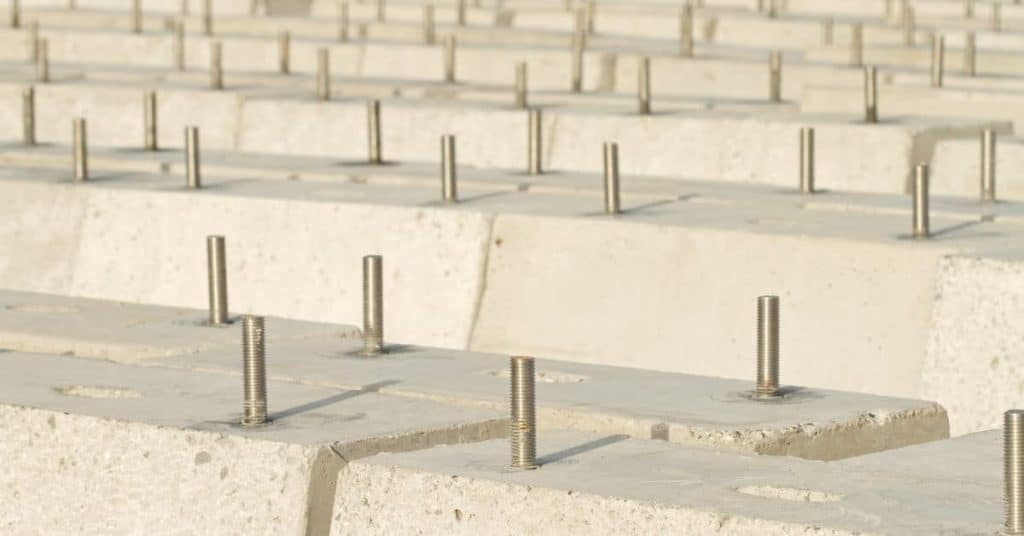
Minimum Edge Clearance Guidelines and Examples
Clearances from form edges are crucial to prevent cracking. Verify local standards, but here’s a general guideline: maintain at least 2 inches (5 cm) between anchor bolts and footing edges.
Why? Concrete needs space to cure evenly without stress. Too close, it may crack under load or when freezing/thawing.
For small footings (16×16 inches (40×40 cm)) or large bolts (>1/2 inch/13 mm), reduce clearance to 1.5 inches (3.8 cm). But never go below 1.5 inches.
Visual Checkpoints Before Drilling or Casting
Before you drill or cast, double-check your layout. It’s easier to fix now than later.
- Edge Clearance: Measure from form edges to marks. Too close? Adjust.
- Post Center Alignment: Ensure marks align with post centers. Off-center? Recheck.
- Bolt Length vs Post Thickness: Check bolts aren’t too short or too long for posts. Wrong length? Change them.
- Sleeve/Sealer Fit: Confirm protective sleeves or sealers fit post bases. Too tight? Adjust.
- Post Base Hardware: Ensure post-base hardware fits within clearances. Too big? Redesign.
- Stagger Pattern: Check multiple posts’ marks aren’t too close. Crowded? Stagger them.
- Load Path Alignment: Verify marks align with beam and brace layout. Misaligned? Recheck.
- Level/Plumb: Use a level, laser, or plumb bob to check alignment. Off? Adjust.
Quick rule: If in doubt, recheck. It’s cheaper than fixing mistakes later.

Installing anchors and setting pergola posts
Compare options such as drill-and-epoxy, wedge anchors, and casting bolts into new concrete, noting their suitability for your substrate and design. Consider how each method affects base plates, alignment, and load transfer. Ensure compatibility with chosen hardware and bases.
Plan a layout that keeps bolts away from post edges and rebar, while maintaining symmetry. Follow step-by-step procedures for drilling, cleaning, installing anchors, and aligning posts. Include curing or setting times and proper handling of epoxy or grout according to instructions.
Step-by-step for retrofit anchors in existing concrete
This section guides you through installing anchors in existing concrete footings to support your pergola posts.
- Drill holes using a hammer drill and masonry bit, 1/2″ to 3/4″ diameter, based on your anchor size. Keep them 6″-8″ from post edges and rebar.
- Clean the holes thoroughly with compressed air or a wire brush to remove dust and ensure epoxy adhesion.
- Mix and apply epoxy according to manufacturer’s instructions. Insert anchors into holes, leaving enough thread for nuts and washers.
- Torque anchors to specified values once epoxy has cured (usually 24-72 hours). Use a torque wrench to avoid overtightening.
- Check anchor installation by trying to move the post gently. If it’s solid, proceed with setting your posts.
Casting and setting anchors in new footings
When pouring new concrete footings for your pergola, follow these steps to ensure proper anchor placement.
Positioning template: Place the anchor template in the wet concrete, ensuring it’s level and vertical. Maintain a minimum edge distance of 6″ from the outer edges of the footing and 2″ from rebar.
Keep the template in place until the concrete has set enough to maintain its position (usually 1-2 hours). Remove the template carefully, ensuring it doesn’t disturb the set concrete.
Once the concrete has cured, you can proceed with setting your pergola posts on these anchored bases. Ensure posts are plumb and level, using temporary bracing if necessary.
Leveling, bracing, and installing beams while protecting anchor placement
Perform trueing and plumb checks on the posts before final securing. Use a level, laser, or plumb line and document tolerances for beam alignment. Plan temporary bracing that relieves stress on anchors during setting.
Protect anchors during leveling with shields or spacing considerations. Outline beam installation sequencing and how to apply shims to achieve level and plumb loads. Ensure loads are transferred correctly into anchors and document any deviations.
Shimming, Grout, and Final Anchor Torque
Once your posts are plumb and temporarily braced, it’s time to secure them with the right amount of torque. But first, let’s talk about shims and grout.
Use non-shrink grout under your base plates. It helps distribute loads evenly and prevents anchor deformation. Apply a thin layer, ensuring it doesn’t cover your anchor threads.
Shims come in handy when you need to fine-tune post levelness. Place them under the base plate, adjusting as needed until the post is perfectly plumb. Remember, a little shim goes a long way. Too many can cause stress on anchors.
After grout cures (follow manufacturer’s instructions), it’s time to torque your anchor bolts. Start with the bottom nut, applying even pressure until you reach the specified torque. Then move up the post, alternating between top and bottom nuts. This ensures a balanced load distribution. Once done, give each anchor a final check for levelness and proper seating.
Preventing Edge Damage During Assembly
Lifting beams onto footings can be tricky. You don’t want to overload the edges, damaging your anchors or footings. Here are a few techniques to help.
Use spreading plates under your beam ends. They distribute the load over a larger area, preventing edge damage. Temporary supports like 2x4s can also help, but remember to remove them once the beam is secure.
When lifting beams, avoid placing too much weight on one side or end. This can cause stress fractures in your footings and anchors. Use a leveling system, ensuring the beam sits evenly across the post tops before securing.
Common assembly mistakes to avoid include:
– Over-torquing bolts, which can strip threads or damage hardware.
– Ignoring proper sequencing when tightening bolts, leading to uneven load distribution.
– Neglecting to check for levelness and plumb after each step. Always double-check your work.
Troubleshooting, safety, costs, and finishing touches
Identify common mistakes such as bolts being too close to edges or misaligned anchors and outline quick checks to verify layout. Emphasize safe procedures for lifts and heavy components. Note that costs vary by method and scope and require verification on site.
Cover finishing steps like sealing around anchors and applying protective coatings. Include a maintenance plan for inspection and potential re-tightening. Provide a simple post-install checklist to guide future upkeep and adjustments.
Common mistakes and how to fix them
To ensure your pergola posts are secure, avoid these common mistakes:
- Insufficient edge distance: Bolts too close to edges weaken the post. Fix: Sister posts or use larger footings.
- Improper embedment depth: Shallow anchors don’t hold well. Fix: Deepen embedment or use engineered anchors.
- Misaligned anchors: Off-kilter bolts stress the post. Fix: Re-check layout and drill accurately.
- Inadequate anchor size: Small anchors can’t handle loads. Fix: Upgrade to larger, heavier-duty anchors.
Regularly inspect your pergola for any signs of these mistakes and address them promptly.
Safety, inspection, and maintenance checklist
Use this checklist before, during, and after installation to ensure safety and longevity:
- PPE: Wear appropriate gear (gloves, glasses, etc.) when drilling.
- Overhead hazards: Check for power lines or other obstructions before lifting posts.
- Temporary bracing: Securely brace posts while setting anchors to prevent falls.
- Lifts/Helpers: Use proper equipment and assistive personnel when lifting heavy posts.
- Lockout/tagout: Ensure no power is running through lines before drilling into concrete.
- Anchor inspection: Check anchors every 6 months for signs of corrosion or loosening.
- Hardware check: Inspect hardware annually to ensure tightness and integrity.
- Moisture protection: Seal around anchors and apply protective coatings to prevent water damage.
Quick rule: Regular maintenance extends your pergola’s lifespan and keeps it safe.
Cost comparison and decision guide
Consider these factors when choosing anchoring methods:
Wedge anchors: Inexpensive, easy to install. Pros: Quick, simple. Cons: Limited load capacity.
Sleeve anchors: Moderate cost, require drilling and tapping. Pros: High strength. Cons: More labor-intensive.
Epoxy anchors: Expensive, high-strength. Pros: Excellent holding power. Cons: Time-consuming, messy application.
DIY when possible, but consider hiring a pro for complex jobs or when working with specialty anchors. Always factor in concrete work costs and potential labor needs.

Conclusion
Placing anchors correctly protects your pergola, keeps posts straight, and prevents costly fixes later. Get the layout nailed now so the bolts don’t land near edges or shift under load.
Double-check your layout in the field, confirm the bolt pattern matches the post hardware, mark the exact angles and distances, verify level and plumb on the footing, test-fit a mock run if you can, drill to the correct depth for your anchors, install and torque per spec, then set and brace the posts before advancing to beams and roofing.
A few common mistakes to avoid are rushing the measurements, letting drills drift or misalign with the layout, and placing anchors too close to an edge or to each other. Safety first means wearing eye and hearing protection, keeping power cords clear of work zones, and testing a small area before committing to full-size cuts or holes. If your footing or anchor options aren’t clear, or the loads look unusual, don’t push ahead—seek professional help when in doubt and don’t compromise on structural integrity. Stay disciplined, stay safe, and you’ll finish strong with a sturdy, good-looking pergola.
FAQ
Where should I start with planing anchor positions for pergola posts?
Measure the post spacing first, then mark anchor locations on the concrete. Keep bolts away from edges by at least 2 inches if possible, more on softer slabs. Planing ahead saves you from redoing holes later.
How close can bolts be to the edge of the concrete?
Don’t run bolts within an inch of the edge. If the slab is thin or chipped, move the bolts inward or use a larger anchor. Bad placement means cracked concrete and headaches when you assemble.
What happens if I misalign the bolts after pouring the slab?
Repairing misaligned bolts is messy work. You may need to drill new holes, patch, and re-align the posts. It’s better to check twice and drill once.
Are sleeve anchors or expansion anchors better for pergola posts?
Use anchors rated for structural loads and the concrete type you have. Follow the manufacturer’s torque specs and keep the bolt length appropriate for the post base. Skimping here invites wobble and failure in wind or heavy rain.