
Introduction
A roof replacement involves nine core materials, and each one has a specific function that helps prevent common roofing problems.
In this article you’ll learn how to assess material roles, spot signs of wear, and approach decisions on selection, installation considerations, and budgeting.
Key takeaways
- Roof decking: plywood or plank decking affects substrate stability and fastener integrity.
- Drip edge provides metal protection along eaves and rakes against water intrusion.
- Underlayment choice matters: felt offers breathability; synthetic resists tearing longer.
- Ice and water shield targets vulnerable areas to prevent leaks at hips, ridges, and penetrations.
- Flashing and pipe boots direct water away from penetrations, preventing joint leaks.
- Ventilation: balanced intake and exhaust vents reduce moisture, heat buildup, and shingle deterioration.
Table of Contents
- Introduction
- Key takeaways
- Roof decking (sheathing): plywood vs. plank decking
- Drip edge: protection at eaves and rakes
- Underlayment (felt vs. synthetic)
- Ice and water shield: targeted waterproofing
- Roof flashing and pipe boots: directing water away from penetrations
- Starter shingles, main roofing material, and ridge capping
- Roof ventilation (intake and exhaust vents)
- Accessories, flashing alternatives, and specialty components
- Conclusion
- FAQ
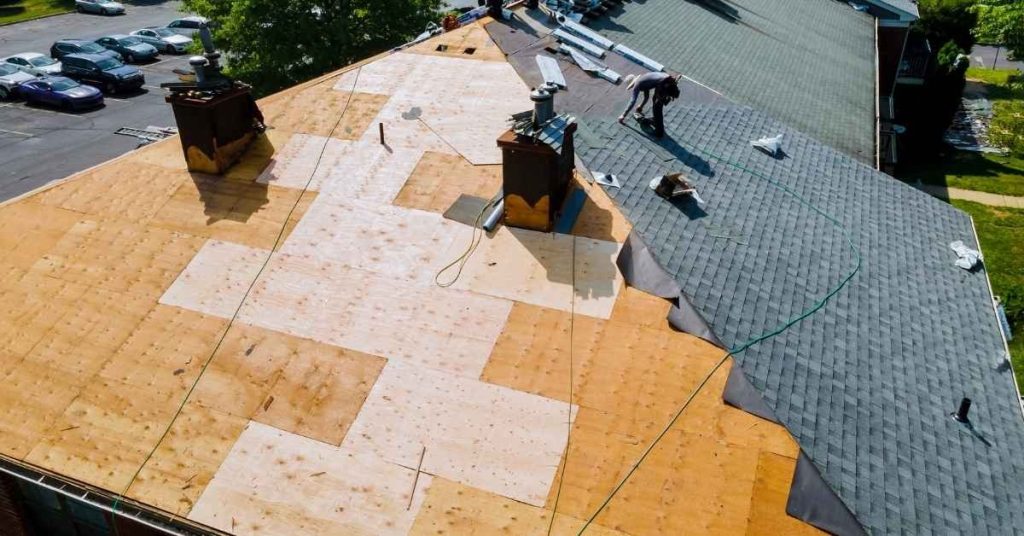
Roof decking (sheathing): plywood vs. plank decking
Roof decking, or sheathing, is the structural substrate that supports the roof system. It transfers load from the roofing material to the framing and helps define venting and insulation interactions. The decking also plays a key role in how underlayment sits against the surface and how edge details are managed at the eaves and rakes.
Compare plywood/sheet decking with plank decking by looking at surface rigidity, spacing, and thickness, along with typical spans. Plank decks can present less planarity and require careful fastener planning to keep laps tight. Structural implications include load-bearing capacity, nailing patterns, and how weathered wood may affect leaks or wind uplift. Choose decking type based on roof pitch, climate, and existing framing, and be prepared to consult a structural pro if there are red flags.
Plywood/Sheet Decking—Benefits and Common Issues
Plywood’s the old standby for roof decking. It’s strong, affordable, and easy to find.
Thickness matters. Typical ranges are 7/16″ to 1/2″. Thicker isn’t always better—it can warp or crack under load. Check manufacturer specs for your chosen thickness.
Support’s key. Plywood spans joists every 16″ to 24″. Less than that, it may sag or fail. More, and you’re wasting money. Check your rafter spacing before buying.
Common failures? Rot happens if water sits on the decking. Fastener pull-out’s another issue. Nails can pop up in high winds. Screws hold better but can still back out. Inspect for these during replacement.
Plank Decking—When It’s Used and How to Inspect
Plank decking, also known as board sheathing, is typically used on lower-pitched roofs where the load from snow or rain isn’t too heavy. It’s cheaper than plywood but has its own quirks.
Gaps are normal, unlike plywood. They help with drainage and ventilation. But check for excessive gaps, which can compromise your roof’s integrity. If you find any, overlay or resheath to prevent issues later on.
To inspect plank decking, look for these signs of trouble:
- Cracks or splits in the boards. These can let water in and lead to leaks.
- Warping or cupping. This means the boards aren’t flat anymore, which can cause problems with your roofing material.
- Nails popping up. If nails are coming out of the boards, it’s a sign that the decking is failing.
If you spot any of these issues, don’t just repair. Check with your local building department to see if you need to resheath or overlay. Better safe than sorry when it comes to your roof.

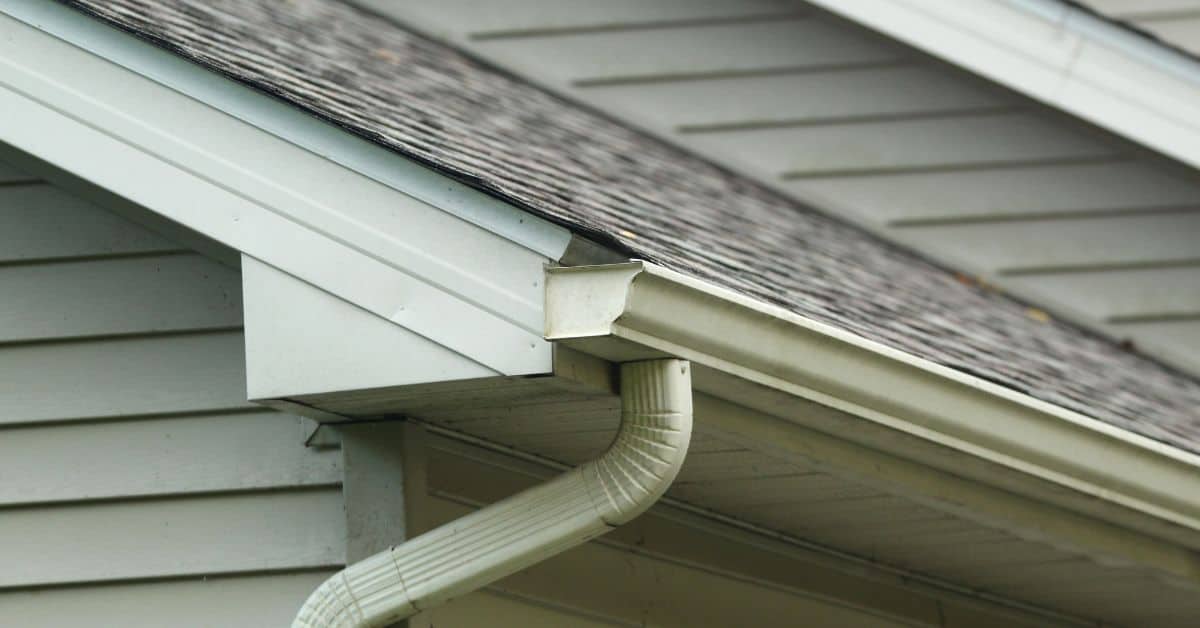
Drip edge: protection at eaves and rakes
Drip edge is a metal edging installed at the roof perimeter to direct water into the gutter and away from the fascia. It protects the eaves and rakes from water infiltration and helps keep the underlying wood dry. Proper placement also supports the underlayment and flashing details at the edge.
Install locations include the bottom edge (eaves) and the side edges (rakes). Material options vary, with galvanized steel, aluminum, and copper common choices that balance durability and appearance. Typical missteps involve gaps, misalignment, or improper overlap with underlayment and flashing, so verify installation details and inspect alignment with gutters and roof edges during a replacement.
Installation best practices and common mistakes
Here are some key aspects to consider when installing drip edge, along with common mistakes to avoid.
- Metal type: Choose the right metal for your roof. Galvanized steel is durable but heavy; aluminum is lighter and more affordable; copper is premium but expensive.
- Overhangs: Ensure drip edge extends beyond fascia to direct water into gutters, not behind them.
- Nailing sequence: Nail through drip edge first, then underlayment, to keep nails from piercing underlayment and causing leaks.
- Improper overlapping: Overlap drip edges at eaves and rakes by 2-3 inches to prevent water tracking behind gutters. Avoid gaps or misalignment.
Proper installation ensures water is directed away from the roof edge, protecting fascia, soffit, and decking.
Visual checkpoints and maintenance tips
Regularly inspect your drip edge to ensure it’s functioning properly. Here’s a quick checklist:
- Rust: Check for rust, especially at corners and overlaps. Rust can cause leaks and weaken the drip edge.
- Gutter alignment: Ensure drip edge is aligned with gutters to prevent water overflows.
- Underlayment exposure: Make sure underlayment isn’t exposed at eaves or rakes, as it can degrade and cause leaks.
- Damage: Inspect for damage from animals, wind, or ice dams. Replace any damaged sections.
Quick rule: Inspect drip edge annually, before winter, and after severe weather events to ensure it’s protecting your home as intended.
Underlayment (felt vs. synthetic)
Underlayment acts as a secondary moisture barrier that protects the decking from vapor, wind-driven rain, and ice formation. It also provides a buffer between the deck and the roofing material. Whether you’re reroofing or replacing the full roof, ensure the underlayment integrates correctly with flashing and ice/water shield.
Compare asphalt-saturated felt to synthetic underlayment for durability and tear resistance. Felt has traditional use and familiar handling, while synthetic options offer better UV resistance and long-term performance in varied climates. Consider installation ease, weight, and how the pitch and ventilation affect your choice, and follow local codes and manufacturer instructions for overlaps and fasteners.
Choosing the right underlayment for your roof material
The type of underlayment you choose should complement your roofing material to ensure optimal performance and longevity. Here are some key considerations:
- Asphalt Shingles: Felt underlayment is commonly used with asphalt shingles due to its affordability and compatibility. Look for 15 lb or 30 lb felt, which indicates the weight per square foot. To avoid wrinkling, ensure proper overlap (at least 2 inches).
- Metal Roofs: Synthetic underlayment is often preferred with metal roofs due to its durability and resistance to punctures during installation. Opt for slip-resistant varieties to enhance safety. Ensure it’s compatible with your chosen metal roofing system.
- Tile Roofs: Synthetic underlayment is also ideal for tile roofs, as it provides excellent protection against moisture intrusion. Choose a product rated for high heat and UV exposure. Proper overlap (at least 4 inches) is crucial to prevent water penetration.
- Wood Shakes/Shingles: Both felt and synthetic underlayments can be used with wood shakes/shingles, but synthetics offer better durability and tear resistance. Ensure the product has good slip resistance for safety during installation. Look for products rated for high wind resistance.
- Climate Considerations: In hot climates, opt for underlayments with high UV resistance to prevent degradation. In cold climates, choose products that remain flexible in low temperatures to avoid cracking.
Installation details that affect performance
The way you install underlayment significantly impacts its ability to protect your roof. Here are some key installation details to consider:
Overlap: Proper overlap is crucial to prevent water intrusion. For felt, overlap should be at least 2 inches; for synthetics, follow the manufacturer’s recommendations, typically around 4-6 inches.
Fasteners: Use corrosion-resistant nails (galvanized or stainless steel) to secure underlayment. Avoid using staples, as they can easily pull through the material and cause leaks. Nail in the overlap area only, following a straight line about 1 inch from the top edge.
Sealing Seams: For added protection, consider sealing seam areas with roofing cement or tape. This is especially important for felt underlayment, which can absorb water and wick it along seams. Proper installation prevents blistering, water intrusion, and premature failure of the underlayment.
Ice and water shield: targeted waterproofing
An ice and water shield is a premium underlayment applied in vulnerable roof areas to prevent water intrusion from ice dams and wind-driven rain. It provides a more secure moisture barrier at transitions and penetrations. Unlike standard underlayment, it is designed to seal around edges and gaps where water could seep in.
Install where required or recommended, such as eaves, rakes, valleys, and around penetrations, following code or manufacturer guidance. It functions best when used with compatible flashing and underlayment systems, and you should inspect thickness and overlaps to ensure continuous protection over time. Remember to verify compatibility with your chosen roofing material.
Proper placement and sequencing
Ice and water shield should be placed in critical areas to prevent water intrusion. It’s usually required or recommended at:
- Eaves: Start 24″ up from the eave edge, overlapping drip edge.
- Rakes: Cover the entire rake area, extending onto the roof slope.
- Valleys: Lay strips along valley centerline, lapping shingles over it.
- Penetrations: Surround chimneys, vents, and skylights with a 3″-6″ wide strip.
Climate considerations: In freeze/thaw areas, extend shield higher up the roof (at least 24″ above expected snow line). Always integrate it with flashing for best protection.
Material types and adhesion issues
Choosing the right ice and water shield is crucial. Self-adhering membranes are popular, but they need proper installation to work effectively.
- Self-adhering: Uses adhesive backing for application. Look for ASTM D4601 rating (min. 25 lb/sq ft). Avoid if roof surface is dirty or wet.
- Asphalt-saturated: Needs separate adhesive. Slower installation but good for high winds. Check ASTM D226 standard.
- Synthetic: Offers superior UV resistance and durability. Look for ASTM D4869 rating (min. 10 lb/sq ft).
Adhesion failures: Check for proper surface preparation, correct application temperature, and no contamination of adhesive.
Roof flashing and pipe boots: directing water away from penetrations
Flashing types handle transitions and penetrations, including step, counter, valley, and apron flashing. Each type has a specific placement around chimneys, vents, and intersections with walls and roofs. Proper flashing forms a continuous waterproof layer with underlayment and drip edge.
Pipe boots seal penetrations and come in rubber, silicone, or neoprene; ensure proper seating and sealing with the drip edge. Missing or improper flashing leads to water intrusion and potential interior damage. Inspect for gaps, corrosion, lifted edges, and worn sealants, and replace flashing or boots as needed.
Flashing materials, corrosion resistance, and overlap rules
Choosing the right flashing material is crucial for a durable roof. Here are your options:
- Aluminum: Lightweight, affordable, and resistant to most chemicals. Look for 26- or 28-gauge with a corrosion-resistant coating. Avoid overlapping in valleys where it can crease.
- Galvanized Steel: Stronger than aluminum, but heavier. Get 24- or 26-gauge with G90 galvanization. Overlap at least 3 inches to prevent leaks.
- Copper: Expensive but durable and malleable. It develops a patina over time that protects against corrosion. Lap at least 4 inches for best protection.
- Lead: Soft, malleable, and excellent for custom flashing. Avoid using it with steel as it can cause galvanic corrosion. Overlap at least 2 inches.
Pipe boots and penetration seals—selection and replacement signs
Pipe boots protect penetrations from water intrusion. Here’s what you need to know:
Rubber Boots: Inexpensive, flexible, and easy to install. They’re suitable for most applications but can degrade under prolonged UV exposure.
Metal Boots: More durable than rubber, they’re ideal for high-wind areas or where extra protection is needed. However, they’re more expensive and harder to install.
Replace boots when you see cracks, UV degradation (rubber), or pull-downs (metal). Inspect them annually during your roof maintenance checks.
Starter shingles, main roofing material, and ridge capping
Starter shingles protect the edge and help seal the first course, while the main roofing material options provide the primary weather barrier. Ridge caps seal the top edge and help venting balance at the peak. Together, they work with flashing and underlayment to form a continuous shield against water and wind.
Look at material-specific considerations like weight, cost, durability, and maintenance needs, and ensure compatibility with starter and ridge components. Use an installation checklist to verify alignment, fastener length, and proper overlaps, especially at hips and valleys. Avoid common mistakes like gaps or improper sealant at the edges and verify flashings are secure after installation.
Starter shingles: why they matter
The first line of defense against wind uplift and edge leaks are starter shingles. They’re designed to seal the edges of your roof, preventing water from getting in.
Proper installation is key. They should be nailed at the correct angle, with enough exposure but not too much. Too many nails can cause leaks, while too few might let shingles blow off.
Common mistakes include using regular shingles as starters or installing them upside down. Always use starter strips designed for your specific shingle type and follow manufacturer guidelines.
Main roofing material pros/cons and expected longevity
Choosing the right main roofing material can make or break your roof’s lifespan. Here are some common options:
- Asphalt shingles: Inexpensive, easy to install. Look for high-quality ones with algae resistance. Avoid cheap ones that may crack or curl.
- Metal: Durable, long-lasting, energy-efficient. Consider standing seam for better protection against leaks. Avoid exposed fasteners which can rust and cause leaks.
- Cedar: Natural look, good insulation. Expect to replace them every 20-30 years. Avoid using them in areas with high fire risk.
- Synthetic: Lightweight, durable, mimics natural materials. Check for UV protection and avoid those without it as they can fade quickly.
- Slate: High-end look, very long-lasting. Heavy, needs strong roof structure. Avoid thin slates that may break easily.
Ridge capping and ridge vent options
The ridge is where most roofs leak, so proper capping is crucial. Ridge caps seal the ridge line, preventing water from getting in.
Clay or concrete ridge caps are common. They should match your roof’s style and color. Avoid using regular shingles as ridge caps; they won’t seal properly.
Ridge vents help with attic ventilation, preventing heat buildup and moisture problems. They come in various styles like static or powered. Always use a vent designed for your specific roof type to ensure proper airflow.
Roof ventilation (intake and exhaust vents)
Attic ventilation matters for moisture control, energy efficiency, and extending shingle life. Proper ventilation reduces humidity buildup and promotes a stable roof environment. It also helps prevent premature deterioration of the roof deck.
Describe vent types and placement, including soffit intake and ridge exhaust, and whether static or powered options fit the space. Plan for a balanced airflow and verify insulation does not block vents. Review code requirements and coordinate with underlayment, drip edge, and flashing during replacement to maintain a continuous vent path.
Sizing and balancing intake vs. exhaust
Proper attic ventilation relies on a balance between intake and exhaust vents. Too little or too much of either can cause problems.
Net free ventilation area (NFVA) is the key to getting it right. It’s the total open area of your vents, adjusted for factors like wind direction and stack effect. Aim for 1 square foot of NFVA per 300 square feet of attic floor.
Under-ventilation traps moisture, leading to mold, mildew, and premature shingle deterioration. Over-ventilation can cause excessive heat loss in winter, driving up energy bills. During replacement, check your attic’s size and pitch, ensure balanced intake/exhaust, and verify minimum venting area per code.
Vent material and flashing considerations
Choosing the right materials for your vents and flashings ensures a durable, leak-free roof. Here’s what to consider:
- Vent boots: Look for durable, weather-resistant materials like rubber or plastic. Avoid cheap, thin boots that crack easily.
- Flashing integration: Ensure vents are flashed properly to prevent water intrusion at the base and sides. Use step flashing with drip edge for best results.
- Avoid common leak sources: Check for proper sealing around vent pipes, ensure boots fit snugly, and inspect flashings regularly to prevent leaks.
- Vent pipe collars: Use metal or plastic collars with a rubber gasket to seal around vent pipes. Avoid drywall screws that can rust and cause leaks.
- Proper installation: Follow manufacturer’s instructions for installing vents and flashings. Improper installation is a common source of leaks.
Accessories, flashing alternatives, and specialty components
Accessories and specialty components include valley metal, drip edge alternatives, coping caps, expansion joints, and sealants. These parts sit in the roof assembly to address transitions, movement, and water intrusion risks. They help prevent wind uplift and heat/moisture damage when installed correctly.
Cover subtopics like how each item functions, typical materials, and installation notes, including code or manufacturer requirements. Identify common failure modes such as improper flashing integration or gaps at joints, and plan maintenance to extend performance and warranty coverage. Use quick decision criteria to choose appropriate flashing terminations at walls, chimneys, and parapets.
Valley treatments: closed vs. open metal and woven valleys
Valleys are critical areas on your roof where two slopes meet, directing water towards the gutters. Incorrect valley treatment can lead to leaks and damage.
Closed valleys use a continuous piece of metal, usually aluminum or copper, forming a watertight seal. They’re great for preventing leaks but can be prone to buckling due to thermal expansion.
Open valleys use individual shingles or tiles with an underlayment beneath. They’re more flexible and better at handling thermal movement but may allow water intrusion if not installed correctly.
Woven valleys combine the benefits of both, using a woven metal strip over an underlayment. They’re durable, flexible, and effective at preventing leaks. Choose based on your roof’s design and local climate.
Parapet coping and flat-roof trim essentials
Parapets are walls that extend above the roofline. Properly coping them prevents water intrusion, wall staining, and damage to your home’s exterior.
Coping materials include metal (copper, aluminum), stone, or composite. They should be durable, weather-resistant, and compatible with your roofing material. Correct installation involves creating a watertight barrier at the parapet wall while allowing for thermal expansion.
For flat roofs, trim essentials include edge metal, gravel stops, and expansion joints. Edge metal protects the roof’s edge from damage and prevents water intrusion. Gravel stops keep gravel from sliding off. Expansion joints accommodate building movement to prevent cracks and leaks.
Always follow manufacturer guidelines for coping installation. Regularly inspect your parapet coping and flat-roof trim for signs of wear or damage, and address any issues promptly.

Conclusion
Protecting your roof means protecting the whole house: safety comes first, then durability and curb appeal. When you control the sequence and do the right details, you prevent leaks, costly repairs, and degraded decking.
To move forward, check that the deck is solid, choose the right underlayment, clamp on a drip edge, apply ice and water shield where water can penetrate, seal penetrations with proper flashing and boots, install starter shingles and the main roofing material in clean layers, cap with ridge pieces, and finish with good ventilation and the necessary accessories. Do each step in the order that fits your house and climate, and work only on a dry, stable surface with proper fall protection and eye and hand safety.
Common mistakes cost a lot: skipping or skimping on underlayment, gaps or overlaps that trap water, flashing installed too low or poorly sealed around pipes, and failing to vent correctly. Keep these safety rules: never walk on wet or uneven decking, always protect edges with drip protection and clean flashing lines, and test fit parts before fastening. If you’re unsure about any step, pause and recheck plans to avoid irreversible mistakes.
If the project starts to creep into questionable terrain—deep roofing mesh, unusual roof geometry, or uncertain weather windows—consider a pro. A cautious pace, clear checks, and knowing when to ask for help will save you time, money, and headaches. Stay steady, stay safe, and you’ll have a solid roof that lasts.
FAQ
What is underlayment and why does it matter?
Underlayment sits between the roof deck and the shingles. It adds a second layer of protection against leaks and helps the roof last longer.
Why do we include flashing and where should it go?
Flashings seal joints around chimneys, vents, and valleys. If flashings are wrong or loose, leaks follow the water path and a cheap fix becomes a big problem fast.
What is the role of shingles or tiles in the system?
Shingles or tiles provide the first line of weather defense. If they are installed without proper alignment or nailing, wind and water can undermine the entire roof.
Why include ventilation components, and what happens if they’re skipped?
Ventilation keeps attic air moving and stops moisture buildup. Poor ventilation leads to leaks, rot, and higher cooling costs down the line.