
Introduction
Six porch colors can inspire you to paint your porch.
The guide walks through practical color-selection tips, simple DIY steps, and smart alternatives that balance style with maintenance and budget.
Key takeaways
- Test color samples on both porch floor and siding in morning and afternoon light.
- Pair porch colors with trim and door hues for cohesive curb appeal.
- Use high-quality exterior acrylic paint and UV-protective primer for longevity.
- Prep by cleaning, sanding rough spots, and caulking before first coat.
- Check local permits and weather windows to avoid project delays.
- Consider semi-permanent options like stain or deck tiles for flexibility.
Table of Contents
- Introduction
- Key takeaways
- Quick overview: why porch color matters
- Six porch color ideas with inspiration and pairings
- Choosing a porch color palette step-by-step
- DIY painting prep and techniques for long-lasting results
- Safety, permits, and when to call a pro
- Smart alternatives to painting (less permanent options)
- Cost, common mistakes, and maintenance for long-lasting porch color
- Conclusion
- FAQ
Quick overview: why porch color matters
Porch color sets curb appeal and communicates your home’s style. Light or dark shades interact with siding, brick, or stone to change how the architecture reads and how visitors perceive the house.
Sunlight and porch orientation change how colors look throughout the day, so test swatches in natural light at different times. Neighborhood context and house style guide what works—from historic districts to modern homes—so aim for harmony rather than a loud mismatch. Pair porch colors with the door, railings, and furniture, and test on-site samples before you commit.
Function vs. aesthetics
When picking a porch color, think about how much traffic it gets and its role as an entry point. A high-traffic area needs durable paint that can handle wear and tear. For example, if your porch is right by the front door where people come in and out all day, go for something tough like epoxy or urethane.
On the other hand, a less busy side porch might be more about looks. You could choose a lighter color to brighten up an area that doesn’t see much use but still wants to look nice from outside. Remember, durability is key where it counts, and aesthetics can take center stage elsewhere.
Tip: Test your paint choices in the actual spot you plan to use them. See how they look at different times of day and under various weather conditions before committing to a full coat.
Weather and light considerations
The way sunlight hits your porch can really change the look of any color. Morning sun might make colors pop, while afternoon glare could wash them out. Test paint samples at different times to see how they hold up.
Also, think about the climate where you live. Hot and humid areas can cause paints to fade faster or peel sooner than cooler climates. Choose a finish that’s tough enough for your weather conditions. For instance, if it rains a lot, go with an exterior paint that resists water damage.
The surrounding landscaping also plays a role. Trees casting shade will affect how colors appear compared to open areas getting full sun. Make sure you’re aware of these factors before making your final decision on color and finish type.
Tip: Always check the paint’s UV resistance rating, especially if your porch faces south or west where it gets a lot of direct sunlight throughout the day.

Six porch color ideas with inspiration and pairings
Six porch color directions give you a ready-to-paint plan, with a quick visual read and simple pairings for trim, door, railings, and accessories such as hardware finishes. Think classic white, deep navy, warm terra cotta, soft sage, bright yellow, and charcoal or black. Each direction includes how the color reads in various lighting and the curb appeal mood it creates.
Use a DIY workflow: prep, test samples on the actual siding or porch surface, then pick a one- or two-step decorating idea to complete the look. Finish and sheen matter, with eggshell or matte options depending on the surface and maintenance. Check labels and manufacturer instructions for exact recommendations, and consider how your porch material—vinyl, brick, or wood—will influence color choice and upkeep.
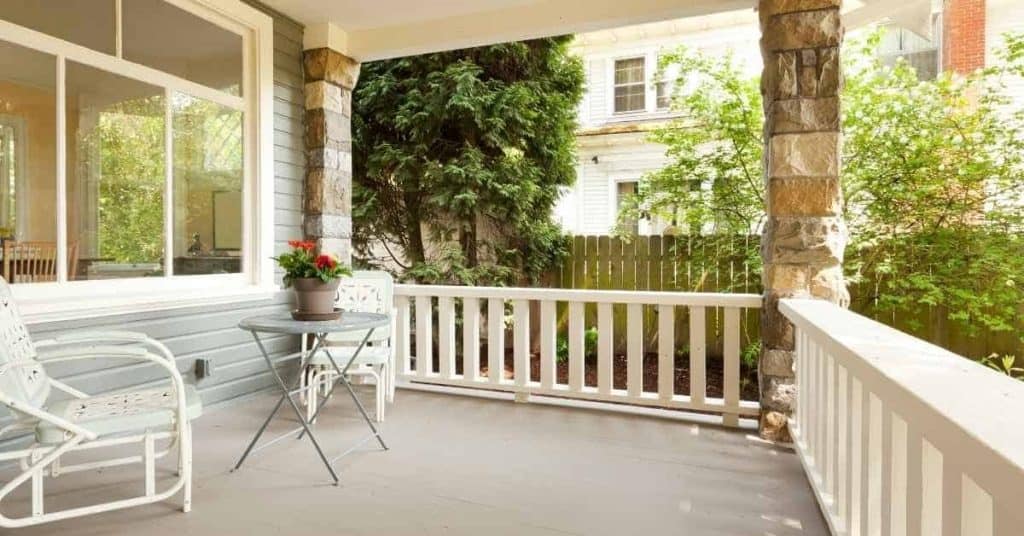
Color 1 — Classic white and off-white
White is a classic choice for porches because it reflects light, making your space feel bright and airy. It’s perfect if you want to highlight architectural details or blend seamlessly with the surroundings.
For trim and doors, go with white or cream tones. This creates a clean look but can be adjusted by using warm whites for a cozy feel or cool whites for a crisp appearance.
If your porch has brick or wood elements, consider an off-white shade to tie everything together. Warm whites work well with natural materials like cedar and pine, while cooler tones complement vinyl siding.
Color 2 — Bold deep hues (navy/charcoal)
Deep navy or charcoal adds drama to any porch, making it stand out. These colors work best when paired with lighter elements like white trim and doors for contrast.
Select hardware in brass or brushed nickel. This metallic finish will complement the dark hues without clashing. For lighting, opt for fixtures that have a sleek modern design to enhance the sophisticated look.
Deep colors suit various architectural styles but are particularly striking on Craftsman and contemporary homes. They can also make small porches feel more intimate and cozy.
Color 3 — Warm and earthy tones (terra cotta/sand)
Terra cotta or sand colors are perfect for adding warmth to your porch. They complement brick, stone, and wood finishes beautifully.
Pick natural wood for trim and doors to enhance the rustic feel. For added texture, consider incorporating planters with greenery like succulents or small shrubs.
Rugs in complementary earth tones can add comfort underfoot while tying the space together. Choose a rug that’s easy to clean and weather-resistant if you plan on using it outdoors regularly.
Choosing a porch color palette step-by-step
Choose a porch palette that complements the house exterior, porch style, and surrounding landscape. Pick a dominant color for the large areas and one or two accent colors, and test how they read in morning, noon, and sunset light.
Test samples on small porch areas or boards and observe for several days to see how color shifts with shadow and weather. Keep harmony with siding, roof, landscaping, and existing architectural details, and check any HOA or guideline constraints before you commit. This approach helps you avoid mismatches and ensures curb appeal from the street.
Step-by-Step Process
This sequence helps you methodically choose a porch color palette, ensuring your final look complements the house exterior and landscape.
- Prepare the site: Clear debris, cover plants, wear gloves. Safety first.
- Gather materials: Paint swatches, sample boards, brushes, painter’s tape. Have everything ready.
- Test samples: Apply paint to small areas or boards. Observe how colors change with light and weather over several days.
- Select dominant color: Pick a main shade for large surfaces like walls or railings based on your tests.
- Choose accents: Select 1–2 accent colors for doors, trim, shutters, or decorative elements that complement the dominant color.
- Check harmony with exterior and landscape: Ensure your palette ties in well with siding, roof, landscaping, and any architectural details.
- Cleanup and final checks: Clean up paint samples, remove tape, and do a final walk-through to ensure everything looks right before committing to full application.
How to test paint samples correctly
To get the best idea of how colors will look on your porch, you need to test them properly. Start with small boards or areas and apply enough paint to see true color.
Place these sample boards in various spots around your porch—under direct sunlight, in shade, and where light changes throughout the day. Observe how the colors shift over several days to ensure they look good at different times of the day.
Note any issues like fading or discoloration that might affect long-term appearance. This testing phase is crucial for making a confident decision on your porch’s final color palette.
Tools for visualizing palettes (physical and digital)
Visualize your porch colors before committing to paint with these tools:
- Mood boards: Use corkboards or online platforms like Pinterest. Pin images, swatches, and notes to see how colors work together.
- Paint brand sample kits: Brands often offer free sample packs for testing. Check the website or local store for availability.
- Smartphone photo tricks: Take photos of your porch with different color options overlaid using apps like Canva or Adobe Color. This gives a realistic preview without physical samples.
- Digital paint swatch apps: Apps like Sherwin-Williams Paint Visualizer let you see how colors look on your specific porch in real-time.
- Color wheel charts: Physical or digital, these help understand color theory and complementary shades. Useful for choosing accent colors that work well with the dominant shade.
DIY painting prep and techniques for long-lasting results
This section covers how to prep exterior concrete for long-lasting paint on porch floors, ceilings, and walls. You’ll clean dust, algae, and grease, then choose the right prep and primer for each surface, and pick a paint type suited to porch conditions. It also walks through a stepwise application sequence with edge protection and proper coating counts.
Understanding the prep choices and primer needs helps you avoid peeling and staining. It matters because concrete porches face sun, moisture, and wear; choosing the right exterior paint type and following a surface-specific sequence gives durability, weather resistance, and safer, longer-lasting results. Watch drying cues, ventilation, PPE, and ladder safety, and run quick adhesion checks between coats.
Cleaning and surface preparation checklist
Before you start painting, follow this checklist to ensure your porch is ready for a long-lasting finish.
- Degrease surfaces: Use a degreaser on greasy areas. Confirm by wiping clean with water; residue means more work needed. Skipping can lead to paint peeling.
- Power wash concrete: Remove dirt and algae thoroughly. Check for even coverage, patches missed may cause uneven finish later.
- Sand rough spots: Smooth out any bumps or ridges with sandpaper. Confirm by running hand over surface; rough areas will show up as blemishes in the paint.
- Patch cracks and holes: Fill gaps with concrete patching compound. Check for levelness and smoothness after drying; uneven patches can cause tripping hazards.
- Dry surfaces completely: Ensure no moisture remains before painting. Confirm by touching surface; if it feels damp, wait longer to avoid blisters or peeling paint.
Quick rule: A clean and prepared surface is the foundation for a durable finish.
Best paints and primers for porches
Selecting the right paint and primer is crucial. For concrete, use an exterior bonding primer to ensure adhesion. Avoid oil-based paints as they yellow over time.
Porch-floor specific paints offer better durability against wear and tear but are more expensive. Acrylic latex provides good UV resistance and flexibility for outdoor conditions.
Consider adding a slip-resistant additive if your porch is prone to wetness, especially with foot traffic. This can prevent accidents during rainy weather.
Painting technique and scheduling tips
Choose the right tools for the job: brushes are best for edges and corners; rollers work well for large areas, and sprayers can cover a lot quickly but require careful setup.
The ideal painting window is between 50°F to 90°F with humidity below 85%. Avoid painting on windy or rainy days as this can affect the finish.
Apply two coats of paint for best results. The first coat should be thin and even, allowing full coverage without dripping. Wait at least 24 hours before applying a second coat for optimal adhesion.

Safety, permits, and when to call a pro
Safety comes first for porch work. Make sure ladders are stable, use fall protection, wear PPE, and ensure proper ventilation and weather conditions. Check for lead paint and environmental hazards, understand when local permits are needed for structural changes, and recognize signals that you should hire a professional for load-bearing tasks.
Getting permits usually involves filing and inspections; start with local building department guidance. If any part feels unfamiliar, or if the job touches rails, joists, decking, or electrical/roof tasks, bring in a pro early. A clear workflow helps you budget and line up inspections.
Health and safety checklist
Use this checklist before starting any work on your porch to ensure a safe environment.
- Ladder setup: Ensure stability; check for level ground, secure footing, and proper height. Falls can cause serious injury if ignored.
- PPE required: Wear safety glasses, gloves, and non-slip shoes. Protect yourself from paint fumes and debris.
- Ventilation: Open windows or use fans to circulate air in enclosed spaces. Poor ventilation can lead to headaches and dizziness.
- Fall protection: Use guardrails if working at heights over 6 feet. Lack of fall protection increases risk of severe injury.
- Weather conditions: Avoid painting or renovating during rain, high winds, or extreme temperatures. Poor weather can ruin your work and cause delays.
- Lead paint test: Use a lead testing kit to check for hazardous materials before starting any surface prep. Lead exposure is dangerous and requires professional removal.
- Mold inspection: Look for signs of mold growth, especially in damp areas like under the porch or near wood. Mold can cause health issues if not addressed properly.
- Structural assessment: Check joists, railings, and deck boards for stability before making changes. Weak structures can collapse without proper evaluation.
Quick rule: Always prioritize safety over speed or convenience to avoid accidents and ensure a smooth project.
Hiring a pro: what to ask and expect
When hiring a professional for your porch renovation, it’s important to get clear answers about their experience, qualifications, and project management skills.
Ask potential contractors if they have specific certifications related to the work you need done. For example, electrical or structural certifications are crucial for certain tasks. Also, inquire about their insurance coverage to protect yourself from liability issues.
Request an itemized quote that breaks down costs by task and materials used. This helps prevent hidden fees and ensures transparency in pricing. Look for warranties on labor and materials as well; a good contractor should offer at least one year of warranty coverage.
Discuss the timeline with your chosen professional, including start dates, milestones, and completion deadlines. A realistic schedule will help you manage expectations and avoid delays.
Smart alternatives to painting (less permanent options)
This section covers smart, less-permanent color updates you can swap in and out without repainting. Think refinishing and staining for porches (wood, concrete, or composite), removable vinyl wraps, outdoor rugs, updated shutters and furniture, and seasonal décor that shifts the look. Keep durability in mind for outdoors and favor options that are easy to remove or reapply.
They let you refresh curb appeal with less downtime and fewer permanent commitments. Use this approach to plan quick swaps like wraps or decor that you can remove or replace seasonally; it helps with testing color schemes. Always check the product label or datasheet for prep, compatibility, and safe disposal guidelines, and compare rough cost and time against a refinishing or staining option.
Temporary and low-commitment color changes
If you’re looking to change up your porch’s look without the hassle of painting or committing long-term, consider peel-and-stick tiles. These come in a variety of colors and patterns that can completely transform your space with minimal effort. Just make sure to check the base surface for cleanliness and stability before laying down any new material.
Another option is using outdoor-grade fabrics like throw pillows or curtains. They’re easy to swap out seasonally, allowing you to refresh your porch’s vibe without spending a fortune on permanent fixtures. Look for water-resistant materials that can withstand the elements but still add a pop of color and texture.
Potted plants are also a fantastic way to change up the look of your porch. They’re low-commitment since you can easily rearrange them or replace them with different species as seasons change. Just be sure to choose containers that match your porch’s aesthetic and ensure they have proper drainage to avoid water damage.
When refinishing or replacing is a better choice
If your deck or fence has deep scratches, rot, or warping, painting won’t cut it. Instead, consider sanding and staining. This method reveals the wood’s natural beauty and seals out moisture better than paint.
For boards that are beyond repair, replacing them outright is a smart move. It’s quicker and gives your structure a fresh look without fuss. Just make sure to check base compaction before you start to avoid future settling issues.
If you’re tired of high-maintenance wood decks, think about installing composite decking. While it’s more expensive upfront, composites are durable, fade-resistant, and don’t need painting or staining. It’s a long-term solution that saves time and money in the long run.
Cost, common mistakes, and maintenance for long-lasting porch color
This section lays out a practical cost-range checklist for porch painting or staining, broken into materials, tools, and rental gear. Plan for surface prep, primers, sealers, brushes and rollers, tape, drop cloths, and seasonal weather considerations, with notes based on porch size. Look for ways to save by buying in bulk, choosing long-lasting finishes, and weighing DIY versus professional help.
Common mistakes to avoid include inadequate surface prep, using the wrong outdoor finish, skipping primer, improper drainage, and ignoring sun exposure and trapped moisture. A seasonal maintenance schedule matters: do a prep/inspection in spring, clean regularly, touch up after harsh weather, and reseal as signs appear to maximize color life. If you’re unsure about a finish or a step, check the product label, manufacturer instructions, and local rules before proceeding.
Typical cost considerations and budgeting tips
The main cost drivers for painting your porch include the quality of paint, surface preparation needs, necessary tools, and labor. High-quality paints might be more expensive upfront but offer better durability over time.
If you’re working with a tight budget, prioritize spending on good primer and sealer to protect your investment in paint. You can save by buying brushes and other tools secondhand or sharing them with neighbors if it’s a community project.
For surface repairs, consider doing the work yourself using basic materials like caulk and filler. This can cut costs significantly compared to hiring professionals for every small fix.
Remember, while DIY saves money on labor, it still requires time and effort. Plan your budget accordingly and set realistic expectations for what you can accomplish within that timeframe.
Common mistakes and how to avoid them
Mistakes like poor surface preparation, choosing the wrong paint type, inadequate testing, and painting at the wrong time of day can lead to costly repairs down the line.
- Poor prep work: Ensure surfaces are clean, dry, and free from loose materials. Use a wire brush or sandpaper for rough areas.
- Wrong paint type: Choose exterior paints designed for high UV resistance and moisture protection. Avoid indoor paints that won’t last outdoors.
- Inadequate testing: Test small patches of your porch to see how the color looks in different lighting conditions before committing to a full application.
- Poor timing: Paint when temperatures are moderate, not too hot or cold. Avoid painting on windy days that can cause dust and debris issues.
Avoid these common pitfalls by planning ahead and taking the time for thorough preparation and testing before starting your project.
Maintenance and touch-up plan
To keep your porch looking fresh, establish a simple annual maintenance routine. Start with an inspection in early spring to check for any cracks or peeling paint that need repair.
Clean the surface regularly using mild soap and water. Avoid harsh chemicals that can damage the finish over time. For tough stains, use a soft-bristled brush and gentle scrubbing action.
Touch-ups should be done immediately after noticing wear spots. Use a small paintbrush to apply touch-up coats in thin layers until the area matches the rest of your porch.
A well-maintained porch not only looks better but also lasts longer, saving you money and effort over time.
Conclusion
Choosing the right porch color matters for safety, durability, and curb appeal. A solid plan keeps you from costly mistakes and from repainting sooner than you should.
Run this as a quick check: confirm the forecast is dry for several days, inspect the surface for peeling or rot, choose a palette and test a small patch, protect doors and plants, gather proper brushes, rollers, and a compatible primer, then apply in the correct order and let each coat dry fully before the next.
Common missteps to avoid include skipping surface prep, using the wrong type of paint for exterior wood or concrete, and rushing the job in heat or humidity. Keep safety in mind: wear eye protection, gloves, and a respirator if needed; test any color in a hidden spot first to see how it ages; and never paint over damp wood or on active cracks.
If the porch has extensive rot, structural issues, or you’re unsure about permits or power washing in your climate, call a pro. When in doubt, prioritize safety and a conservative color choice that complements the house. You’ve got this—start with a small test area, follow the steps, and keep the work moving at a steady, safe pace.
FAQ
What color should I choose for a small porch?
Light colors make a small porch look bigger. Go with off-white, soft beige, or pale gray. Avoid dark colors that swallow light unless you have strong contrast trim.
Will a dark porch hide dirt?
Dark colors hide staining on light grime, but they show water marks and chips. Make sure you seal the paint and keep up with cleaning. If in doubt, pick a mid-tone with good durability.
Should I match the porch color to the house or go contrast?
Contrast can punch up curb appeal. Matching is safer and simpler. Pick a main color and a trim color that works with your siding.
Do I need primer or how to prep the porch before painting?
Yes, clean the surface first. Use a good exterior primer on bare wood. Skimping on prep leads to peeling fast.