

Introduction
Water-damaged plaster needs to be removed, dried, and rebuilt in a practical, step-by-step way.
You’ll determine what to remove, what to dry, and what to replace based on how far the damage has spread. This article keeps the tone hands-on and avoids fluffy theory.
Start by inspecting the area to judge how much material must come out, then set up drying in a safe, breathable way. Finally, plan the rebuild with compatible materials and follow the label instructions for any coatings or patches.
Key takeaways
- Check for active leaks and document water intrusion before removing plaster.
- Wear respirator, eye protection, and gloves during demolition to guard against mold.
- Remove damaged plaster and lath in sections, not all at once to prevent collapse.
- Drying setup should maximize air flow and moisture removal using fans and dehumidification.
- If visible mold or suspect materials, halt work and consult local guidelines on safety.
- Rebuild decisions depend on material integrity, framing condition, and moisture history.
- Use compatible materials and follow manufacturer directions for plaster patching and bonding.
Table of Contents
- Introduction
- Key takeaways
- How to Assess Water Damage
- Safety Concerns: Mold, Asbestos, Lead, and Electrical Hazards
- What to Remove: Criteria and Step-by-Step Removal
- What to Dry: Materials, Methods, and Drying Setup
- Repair Vs Rebuild: Decision Framework
- Rebuilding: Materials, Methods, and Best Practices
- Tools and Materials Checklist and Material Specs
- Preventing Future Damage and Maintenance
- Conclusion
- FAQ
How to Assess Water Damage
Start with a systematic walk-through to identify visible signs of moisture, staining, and softness in materials. Map the affected areas on a plan and note the extent of saturation you observe. Photograph each zone, and record when the event happened and where the water came from.
Prioritize areas that show ongoing leakage or high moisture potential and plan the work in phases. Use the photos and notes to document conditions for later reference and decisions. Keep the documentation organized for quick review with any trades or insurers.
Step-by-Step Process
Follow these practical steps to assess water damage systematically, ensuring safety and thoroughness.
- Prepare and ensure safety: Put on gloves, goggles, and a mask. Turn off power if needed. Have flashlights ready for dark areas.
- Check for immediate hazards: Look out for unstable structures or electrical hazards. If unsure, call a pro before proceeding.
- Main work:
- Do initial visual inspection (next section).
- Use moisture meters and thermal imaging to map damage.
- Document findings with photos, notes, and sketches.
- Prioritize affected areas based on severity and urgency.
- Clean up or final checks: Remove any temporary safety measures. Ensure all affected areas are noted for repair.
Initial visual inspection
Use this checklist during your first walkthrough to prioritize work based on visible signs of water damage.
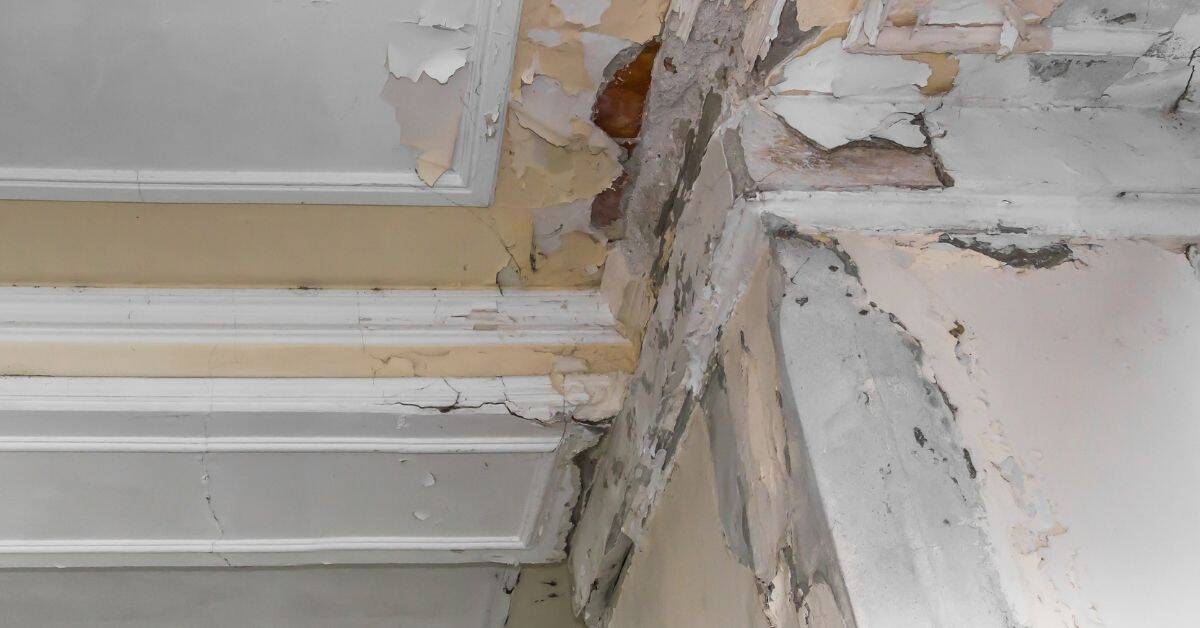
- Staining: Look for discoloration, especially around walls, ceilings, and floors. Confirm by touching. Skipping may lead to hidden mold growth.
- Bulging: Check for swelling or warping in walls, ceilings, or floors. Press gently; if it gives, moisture is likely present.
- Cracking: Inspect for new cracks, especially around windows and doors. Measure with a tape measure. Wide or growing cracks may indicate structural issues.
- Efflorescence: Search for white, powdery deposits on walls or floors. Wipe with a damp cloth. If it’s salty to taste, moisture is present.
- Odors: Smell for musty odors, indicating possible mold growth. Sniff around affected areas. Skipping may lead to health issues.
- Warping: Check for warped or bowed walls, ceilings, or floors. Use a level. Severe warping may require immediate repair.
Quick rule: If you find any of these signs, document and prioritize for further investigation.
Moisture measurement and documentation
Accurately map moisture levels to understand the extent of damage and track progress over time.
Use pin and pinless moisture meters for precise readings. Insert pins into walls, ceilings, or floors. Pass pinless meters over surfaces. Calibrate regularly.
Employ thermal imaging cameras to visualize heat patterns, helping locate hidden moisture. Compare results with moisture meter readings for accuracy.
Document findings by logging locations and readings. Sketch affected areas, note moisture levels, and photograph for future comparison. Regular checks help track drying progress.
When to call a professional assessor
Certain water damage scenarios require expert evaluation. Know when to seek professional help.
If you suspect structural compromise, such as severe warping, cracking, or bulging walls, call a structural engineer. Unaddressed issues may lead to costly repairs or safety hazards.
When faced with widespread contamination, like extensive mold growth or unknown chemical exposure, contact a certified restoration company. They have specialized equipment and training for safe cleanup.
If the moisture source is unclear or hidden, such as no visible leaks but high moisture readings, consult a water damage specialist. They can help locate the source and prevent recurring issues.
Safety Concerns: Mold, Asbestos, Lead, and Electrical Hazards
Health and legal risks require careful handling of mold, lead, and asbestos in older plaster or building assemblies. Expect hidden electrical hazards where water intrusion occurred, and treat them as serious safety concerns. Do not disturb suspected hazardous materials until testing confirms what you’re dealing with.
Contain the affected area to prevent spread and call in the right professionals when hazardous materials are suspected. Follow local rules for disposal and ensure that contractors use proper PPE and containment practices. Verify testing results and scope of work before any removal begins.
Mold Indicators and Testing
First off, mold’s not always visible. You might smell it first – musty, earthy odor. That’s your cue to investigate.
Look for water stains, discoloration, or actual mold growth on walls, ceilings, or under carpets. Remember, if you see or smell mold, there’s likely more hidden.
DIY sampling kits can help, but they’re not foolproof. They only test a small area. For thorough testing, hire certified professionals. They use specialized equipment and lab analysis to pinpoint mold growth and spore counts.
Asbestos and Lead Risk and Testing
Older homes, built before the 1980s, might have asbestos in plaster. If you suspect it, do not disturb the material. Asbestos fibers become airborne when disturbed, posing serious health risks.
Lead paint was commonly used until 1978. If your home was built before then, assume there’s lead paint under layers of newer paint. Again, do not scrape or sand old paint without proper protection and containment.
Before any removal, test for both asbestos and lead using accredited labs. They’ll take samples and analyze them in a controlled environment. It’s the only safe way to know what you’re dealing with.
Electrical and Structural Hazards
Water and electricity don’t mix. If walls or ceilings are wet, assume there’s live wiring behind them. Turn off power at the main panel before starting any work.
Wet plaster can lose its structural integrity. Sagging ceilings or bulging walls could collapse without warning. If you see signs of this, do not attempt to fix it yourself. Call a structural engineer immediately.
Even if power’s off, be cautious around wires and outlets. Consult an electrician if you’re unsure about any electrical components. Safety first, always.
What to Remove: Criteria and Step-by-Step Removal
Define clear criteria for what must be removed versus what can be saved, based on material condition, contamination, and structural integrity. Prioritize removal in a staged approach to avoid unnecessary damage to surrounding work.
Document conditions as you remove, and stop immediately if hazardous materials or unexpected damage is found. Keep the process orderly so you can backfill and rebuild with accurate records. Always align with manufacturer guidance and local codes when in doubt.
Step-by-Step Cleaning Process
The following steps guide you through safely removing damaged plaster, ensuring minimal collateral damage and preserving salvageable components.
- Preparation: Wear safety gear – gloves, goggles, dust mask. Tape plastic sheets at the room’s entrance to contain debris.
- Safety Checks: Test for live electrical wires before starting. Look for mold, asbestos, or lead hazards and stop if suspected.
- Main Work – Plaster Removal: Carefully chip away damaged plaster with a cold chisel and hammer. Start from the top, working downwards.
- Lath Removal: Remove laths using a reciprocating saw or pry bar once plaster is gone. Be cautious not to damage framing.
- Cleanup & Final Checks: Vacuum and wipe down the area. Inspect for any missed damaged spots or hazards.
Unsalvageable Plaster and Lath Removal
Identify unsalvageable plaster by checking for delamination, crumbling, or excessive water saturation. Remove it back to the firm substrate.
Use a cold chisel and hammer to carefully chip away damaged plaster. Work from top to bottom to control falling debris.
Once plaster is removed, use a reciprocating saw or pry bar to remove laths. Be cautious not to damage framing or create further collateral damage.
Damaged Insulation, Framing, and Finishes to Remove
Remove wet or moldy insulation to prevent further damage. Wear appropriate safety gear.
Trim and assess framing for rot using a utility knife or saw. If found, mark it for replacement.
Remove baseboards and trim that conceal damage. Use a pry bar and hammer, working from one end to the other.
Salvageable Components and Careful Removal Techniques
Preserve clean trim, fixtures, and decorative elements by carefully removing them before starting main work.
Isolate the removal area using plastic sheets to protect adjacent surfaces from debris. Tape sheets at the top and bottom.
Use drop cloths on floors to catch falling debris. This helps in easy cleanup and prevents further damage.
What to Dry: Materials, Methods, and Drying Setup
Some materials can be dried in place with proper ventilation and moisture control, while others should be replaced due to deep saturation or compromised structure. Develop a drying plan that targets the specific material types present and the extent of saturation.
Monitor ambient conditions and adjust equipment as moisture levels change. Keep notes on readings and actions, and verify with product data or guidance from the manufacturers or local codes before proceeding to the next step.
Drying Porous Materials and When Drying Is Feasible
Material choice plays a big role in how well something dries. Here’s what you need to know about common porous materials.
- Plaster: Can be dried if not too saturated, but watch for cracking and weak bonds with wrong material choices.
- Wood Framing: Dries well in most cases. Look for ACQ-rated lumber to avoid rot issues.
- Gypsum Board: Can dry out if not too damaged, but beware of mold growth and weak seams.
- Concrete: Can dry slowly with proper ventilation. Avoid if there’s significant cracking or delamination.
- Insulation (Fiberglass/Cellulose): Dries well if not too wet, but avoid if it’s compressed or damaged.
Drying Equipment and Placement (Fans, Dehumidifiers)
Proper use and placement of drying equipment is key to successful water damage restoration.
- Air Movers: Force evaporation by moving air. Place them along walls for best effect. Rentals around $50/day.
- Axial Fans: Exhaust moisture-laden air. Position in windows or doors. Expect to pay $30-$50 per day to rent.
- Refrigerant Dehumidifiers: Remove moisture from the air. Place on lowest level, vent hose out window. Rental costs around $70/day.
- Desiccant Dehumidifiers: Use heat to remove moisture. Ideal for high humidity areas. Rentals start at $150/day.
Monitoring Progress and Verifying Dryness
Regular checks are crucial to ensure your drying efforts are working. Here’s what you should do:
Moisture Readings: Use a moisture meter daily until readings stabilize at 16% or lower.
Visual Checks: Look for signs of mold regrowth, especially in hidden areas like behind furniture or under carpets. If you see any, clean and dry the area again.
Record Keeping: Keep a log of your readings and observations. This helps track progress and can be useful if you need to make an insurance claim.
Repair Vs Rebuild: Decision Framework
Use a decision framework that weighs the extent of damage, substrate soundness, recurrence risk, and your aesthetic goals. This helps you choose between repairs and a full rebuild in a structured way.
Document the decisions for insurance, warranties, and future resale. Compare costs and timelines for different paths, and confirm that chosen approaches meet local requirements and your project goals.
Small Repairs and Patching vs Full Rebuild
When deciding between a repair and a full rebuild, consider the extent of damage. Small cracks or holes can often be patched with a skim coat or joint compound. This is quick and inexpensive.
Partial replastering might be needed if there are larger damaged areas but they don’t cover more than 20-30% of the wall or ceiling. Beyond that, it’s usually best to remove and replace the entire section for a lasting fix.
Remember, plaster is like a web – damage in one spot can weaken surrounding areas. So, be sure to check adjacent sections before deciding on a repair method.
Structural and Long-Term Performance Considerations
Before making repairs, assess the wall’s structural integrity. Hidden damage from water can compromise studs, joists, or other framing members. If you find any issues, address them first to ensure your repair lasts.
Consider future moisture exposure too. If the source of the water damage isn’t fixed, repairs will likely fail again. Make sure any underlying issues are resolved before starting work.
Also, keep in mind that older homes may have different plaster types or lath construction. Replacing with modern materials might not match the original aesthetics or performance.
Cost, Time, and Insurance Considerations
Get written estimates from professionals for both repair and rebuild options. This helps you understand the full scope of work and cost.
Check your insurance policy language. Some policies require certain repairs to be made by licensed contractors, or may only cover specific types of damage.
Document everything – photos, estimates, receipts, and any communication with your insurance company. This will help if you need to make a claim later or sell the property.
Rebuilding: Materials, Methods, and Best Practices
Explore options for replacing plaster assemblies with traditional plaster or modern alternatives, based on room use and moisture exposure. Outline a practical installation sequence that minimizes moisture intrusion and maximizes long-term resilience.
Consult product specs and installation guidelines for suitability in wet-prone locations. Align your method with moisture control practices and local building norms, and coordinate with trades to ensure compatibility.
Choosing between new plaster, gypsum board, or cement board
When rebuilding your walls after water damage, you’ve got options. Traditional plaster, standard gypsum board (drywall), and moisture-rated cement or gypsum backer boards are common choices.
Plaster offers a classic look and feel but can be more labor-intensive to install and repair. It’s also less moisture-resistant than other options.
Gypsum board is easier to install, provides good soundproofing, and comes in various thicknesses. However, standard drywall isn’t designed for high-moisture areas without additional protection.
For wet-prone locations, consider moisture-rated cement or gypsum backer boards. They’re designed to resist mold and mildew growth, making them ideal for bathrooms, laundry rooms, or other damp spaces. Always check product specifications before installing.
Lath replacement and modern backing options
Traditional wood lath might not be the best choice in wet-prone areas due to its susceptibility to rot. Consider these alternatives:
Metal lath is durable, won’t rot, and provides a solid base for plaster. It’s more expensive than wood but lasts longer.
Fiberglass-reinforced bases are lightweight, non-corrosive, and resistant to mold and mildew. They’re great for areas with high humidity or moisture.
Resilient channel systems create an air gap between the wall and the drywall, reducing noise transfer and preventing the wall from wicking moisture. They’re ideal when using gypsum board in damp locations.
Finishing steps: bonding, skim coat, and paint prep
Once your new backing is up, it’s time to finish the job. Here’s a simple step-by-step guide:
Start with bonding or brown coats. These are thin layers of plaster that help bond the new material to the old. They also provide a base for the final skim coat.
Next, apply the finishing skim coat. This is the final layer that gives your wall its smooth finish. Let it dry completely before moving on.
Sand any rough spots with fine-grit sandpaper, then prime with a suitable primer. This seals the surface and provides a base for paint. Choose a primer designed for new plaster or the specific material you’ve used.
Finally, select a high-quality paint designed for long-term performance in your specific environment. Follow manufacturer instructions for application and drying times.
Tools and Materials Checklist and Material Specs
Prepare a DIY-friendly checklist of essential inspection, removal, drying, and rebuilding tools, plus PPE. Include items for moisture testing, cutting, cleaning, and safe handling of debris.
Check product specifications and compatibility before purchasing materials. Be aware of local disposal rules for hazardous waste and verify that tools meet safety standards required by your project.
Essential tools for assessment, removal, and drying
Before you start, gather these tools to assess the damage, remove affected materials, and dry out the area.
- Moisture meter: Check moisture levels in plaster and surrounding materials. Skip this, risk missing hidden damp spots.
- Thermal camera (optional): Detects cold spots indicating water intrusion. Not essential but helpful for thorough checks.
- Utility knife: Carefully cut through plaster for removal. Be cautious to avoid injuries.
- Reciprocating saw or multi-tool: Cut and remove lathes and other obstacles. Wear safety glasses.
- Sledgehammer: Break up large sections of damaged plaster. Use safety gear, control the swing.
- Shop vacuum: Suck up water and debris during removal. Keep area clean to prevent slips.
- Box fan(s): Provide airflow for drying. Place strategically for best results.
- Dehumidifier: Remove moisture from the air. Empty regularly, maintain as per instructions.
- Plastic sheeting: Contain dust and debris during removal. Protect unaffected areas.
Quick rule: Always wear appropriate safety gear when using tools to prevent injuries.
Materials to rebuild and their trade-offs
Choose the right materials for your rebuild, considering moisture exposure limits and performance.
- Bonding agent: Promotes adhesion between new and existing plaster. Skip this, risk delamination over time.
- Plaster mix (new): Choose one suitable for your climate and moisture conditions. Check manufacturer data sheets.
- Drywall (gypsum board): Consider if water damage was extensive or you prefer a different finish. Not ideal for high-moisture areas without proper protection.
- Cement board: Durable, moisture-resistant option. More expensive and heavier than drywall.
- Fasteners (screws/nails): Use appropriate fasteners for your chosen backing material. Skip this, risk inadequate support.
- Tapes (joint compound, mesh): Seal joints and cracks before skim coating. Skip taping, expect uneven surfaces and potential cracking.
- Sealants: Apply to prevent future water intrusion. Choose one suitable for your specific application.
Quick rule: Always check manufacturer data sheets for moisture exposure limits before using a product.
Safety gear and disposal considerations
Protect yourself and the environment during your project with these safety measures.
- Respirator: Protect against dust and potential hazardous materials like asbestos or lead. Wear appropriate filters.
- Safety glasses: Shield eyes from debris during removal and demolition. Safety first, always wear them.
- Work gloves: Protect hands from cuts, scrapes, and chemicals. Choose ones suitable for the task at hand.
- Coveralls or long sleeves: Protect skin from dust and potential hazards. Wear appropriate clothing.
- Containment materials (plastic sheeting, zip ties): Contain dust and debris during removal. Keep work area clean and safe.
- Local disposal regulations: Check for hazardous waste like asbestos or lead-containing materials. Dispose of these safely per local rules.
Quick rule: Always prioritize safety gear to protect yourself and follow local regulations for proper waste disposal.
Preventing Future Damage and Maintenance
Focus on eliminating moisture sources, improving ventilation, and keeping drainage clear to prevent recurrence. Implement practical, low-cost actions you can tackle this season.
Know when to invest in professional upgrades or more extensive moisture control measures. Set up routine maintenance checks to catch issues early and document any improvements for future reference.
Source control and moisture management
First, tackle the root causes of water damage. Fix any leaks from your roof or plumbing ASAP.
Improve exterior drainage around your home’s foundation to keep water away from walls. This might mean installing gutters, grading the ground, or even adding a French drain.
Insulate cold surfaces like exterior walls and unheated rooms to control condensation. In bathrooms and kitchens, upgrade ventilation to remove excess moisture from the air.
Visual checkpoints and routine inspections
Regular checks help catch issues early. Here’s a quick checklist:
- Ceilings near plumbing: Check for water stains or cracks, especially after heavy rain or when using fixtures.
- Exterior walls: Inspect for signs of moisture, like peeling paint or efflorescence (white powdery residue).
- Window/door sills: Look for water intrusion, mold, or rot.
- Basement/crawlspace: Check for standing water, dampness, or musty odors.
- Plumbing fixtures: Inspect for leaks around toilets, sinks, and showers.
- Exterior walls: Look for cracks, gaps, or damaged siding that could let water in.
- Roof: Check for missing, damaged, or curling shingles, and inspect flashing around vents and chimneys.
- Attic: Inspect for moisture, mold, or water stains on the roof decking.
Quick rule: Make this a quarterly habit. It’s easier to fix small problems than big ones.
When to schedule professional maintenance
Some issues need pro help. Here are signs it’s time:
Persistent dampness: If you’ve dried out your walls but they stay damp, there might be a hidden leak or moisture source that needs expert diagnosis.
Repeating stains after repairs: If you keep seeing water stains in the same spot despite previous fixes, it’s time to call a pro. They can find the underlying cause and fix it right.
Signs of hidden leaks: Warped walls or ceilings, musty odors, or visible mold could mean there’s a leak behind your finishes. Don’t DIY this one; get a professional inspection.
Conclusion
You’ve got a clear path from assessment to rebuild, with safety first and a plan you can follow. Focus now on finishing strong so the project lasts and your home stays healthy.
Check in this order: verify there is no ongoing water source, test for health hazards, remove damaged material using the criteria you set, dry the space thoroughly with the right setup, decide whether you repair or rebuild, and complete the rebuild with proper materials and finish. Run through the steps in a steady, methodical way: stop any work if you find new leaks or suspect mold or asbestos, isolate the area, dispose of waste properly, and verify drying and structural stability before moving ahead. Keep notes as you go so you can back up decisions if questions come up later.
Common mistakes to avoid are skipping safety tests, rushing the removal or drying steps, and trying to push a rebuild before you’ve confirmed the area is dry and safe. Always wear the right PPE, test in a small area first, and never mix questionable materials with a plan you haven’t verified. Don’t ignore signs of lingering moisture, and don’t assume a surface looks dry if it feels cool or damp behind the wall. If in doubt about hazardous materials, or if the job would require more than you can manage safely, call a professional and get a clear scope before you proceed.
If the situation calls for it, know when to bring in a pro—mold remediation, asbestos or lead concerns, electrical hazards, or large-scale structural work are strong reasons to step back. Stay practical, stay safe, and you’ll finish with a durable, clean result that holds up over time. Stay with the plan, stay cautious, and you’ll see this through with confidence.
FAQ
Can I dry and save plaster without removing it all?
Yes, but only if the plaster and framing are structurally solid and not compromised by moisture or rot. If you see crumbling edges, soft spots, or peeling paint, plan to remove and replace those sections. Always follow manufacturer instructions for any drying equipment you use.
What signs mean I should remove more material beyond the obvious water damage?
Look forsoft, hollow, or crumbling plaster behind the surface, mold growth, or damp odor that persists after drying attempts. Any area that still feels damp after a thorough dry-out should be removed and treated. If in doubt, test with a moisture meter and err on the side of removing suspect material.
How do I protect the rest of the house during drying and removal work?
Contain work zones with plastic sheeting, seal doorways, and keep HVAC or fans limited to the affected area. Use drop cloths to catch dust and debris, and turn off or isolate ventilation near the work zone to prevent spread. Always manage dust and debris responsibly to avoid cross-contamination.
What are common finish options after rebuilding, and what should I check before choosing?
Options include patching with compatible plaster or drywall, skim coating, or applying a reinforced finish. Check the existing wall type, adhesive compatibility, and local guidance on finishes. Follow label instructions for any patch or finish products and plan for proper curing or drying times.