
Introduction
Stucco too close to grade means the stucco base sits near soil and splash zones, which can trap moisture and invite damage.
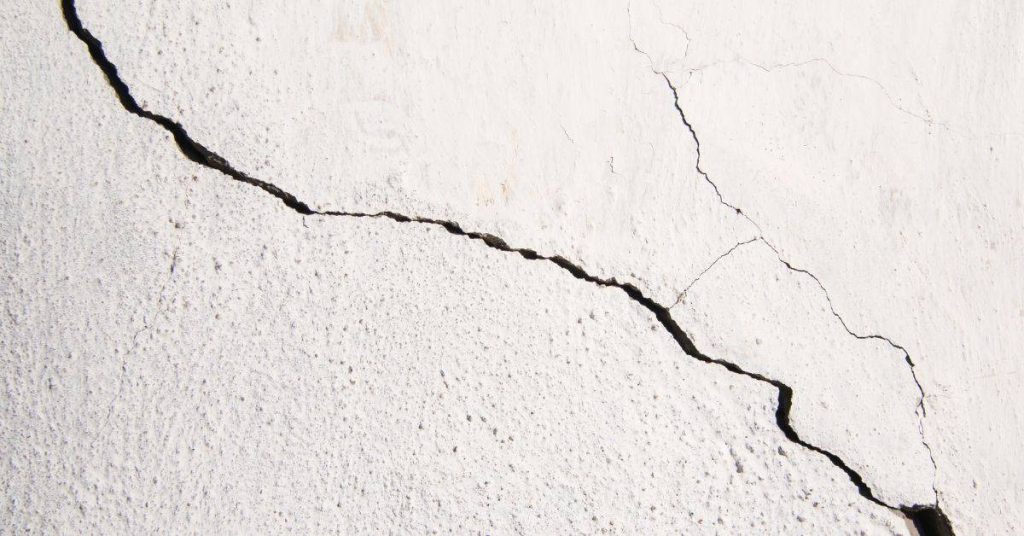
Common signs include cracking, staining, or peeling where the wall meets the ground, plus any bubbling or powdery finish. Watch for moisture staining, plant growth against the wall, and gaps that let water behind the finish.
Repair options short of full tear-down include patching damaged areas and reapplying finish coats in the affected zone, along with improving flashing and water shedding.
If needed, adjust the surrounding grade or add protective surface to create a small clearance, but always check local rules and manufacturer guidance.
For any fix, verify the substrate is sound, follow proper cure, and use the product labels as your guide rather than guessing.
Key takeaways
- Inspect for cracking, damp staining, efflorescence, or spongy texture near foundation.
- Causes include improper moisture management, soil splash, and damage from irrigation.
- Non-invasive options: seal cracks, install flashing, and improve drainage away.
- Moderate repairs avoid full tear-down by patching, skim-coat, or re-sealing joints.
- Base relocation or adjusting stucco base requires licensed input and permits.
- Safety: stop work if moisture persists and consult local code guidance.
Table of Contents
- Introduction
- Key takeaways
- Why Stucco Too Close to Grade Is a Problem
- Visual Inspection and Diagnostic Checklist
- Non-Invasive and Temporary Fixes to Reduce Risk
- Moderate Repairs That Avoid Full Tear-Down
- Alternative Treatments Short of Full Replacement
- Step-by-Step Process for Moving or Replacing Stucco Base
- Tools, Materials, and Material Specs Explained
- Costs, Timing, and Long-Term Implications
- Conclusion
- FAQ
Why Stucco Too Close to Grade Is a Problem
When stucco sits too close to the ground, moisture can wick up the wall and capillary action carries water toward the surface. This shortens the life of the stucco system and invites ongoing trouble. You may see early signs before serious damage unfolds.
Moisture can bypass the weep screed and travel behind the finish toward the sheathing and framing. That path speeds freeze/thaw cycles and can lead to rot, mold, and pest incursions. Understanding the risks helps justify practical fixes that don’t require tearing the whole wall down.
Common signs to look for
Stucco that’s too close to grade can cause visible issues both inside and outside your home. Keep an eye out for these common signs of moisture intrusion:
Exterior indicators: Staining, efflorescence (white powdery deposits), crumbling stucco, or cracked stucco near the base could all point to a moisture problem.
Interior indicators: Musty odors, soft or spongy sheathing when you press on it, and signs of insect activity like sawdust or damage to woodwork can also signal trouble. If you notice any of these, it’s time to investigate further.
How close is “too close” — what to check
Before you start making changes, figure out if your stucco really is too close to grade. Use this checklist:
- Measure clearance: From the ground level up to the bottom of your stucco, measure the distance. Compare it to local code and manufacturer recommendations.
- Check weep screed: Ensure there’s a weep screed at the base of your stucco to allow water to drain. If it’s blocked or missing, water can’t escape and will start to build up.
- Inspect grading: The ground should slope away from your home’s foundation. If it slopes in, water will pool and find its way into your stucco.
- Check flashing: Flashing at the base of your stucco should be intact and directing water outwards. If it’s damaged or missing, water can seep behind the stucco.
- Examine sheathing: Check for any soft spots, staining, or other signs of moisture damage on your exterior wall sheathing.
- Look for pests: Termites and carpenter ants love moist environments. If you see signs of these pests, it could indicate a moisture problem.
- Inspect foundation: Check for cracks or other damage that could allow water to enter your home’s interior.
- Review local code: Consult your local building code or a professional to ensure you’re meeting the required clearances for stucco-to-grade separation.
Quick rule: If your stucco is within 6-8 inches of grade, it’s likely too close. But always check with your local code and a professional to be sure.
Risks if left unaddressed
Stucco that’s too close to grade is a problem that won’t fix itself. Over time, moisture intrusion can lead to serious issues:
Accelerating deterioration: Moisture wicking up your stucco will cause it to break down faster than normal. Cracks and delamination will become more frequent and severe.
Higher repair costs: The longer you wait, the more extensive (and expensive) the repairs will be. What started as a simple clearance issue could turn into a full-blown stucco replacement job.
Possible structural damage: Moisture can cause rot to your sheathing and framing, weakening the structure of your home. In cold climates, freeze/thaw cycles can accelerate this damage. Mold growth is also a risk, which can lead to health issues and further property damage.
Reduced resale value: Prospective buyers will be wary of a home with stucco too close to grade. They know the problems it can cause and may offer less for your home or choose not to buy at all.
Visual Inspection and Diagnostic Checklist
The goal is to map how close the stucco is to grade and spot active intrusion. Look for staining, soft spots, and delamination as warning signs. Document locations with notes and photos for decisions later.
Check exterior grading, drainage, and splash zones. Observe downspout discharge and flashing that directs water away from walls. Note any buried or obstructed weep screed and cracks that run along the lower wall.
Tools and materials checklist for inspection
Before you start your inspection, make sure you have the right tools and materials. This will help you identify issues quickly and safely.
- Camera: To document findings and track progress.
- Measuring tape: To measure how close stucco is to grade.
- Moisture meter: To detect moisture in walls. Skipping this can lead you to miss active leaks.
- Pry bar: To gently probe for soft spots or hidden damage.
- Caulk probe: To check for proper caulking around trim and windows.
- Flashlight: To inspect dark areas like behind downspouts.
- Safety glasses: To protect your eyes from debris.
- Work gloves: To protect your hands while probing.
- Expert consultation: If you find signs of structural damage, call a professional. DIY repairs on structural issues can cause more harm than good.
Quick rule: Having the right tools and knowing when to call an expert will save you time and money in the long run.
Visual checkpoints and photo documentation
Taking photos at specific angles and of key details will help you understand the problem areas and track progress over time.
- Base of wall: Photograph the bottom few feet of the stucco. This is where moisture intrusion often starts.
- Inside sheathing: If accessible, photograph behind trim or under eaves to check for hidden damage.
- Adjacent grade: Show the relationship between the soil and the bottom of your walls.
- Flashings: Photograph where roof meets wall. Improper flashings can lead to water intrusion.
- Cracks: Document all cracks, no matter how small. They could indicate bigger issues.
- Staining: Photograph any stains on the stucco. These could be signs of moisture intrusion.
- Downspouts: Show where water is being directed after a rainstorm.
- Time-lapse photos: If possible, take photos from the same angle over time to track progression or changes.
Quick rule: Good documentation helps you understand the problem and track your progress as you make repairs.
Moisture and structural diagnostic steps
Checking for moisture and structural issues early can prevent small problems from becoming big, expensive ones.
- Probe for softness: Gently probe the stucco with a pry bar or caulk probe. Soft spots could indicate rot or other damage.
- Moisture meter on sheathing: Check moisture levels in the wall’s substrate. High readings could mean active leaks.
- Check for hidden rot: Look behind trim, under eaves, and in other hard-to-see areas for signs of rot or damage.
- Inspect control joints: Check if they’re properly aligned. Misaligned joints can lead to cracking.
- Look for rust on lath: Rust could indicate water intrusion and potential structural issues.
- Gaps between layers: Check for gaps between stucco layers or between stucco and trim/windows. Gaps can let in water.
- Substrate movement: Look for signs of substrate movement, like cracks in the foundation or walls pulling away from each other.
- Professional evaluation: If you find signs of structural damage, call a professional. DIY repairs on structural issues can cause more harm than good.
Quick rule: The earlier you catch moisture and structural issues, the easier (and cheaper) they are to fix.
Non-Invasive and Temporary Fixes to Reduce Risk
First, identify ongoing moisture pathways and ensure drainage is directing water away from the base. Pause here if you suspect major leakage or structural issues. Keep in mind these steps are stopgaps, not permanent solutions.
Implement temporary barriers to divert water, seal cracks with breathable exterior caulk, and cover weep screed openings so moisture isn’t drawn into the wall. Maintain a clean zone around the wall and monitor after rain for changes.
Improve drainage and grade away from the wall
Regrading soil is a quick, non-invasive way to reduce moisture exposure. Water naturally follows gravity, so slope your soil away from the wall.
Create a gravel band at the base of your wall. This helps water drain faster and prevents soil from splashing onto the stucco.
For larger areas, consider using swales or extending downspouts to divert water further away. Remember, these are temporary fixes until you can address the issue permanently.
Protective coatings and sealants
Temporary protective coatings and sealants can help keep moisture out. Look for breathable masonry sealers or elastomeric coatings designed for low-porosity masonry.
These products form a barrier against water, but they don’t trap moisture inside the wall. Always follow product instructions to ensure proper application and expected lifespan.
Keep in mind, these are temporary solutions. They buy you time while planning a permanent repair, but they’re not a long-term fix.
Splash blocks, gutters, and landscaping adjustments
Add splash blocks at the end of your downspouts to direct water away from the wall. This simple adjustment can significantly reduce splash-back.
Extend your downspouts further if possible. The longer the water travels, the less likely it is to pool near your foundation.
Consider low-water landscaping around your home’s perimeter. Remove any soil or mulch within a few feet of the wall to minimize saturation at the base. This creates a defined zone that helps prevent moisture intrusion.
Moderate Repairs That Avoid Full Tear-Down
Begin with an assessment of the lower edge of stucco to judge how much needs attention. Decide if removing the bottom couple of inches or a recessed belt is feasible without destabilizing the wall. Plan a continuous flashing detail behind the repaired zone.
Rebuild with proper weep and control joints at the repair line, and install a moisture barrier behind the new section. Patch and texture to blend with the existing wall while keeping long-term performance in mind.
Removing and replacing the lower stucco lift
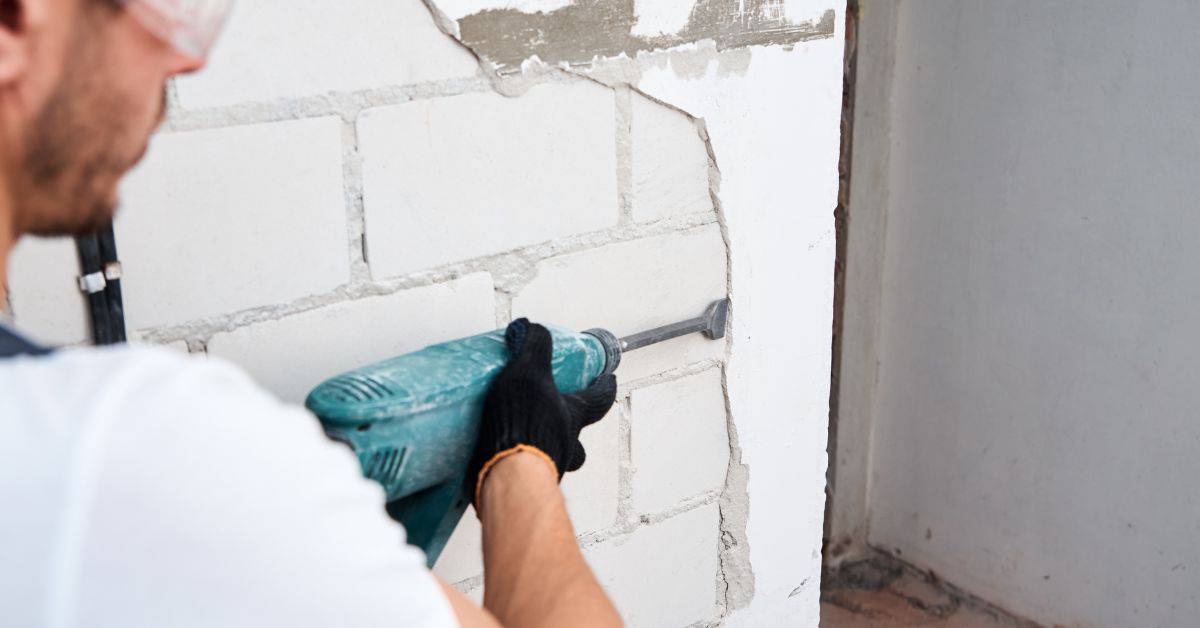
First, mark out the bottom 6-8 inches of your stucco wall that’s too close to grade. Carefully cut along these marks using a utility knife or score-and-snap method.
Assess the substrate. If you find rotten wood or crumbling concrete, replace it before proceeding. Ensure the surface is clean and sloped away from the wall.
Reinstall your base elements – like metal lath or a scratch coat – then apply new stucco layers to restore proper clearance. Remember to embed control joints as you go.
Installing or repairing flashing and drainage planes
Start by removing any existing damaged flashing at the base of your wall. Inspect the underlying drainage plane; replace if necessary.
Install new metal flashing. Ensure it extends beyond the stucco onto the roof or siding to divert water away from the wall. Integrate it with your existing cladding system.
If you’re using a house wrap as your drainage plane, ensure it’s intact and sloped properly. If not, replace it and reinstall correctly.
Adding a metal or masonry kickout/skirt
A kickout or skirt provides a durable, protective transition at the bottom of your stucco. It helps direct water away from the wall and prevents it from wicking back up.
Install a metal drip edge. This can be attached directly to the flashing or installed separately. Ensure it extends far enough to divert water effectively.
For masonry kickouts, use concrete or stone that matches your existing wall. Install it over the flashing and ensure it’s properly sloped. Seal any joints to prevent moisture intrusion.
Alternative Treatments Short of Full Replacement
Think through options that raise or shield the stucco edge rather than tearing it out. Evaluate whether cladding skirts, stone veneer, or a mechanical drainage system suits the site. Each choice shifts how the wall sheds water and how it looks.
Check compatibility with the existing structure and weather barrier. Plan for backing materials, sealants, and flashing that match the new detail. Consider permits, warranties, and maintenance implications with each route.
Attaching a removable or permanent skirt cladding
A skirt cladding can be your first line of defense against moisture intrusion. It raises the effective grade level, creating a visual and functional barrier.
Use siding, stone veneer, or metal trim to cover the base area. Make sure it’s compatible with your existing stucco and structure. For removable options, use screws or nails that allow for easy removal if needed.
Pros: Quick installation, improves curb appeal. Cons: May not address underlying moisture issues, requires periodic maintenance.
Installing a continuous waterproof membrane behind a new skirt
A waterproof membrane behind your skirt cladding can significantly improve performance. It helps direct moisture away from the wall and ties into existing drainage planes.
Use a self-adhesive or liquid-applied membrane. Extend it at least 6 inches above the grade line and tie it into any flashing or drainage plane systems.
Pros: Enhances waterproofing, integrates with existing systems. Cons: Adds cost and complexity to installation.
When cosmetic fixes are appropriate (and when they are not)
Cosmetic fixes can be a good option if there’s no active moisture intrusion or hidden rot. They’re quick, cheap, and improve curb appeal.
However, if you find any signs of water damage during your inspection, do not rely on cosmetic fixes alone. Address the underlying moisture issue first with proper drainage, flashing, and possibly removing affected stucco.
Always remember, a cosmetic fix is just that – it doesn’t address the root cause of the problem. If in doubt, consult a professional.
Step-by-Step Process for Moving or Replacing Stucco Base
Start with a clear scope, safety plan, and any permit requirements. Set a realistic budget and timeline before touching the wall. Identify whether you’ll do partial base work or a larger scope.
Outline removal methods that minimize damage to substrates and prepare for substrate repairs. Plan moisture barriers, flashing, and drainage details to integrate with the rest of the wall system.
Step-by-Step Pouring Process
The pouring process is where you’ll transform your prepared base into a solid, durable surface. Follow these steps closely to ensure a successful outcome.
- Check final measurements: Before pouring, double-check that your base dimensions are correct. A slight miscalculation here can lead to an uneven or improperly sized slab. Use a tape measure and compare with your plans.
- Lay out forms: Place your formwork around the base, ensuring it’s level and secure. The forms contain the concrete and give it shape as it cures. Check for any gaps or leaks that could allow concrete to escape.
- Prepare concrete mix: Follow the manufacturer’s instructions on your bagged mix or have ready-mix delivered. A typical mix is 1 part cement, 2 parts sand, and 3-4 parts aggregate (gravel). Check the consistency by picking up a handful; it should hold together but not be too wet.
- Pour concrete: Start at one corner of your base and pour the concrete into the forms. Use a shovel to spread it evenly, ensuring all areas are covered. If you notice any air pockets or dry spots, fill them in with more concrete. Stop pouring if you encounter unexpected obstacles; these could indicate structural issues that need professional attention.
- Level and finish: Once the base is filled, use a screed board to level off the top surface. This tool helps create a smooth, even plane. Then, use a bullfloat to remove any excess water and compact the concrete. Check for any low or high spots; these should be minimal if your forms were properly laid out.
- Cure the slab: Cover the newly poured concrete with plastic sheeting to retain moisture and aid curing. This process can take 24-72 hours, depending on weather conditions. Check local guidelines for specific cure times in your area.
Pro tip: Keep children and pets away from the curing slab. Concrete is toxic if ingested and can cause serious burns if touched during this stage.
Prep, permits, and site safety
Before you start moving or replacing your stucco base, there are some crucial steps to take. First off, check local building codes – you might need a permit for this job.
Next up, protect your landscaping. Lay down tarps or drop cloths around the work area to keep debris from damaging plants and grass. It’s also a good idea to temporarily remove any valuable or breakable items from nearby windows.
Now, let’s talk safety. Make sure you’ve got your personal protective gear – that means gloves, safety glasses, and a hard hat if you’re working under an existing structure. Also, check base compaction. If it’s not up to par, you’ll need to hire a pro with the right equipment.
Lastly, know your limits. If you’re unsure about any part of this process, don’t hesitate to hire a licensed tradesman. It might cost a bit more, but it’s worth it to get the job done right and safe.
Removing Damaged Stucco and Assessing Substrate
First off, safety first. Wear gloves, goggles, and a dust mask when handling stucco.
Start by scoring the damaged stucco with a utility knife or a special scoring tool. This makes removal easier and cleaner. Then, use a pry bar to gently lift and remove the damaged pieces. Be careful not to damage the underlying substrate.
Inspect the substrate once you’ve removed the damaged stucco. Look for any signs of rot, warping, or other damage. If the sheathing or framing is compromised, you’ll need to replace it before applying new stucco.
To check if the base is solid, knock on it. A hollow sound indicates that the base might be weak and needs replacement. Also, check base compaction by probing with a screwdriver or a similar tool. If it goes in too easily, the base may need to be re-compacted.
If you find any damage, don’t try to fix it yourself unless you’re sure you know what you’re doing. It’s better to call a professional to assess and repair the damage before proceeding with your stucco work.
Rebuilding the base, integrating flashing, and finishing
Now that you’ve prepped your substrate and removed the old stucco, it’s time to rebuild your base. First, check your local building codes for any specific requirements.
Start by reinstalling your drainage plane components. Ensure they’re properly lapped and secured. Then, install your backing system or lath. Make sure it’s securely attached and complies with manufacturer instructions. If you’re using metal lath, ensure it’s properly supported to prevent sagging.
Next, integrate your flashing. Ensure it’s properly lapped and sealed at all joints and edges. Flashing should be installed in a way that allows water to drain away from the wall. Be sure to check with your local building codes for specific flashing requirements.
Now you’re ready for stucco application. Follow the manufacturer’s instructions for mixing and applying each layer. Remember, proper curing is crucial. Keep the new stucco moist for at least three days after application, unless otherwise specified by the manufacturer. Finally, perform a visual inspection to ensure everything looks as it should.
Tools, Materials, and Material Specs Explained
List the typical tools and materials used near grade, emphasizing safety and compatibility. Include trowels, patch mortars, lath, and sealants that suit exterior masonry. Keep your kit focused on practical, field-proven items.
Explain how to verify product choices by reading manufacturer sheets and checking cure times, substrate compatibility, and breathability. Use a simple field-checklist to confirm prep, application, and cleanup steps are understood.
Materials homeowners should expect in repairs
Choosing the right materials is crucial for a durable, long-lasting repair. Here are the key materials you’ll need and what to look for:
- Metal Flashing: Prevents water intrusion at joints and edges. Look for galvanized steel or aluminum, 24-26 gauge. Avoid cheaper, thinner options that rust or bend easily.
- Weep Screed Equivalents: Allows moisture to escape from walls. Choose a material compatible with your wall system, like open-cell foam or drainage mats. Check manufacturer instructions for compatibility.
- Lath: Supports stucco and provides key for strong bond. Opt for metal lath ( Expanded or Welded) over cheaper, weaker wire lath. Check local codes for specific requirements.
- Cement/Stucco Mixes: Base of your repair. Look for Type N or Type S mortar, suitable for your climate and application. Avoid cheap, unknown brands that may not meet standards.
- Waterproof Membranes: Keeps moisture out. Choose a membrane rated for your specific application (e.g., foundation, walls). Check product labels for compatibility with other materials.
- Sealants: Seals joints and cracks. Opt for silicone or polyurethane sealants suitable for your joint size and movement. Avoid cheap, low-quality sealants that stain or fail quickly.
- Backer Rod: Fills expansion joints before sealing. Choose closed-cell foam rod for best results. Avoid cheaper, open-cell options that absorb water.
Pro tip: When buying materials, check product labels and manufacturer instructions for storage and mixing guidelines. Proper storage extends shelf life, and correct mixing ensures optimal performance.
Tool list and when to get professional equipment
Here’s a quick rundown of tools you’ll need for concrete work, along with when to consider renting or hiring specialized gear.
Basic Tools:
- Demolition tools (sledgehammer, pry bar) – For removing old concrete
- Trowels (hand trowel, straight edge trowel) – For smoothing and finishing
- Levels (2-ft and 4-ft levels) – To ensure your surface is flat and even
- Fasteners (nails, screws, anchors) – For securing forms and reinforcing steel
Specialized Equipment:
- Scaffolding – For high work areas. Always check local safety regulations before setting up.
- Concrete mixer (rental) – For mixing large batches of concrete. Check the mixer’s capacity to match your needs.
- Power trowel (rental) – For large, flat surfaces. It’s faster and more efficient than hand troweling for big jobs.
Remember, it’s better to rent or hire equipment you’re not familiar with rather than risking injury or poor results. Always check manufacturer instructions and local rules before using any specialized gear.
How to verify material compatibility and warranties
Choosing the right materials is crucial for a durable, long-lasting repair. Follow these guidelines to ensure you’re picking the best products for your job.
- Type N mortar: Used for most repairs, especially in CMU (concrete masonry units) walls. Look for ASTM C270 compliance on the bag. It’s affordable and versatile but avoid using it with soft stones or bricks as it can cause cracking.
- Type S mortar: For high-strength repairs, like in load-bearing walls or where extra durability is needed. Check for ASTM C270 compliance and look for a higher compressive strength (around 1800 psi). It’s pricier but worth it for critical repairs.
- Concrete patching compound: For filling cracks or holes in concrete surfaces. Choose one with good adhesion and flexibility to handle movement. Check the package for freeze-thaw resistance if your area experiences harsh winters.
- Expansion joint filler: Used where two slabs meet to allow for movement. Opt for a flexible, non-hardening caulk that can withstand UV exposure and temperature changes. Don’t use silicone or other hardening sealants as they can cause cracking over time.
- Flashing materials: Crucial for preventing water intrusion. Choose from metal (aluminum or galvanized steel) or plastic, depending on your roofing material. Ensure it’s compatible with your existing flashing and follow manufacturer guidelines for proper termination techniques to maintain warranties.
Pro tip: Always check the product label and manufacturer instructions before buying. Store materials properly to prevent degradation, and mix only what you can use within the working time specified by the manufacturer to avoid waste and ensure durability.
Costs, Timing, and Long-Term Implications
Clarify what counts as being too close to grade and outline a range of repair options. Consider localized patches, skim coats, or partial re-stucco versus full teardown. Keep expectations aligned with what each option can achieve.
Discuss how price drivers like access, materials, and required flashing affect overall cost and schedule. Note how weather and permits can shift timing, and how the choice influences long-term maintenance and home value.
Cost drivers and budget planning
Repairing stucco too close to grade varies in cost based on several factors. First, consider the extent of damage. A small patch job will be cheaper than a partial re-stucco.
Accessibility also plays a role. High or hard-to-reach areas may require scaffolding, increasing labor costs.
The type of stucco—traditional, acrylic, or synthetic—and its condition affect pricing. Damaged substrate beneath the stucco can add to expenses if it needs repair or replacement.
Labor rates vary by location and contractor. Always get multiple estimates and set aside a contingency fund (around 10-15% of total estimate) for unexpected issues.
Seasonal impacts and optimal timing for repairs
Stucco work is best done in dry, non-freezing periods. This allows the stucco to cure properly without risk of frost damage or excessive moisture.
Ideally, start repairs in late spring (after the last freeze) and finish before fall rains set in. High humidity can slow curing and promote mold growth.
Rainfall during work can cause delays and complicate application. Schedule work around weather forecasts when possible.
Labor availability may also shift with season, affecting scheduling and pricing.
Long-term implications for home value and resale
A well-documented, permanent repair preserves your home’s value. It shows buyers that maintenance was a priority and reduces the need for costly repairs down the line.
Visible band-aid fixes can negatively impact buyer perceptions. They may question the overall condition of the home or worry about hidden issues.
Insurance companies also take note of visible repairs. They may require disclosures or adjust premiums based on perceived risks, such as moisture intrusion or foundation concerns.
To protect your investment, choose a repair option that addresses the root cause and stands up to future weathering.
Conclusion
The core idea is simple: keep stucco away from the dirt, protect the structure, and fix it with solid methods that don’t wreck the job or your wallet. Work safely, test ideas in small spots, and move forward only when you have clear results.
First, look over the area and confirm clearances, moisture signs, and any cracks or detachment. Then plan a practical path: start with non-invasive fixes, verify by monitoring moisture and movement, move to moderate repairs if needed, and only escalate to removal if the base is unsalvageable. Check weather, have the right tools, and follow a step-by-step move-or-replace sequence, keeping every test reversible whenever possible. Keep notes and photos as you go to stay honest with the plan and the budget.
Common mistakes to avoid are patching over damp or stained wood, rushing a repair without testing moisture, and assuming one fix fits all walls. Safety rules are simple: shut off power when working near outlets, wear eye and skin protection, and never cut or grind while standing on unsecured surfaces. Test fixes in a small, controlled area first, and keep the work area dry and well-ventilated to prevent hidden damage from worsening.
If the base shows persistent moisture, structural looseness, or you’re unsure about moving or replacing the base, call a qualified pro before you push ahead. A professional can confirm the diagnostic results, provide proper material specs, and prevent costly missteps. Stay steady, stay deliberate, and you’ll keep the project on track and out of trouble.
FAQ
What signs should I look for to know stucco issues near grade are happening?
Look for cracking, chipping, or soft spots that appear at or just above the ground. Water stains, efflorescence, or damp smells near the base are red flags. Peeling paint on the siding close to the soil can also signal a problem.
What causes problems when stucco sits close to the ground?
Moisture wicking from the ground up, poor drainage, and splash from rain or irrigation all take a toll. Inadequate flashing or graded soil can trap water against the stucco. Vegetation too close to the wall can trap moisture and rub away protective finishes.
What repair methods work without doing a full tear-down?
Small repairs can include patching cracks, re-sealing flashing, and applying a crack-resistant coating in the problem area. You can sometimes remove and re-scratchcoat only where needed, then re-seal and maintain drainage. For moisture-prone spots, addressing the moisture source is essential before patching.
How can I prevent future damage and what about costs?
Improve drainage, keep soil away from the stucco, and install proper flashing and sealants as needed. Regular inspection and timely repairs save money by delaying bigger jobs. Check manufacturer instructions and local rules for approved products and methods.
What safety precautions should I follow during repairs?
Wear eye protection, gloves, and a dust mask. Work from stable surfaces and avoid leaning on weak framing. If you’re unsure about lead paint, asbestos, or structural issues, stop and consult the label, datasheet, or local guidelines for safe handling.