

Introduction
Suction in stucco patching happens when the surface draws water away as the patch cures, which can lead to poor bonding. Pre-wet rules help control the moisture draw so the patch cures with intact adhesion. Follow basic guidelines on dampening the area and feeling the surface moisture before applying patch material.
Bonding timing matters: apply the patch while the surface moisture level is appropriate and before the patch material dries too much. Avoid suction by pre-wetting the area or using a bonding agent as recommended by the patch product and manufacturer instructions. Always check product labels and local requirements for surface prep and cure guidance.
Key takeaways
- Pre-wet substrate evenly before patching to reduce suction-driven cracks and de-bonding.
- Inspect substrate for moisture, cracks, or holidays before applying any patch.
- Use mechanical bonding where possible; reserve chemical bonding for clean, sound surfaces.
- Pre-wet materials and patch edges gradually to avoid rapid moisture loss.
- Check cure and bond timing with manufacturer guidelines or local code requirements.
- Wear eye protection and gloves when mixing patch materials and applying.
- Perform post-repair checks for proper adhesion, feathering, and surface uniformity.
Table of Contents
- Introduction
- Key takeaways
- Why Suction (Substrate Absorption) Causes Stucco Patch Failures
- Pre-Repair Planning and Inspection
- Surface Preparation Techniques
- Pre-Wetting Rules: When and How to Dampen the Substrate
- Choosing Bonding Method: Mechanical Versus Chemical
- Bonding Timing and Application Best Practices
- Tools, Materials, and Material Specs Explained
- Post-Repair Checks and Quality Verification
- Conclusion
- FAQ
Why Suction (Substrate Absorption) Causes Stucco Patch Failures
Suction happens when the substrate is porous and dry, pulling water out of the fresh patch material. This creates a water potential gradient that can disrupt hydration and bond formation. The result is a weaker connection between patch and substrate over time.
Expect common failure modes such as debonding at the patch edge, shrinkage cracks near the repair, and feathered or hairline cracks that reveal the underlying surface. Rapid drying and strong sun or wind can intensify these effects, especially on larger patches. Quick checks include noticing uneven set, darkening around the patch, or a dry-looking substrate that remains drier after initial cure. Pre-wetting and proper bonding timing are previewed as mitigation in the following sections.
What Suction Is and How It Works
Suction, also known as substrate absorption, is like a thirsty sponge. When you patch dry stucco or concrete, that ‘sponge’ sucks water out of your fresh mix.
The science behind this is called water potential gradient. It’s just a fancy way to say the dry surface wants water more than the wet patch, so it takes it. This disrupts the hydration process – that’s when water and cement react to make strong concrete or stucco.
Think of it like this: you’re trying to make a cake (patch), but your oven (substrate) is too dry. It steals moisture from your batter, leaving you with a dry, crumbly cake instead of a moist one.
Failure Modes Linked to Uncontrolled Suction
When suction isn’t controlled, it can cause all sorts of problems. Here are some common failure modes:
Debonding: The patch peels off like a sticker that’s lost its stick. This happens when the water loss is so rapid that the bond between the patch and substrate never sets properly.
Shrinkage cracks: These are like tiny, dry riverbeds near your patch. They form when the patch dries out too fast, shrinking as it does so and cracking the surface.
Feathering or hairline cracks: Fine cracks that radiate out from the patch like a spider’s web. These happen when the patch stiffens too quickly due to rapid water loss.
Long-term bond delamination: This is like a slow-motion debonding. The patch looks fine at first, but over time, it gradually loses its bond with the substrate and eventually fails.
Pre-Repair Planning and Inspection
Start with a clear decision framework to decide between repair and replacement. Consider crack width, substrate condition, moisture levels, and the age of the stucco. Define acceptable performance criteria for the patch before you begin.
Identify high‑risk areas that need extra attention, such as corners, joints, and spots with chronic moisture intrusion. Check substrate condition and moisture with tests and by inspecting interior spaces for dampness that could signal suction risk. Plan substrate readiness, bonding compatibility, and a stepwise patching sequence to minimize suction during application.
Repair vs replace decision checklist
Before you start any concrete repair work, use this checklist to determine if a repair will be sufficient or if replacement is necessary. This step can save you time and money by avoiding temporary fixes that may need rework.
- Check for structural cracks: Look for horizontal or diagonal cracks wider than 1/8″. These indicate structural issues that require professional assessment and likely replacement.
- Assess crack width and length: Measure the widest part of each crack. Cracks wider than 2mm (3/32″) are signs of significant damage and may need replacement.
- Inspect for recurring cracks: If cracks have reappeared after previous repairs, it’s a sign that the underlying issue hasn’t been addressed and replacement might be needed.
- Check for delamination: Tap the surface with a hammer. A dull thud instead of a solid sound indicates delamination, which requires replacement.
- Examine reinforcement exposure: If rebar or wire mesh is exposed, it’s a sign of significant damage that likely requires replacement.
- Look for settlement or heaving: Uneven surfaces or signs of movement indicate soil issues that may require professional assessment and potentially replacement.
- Check for spalling or flaking: If concrete is breaking off in large pieces, it’s a sign of severe damage that requires replacement.
- Inspect for rust stains or efflorescence: These can indicate moisture issues that may require professional assessment and potentially replacement.
Quick rule: If you find any signs of structural damage, recurring cracks, exposed reinforcement, settlement, heaving, spalling, or flaking, it’s best to err on the side of caution and consider replacing the concrete rather than attempting a repair.
Field tests to identify suction and porosity
Before you start any repair work, use this checklist to test your concrete surface. These simple, non-invasive tests will help you understand if your concrete has high suction or surface contamination.
- Visual Inspection: Look for cracks, stains, or discoloration that could indicate contamination or damage.
- Touch Test: Feel the surface. If it’s rough or powdery, it might have a high suction due to surface laitance or scaling.
- Moisture Content Check: Use a simple moisture meter (available at hardware stores) to check if the concrete is dry enough for repair. Aim for 75% relative humidity or less.
- Water Drop Test: Place a small drop of water on the surface. If it’s absorbed quickly, the suction is high.
- Methyl Ethyl Ketone (MEK) Test: Apply MEK to a small area. If it foams or bubbles, there’s likely contamination like curing compounds or laitance.
- Check for Delamination: Tap the surface with a hammer. A hollow sound could indicate delamination, where the old concrete is lifting off the base.
- Inspect Rebar: If visible, check rebar for rust or damage. This can cause suction and affect repair adhesion.
- Check for Efflorescence: White powdery deposits could indicate moisture issues that might affect your repair.
Quick rule: If any of these tests show high suction, contamination, or damage, you’ll need to clean and prepare the surface properly before applying any repair materials. Skipping this can lead to failed repairs and costly rework.
Documenting and planning the work area
Before you start any concrete repair, use this checklist to document and plan your work area. This helps avoid surprises during patching and ensures a successful outcome.
- Map problem spots: Use a tape measure and mark out the damaged areas on a sketch or take photos with measurements noted. This helps you understand the extent of repairs needed and plan your materials accordingly.
- Check ambient conditions: Measure temperature, humidity, and wind speed using a site-specific weather app or meter. Concrete patching has specific temperature and humidity requirements for optimal curing (check manufacturer instructions).
- Identify moisture levels: Perform a simple moisture test on the concrete surface using a calcium chloride test kit (available at hardware stores) to ensure it’s dry enough for patching.
- Check substrate condition: Inspect the area around the damaged spots. If you find cracks or other signs of deterioration, these may need repair before patching to prevent further issues.
- Plan stages of work: Break down your repair into manageable stages. For example, if you’re repairing multiple areas, prioritize them based on accessibility and severity.
- Check for hidden obstacles: Before starting any cutting or drilling, use a stud finder or X-ray machine (if available) to locate any rebar, pipes, or wires that could be hidden within the concrete.
- Ensure proper ventilation: If you’re using power tools or applying sealants, ensure there’s adequate ventilation to prevent fumes from building up. This is especially important when working in enclosed spaces.
- Check local rules and regulations: Ensure you have any necessary permits for the work and that your repair methods comply with local building codes (check with your local building department).
Quick rule: Always plan your work area thoroughly before starting repairs. This helps avoid costly mistakes, ensures a safe working environment, and increases the likelihood of a successful outcome.
Surface Preparation Techniques
Assess the substrate to distinguish porous stucco from solid concrete, and inspect for cracks or coatings that could hinder bonding. A clean, sound surface is essential before any patch material goes on. Surface profiling creates a mechanical key that improves adhesion without causing new damage.
Use a tack test or moisture check to gauge suction risk and determine if pre-wetting or bonding aids are needed. Keep the area dust-free and use the right tools to avoid overheating or cracking the substrate. Re-check the surface before applying the patch.
Cleaning methods: sweep, wash, and degrease
Start by removing loose material with a stiff-bristle broom or brush. This helps expose the sound substrate for better bonding.
Washing: Use a low-pressure washer to remove dirt, dust, and efflorescence. Be careful not to damage the surface or create micro-cracks by keeping the pressure below 1200 PSI.
Degreasing: For areas with oil stains or grease, use a degreaser or detergent. Apply it, let it sit for a few minutes, then scrub and rinse thoroughly. Avoid over-wetting to prevent suction-induced failures.
Mechanical preparation and profiling
For solid concrete substrates, use a scarifier or chipping hammer to expose sound material. Be careful not to overheat the substrate or create micro-cracks.
For stucco, use an angle grinder with a diamond cup wheel to lightly grind the surface. This creates a matte, textured finish that provides mechanical key for better bonding.
Note: Always wear appropriate PPE when using power tools and follow safety guidelines.
Dealing with oil, sap, and deep stains
Deep contaminants like oil or sap can hinder bonding. If possible, remove them using a suitable solvent or degreaser.
For stubborn stains, consider encapsulating them with a primer designed for deep stain blocking. This prevents the contaminant from migrating back to the surface and compromising the patch.
Alternatively, use a primer that’s compatible with your patch mix and can isolate the contaminant. Always follow the manufacturer’s instructions when using primers.
Pre-Wetting Rules: When and How to Dampen the Substrate
Pre-wetting helps porous substrates resist suction and promotes a more reliable bond. Understand how suction can disrupt bonding on concrete, masonry, or stone, and plan accordingly. If the surface is already damp, additional pre-wetting may not be necessary.
Assess dampness with simple cues such as touch and appearance, and avoid standing water. Use light, even dampening rather than soaking the surface, and time it so the surface dries to the right state before applying the patch. Include a quick recheck step to confirm suction has eased before finishing.
Why pre-wetting matters for hydration and bond
Pre-wetting is crucial when working with porous substrates like concrete, masonry, or stone. These surfaces can absorb water quickly, causing suction that disrupts bonding.
Think of it like this: too little water, and the stucco patch can’t stick; too much, and it won’t adhere either. Pre-wetting helps maintain a balance, preventing suction from pulling moisture away from the fresh patch while ensuring there’s no excess surface water to hinder adhesion.
Key: The goal is to keep the surface consistently damp, not wet or dry.
Practical pre-wetting methods
To achieve the right level of dampness, use a fine mist sprayer or garden spray bottle. A light, even mist is what you’re after – think ‘dew-drop’ consistency, not heavy rain.
Here’s how to do it: start by lightly misting the surface. Wait about 5-10 minutes, then re-wet any areas that feel dry or look dull. Repeat this process until application time.
Timing: Pre-wet just before you’re ready to apply the patch. Don’t do it too early; otherwise, the surface might dry out again.
Visual and tactile signs the surface is ready
The ideal pre-wet condition should look like a consistently damp, sawn-off sheen across the entire surface. It’s not shiny or wet, but it’s not dry either.
Here are some cues to look for:
- Uniform appearance: The whole area should have an even matte/damp look.
- No visible pooling: There shouldn’t be any standing water or puddles.
- Not powdery: The surface shouldn’t feel dry and dusty when touched.
Choosing Bonding Method: Mechanical Versus Chemical
Match the substrate condition and suction risk to the bonding approach. Decide whether a mechanical key or a chemical bond will provide the best long-term adhesion. Consider if the surface is dry, damp, or dusty when making the choice.
Explain the mechanical options such as scratch coats or surface keys and whether pins or anchors are appropriate. Outline chemical bonding options like acrylics or polymer-modified mixes, and confirm compatibility with the existing substrate and patch material.
Mechanical bonding: scratch coats and keys
Scratch coats and surface keys are your go-to methods when dealing with dry, dusty, or porous substrates. They create a mechanical interlock that secures the patch.
Scratch Coats: Use them on smooth surfaces like freshly poured concrete or previously painted substrates. Score the surface with a stiff brush or wire tool to create grooves for better adhesion. Do this just before applying the patch.
Surface Keys: For crumbling stucco or highly porous surfaces, undercuts are your best bet. Use a chisel or grinder to create deep, wide grooves. This provides more surface area for the patch to grip onto.
Chemical bonding agents and primers
Chemical bonding agents and primers are liquids that penetrate into the substrate, creating a strong bond. They’re ideal for damp or dusty surfaces where mechanical methods might not work well.
Acrylic Bonding Agents: These are great for porous substrates like crumbling stucco. Apply them with a brush or roller, letting it soak in before applying the patch. They create a strong bond but may not be compatible with all patch materials.
Polymer-Modified Cement Mixes: These are cement-based mixes with added polymers for extra strength. They’re versatile and can be used on various substrates. However, they might not penetrate as deeply as acrylics.
Combining methods for robust adhesion
For the best long-term results, consider combining mechanical and chemical bonding methods. This gives you the benefits of both worlds – a strong initial grip from mechanical methods and deep penetration from chemicals.
Here’s how: First, prepare your surface mechanically as described earlier. Then, apply a chemical primer or bonding agent. Let it soak in for the time specified on the product label. Finally, apply your patch material.
This combination works well on challenging surfaces like previously painted substrates, highly porous surfaces, or when dealing with suction risks. It ensures a strong bond that can withstand the test of time and weathering.
Bonding Timing and Application Best Practices
Follow a logical sequence: prepare the surface, apply the bonding agent if used, and then begin the patch while the surface is at an appropriate moisture level. Verify porosity and cleanliness before starting the bonding process. Check that moisture or suction potential is controlled prior to patching.
Understand layering timing, including when to re-wet or prime between coats, and how environmental conditions influence sequencing. Use bonding agents and primers as needed, and ensure cure conditions support a strong bond. Use practical checks to confirm readiness before finishing the repair.
Timing window: from pre-wet to application
Pre-wetting the surface is crucial for a strong bond. But timing is key – too little time, and it’s still dry; too much, and it’s waterlogged.
Monitor the surface closely after pre-wetting. Feel it. It should be damp but not wet. Wait until the surface reaches an appropriate moisture level before applying your patch or bonding agent.
Follow product instructions for exact timing. They know their stuff, so trust ’em. Don’t rush; patience here pays off.
Layer sequencing and scratch-to-finish timing
Stucco patching is a layered process. Each layer needs time to set properly before the next goes on.
Start with your scratch coat. Apply it, let it cure as per product guidance – usually 24-48 hours. This gives it time to firm up and create a solid base for the next layer.
Then comes your finish coat. Again, wait until it’s firm but not fully cured before applying the final layer. This way, you avoid cold joints – weak points that can crack or peel over time.
Application techniques that promote adhesion
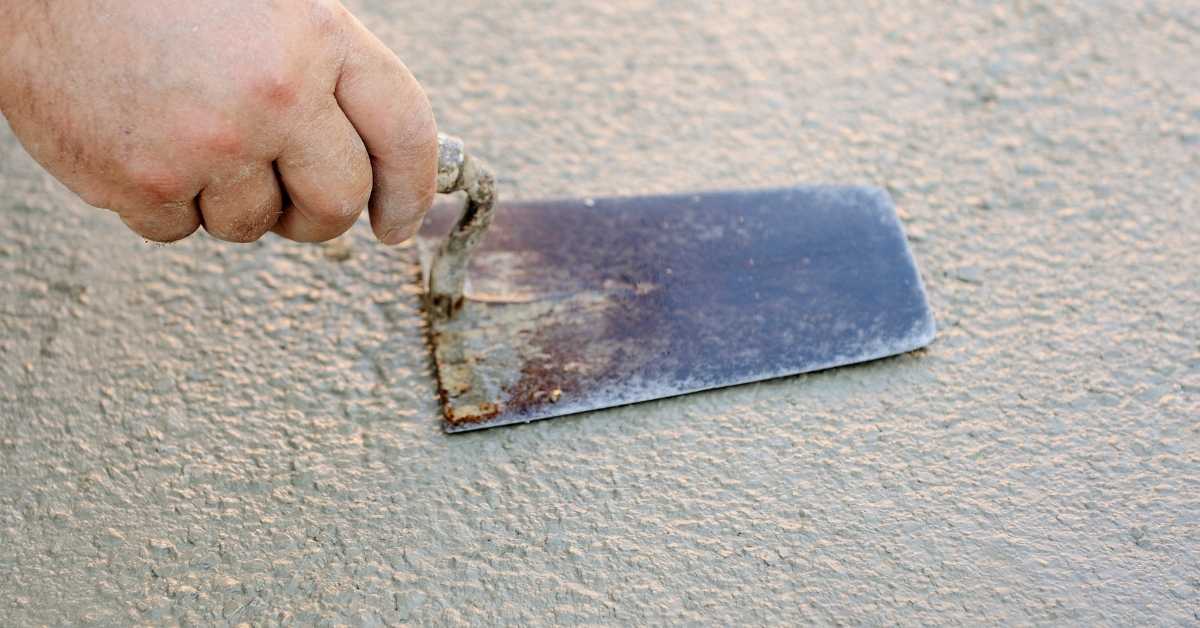
How you apply your patch matters. You want it to stick like glue, right?
Press the patch into the substrate. Compaction is key here. Use a trowel or float, press down firmly, and work out any air pockets. The more contact, the better the bond.
Finish with smooth, even strokes. Reduce entrapped air as much as possible. Good application technique means a stronger final product.
Tools, Materials, and Material Specs Explained
Prepare a DIY-friendly tools list, including measuring tools, trowels, mixing containers, a moisture meter, a spray bottle, and PPE. Note which items are optional but helpful for consistency. Have a clean, organized workspace to support suction control during the process.
Outline patch materials, bonding agents, and compatible sealants, emphasizing practical choices for patching and substrate compatibility. Verify on labels specs such as mix ratios, work time, cure time, adhesion claims, and temperature or humidity limits. Plan a workflow that matches substrate condition and suction considerations.
Tools and consumables checklist
Before you start, make sure you have all the necessary tools and consumables for a successful patch job. Here’s a handy checklist to ensure nothing gets overlooked.
- Measuring tape: To ensure accurate cuts and measurements.
- Scraper: For removing loose material and preparing the surface.
- Stiff-bristle brush: To clean the surface before pre-wetting.
- Spray bottle or garden sprayer: For dampening the substrate (optional but helpful for consistency).
- Margin trowel or stencil: To apply bonding agent evenly.
- Trowels (3-4 sizes): For mixing, applying, and finishing the patch.
- Mixing bucket: To prepare your patch mix.
- Moisture meter: To check substrate moisture levels before pre-wetting.
- Personal protective equipment (PPE): Safety glasses, gloves, and a dust mask for handling dry materials.
Quick rule: Having the right tools ensures consistency, cleanliness, and a successful patch job.
Choosing patch material and bonding products
The right materials make all the difference in a durable, long-lasting stucco patch. Here’s how to choose the best ones for your job.
- Cement-based patch mixes: Ideal for small repairs, easy to apply, and affordable. Look for high cement content (at least 70%) and low water demand.
- Stucco repair mixes: Designed to match existing stucco texture and color. Ensure it’s compatible with your substrate and follows the same expansion capabilities.
- Polymer-modified options: Offers enhanced flexibility, durability, and adhesion. Great for areas prone to movement or vibration. Check for high polymer content (at least 10%).
- Bonding agents/concrete primers: Enhances adhesion between old and new surfaces. Choose one compatible with your patch mix and substrate.
Quick rule: The wrong material can lead to cracking, staining, or weak bonds, so always choose the right one for your job.
What to check on product labels and specs
Before purchasing materials, make sure you understand their specifications and requirements. Here’s a checklist to guide you through the process.
- Mix ratio: Ensure it matches your needs (e.g., cement-to-aggregate).
- Shear/pot life: Check how long the mixed material remains usable.
- Curing time: Plan accordingly to allow proper curing before exposure to elements.
- Expansion capability: Match it with your existing substrate to prevent cracking.
- Water demand: Ensure it matches your pre-wetting and mixing methods.
- Adhesion claims: Check if it adheres well to your substrate and existing stucco.
- Wind/surface temperature limits: Follow these guidelines for optimal application conditions.
- Breathable vs. non-breathable finishes: Choose based on your climate and substrate needs.
Quick rule: Always follow manufacturer guidelines to ensure a successful patch job that lasts.
Post-Repair Checks and Quality Verification
Use quick, non-destructive checks like a fingertip scrape, gentle tape pull, and close-up visual inspection to spot poor bonding or suction effects. Document immediate observations as a baseline for future comparisons. Keep notes on any obvious delamination or movement.
Establish a brief verification routine with staged checks after repair, such as immediate, short-term, and mid-term reviews. Learn to interpret red flags like edge pull-away or soft patches, and know when to re-wet, re-prime, or re-patch. Include environmental considerations to ensure the cure is not compromised by weather or vibration.
Visual and tactile checkpoints during curing
Inspect your stucco patch regularly during the curing process to ensure it’s drying evenly and adhering properly.
- Check surface appearance: The finish should look uniform, with no obvious discoloration or inconsistencies. If you see patches that are darker or lighter, they might not be curing right.
- Feel for uniform drying: Gently press on the patch at various points. It should feel firm and consistent throughout. Soft spots could indicate poor adhesion or inadequate curing.
- Look for surface crazing: Fine cracks on the surface can appear if the patch dries too quickly. If you see these, re-wet the area slightly to slow down drying.
- Monitor shrinkage: As the patch dries, it should shrink uniformly. If one part shrinks more than others, it could pull away from the substrate and cause delamination.
- Check for moisture sheen: A shiny or glossy surface can indicate trapped moisture, which needs to escape for proper curing.
- Feel for warmth: The patch should feel warm to touch as it cures. If it feels cool, it might not be drying properly.
- Look for efflorescence: A white, powdery residue on the surface can indicate moisture movement, which could compromise adhesion.
Quick rule: Regular inspections during curing help catch issues early, preventing costly rework later.
Simple tests for bond integrity
The best way to check your patch’s bond is by following the manufacturer’s instructions. However, here are some simple tests you can perform in the meantime.
Gentle percussion: Tap on the patch with a light hammer or the handle of a trowel. A strong bond will sound solid, while a weak one might sound hollow or dull.
Localized probing: Gently press around the edges and in any suspect areas with a flat-bladed tool. If the patch feels loose or moves, it’s not bonded properly.
Monitor for movement: Keep an eye on the patch over time. Any movement, no matter how slight, could indicate a weak bond that will only get worse.
When and how to rework a failed patch
If your stucco patch fails, you’ll need to decide whether to repair it in place or remove and replace it. Here’s how:
Repair in place: If the failure is minor – a small crack or slight delamination – you might be able to repair it without removing the entire patch. Re-wet, re-prime, and apply a new layer of stucco.
Remove and replace: If the failure is extensive, or if the patch has pulled away from the substrate, it’s best to remove it completely. Use a chisel and hammer to carefully chip away the failed patch, then clean the area thoroughly before re-patching.
Safety first: Always wear appropriate safety gear when removing a failed patch. The process can create dust and debris that could harm your eyes or lungs.
Conclusion
Getting the patch to hold and look right comes down to proper pre-wetting, correct bonding, and solid timing. When these steps are done right, you get a durable patch that resists suction, looks like the surrounding wall, and stays safe to touch.
First, assess the area, clean the surface, and roughen any slick spots. Then dampen the substrate according to the rules you learned, choose a bonding method that fits the patch and substrate, apply the patch with the right timing, and finish with a careful cure and a quick post-check for grip, crack resistance, and appearance.
Common mistakes to avoid are over-wetting or under-wetting the substrate, skipping proper surface preparation, and mixing or applying bonding methods in a way that fights the substrate rather than embracing it. Always wear eye and skin protection, test a small area first, and plan repairs so you don’t rush the cure or damage nearby work. If you’re unsure about substrate condition, weak backing, or patch size, halt and verify before proceeding—these checks save you time and costly callbacks.
If the patch would require abnormal surface access, extensive substrate damage, or repeated failures after a test area, it makes sense to bring in a professional. Stay disciplined, follow the steps, and you’ll end with a safe, durable finish and real confidence in your work. You’ve got this—check, prepare, bond, and cure with purpose, and the wall will reward you.
FAQ
How should I prep the surface before patching to reduce suction and improve bonding?
Knock away loose material and clean the area well. Expose sound substrate and remove dust, dirt, and any efflorescence. If the surface is chalky, remove it so the patch can grab hold.
What are the proper pre-wetting techniques for a stucco patch?
Dampen the area with a light, even spray so the surface is moist but not saturated. Avoid pooling water or a wet puddle. Give the substrate a short soak if you see it drying quickly, then recheck for dampness before applying the patch.
When is the right time to apply the bonding material or patch after prep?
Start patching only when the surface is consistently damp and the substrate feels cool to the touch. Do not time the patch to wait for dry conditions or until the surface is completely dry. Always follow the product label and your local rules for open time and cure expectations.
What measures help avoid suction and loss of water during patching?
Use a mist coat or light dampening between coats to keep the patch from drying too fast. If you’re using a bonding agent, apply it per the manufacturer’s instructions and ensure even coverage. Keep the patchwork from drying out too quickly by maintaining a consistent moisture level.