
Introduction
Movement joints in stucco are intentional gaps that let the plaster move with temperature and framing shifts. They help prevent cracks by giving the wall a controlled place to flex, not tear. Check local building rules and follow manufacturer instructions for spacing and placement in your area.
There are different joint profiles and sealants, and selecting the right combo matters for durability. Choose a sealant that matches your climate, substrate, and movement expectations, and apply it cleanly in a prepared gap. Know common causes of cracking—shrinkage, movement, or improper prep—and plan joints and seals accordingly, while always verifying with product labels and local rules.
Key takeaways
- Understand common cracking causes to locate movement joints at stress points.
- Plan spacing rules with control joints at corners, transitions, and large wall areas.
- Choose joint profiles (lapped, beveled, or butt) matching stucco system.
- Select sealants compatible with substrate, weather, and anticipated joint movement.
- Prepare substrates properly, clean joints, and prime before sealant or backing—wear gloves.
- Inspect regularly for cracking or separation and address quickly to prevent spread.
Table of Contents
- Introduction
- Key takeaways
- Why Movement Joints Matter in Stucco
- Movement Joint Types and Stucco Joint Profiles
- Spacing Rules and Layout Strategies for Durable Joints
- Crack Control Methods and Reinforcement Interactions
- Sealant Selection, Compatibility, and Substrate Preparation
- Joint Geometry and Application Best Practices
- Inspection, Maintenance, and Common Mistakes to Avoid
- Standards, Specifications, and Tools/Materials Checklist
- Conclusion
- FAQ
Why Movement Joints Matter in Stucco
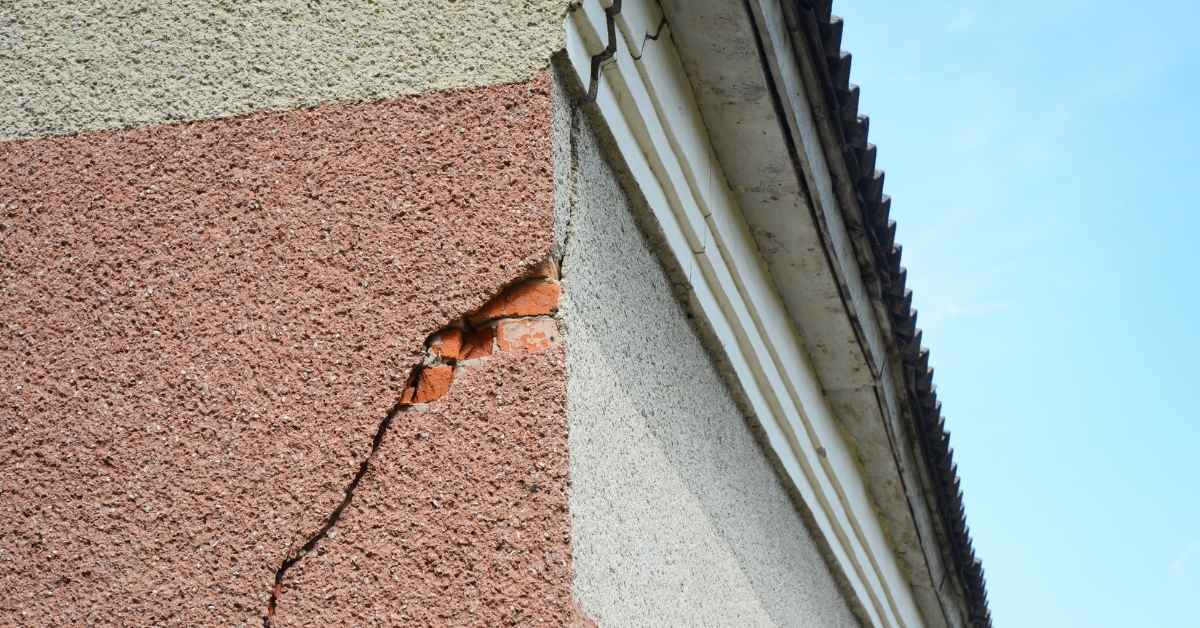
Movement joints are not decorative; they are a functional part of a stucco system. Substrate movement from temperature changes, moisture cycles, and wind loading translates into cracks if joints are skipped. By providing controlled paths for movement, joints help preserve the wall assembly over time and reduce visible cracking.
Common failure modes tied to too-few joints include random cracking, delamination at overlays, sealant failure, and moisture intrusion. Joints mitigate these issues by isolating movement and guiding where stresses concentrate. The type of substrate system—lath, wood backing, metal, or rigid foam—affects joint behavior and the stresses at interfaces. Look for nonstructural indicators of needed joints near transitions, openings, corners, terminations, penetrations, and areas with dynamic loads or vibration. This alignment supports maintenance, finish longevity, and cost efficiency by limiting repairs. When in doubt, check manufacturer instructions, project specifications, and local guidelines to ensure the joint layout meets code and industry practice.
Causes of cracking and restrained movement
The main culprits behind stucco cracks are internal and external forces. Internally, moisture loss and shrinkage during curing can cause the substrate to pull away from itself. Externally, temperature changes (thermal expansion/contraction), structural deflection, or settlement can push and pull on the wall.
When these movements are restrained – say, by rigid foam backing or a strong bond with the substrate – stress concentrations build up. This is like stretching a rubber band too far; eventually, it snaps, causing cracks.
Key takeaway: Understanding these causes helps us plan for and mitigate cracking by incorporating movement joints strategically.
Performance consequences: water, air, and aesthetics
Cracks in stucco, no matter how small, can lead to serious issues. Hairline cracks allow water ingress, which can lead to mold growth and structural damage over time. Wider cracks increase air leakage, leading to energy loss and discomfort.
Visually, cracks mar the aesthetic appeal of your cladding. They’re unsightly and can depreciate your property’s value. Moreover, these cracks can propagate, turning small problems into big ones that require costly repairs.
Bottom line: Cracks compromise stucco’s function as a protective cladding, inviting water and air intrusion while detracting from its appearance.
Movement Joint Types and Stucco Joint Profiles
Control joints, expansion joints, sight beads, and stop or J-beads cover the spectrum of movement accommodations. Each type serves a purpose in walls, corners, windows, doors, and transitions. Selection depends on expected movement and the surrounding assembly.
Placement and spacing follow building movement and substrate behavior, with attention to vertical and horizontal alignment. Profiles can be flush or recessed, and bead sizes vary by material. Materials such as PVC, aluminum, or elastomeric seals influence movement and aesthetics. Plan for integration with openings, parapets, and flashing, and specify sealant types that suit the joint profile and climate. Ensure pre-planning drawings, proper substrate prep, joint cut depth, backer rod usage, and cure/adhesion considerations are reviewed before installation.
Control joints and expansion joints — functional differences
Both control joints and expansion joints are crucial for managing movement in stucco, but they serve different purposes.
Control Joints are designed to relieve minor shrinkage and thermal stress. They’re typically 1/8″ to 1/4″ deep and spaced every 6′ to 10′ apart on walls.
Expansion Joints, on the other hand, accommodate larger movements and provide full-depth separation. They’re usually 1/2″ to 3/4″ deep and spaced further apart, every 15′ to 30′.
Trim and accessory profiles (stop bead, J-bead, corner beads)
These finishing profiles help create clean terminations at the end of control joints and improve water shedding.
Stop Beads are used to terminate control joints at windows, doors, and other openings. They’re typically 1″ to 2″ wide and made from PVC or aluminum.
J-Beads are similar but have a return leg that fits over the edge of the substrate, providing extra protection against water intrusion.
Corner Beads are used at inside and outside corners to reinforce the joint and provide a clean, finished look. They’re usually 2″ to 3″ wide and come in various profiles.
Spacing Rules and Layout Strategies for Durable Joints
Core spacing aims to control crack width while limiting visual disruption. Balance between structural movement and aesthetics guides how often joints appear. Avoid creating overly crowded joints that trap moisture or compromise backing materials.
Influencing factors include climate concerns, substrate movement, wall height, and architectural features. Consider large wall areas, corners, and penetrations when planning spacing. Layout patterns such as grids or staggered lines should align with structural elements to reduce stress concentration. Edge transitions, changes in plane, and corner guards help limit crack initiation. Always document mock-ups and field measurements, and verify alignment with project specs and sealant joints to ensure long-term performance.
Horizontal and Vertical Spacing Considerations
Stucco movement joints need balanced horizontal and vertical spacing to control cracks effectively. Here’s what drives these spacings:
Vertical spacing depends on wall height and restraint from the substrate. Taller walls need closer spacing, typically every 6-8 feet for thin stucco panels (3/8″ thick) or as required by local codes.
Horizontal spacing is influenced by slab thickness and wind/thermal expansion. Wider slabs need more frequent joints, usually every 4-5 feet. Always verify manufacturer and code requirements.
Terminations, Corners, and Openings Layout
Proper joint placement near terminations, corners, and openings minimizes stress concentrations:
Place joints 1-2 inches away from windows and doors to avoid load paths that could cause cracking. At corners, use a control joint with a corner guard or bead to direct movement and prevent cracks.
For transitions like soffits meeting stucco, place a joint at the transition line to accommodate any differential movement between surfaces. Always align joints with structural elements where possible to minimize stress.
Crack Control Methods and Reinforcement Interactions
Empirical crack-control methods rely on traditional spacing, while engineered approaches use calculations and crack-width targets. Each has pros and cons for DIY projects versus professional installations. Use the method that fits project skill and risk tolerance, and cross-check with specs.
Reinforcement interacts with movement joints by potentially reducing joint frequency. Horizontal and vertical meshes or rebar influence where joints land, and joints should align with reinforcement zones when possible. When reinforcement is present, you may adjust spacing for large panels and substrates with higher movement potential. Verify that the joint design accommodates anticipated stresses, and integrate with water-resistive barriers, flashing, and sealant choices to keep joints effective around reinforced areas.
Empirical vs. engineered crack control approaches
The old way, empirical methods, uses set rules like every 6-8 feet for joint spacing. It’s simple but might not work best on all jobs.
Engineered approaches are smarter. They use math and tests to figure out where cracks will happen based on how the stucco shrinks or moves. This way, you can make joints that fit your specific job.
Pros of empirical: Easy to understand, quick to plan.
Cons: Might not work well for all jobs.
Pros of engineered: Better suited for unique jobs, fewer cracks.
Cons: More complex planning, needs testing.
Horizontal reinforcement, distributed cracking, and when joints can be reduced
Horizontal rebar or mesh helps spread out cracks. This means you might need fewer joints.
But remember, structural needs and earthquake risks change how many joints you need. You don’t want too few joints causing big cracks.
So, if your job has good horizontal reinforcement, you can space joints 8-10 feet apart. But always check local codes and consider any unusual conditions.
Concrete brick and anchored veneer considerations
Anchored masonry needs different joint planning. You’ve got to account for the movement of both the stucco and the veneer.
Ties or anchors hold the veneer in place, but they can restrict movement. So, you might need more joints, maybe every 4-6 feet.
Also, use special tie/anchor detailing that lets the veneer move without pulling away from the wall.
Sealant Selection, Compatibility, and Substrate Preparation
Sealant families suitable for stucco joints include breathable elastomerics, silicone, and polyurethane. Each offers different movement capabilities and life expectations. Evaluate climate, movement needs, and aesthetics, then balance pros and cons and verify with product data sheets or manufacturer instructions before choosing.
Chemical compatibility matters: sealants must get along with stucco, primers, colorants, paints, and coatings. Check substrate porosity, moisture exposure, and UV stability to prevent adhesion failure. Planning steps include surface cleaning, moisture checks, efflorescence control, and primers or bonding agents as required. Define proper joint depth, backer materials, and sequencing to ensure long-term performance. Review standards and warranties, then set a maintenance plan for scheduled re-sealing and monitoring of aging joints.
Sealant types and compatibility with stucco
When choosing a sealant for your stucco joints, consider three main types: silicone, polyurethane, and hybrid (elastomeric). Each has its pros and cons.
Silicone is highly flexible and durable but may not adhere well to all substrates. It’s great for high-movement areas and UV exposure but can’t be painted.
Polyurethane offers excellent adhesion, paintability, and good movement accommodation. However, it’s less resistant to UV and moisture compared to silicone.
Hybrid sealants combine properties of both. Always check compatibility with your specific stucco mix, primers, colorants, and paints to prevent adhesion failure.
Backer rods, bond breakers, and priming
To control joint geometry and maximize sealant life, use backer rods and bond-breaker tape. Backer rods come in open-cell (porous) or closed-cell (non-porous) varieties.
Open-cell rods allow moisture to escape but can absorb water, leading to potential issues. Use them where moisture exposure is low.
Closed-cell rods prevent moisture transfer but may trap water if not properly installed. They’re ideal for high-moisture areas.
Bond-breaker tape prevents three-sided adhesion, allowing the sealant to move independently of the substrate. Priming ensures optimal adhesion and seals the surface against moisture penetration.
Joint Geometry and Application Best Practices
Best-practice detailing covers recommended joint spacing and widths for movement joints within concrete assemblies. Adapt spacing for climate zones and substrate movement expectations. Ensure joints stay functional without compromising appearance or performance.
Choose profiles for continuous versus isolation joints, and align tools with surface finish to support longevity. Rake joints, butt joints, and edge detailing influence sealant performance. Plan sequencing: substrate prep, priming, backer rods, sealant selection, extrusion, tooling, and curing. Climate-aware practices consider temperature, moisture, cure times, and seasonal adjustments. Establish inspection routines and QA milestones to confirm movement accommodation and adhesion performance, referencing applicable standards.
Depth-to-width guidance and tooling
The depth of your movement joint should be about half its width. This ratio helps accommodate substrate expansion and contraction.
- Joint depth: For a 1/2″ wide joint, aim for a 1/4″ deep cut. Check with the sealant manufacturer for their recommended ratios.
- Tooling: Use a straight edge and a utility knife or a purpose-made joint tool ($10-$30) to score the joint. Ensure the cut is clean and smooth for better sealant adhesion.
- Optional: Joint forming tools: You can rent or buy joint forming tools that create consistent, precise joints. Expect to pay around $50-$200 depending on the model.
- Compaction: After applying the sealant, use a trowel or squeegee ($10-$30) to compact it into the joint. This ensures a tight bond and removes excess material.
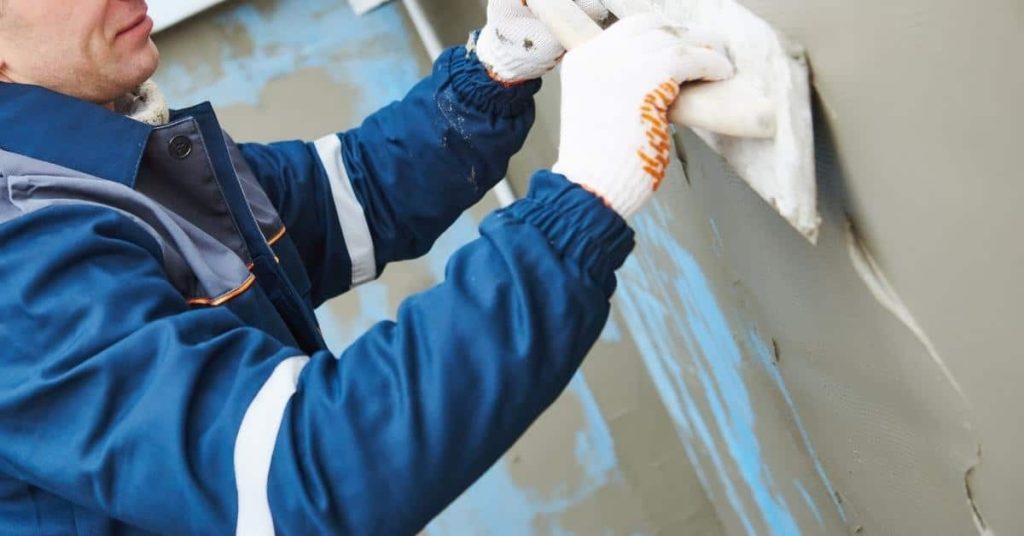
- Safety tip: Always wear gloves when handling sealants and tools to protect your hands from chemicals and sharp edges.
Detailing at transitions, flashings, and dissimilar materials
The right material choices at transitions can prevent leakage and accommodate differential movement between stucco and other materials.
- Window/door flashings: Use compatible flashing materials like galvanized steel or aluminum. Ensure they are properly sealed to the substrate and extend into the joint to prevent water intrusion.
- Coping and dissimilar materials: At transitions, use a flexible sealant rated for the specific materials involved (e.g., silicone for metal, polyurethane for wood). Apply it generously but neatly, allowing it to bond with both surfaces.
- Avoid: Incompatible materials: Don’t use rigid materials like caulk or paint at transitions. They can’t accommodate movement and will crack or peel, leading to leaks and weak bonds.
- Edge detailing: At edges, use a flexible sealant and apply it generously. This allows for expansion and contraction while preventing water intrusion.
- Backer rods: For wide joints (>1/4″), use backer rods ($5-$20 per pack) to support the sealant and prevent it from being squeezed out during application.
Inspection, Maintenance, and Common Mistakes to Avoid
Use a practical inspection checklist focusing on joint spacing, cracking patterns, corner displacement, and signs of movement or moisture around joints. Document findings with notes and photos to guide remediation. Schedule routine maintenance tasks and track any changes over time.
Common mistakes include too few joints, improper backing or bond-break, wrong sealant type, substrate contamination, and failing to accommodate thermal expansion. Develop criteria for resealing or upgrading joints, and assess sealant performance through visible adhesion and cohesion indicators. Keep records of inspections and determine when to involve a professional for structural or moisture concerns.
Visual checkpoints and maintenance checklist
Use this checklist annually to ensure your stucco movement joints are in tip-top shape.
- Joint Spacing: Check if joints are still evenly spaced. Inconsistencies can lead to cracking.
- Cracking Patterns: Look for new cracks or changes in existing ones. Ignoring this may result in further damage.
- Corner Displacement: Inspect corners for any movement. This could indicate substrate issues.
- Moisture Intrusion: Check around joints for signs of water intrusion, like stains or efflorescence.
- Sealant Condition: Examine sealant for adhesion, cohesion, and hardness. UV exposure can degrade it over time.
- Backer Rod Exposure: Ensure backer rod isn’t exposed to prevent water intrusion and damage.
- Resealing Intervals: Reseal every 5-7 years or as needed based on sealant performance.
- Cleaning: Clean joints gently using a mild detergent. Harsh cleaners can degrade the joint.
Quick rule: Regular checks and timely maintenance extend your movement joints’ lifespan.
Common design and installation mistakes
Identify these common errors to avoid shortening the life of your stucco movement joints.
- Inadequate Joints: Too few joints can lead to excessive cracking. Ensure spacing follows recommended rules.
- Improper Backer Rod/Bond-Break: Incorrect materials or installation can cause water intrusion and damage.
- Wrong Sealant Type: Using incompatible sealants can result in poor performance and failure over time.
- Substrate Contamination: Dirty surfaces can prevent proper adhesion of sealant, leading to failures.
- Thermal Expansion Failure: Not accounting for thermal expansion can cause excessive stress on joints.
Quick rule: Regularly inspect and address these issues promptly to maintain your movement joints’ longevity.
Standards, Specifications, and Tools/Materials Checklist
Refer to key standards such as exterior plaster and stucco guidelines, sealant performance, and code sections that govern movement joints and backer materials. Cross-check with manufacturer installation guides and local codes to align specifications. Use these references to shape project details and field practices.
Clarify joint spacing, profiles, and types, and how to choose expansion versus control joints for different wall faces. Outline compatible sealant families, backer rod sizing, primers, curing times, and movement-capability ratings. Build a field-kit checklist including spacers, caulk guns, texture tools, mockups, moisture meters, and the relevant manufacturer data sheets. Document QA procedures, mockup acceptance, and any performance testing required by specs.
Material specs and standards to consult
Before you start any concrete work, use this checklist to ensure you’re following the right standards and specifications. This will help you avoid costly mistakes and rework.
- Sealant Installation Guide: Check for specific application instructions, recommended temperatures, and cure times.
- Stucco/EIFS Installation Standards (ASTM C926/C1063): Verify the system’s requirements, including substrate preparation, mix design, and application methods.
- ASTM Practices (e.g., C150, C305): Confirm concrete mix proportions, slump, air content, and curing procedures.
- Manufacturer Instructions: Always follow the manufacturer’s guidelines for using their products to maintain warranties and ensure proper performance.
- Local Building Codes: Check with your local building department to confirm any project-specific requirements or exceptions.
- Concrete Mix Design Report: Ensure you have an approved mix design that meets the required strength, durability, and workability for your project.
- Job-Specific Drawings/Specs: Review and understand any project-specific details, notes, or requirements outlined in the drawings or specifications.
- Product Labels/Technical Data Sheets: Always check product labels and technical data sheets for safety information, handling instructions, and compatibility with other materials.
Quick rule: Always double-check the project-specific requirements. What works on one job might not be suitable for another due to differences in climate, substrate, or design.
Tools and materials checklist for layout and sealing
Use this checklist before you start laying out your joints. It’ll help you gather everything you need and avoid costly mistakes.
- Tape measure: Verify it’s in good working order and calibrated. A faulty tape can lead to inaccurate measurements.
- Chalk line: Check that the chalk is flowing freely. A broken or clogged chalk line won’t give you a clear, straight line.
- Level: Ensure it’s level and in good condition. A crooked level can cause uneven joints.
- Backer rod: Check the diameter is suitable for your joint width (usually 1/3 to 1/2 of the joint width). Too small, and you’ll have issues filling; too large, and it won’t fit.
- Sealant: Confirm it’s compatible with your substrate and joint type. Check the manufacturer’s instructions for proper storage and handling.
- Grout float or trowel: Ensure it’s clean and in good condition. A damaged tool can leave marks on the sealant.
- Primers: Verify they’re suitable for your substrate and joint type. Check the manufacturer’s instructions for application methods and drying times.
- Safety gear: Include safety glasses, gloves, and appropriate clothing to protect from chemicals and debris.
Quick rule: Always check your tools and materials before starting. A few minutes of preparation can save hours of rework.
Conclusion
Movement joints matter for safety, durability, and a clean look. Plan your joints around the wall layout, substrate, and sealant details so you don’t chase cracks after plastering. The goal is to keep water out, let the stucco move without damage, and avoid costly fixes later.
First, check the site: verify joint locations and profiles match the spacing rules, confirm substrate prep and primer, and choose sealants that fit the joint geometry. Then confirm the order: prep the surface, set joints with the right gaps, install reinforcing where required, apply sealant with compatible cartridges, and finally inspect and maintain. Test small areas first, then scale up when the setup behaves as expected.
Avoid these common mistakes: over-tight sealing that crowds movement, using incompatible sealants with the substrate, and skipping substrate prep or weather protection. Safety rules are simple: work on dry days, wear eye protection and gloves, and never mix or apply materials beyond the manufacturer’s guidance. If a joint or surface acts differently than the plan—stop, reassess, and verify compatibility before continuing.
If the project involves complex profiles, unusual substrates, or large areas, consider bringing in a pro rather than pushing ahead hoping for luck. With careful planning, measured steps, and proper protection, you’ll finish with joints that move with the wall, stay sealed, and look right for years to come. Stay practical, stay patient, and keep the work progressing solidly.
FAQ
What causes stucco cracking and how can I spot it early?
Cracking usually comes from movement, shrinkage, or improper prep. Look for hairline cracks that run along joints, corners, or around openings. If cracks widen with seasonal movement or moisture, that’s a sign to inspect joints and substrate prep.
How should I space movement joints in a stucco system, and what joint profiles work best?
Space joints where the wall changes stress direction, like around openings or corners, and at transitions to different materials. Use profiles that allow moisture drainage and accommodate movement without tearing the coating. If unsure, check manufacturer instructions for joint spacing and profile recommendations specific to your product.
How do I choose and apply sealant for stucco joints?
Select a sealant compatible with the stucco substrate and any backer material you’re using. Apply with the proper backing and tooling to form a continuous, uniform bead; cut the tip to fit the joint width and follow manufacturer cure times. If in doubt, read the label and follow local wall-prep and weather guidance.
What’s the difference between concrete masonry units and anchored veneers, and how does that affect joints?
Concrete masonry tends to move as a solid block; anchored veneers introduce an additional interface where movement can transfer. Plan joints to accommodate multi-material movement and follow the specific detailing for each system. When unsure, check the product data and installation guidelines for both substrates.