
Introduction
Expansion gaps at slab lines are deliberate spaces that allow concrete and stucco to move with temperature and moisture changes. They help prevent cracks by giving seams somewhere to open and close without telegraphing through the finish. Cracking often occurs when gaps are too small, poorly located, or not sealed properly over time.
Detailing the break means planning for a clean, durable joint in the stucco finish, then choosing materials that suit the environment and code requirements. Check the product instructions and local rules for allowed gap sizes and sealant types, and be prepared to adjust with backer material or trim if needed. If in doubt, a qualified contractor can confirm the best approach for your project.
Key takeaways
- Understand expansion gaps at slab lines prevent stucco cracking and movement transfer.
- Concrete expansion joints manage movement; plan joints at interior edges and perimeters.
- Cracks commonly appear at slab lines due to settlement, temperature, and differential movement.
- Inspect for misaligned joints, shifting frames, and gaps that trap moisture.
- Materials should match manufacturer guidance; verify compatibility with stucco and concrete.
- Safety: wear PPE and shut off moisture sources when detailing or repairing joints.
Table of Contents
- Introduction
- Key takeaways
- What Are Stucco Expansion Gaps at Slab Lines?
- Why Stucco Cracks at Slab Lines — Underlying Causes and Mechanics
- Common Locations and Visual Checkpoints for Cracks at Slab Lines
- Materials and Components for Stucco Expansion Gaps
- How to Detail the Break at Slab Lines — Step-by-Step Detailing
- Repairing Existing Cracks and Failed Joints at Slab Lines
- Maintenance, Inspection Frequency and Long-Term Care
- Cost, Planning for New Construction and When to Call a Professional
- Conclusion
- FAQ
What Are Stucco Expansion Gaps at Slab Lines?
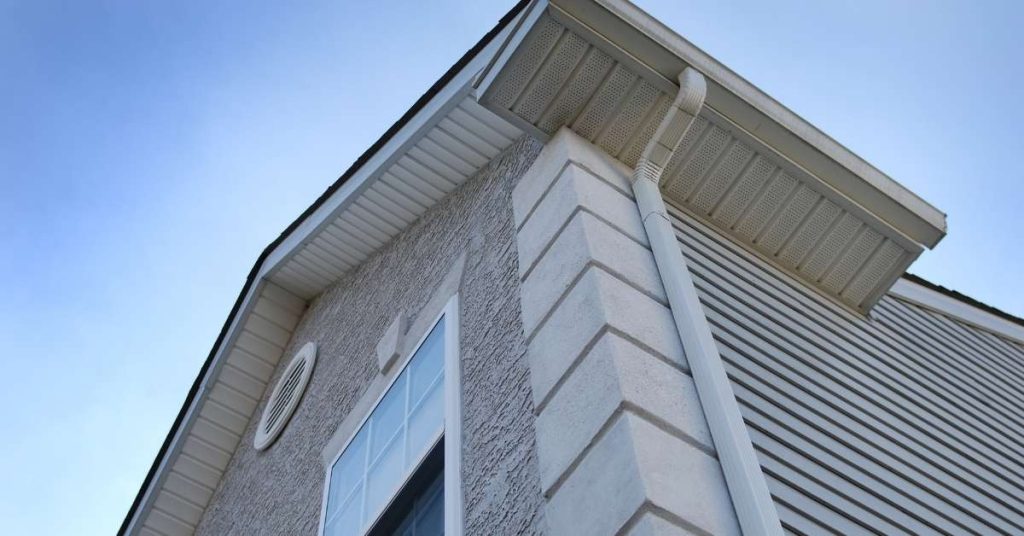
A stucco expansion gap at a slab line is a deliberate separation between a stucco-clad wall and a concrete slab. It functions to accommodate movement from settlement, thermal expansion, and moisture-related shifts, while preserving the integrity of the wall finish. Understanding the difference between expansion, control, isolation, and construction joints helps clarify where each should appear and how they behave at slab interfaces.
Expansion joints allow movement; control joints guide where cracks should form; isolation joints separate dissimilar substrates; and construction joints connect along structural changes. At slab lines, the ideal gap location and spacing depend on the wall system, openings, and penetrations. Plan joint placement relative to doors, windows, and transitions to prevent crack propagation into finishes.
Definition and purpose
The gap at the interface of stucco and a concrete slab serves a critical function: it provides movement capacity. This allows for expansion and contraction due to temperature changes, moisture content fluctuations, or structural settling without transferring stress to the stucco surface, which could otherwise cause cracking.
Stucco is rigid and brittle, making it sensitive to movement. A properly sized gap prevents this movement from being absorbed by the stucco, preserving its integrity and appearance.
Quick check: Inspect the gap to ensure it is properly aligned with the slab edge. Pro check: Verify that the gap size accommodates expected movement. If the gap size is insufficient, increase it to prevent stress transfer.
Control vs expansion vs isolation for stucco
Understanding the difference between control joints, expansion joints, and isolation joints is crucial when detailing stucco at slab lines. Each serves a distinct purpose in managing movement, directing cracks, or separating elements.
Expansion joints allow for significant movement and are typically filled with compressible material like closed-cell foam or backer rod. They direct any resulting cracks to the joint, preventing them from propagating into the stucco surface.
Control joints limit crack width and control their location. They are usually narrower than expansion joints and may be left unfilled or filled with a flexible sealant. Isolation joints separate different parts of the structure, preventing movement in one area from affecting another.
Quick check: Inspect joint alignment with adjacent elements. Pro check: Confirm that the correct joint type is used based on project requirements. If expansion is needed, use expansion joints. If crack control is required, use control joints.
Why stucco systems are sensitive at slab lines
Stucco systems are particularly sensitive at slab lines due to several system-specific vulnerabilities. Firstly, the rigid cement finish of stucco cannot accommodate much movement without cracking. Secondly, lath ties that anchor the stucco to the substrate can also act as stress risers if not properly detailed or if they corrode over time.
Additionally, thin veneer systems are more susceptible to cracking because they have less material to absorb movement. Proper jointing is critical for these systems to prevent damage from movement at slab lines.
Quick check: Inspect lath ties and the cement finish for signs of stress or cracking. Pro check: Review system details, including thickness and tie spacing, for potential weaknesses. If system vulnerabilities are identified, implement additional protective measures such as increasing gap size or using more flexible materials.
Why Stucco Cracks at Slab Lines — Underlying Causes and Mechanics
Cracks at slab lines usually signal movement rather than just a finish issue. The primary drivers are differential movement between the slab and stucco, amplified by thermal cycling and moisture movement. These forces concentrate at transitions where rigid stucco meets a flexible or moving edge.
Environmental factors such as temperature swings, soil moisture, and drainage interact with a slab-on-grade and rigid siding to create stress at the break line. Construction sequencing matters too, with plaster timing, curing conditions, and joint layout influencing crack potential. Movement joints and control joints have distinct roles in this context, and proper detailing reduces crack initiation and propagation.
Thermal expansion, contraction and moisture movement
Temperature swings and moisture uptake in both concrete and stucco cause cyclic movement that stresses the joint. As temperatures rise, materials expand; as they fall, materials contract. Similarly, moisture uptake causes swelling, while drying leads to shrinkage.
This constant cycle of expansion and contraction creates stress at slab lines where the stucco is restrained by the rigid slab. Recurring cracks after freeze-thaw cycles or significant temperature changes indicate this type of movement.
To mitigate these effects, ensure materials are compatible with similar thermal and moisture expansion coefficients. Consider using flexible sealants and movement joints to accommodate stress if severe cyclic movement is observed.
Settlement, shrinkage and differential movement
Slab shrinkage, footing settlement, or separate structural movement can force the stucco to crack where it is restrained. Diagonal cracks or stepped cracking patterns indicate differential movement.
Soil instability or structural issues on-site may contribute to these problems. To address this, evaluate site conditions for potential soil instability or structural issues and design for potential movement using appropriate joint layout and backer rod materials.
Isolation joints can decouple the stucco from the slab, allowing each to move independently and reducing cracking due to differential movement.
Poor detailing, material mismatch and installation defects
Material choices significantly impact the performance of stucco at slab lines. Common detailing errors can convert normal movement into cracks.
- Insufficient or improperly terminated backer rod: Inadequate backer rod depth or termination allows sealant to bond with both the lath and substrate, preventing proper joint function and leading to cracking.
- Improper sealant depth: Incorrect sealant depth can cause inadequate adhesion, leading to staining and weak bond. Verify sealant depth meets manufacturer’s recommendations.
- Lath termination over slab edge: Terminating lath over the slab edge restrains stucco movement and causes cracking at the joint. Ensure lath terminates properly at the slab line.
- Incompatible materials: Using materials with incompatible expansion coefficients can lead to stress concentrations and cracking. Verify material compatibility before installation.
- Improper curing conditions: Inadequate curing allows the stucco to dry too quickly, leading to shrinkage cracks. Follow manufacturer’s curing guidelines for optimal results.
Common Locations and Visual Checkpoints for Cracks at Slab Lines
Perimeter slab lines, garage-to-house joints, step-downs, cantilevered slabs, and any isolated joints are common crack-prone locations. These areas require particular attention during routine inspections. Visual cues help distinguish movement-related cracks from surface defects.
Watch for hairline or diagonal cracks, offsetting at joints, or cracking through break lines. Moisture staining or efflorescence near slabs can indicate water movement. Use seasonal checks and simple measurements to flag widening cracks or changes in alignment for more evaluation.
High-risk locations around buildings
Inspect these areas regularly to prevent stucco cracking.
- Corners: Check for diagonal cracks due to stress concentrations.
- Slab edges: Look for hairline cracks from movement and expansion.
- Control joints in concrete: Inspect for signs of separation or cracking.
- Door/garage openings: Check for cracking around frames due to differential movement.
- Step-downs: Examine transitions for offsetting or displacement.
- Cantilevers: Inspect ends of overhanging slabs for cracks.
- Isolation joints: Check for signs of movement at separation points.
- Garage-to-house joints: Look for cracking due to thermal expansion and contraction.
Quick rule: Focus on these areas during seasonal inspections after loading/shrinkage cycles.
Visual signs and probe checks to identify failure mode
Use this checklist to determine the cause of cracks for targeted repair.
- Crack patterns: Identify hairline, diagonal, or stair-step cracks.
- Separation from slab: Check for gaps between stucco and concrete.
- Staining: Look for moisture-related discoloration.
- Rust: Inspect for signs of metal reinforcement corrosion.
- Adhesion: Probing can check if stucco is still firmly attached to the substrate.
- Substrate movement: Probe to feel for any give or movement in the underlying structure.
Quick rule: Photograph cracks, mark their growth, and measure width, offset, and length for trend analysis.
When a crack indicates a structural problem
Use this checklist to recognize signs that warrant professional assessment.
- Crack growth: Monitor for rapid or large cracks over time.
- Stair-step pattern: Look for cracks that form a stair-step shape, indicating significant movement.
- Settlement-related cracks: Check for cracks tied to settlement or differential movement of the foundation.
- Crack width: Measure crack width; wider cracks may indicate more serious issues.
Quick rule: If you notice any of these red flags, consult a structural engineer promptly.
Materials and Components for Stucco Expansion Gaps
Backer rods, sealants, compressible fillers, flashing, and termination accessories each play a specific role in a slab-line gap. Proper selection and placement help accommodate movement while preventing moisture intrusion. Compatibility with cement stucco is essential for long-term performance.
Verify that products meet relevant standards and are appropriate for the climate and substrate. Check manufacturer data sheets and local codes. Plan the installation sequence carefully, including substrate prep, backer rod placement, sealant choice, flashing integration, and appropriate termination to maintain a continuous weather barrier.
Backer rods and compressible fillers
Backer rods and compressible fillers play a crucial role in maintaining proper sealant depth and bond-break function within stucco expansion gaps at slab lines.
Selecting the right backer rod involves choosing between closed-cell and open-cell options based on your project’s requirements:
– Closed-cell backer rods are ideal for air/moisture barrier functions, while open-cell backer rods provide drainage and vapor permeability. Always measure the backer rod’s diameter to ensure it fits the joint depth and allows for adequate sealant thickness.
Sealants and primers — what to specify
Specifying the right sealant is essential for ensuring adhesion, UV resistance, and movement capability in your stucco expansion gaps.
Choose a sealant rated for exterior cementitious substrates by checking product data sheets for compatibility with your substrate. Key factors to consider include:
– Adhesion: Ensure the sealant adheres well to both the backer rod and the substrate.
– UV resistance: For exposed surfaces, specify a UV-resistant sealant to prevent degradation.
– Movement accommodation: If significant movement is expected, choose a high elongation, low modulus sealant.
Flashing, termination beads and substrate preparation
Proper integration of through-wall flashing, termination beads, and a clean, sound substrate is vital for durable joint performance in stucco expansion gaps.
Through-wall flashing should extend beyond the plane of the wall to prevent water intrusion. Always inspect the substrate for cleanliness, soundness, and absence of contaminants that could hinder adhesion:
– If termination beads are required to protect sealant from mechanical damage, include them in your specification.
– If the substrate is not sound or clean, pre-treat it with an appropriate primer or repair as needed before installing flashing and sealing.
How to Detail the Break at Slab Lines — Step-by-Step Detailing
The break at slab lines exists to absorb movement, prevent cracking, and maintain a weatherproof finish. A clear detailing sequence helps ensure a durable junction between stucco and the concrete slab.
Begin with edge preparation and verify a flat, clean substrate. Install flashing and termination, place backer rod, and tool the sealant with attention to movement tolerances. Ensure finish coats align with the break and confirm curing and drainage details as you progress through retrofit or new construction steps.
Step-by-Step Process
This step-by-step sequence guides you through detailing the break at slab lines for long-term stucco performance.
- Inspect the area for any signs of damage or movement. If existing flashing is damaged or missing, remove and replace it before proceeding.
- Prepare the slab edge by exposing a clean surface. Ensure the substrate material is compatible with the chosen stucco system.
- Install continuous flashing around the slab edges, integrating it with the waterproofing/drainage plane. Seal against moisture entry at the joint using an appropriate sealant.
- Place backer rod at the flush break, choosing an appropriately sized foam material relative to the gap width. Select a sealant with UV, weather, and movement tolerance compatible with stucco.
- Tool the sealant, ensuring no pinholes are present. Apply stucco base coat, weep screed/termination, and finish coat according to manufacturer’s instructions, integrating them relative to the joint to shed water and prevent bridging.
- Perform a final inspection, checking for proper integration of materials, correct sealant depth-to-width ratio, and no signs of movement or damage. Ensure all tools are cleaned and stored properly.
Prepare Slab Edge, Flashing and Lath Termination
Proper preparation of the slab edge ensures a solid foundation for your stucco detailing.
Expose a clean, flat slab edge free from debris or contaminants. Ensure the edge is compatible with the chosen stucco system.
Install continuous flashing around the slab edges, extending it above the joint to prevent moisture entry. Integrate the flashing with the waterproofing/drainage plane.
Correctly terminate lath or EIFS components above the joint to maintain structural integrity and allow for movement accommodation.
Backer Rod Size and Sealant Joint Profile
Choosing the right backer rod diameter and achieving the correct sealant depth-to-width ratio are crucial for accommodating movement.
Measure the gap width to determine an appropriately sized backer rod. Generally, use a backer rod with a diameter about 1/3 to 1/2 of the gap width.
When applying sealant, aim for a depth-to-width ratio between 1:2 and 1:4 for proper movement accommodation. Ensure the chosen sealant has a compatible movement tolerance with stucco.
Integrating Stucco Base, Finish and Drainage Plane
Proper integration of stucco components prevents water bridging and ensures long-term performance at slab lines.
Apply the stucco base coat according to manufacturer’s instructions, extending it above the joint to create a proper starter plane. Integrate the base coat with the chosen weep screed/termination to facilitate water drainage.
The finish coat should be applied in a manner that maintains continuity with the base coat and does not bridge over the joint. Ensure proper curing conditions for both base and finish coats.
Repairing Existing Cracks and Failed Joints at Slab Lines
Diagnose the underlying cause of cracks to distinguish between cosmetic fixes and structural repairs. Movement, moisture, and initial detailing all influence repair strategy. This assessment guides whether to repair or replace components.
Follow a step-by-step workflow: create clean joints, remove degraded material, install backer rod, apply elastic sealant, and patch stucco to match texture. Choose compatible sealants and backer materials, and observe local code requirements during repair. Timing and curing are critical to avoid resealing failures.
Assess cause before repairing
Before attempting any repairs, it’s crucial to identify the underlying cause of cracks at slab-line joints. Cracks can result from ongoing movement, moisture intrusion, or adhesion failure.
Movement-related cracks often widen over time and may indicate structural issues. Moisture intrusion can lead to degradation of sealants and backer materials. Adhesion failure might suggest improper initial installation.
Inspect the joint thoroughly, checking for signs of movement, moisture, or adhesion problems. Consult local building codes and manufacturer instructions if unsure about the cause.
Repair techniques: saw-cut, reseal, and patch
When cracks are less than 1/4 inch wide, they may be repaired by cleaning and resealing. Wider cracks or failed sealants require a more involved process.
Begin by saw-cutting a control slot along the crack to create clean edges. Remove any old sealant and backer material using a utility knife or similar tool.
Install new backer rod to the recommended depth, ensuring it’s compatible with your chosen sealant. Apply the appropriate elastic sealant, following manufacturer instructions for application and cure times.
To patch the stucco edge, use a patch compound that matches the surrounding texture and color. Apply according to manufacturer instructions, blending the patched area with the existing surface.
When to consider replacement or structural remediation
Not all cracks can be repaired using simple resealing and patching techniques. In some cases, joint replacement or structural remediation may be necessary.
Signs that indicate a need for replacement include active settlement (sinking or heaving of the slab), large differential movement (more than 1/4 inch), or extensive damage to the backer rod or sealant.
If you notice any of these signs, consult with a structural engineer. They can assess the situation and recommend appropriate action. Always follow local building codes and obtain necessary permits before proceeding with major repairs or replacements.
Maintenance, Inspection Frequency and Long-Term Care
Adopt a practical maintenance cadence focused on expansion gaps at slab lines. Conduct annual visual checks and formal reviews every few years for resealing and flashing. Documenting conditions over time helps track performance and plan interventions.
Use a checklist to monitor sealant health, UV exposure, ponding, and joint movement indicators. Regular cleaning, re-sealing, and re-flashing as needed reduce deterioration. Keep a simple repair history with photos and dates to guide future maintenance decisions.
Visual Inspection Checklist
Conduct a visual assessment annually or after extreme weather to catch any signs of deterioration early.
- Sealant Adhesion: Check if sealant is still firmly attached to both stucco and substrate. Confirm: Gently press on the sealant; it should not lift or peel.
- Gaps and Cracks: Look for any gaps, cracks, or separations in the sealant. Confirm: Use a flashlight to inspect closely; even small defects can lead to water intrusion.
- Staining: Check for discoloration or staining on the sealant and surrounding area. Confirm: Staining may indicate water penetration, which could cause further damage if left unaddressed.
- Flashing Integrity: Inspect the flashing at the slab line to ensure it’s intact and properly sealed. Confirm: Look for any tears, corrosion, or lifting; damaged flashing can allow water intrusion.
Quick rule: If you notice any issues during your visual inspection, address them promptly to prevent further damage.
Sealant Reapplication Guidelines
Sealant performance varies based on material, environmental exposure, and observed condition. Here’s how to determine when to reapply:
- Silicone: Suitable for exterior use with good UV resistance. Inspect: For signs of yellowing or cracking; reapply every 3-5 years.
- Acrylic Latex: Economical but less durable. Avoid: Use in harsh weather conditions; reapply every 1-2 years.
- Polyurethane: Highly flexible and durable, ideal for high-movement joints. Inspect: For signs of discoloration or shrinking; reapply every 5-7 years.
Seasonal and Drainage Considerations
Protect your expansion gaps from freeze-thaw damage and ensure proper drainage to maintain long-term performance. Follow this seasonal maintenance checklist:
- Fall: Clean out any debris that may have accumulated in the joint. Confirm: A clear joint allows water to drain properly.
- Winter (before first freeze): Apply a sealant specifically designed for winter use or use an anti-freeze solution. Confirm: This prevents water from freezing and expanding in the joint, which can cause damage.
- Spring (after thaw): Inspect the joint for any signs of freeze-thaw damage. Confirm: Look for cracks or separations; repair as needed.
Quick rule: Always ensure positive drainage away from the slab line to prevent water ponding and subsequent damage.
Cost, Planning for New Construction and When to Call a Professional
Cost drivers for detailing expansion gaps include materials, access, and the extent of movement control required. Anticipating these factors during planning helps keep retrofit costs down. Early coordination with structural and framing elements reduces surprises later.
Set clear criteria for hiring professionals: determine when a stucco contractor or a structural engineer is needed, verify qualifications and permits, and understand insurance requirements. Decide between DIY and professional service based on movement risk, project scope, and the potential for long-term savings with proper initial detailing.
Budgeting and cost drivers
When planning stucco expansion-gap detailing for new construction, understanding the major cost factors is crucial to manage project expenses.
The primary cost drivers include:
- Joint system quality: Higher-quality systems offer better performance but come at a higher upfront cost. Expect lower long-term maintenance with premium systems.
- Labor for flashing and access: Complex access challenges can significantly increase labor costs. Consider alternative methods or adjusting the project schedule to mitigate this.
- Extent of remedial work: The more extensive the movement control needed, the higher the cost. Early planning can minimize retrofit needs and reduce overall project price.
Complexity directly impacts overall project price. Regularly review and re-evaluate joint system and labor costs to stay within your budget.
DIY scope vs professional work
Safely managing tasks reduces risks and prevents costly mistakes. Homeowners can handle certain aspects of stucco expansion-gap detailing, while others require professional intervention.
Tasks suitable for homeowners include:
- Visual inspection to identify cracks or gaps
- Cleaning the affected areas before repairs
- Small re-caulking jobs to address minor issues
However, tasks involving structural movement diagnosis, full joint replacement, or through-wall flashing should be handled by licensed professionals. Engage their services to prevent further damage and ensure quality workmanship.
What to ask contractors and engineers
Thoroughly vetting professionals ensures competent handling of critical tasks. When hiring stucco contractors or structural engineers, ask the following key questions:
- What is your experience with stucco/slab interfaces?
- Can you provide sample details of similar projects you’ve worked on?
- What material brands and specifications do you plan to use for this project?
- May I contact some of your references?
Always request proof of insurance and necessary permits. If concerns persist about a contractor’s experience or material choices, consider other candidates or request additional training.
Conclusion
The key takeaway is to protect slab-line joints with careful detailing and timely checks so stucco stays durable, looks clean, and avoids costly cracks. A calm, methodical approach reduces risk from movement, moisture, and poor installation.
Review the next steps: inspect the slab-line joints and expansion gaps in a representative area, verify materials and detailing requirements against manufacturer instructions, plan work for an appropriate weather window, test a small area first to confirm reaction and adhesion, document observations with photos, then execute the detailing or repairs with the prescribed steps and then monitor the area over time. Use the findings to guide repairs on other joints and to inform future projects.
Common mistakes to avoid include rushing the detailing or repair, using incompatible materials or improper joint widths, and neglecting moisture control or surface preparation. Always follow safe practices, wear appropriate PPE, and avoid invasive work that could undermine structural movement paths. A safety-minded approach—testing in a small area first, validating product labels, and sticking to the recommended procedures—helps prevent irreversible damage.
If movement is significant, joints show widespread failure, or you are unsure about local rules, plan to call a professional. For ongoing projects, set up a routine inspection interval and address any cracks promptly to maintain long-term performance. With careful planning and disciplined execution, you can protect the integrity and appearance of the stucco at slab lines and move forward with confidence.
FAQ
What are concrete expansion joints and why are they needed?
Concrete expansion joints are gaps that allow slabs to move with temperature and moisture changes. They prevent stress from transferring to adjacent materials and reduce cracking, especially near edges and joints with other structures.
Where do concrete expansion joints commonly appear in slabs, and why do cracks form near them?
Expansion joints are typically placed at planned breaks in a slab, along perimeter edges, and where different materials meet. Cracks can form near joints if movement is restrained, if joints are not properly filled, or if the joint material wears away over time.
What materials are used for concrete expansion joints, and how are they installed?
Common joint materials include fiberboard, foam fillers, and flexible sealants. Installation generally involves placing a compliant filler to maintain a gap, covering the joint with a compatible backer and sealant, and following the manufacturer’s guidance for surface prep and curing. Check product labels and local requirements for specifics.
When should you detail and install an expansion joint versus retrofilling a crack?
Detail and install an expansion joint where movement is expected or where joints were neglected during initial construction. If a crack appears at a suspected joint line, assess whether movement is ongoing and whether the joint is compromised. Refer to manufacturer instructions, label information, and local rules for proper methods and repair options.