
Introduction
Sealing micro-cracks before staining helps prevent telegraphing of dark spots by blocking uneven absorption of the stain. This step slows and evens out how the color takes across the surface. Check the product label for surface prep and cure times to ensure proper results.
Choose sealants designed for concrete floors and compatible with staining, and look for guidance on filling micro-cracks. Apply evenly according to manufacturer instructions, and let the sealant cure fully before staining to avoid uneven color. Common mistakes include skipping prep, applying thick coats, or staining too soon.
Key takeaways
- Test sealant on a small area to check telegraphing before full jobs.
- Choose flexible sealants labeled for micro-cracks and stain compatibility.
- Follow manufacturer’s guidance for curing times and re-coating to avoid blotting.
- Prepare surfaces by cleaning dust and oils to improve adhesion.
- Apply sealant evenly with a small roller or caulking gun.
- Safety: wear gloves and eye protection; work in ventilated area.
Table of Contents
- Introduction
- Key takeaways
- Why Micro-Cracks Telegraph and Darken Under Stain
- Types of Sealants Suitable for Micro-Cracks
- How to Choose Products That Minimize Telegraphing
- Preparation Steps Before Applying Sealant
- Application Process: Step-by-Step for Micro-Crack Sealing
- Products and Formulations Shown to Prevent Telegraphing
- Common Mistakes, Pitfalls, and How to Avoid Them
- Product Effectiveness: Interpreting User Reviews and Lab Data
- Conclusion
- FAQ
Why Micro-Cracks Telegraph and Darken Under Stain
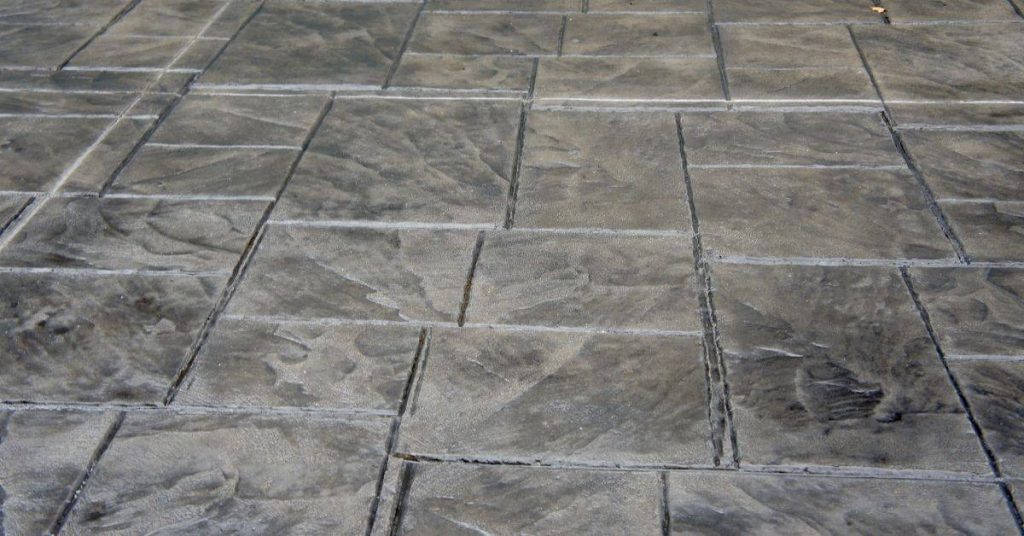
The phenomenon starts with capillary action drawing liquid stain into tiny pathways in the concrete. Different porosity and irregular surface textures create uneven absorption that concentrates color in small fissures. This is why you often see hairline cracks darken more than the surrounding area when you apply stain.
Sealing aims to slow or even out that uptake, so color develops more uniformly. Penetrating sealers and film-forming sealers influence how stain sits on or within the surface, which in turn affects sheen and future maintenance. In practice, a good seal reduces visible telegraphing and helps you read the substrate rather than the micro-pores themselves. Surface prep, careful sealer selection, and test patches set the stage for predictable results and less blotchy darkening after staining.
What is telegraphing?
Telegraphing refers to the visibility of underlying cracks or defects through a stain or coating. It’s like when you can see a map’s contour lines through a thin layer of transparent film – it’s not just about discoloration, but revealing what’s underneath.
In concrete staining, telegraphing shows up as dark lines or patches along hairline cracks and micro-pores. These aren’t just surface imperfections; they’re signs that the stain is being drawn into the concrete’s tiny flaws.
Understanding telegraphing is key to knowing why sealing is so important before staining your concrete. It helps you set realistic expectations for what your stained concrete will look like and how to achieve the best results.
How staining interacts with cracks
Concrete stains work by penetrating into the surface and reacting with it. When there are cracks or pores, stain is drawn in more quickly and deeply along those lines due to capillary action – like how water flows through a narrow tube.
Different stain chemistries interact differently with moisture movement. Water-based stains may be drawn in more readily by capillary action, while solvent-based stains might take longer but penetrate deeper into cracks once they do start moving.
This interaction is why you often see darker lines along cracks after staining. It’s not just about the stain color, but how it moves and reacts within the concrete’s tiny flaws.
Types of Sealants Suitable for Micro-Cracks
Different chemistries interact with micro-cracks by either filling or penetrating. Fill-heavy formulations can bridge hairline gaps, while penetrating sealers rely on diffusion to slow uptake without creating a thick surface film. This distinction matters for stain compatibility and final appearance.
Penetrating silanes and siloxanes offer shallow interaction with the surface while preserving porosity, whereas silicates and low-viscosity resins can create more robust bridges. Acrylics tend to form films that influence edge definition and color uniformity. Practical evaluation should include substrate prep, crack cleaning, and a small test area to observe stain response with your chosen sealer type.
Penetrating silanes and siloxanes
Silanes and siloxanes are penetrating sealants that reduce substrate absorption without forming a visible film. They react chemically with the concrete’s silica content, creating a barrier deep within the surface.
When to use: These are ideal for micro-cracks (less than 0.1mm wide) where you want minimal change in appearance but need to prevent stain penetration.
They won’t fill cracks; they’ll just stop liquids from entering. So, if your cracks are wider, consider other options.
Low-viscosity epoxies & polyurethanes (micro-fillers)
Epoxies and polyurethanes in thin, low-viscosity formulations can penetrate and bond within hairline cracks. They often contain micro-fillers to help bridge small gaps.
When to use: These are suitable for micro-cracks (up to 0.3mm wide) where you want some crack filling but minimal surface change.
They’re more flexible than epoxies, making them a good choice for areas with movement. But they might not last as long under heavy traffic or harsh conditions.
Acrylics and surface coatings
Acrylic surface films can mask defects by forming a thin, flexible layer over the concrete. They don’t penetrate deep into the substrate but create a barrier at the surface.
When to use: Acrylics are good for wider cracks (up to 0.5mm) where you want to hide imperfections and prevent stain penetration.
However, they have limited elongation, so they might crack under movement. Also, deep stains can still penetrate if not properly sealed first.
How to Choose Products That Minimize Telegraphing
When evaluating products, look for viscosity and penetration behavior that balance infiltration with coverage. Testing thickness on representative samples helps you see how the product behaves before committing to the full job. Flexibility and elongation are essential for movement in concrete slabs and overlays.
Stain compatibility is key, so verify with the product label or data sheet that the sealer works with your chosen stain. Check for VOC guidance and environmental notes to align with your staining schedule. Document test results and compare them against manufacturer guidance to select the best match for your project.
Step-by-Step Process
Follow these practical steps to choose products that minimize telegraphing, ensuring a smooth staining process.
- Preparation: Gather safety gear (gloves, goggles), sample substrates, and manufacturer data sheets. Check your chosen stain’s compatibility with potential sealants.
- Test thickness: Apply sealant candidates on sample substrates using a notched trowel or brush. Let them cure as per manufacturer instructions.
- Inspect penetration: Check if the sealant has penetrated micro-cracks without leaving a thick, telegraphing layer. Use a magnifying glass if needed.
- Flexibility test: Bend or flex the sample substrate to ensure the sealant doesn’t crack or peel. This tests its flexibility and elongation.
- Stain cross-test: Apply your chosen stain on small areas of each sealant candidate. Observe for any adverse reactions or darkening effects.
- Document results: Note down observations, cure times, and any issues encountered with each sealant candidate.
- Final choice: Based on real-world performance indicators, choose the best-suited sealant for your project. Recheck manufacturer guidance before proceeding.
- Cleanup: Dispose of materials responsibly, following local regulations. Store leftover products properly to maintain their integrity.
Compatibility with stain chemistry (acid vs. water-based)
Different staining chemistries interact differently with sealants, making compatibility crucial.
Acid stains react with concrete’s lime content to produce rich, earthy tones. They require sealants that won’t interfere with this chemical reaction or darken under stain. Water-based stains are more forgiving but still need compatible sealants for optimal results.
Always check if the sealant is tested and approved for use with your chosen stain chemistry. Manufacturers often provide compatibility lists, so consult their data sheets.
Pro tip: If in doubt, perform small-area cross-tests using both acid and water-based stains to ensure no adverse reactions or darkening occurs.
Viscosity and penetration vs. surface bridging
Understanding when deep penetration is preferable versus when a thin bridging layer is needed is key to minimizing telegraphing.
For micro-cracks, low-viscosity sealants like penetrating silanes and siloxanes are ideal. They seep into cracks, providing protection without leaving a thick surface layer that could telegraph.
However, for larger cracks or uneven surfaces, a thin bridging layer may be necessary to level micro-topography. In such cases, low-viscosity epoxies or polyurethanes with micro-fillers can help create a smooth, stain-ready surface without telegraphing.
Remember: The goal is to seal cracks and provide a consistent surface for staining without leaving visible marks or darkening effects.
Preparation Steps Before Applying Sealant
A thorough clean is essential: degrease, remove dust, and ensure a dry, dust-free surface. Check for lingering contaminants that could hinder adhesion and dull the final look. A solid prep reduces the chance of telegraphing after sealing and staining.
Efflorescence and laitance must be removed, and any coatings or loose material should be addressed before sealing. Verify soundness by inspecting for cracks or spalling and repair as needed. Record moisture test results and ensure the surface meets the product’s prerequisites for adhesion.
Cleaning and Degreasing Methods
Start by removing any loose debris or dirt from the concrete surface using a stiff-bristled broom or wire brush.
Next, use a detergent specifically designed for concrete. Apply it with a scrub brush, let it dwell for 10-15 minutes to break down grease and grime, then rinse thoroughly with clean water. A pressure washer can help with this step.
Caution: Avoid using harsh chemicals like acid-based cleaners or over-applying etchants as they can weaken the concrete surface.
Moisture and Soundness Checks
Before applying any sealant, it’s crucial to check for moisture. Use a simple in-situ relative humidity (RH) test or calcium chloride test to ensure the concrete is dry enough. Target RH should be below 75% at 73°F (23°C).
Perform a tap test to identify any delaminated areas by gently tapping the surface with a hammer. A dull thud indicates delamination, which needs repair before sealing.
Inspect for active cracks. If they’re wider than 1/8 inch (3mm) or growing, consider structural repair before proceeding.
Tools and Materials Checklist
Before you begin, ensure you have all the necessary tools and materials to prep your concrete surface effectively. Use this checklist as a guide:
- Wire brushes: To remove loose debris and dirt.
- Pressure washer: For thorough cleaning and rinsing.
- Moisture meter: To test for excess moisture before sealing.
- Injection kit or applicator: For applying sealant into micro-cracks.
- Mixing containers: For preparing sealant mixtures.
- Protective clothing (PPE): Including gloves, safety glasses, and a respirator if needed.
- Tape and plastic sheets: For masking off areas not to be sealed.
- Hammer and chisel: To repair any damaged or delaminated areas.
Quick rule: Always double-check your tools and materials before starting. Missing something can lead to delays or poor results.

Application Process: Step-by-Step for Micro-Crack Sealing
Identify cracks likely to telegraph and decide whether a fill or an injectable sealant is appropriate. Assess movement versus stagnant cracks to determine if a DIY fill will suffice or if professional injection is warranted. This sets expectations for performance and cost.
Prepare the surface, then choose primer or bond enhancers if required. Select the sealant type based on crack size, substrate, and stain compatibility. Apply using the recommended method, level fills, and avoid trapping air to ensure a smooth, uniform surface before staining.
Step-by-Step Process
Follow this clear, numbered sequence to effectively seal micro-cracks before staining. It starts with preparation and safety checks, moves on to the main work, and ends with cleanup or final checks.
- Prep & Safety: Clean, dry, mask, test moisture, assess cracks. Wear gloves, goggles, and a respirator for chemical handling.
- Choose Sealant: Select appropriate sealant (epoxy, polyurethane, acrylic) based on crack size, substrate, stain compatibility, and product limits.
- Apply Sealant:
- For small cracks: Brush or roll fills.
- For wider cracks: Inject using ports or gravity-fed pours.
- Tool & Level: Use a trowel or float to level and smooth fills, minimizing air voids for an even surface.
- Cure & Verify: Follow cure times, check surface, perform test-stain verification. If cracks reappear or shift, call a pro.
Injection and low-viscosity fill techniques
For hairline cracks, use injection ports or gravity-fed pours. Apply sealant slowly to avoid overfill.
Tip: Use a syringe for precise application through ports. For wider cracks, consider using backer rods to control fill depth and prevent overfilling.
With gravity-fed pours, ensure the crack is open at both ends to allow air escape and complete filling. Monitor progress closely to avoid overfill.
Surface bridging and skim coats
Apply thin skim coats to smooth micro-topography without creating a thick film that could trap stain. Use a trowel or float, applying just enough material to bridge the surface.
Note: Thicker applications may telegraph through stains, defeating the purpose of sealing.
Work in small sections, ensuring each skim coat is smooth and even before moving on. Avoid overworking the material, which can lead to air voids or uneven surfaces.
Curing and test stains
Confirm full cure per product instructions before proceeding with staining. This ensures the sealant has reached its maximum performance.
Perform small-area stain tests to verify no telegraphing occurs. Apply a small amount of stain in an inconspicuous area, let it sit according to manufacturer’s guidelines, then remove and inspect for any signs of telegraphing.
If test stains show no telegraphing, proceed with full staining. If cracks reappear or shift after sealing, call a professional to reassess the situation.
Products and Formulations Shown to Prevent Telegraphing
Categories include micro-fill epoxies, penetrating silane/siloxane treatments, and primers or additives designed to work with common stains. Each aims to either fill micro-cracks or limit penetration to reduce color diffusion. Understanding these roles helps you match the product to your substrate.
Key performance indicators include how well the product penetrates or bridges, how it affects porosity, and its compatibility with your stain. Consider substrate prep, moisture content, crack characteristics, cure times, and ambient conditions. Use independent data where available and compare class-level behavior rather than brand claims.
Micro-fill epoxy classes (overview)
Micro-fill epoxies are your first line of defense against stain telegraphing through micro-cracks. These products bond within cracks, filling and sealing them from the inside out.
How they work: Micro-fill epoxies penetrate deep into hairline cracks, creating a strong bond with the concrete surface. This helps prevent stains from bleeding into the crack and causing discoloration.
Their high solids content allows for excellent filling and bridging of micro-cracks, reducing the risk of telegraphing. They’re typically two-part systems that cure to form a durable, long-lasting seal.
Penetrating treatments (overview)
Penetrating silane/siloxane treatments are another effective way to prevent stain telegraphing. They work by reducing differential stain uptake and preserving surface texture.
How they work: These treatments penetrate deep into the concrete, reacting with the substrate to form a protective barrier. This barrier reduces the absorption of stains, preventing them from causing discoloration.
Penetrating treatments are great for maintaining the natural look and feel of the concrete surface. They don’t leave a film or change the texture, making them ideal for applications where a natural finish is desired.
Primers and adhesion promoters
Primers and adhesion promoters play a crucial role in reducing future telegraphing risk. They improve the bond between the sealant and the concrete substrate, ensuring better performance over time.
How they work: Primers prepare the surface by cleaning it and improving its ability to accept the sealant. Adhesion promoters, on the other hand, create a chemical bridge between the sealant and the substrate, enhancing their bond.
Using primers and adhesion promoters can help extend the life of your sealant, reducing the risk of delamination or peeling over time. They’re especially useful in areas with high foot traffic or exposure to harsh conditions.
Common Mistakes, Pitfalls, and How to Avoid Them
One frequent error is skipping proper prep, which leads to weak adhesion and uneven results. Mismatched sealer and stain systems can cause telegraphing or unexpected darkening. Avoid applying too soon after sealing, which traps moisture and creates blotchy patches.
Other pitfalls include thinning products, using inappropriate tools, and failing to observe cure times. Watch for signs that telegraphing persists after a patch test and have a plan for spot repairs or rework. Documenting steps helps prevent repeated mistakes on future projects.
Skipping or rushing surface prep
Proper cleaning and preparation of your concrete surface is crucial before sealing micro-cracks. Contaminants like dirt, grease, or old sealers can prevent the sealer from adhering properly.
Moisture is another enemy here. Rushing through prep can leave residual moisture that weakens adhesion and may cause your sealer to fail over time.
Take your time to clean, degrease, and test for moisture. Etch the surface if needed to open those micro-cracks just right. This ensures your sealer has a solid foundation to bond with.
Choosing the wrong viscosity or film thickness
The viscosity of your sealer – how thick or thin it is – plays a big role in how well it seals and hides those micro-cracks. Too thick, and it’ll accentuate every little defect on your surface.
Too thin, and it might not form a strong enough barrier to stop capillary stain migration. This can lead to blotching or uneven staining later on.
Stick with the recommended viscosity for your specific sealer and stain system. If you’re unsure, ask the manufacturer or consult with a pro.
Staining before sealant cure
Patience is key when it comes to curing your sealant. Staining too soon can lead to uneven results and telegraphing issues.
Each sealer has its own cure window – the time it needs to dry and harden before staining. Check your manufacturer’s guidelines, and always test a small area first before committing to full application.
Rushing this step can cause blotching, sheen inconsistencies, or even make your stain look patchy. So, wait it out. It’ll be worth it in the end.
Product Effectiveness: Interpreting User Reviews and Lab Data
Identify reliable evidence by distinguishing between anecdotal feedback and professional lab data. Look for repeatable results, diverse substrates, and documented timelines in reviews and reports. Be wary of cherry-picked photos or vague claims.
When reading datasheets, pay attention to penetration depth, film formation, moisture tolerance, and cure times. Interpret results in the context of substrate condition and environmental factors. Use a simple scoring approach to compare products and rely on pilot patches to verify performance before committing to a full project.
What to look for in user reviews
When reading user reviews, look for concrete evidence of product effectiveness. Trust reviews with clear before/after photos and detailed timelines over single anecdotes.
Repeatable conditions are key. If multiple users report similar results on the same substrate type, it’s a good sign. Long-term outcomes also matter – check if users report lasting results after months or years.
Look for reviews that document the substrate used and provide dates for before/after photos. This helps you understand if the product worked under conditions similar to your project. Vague claims or excessive emphasis on a single success should raise eyebrows.
Key datasheet metrics to read
Product datasheets provide crucial technical data. Focus on these key metrics:
Penetration depth: This tells you how well the product will fill micro-cracks. Deep penetration is good for hiding telegraphing.
Elongation/Tensile data and Adhesion values: These indicate flexibility and bond strength, helping prevent re-telegraphing after curing.
Also note recommended substrates, as some products work best on specific surfaces. Check curing times to plan your project timeline effectively.
Red flags and patterns of failure
Be wary of products with consistent reports of re-telegraphing after short periods. This could indicate inadequate penetration or poor adhesion.
Poor adhesion can lead to delamination, especially if the product is incompatible with your chosen stain or sealer. Check for reviews mentioning issues with specific stains or sealers you plan to use.
Outdated data or inconsistent photo quality in reviews should also raise red flags. Always verify claims with recent, high-quality evidence.
Conclusion
Sealing micro-cracks before staining is about choosing the right sealant, preparing properly, and testing first so the stain stays true and the surface stays durable. Do not rush. Safety comes first, and small test patches save big trouble later.
First, pick a sealant type that matches the crack size and expected movement, then test it on a hidden area to confirm it stops telegraphing and darkening, clean and dry the surface, apply in a thin, even film following the product directions, wipe off any excess, and let it cure fully before staining, then inspect the area under light to confirm the finish before proceeding across the whole slab.
Avoid these missteps: skipping the test patch, choosing a product simply because it sounds fast, or applying too thick a coat and trapping moisture. Always wear eye protection and gloves, work in a well ventilated area, and keep pets and bystanders away from the work zone. If the surface is damp, dusty, or already stakes darkens unevenly, stop and reassess before continuing.
If cracking is heavy, the concrete has complex movement, or you see inconsistent results after initial sealing, call in a professional rather than pushing ahead. When you follow the steps, you keep the stain true, the look even, and the project on time—confidence, with a solid, lasting finish. Stay precise, stay safe, and finish strong.
FAQ
What types of sealants best prevent telegraphing when staining micro-cracks?
Look for sealants labeled for crack sealing in concrete and compatible with stains. Epoxy and polyurethane sealants tend to form a solid, less permeable film, while acrylics can be easier to work with but may telegraph more if not cured properly. Always check the product label or datasheet for stain compatibility before buying.
How do I apply sealant to micro-cracks before staining?
Clean the crack, remove loose material, and apply the sealant flush with the surface. Follow the manufacturer’s cure times and remove excess before it skins over. A thin, even bead is better than a thick lump that gets squeezed out and looks odd after staining.
What common mistakes should I avoid when sealing and staining concrete?
Avoid leaving debris in the crack or applying on damp surfaces. Don’t overfill cracks or apply sealant too close to the surface where it can roughen the stain. Skipping cure time or not testing compatibility with your stain can ruin the look.
How should I compare different sealant options?
Compare film strength, flexibility, and stain compatibility on the label or datasheet. Note whether the product is water- or solvent-based and if it’s meant for interior, exterior, or both. If unsure, check manufacturer instructions and look for practical homeowner-friendly guidance.