
Introduction
Sealing lime plaster means applying a breathable coating that protects the wall without stopping moisture. Choose sealers or finishes that are specifically marked breathable and lime-plaster compatible. Test a small patch first and check the product label for indications of breathability and surface compatibility.
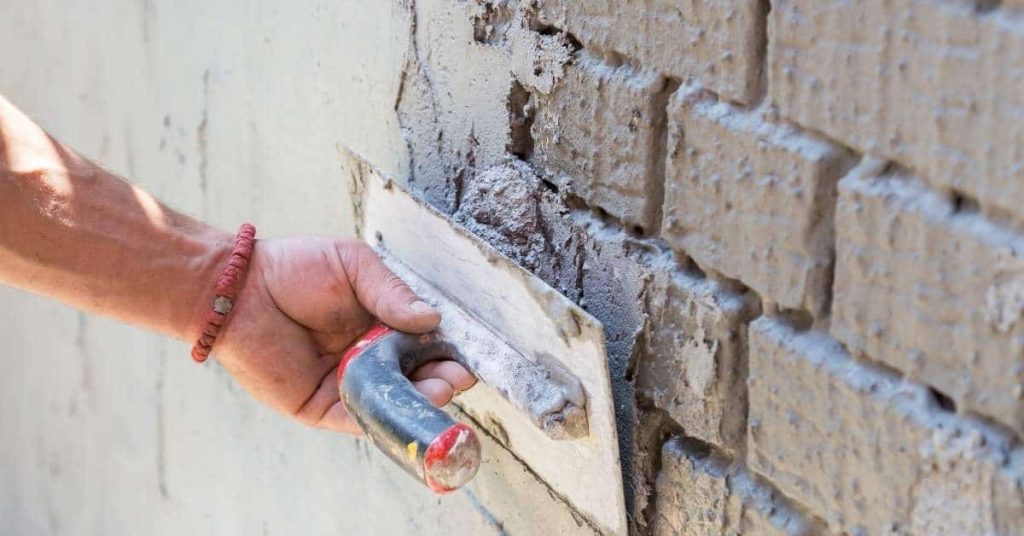
Prepare and clean the wall, then apply in thin, even passes according to the product directions. Let it dry fully and inspect for any changes in appearance or moisture issues before continuing. Check the label, instructions, and local rules to confirm compatibility with lime plaster and breathable performance.
Key takeaways
- Assess lime plaster breathability needs before choosing any sealing product.
- Define sealing goals clearly to balance moisture control and surface protection.
- Prefer breathable sealers unless non-breathable is essential for moisture risk.
- Wear PPE during mixing and ensure adequate ventilation to avoid fumes.
- Test compatibility on discreet area and monitor for changes in appearance.
- Inspect sealed walls regularly and reapply sealers per manufacturer guidance.
Table of Contents
- Introduction
- Key takeaways
- Why Breathability Matters for Lime Plaster
- Sealing Objectives and Risks — Defining What You Need the Sealer to Do
- Breathable Protection Options Explained
- Non-Breathable Options to Avoid (and When Exceptions Exist)
- Compatibility Testing and Small-Scale Trials Before Full Application
- Application Methods, Preparation and Practical Tips
- Maintenance, Inspection and Repair of Sealed Lime Plaster
- Choosing the Right Sealer — a Practical Selection Guide
- Conclusion
- FAQ
Why Breathability Matters for Lime Plaster
Lime plaster must stay vapor-permeable. Moisture moves through the wall, salts can travel and crystallize, and trapped water weakens the finish and can cause paint to fail. Using impermeable coatings on porous, hygroscopic masonry is a bad mix that often leads to peeling and flaking over time.
For DIY work, breathing finishes let moisture escape without blowing out the plaster. If you seal the wall too tight, damp spots can linger, and efflorescence or salt problems may show up later. Always read product labels and guidelines to confirm permeability and compatibility with lime plaster and masonry.
How lime plaster differs from cement and gypsum
Lime plaster is a unique material with properties that set it apart from other plasters like cement or gypsum. It’s crucial to understand these differences when choosing sealers.
Porosity: Lime plaster is porous, allowing moisture to pass through. Cement and gypsum are denser, less permeable.
Flexibility: Lime plaster can stretch and compress slightly, making it better at handling minor movement or settling. Cement and gypsum plasters are more rigid.
Alkalinity: Lime plaster is alkaline, which helps prevent mold growth but also means it can react with some paints or sealers. Cement and gypsum plasters are neutral or slightly acidic.
Salt tolerance: Lime plaster can handle salts better than other plasters. This is important because lime plaster walls can draw salts to the surface, where they need to evaporate.
Key terms: permeability, vapour diffusion, capillarity, water repellency
When shopping for sealers, you’ll come across these technical terms. Understanding them will help you make informed decisions.
Permeability: This is how well a material allows moisture to pass through it. Lime plaster is permeable to water vapor but not liquid water.
Vapour diffusion: This is the process by which water vapor moves from an area of high concentration (like inside your home) to low concentration (outside).
Capillarity: This is when moisture moves through tiny spaces or pores, like how a paper towel absorbs liquid. Lime plaster has good capillary action.
Water repellency: This describes how well a material resists water penetration. Sealers can provide water repellency without blocking vapor diffusion.
Sealing Objectives and Risks — Defining What You Need the Sealer to Do
Sealing objectives are about what you want the sealer to do on your concrete. Common goals are to reduce rain penetration, resist dirt, and keep the look you want. Each goal comes with trade-offs like less breathability, changed appearance, and ongoing maintenance.
Before you pick a product, decide which risks matter most for your area and how you use the space. This helps you choose a sealer that balances protection with upkeep and appearance. If you need specifics, check the label or datasheet for guidance on suitability, reapplication intervals, and care.
Conservation and regulatory considerations for historic/hygric-sensitive buildings
If you’re working on a listed or traditional building, it’s crucial to understand that breathable, compatible treatments are usually required. These structures are often protected by conservation officers or charters who ensure their integrity is maintained.
Before specifying any treatment, always consult with the relevant authorities. They can provide guidance tailored to your specific property and its historical significance.
Using inappropriate sealers on historic buildings can trap moisture, leading to damage over time. It’s also important to consider the building’s hygric sensitivity – how it responds to changes in humidity. Breathable sealers allow walls to breathe, preventing issues like dampness and mold growth.
Breathable Protection Options Explained
Breathable protection keeps moisture moving through lime plaster without trapping salts. The main options are different systems that allow vapor to escape while staying flexible enough to handle lime movement. The goal is to balance drying with protecting the surface.
Understanding how each breathable system handles moisture and salts helps you predict drying and salt movement. It matters for DIY because the wrong choice can trap dampness and damage lime plaster. Always check the label or datasheet for directions and compatibility with your wall conditions.
Limewash and lime-based protective coatings
Traditional limewashes and modern lime-based paints are excellent choices for protecting your lime plaster while maintaining breathability. These coatings form a sacrificial layer, meaning they protect the substrate by degrading themselves first when exposed to moisture or salts.
They create a highly vapor-permeable barrier, allowing water vapor to pass through but preventing liquid water and salt ingress. This makes them ideal for historic buildings and situations where you want to preserve the natural look and feel of lime plaster.
Limewashes are typically applied by brush or roller in multiple thin coats, allowing each layer to dry before applying the next. They can be tinted with natural pigments to achieve a range of colors while still maintaining breathability.
Remember, lime-based coatings need time to cure properly and should not be applied when temperatures drop below 50°F (10°C).
Silicate (mineral) coatings and potassium silicate treatments
Silicate systems, such as potassium silicate treatments, create a durable, breathable mineral skin on your lime plaster. They work by chemically bonding with the mineral substrate, forming a strong, long-lasting barrier.
These coatings are particularly suitable for situations where you need robust protection against moisture and salts, like in areas prone to condensation or dampness. They can also help to reduce efflorescence (the appearance of white salt deposits on walls) by preventing soluble salts from reaching the surface.
Silicate treatments are usually applied by brush or roller in one or two coats, depending on the product and the substrate’s condition. They typically require a certain level of humidity during application and curing to ensure proper bonding.
While silicate coatings can be tinted with mineral pigments, they may not provide the same range of colors as lime-based paints. Always check compatibility with your specific plaster type before application.
Microporous water repellents (siloxane/silane systems) used carefully
Some siloxane or silane-based water repellents can reduce liquid water ingress while allowing vapor movement, making them useful in certain situations. These products work by penetrating the substrate and forming a protective barrier within the pores.
They are typically applied as a single coat by brush, roller, or spray, depending on the product. While they can help to protect against water damage, it’s crucial to use them carefully. Over-application or incorrect usage can lead to reduced breathability, trapping moisture and causing problems down the line.
Siloxane/silane systems are most effective when used in combination with other protection measures, such as addressing any underlying dampness issues. They should not be relied upon as a sole solution for preventing water ingress.
Always follow the manufacturer’s guidelines for application and ensure compatibility with your specific plaster type. It’s also a good idea to test these products on a small, hidden area first to check their suitability for your project.
Non-Breathable Options to Avoid (and When Exceptions Exist)
Non-breathable paints and sealers—dense acrylics and solvent-rich film-formers—trap moisture under the film. Avoid them on most exterior or moisture-prone surfaces, because they can lead to blistering, peeling, and mold growth.
There are limited exceptions for internal, non-structural, or temporary uses, but you still need to verify with the label or datasheet. This matters because breathable coats usually dry and move with the wall, reducing problems down the line; if you choose the non-breathable path, know the risks and monitor for signs of trouble. For disposal, check local household hazardous waste rules and never dump coatings down drains or into the soil.
How to recognize non-breathable products on datasheets
When choosing a sealer, always check the product’s datasheet. It’s your key to understanding if it’ll let walls breathe or not.
Vapor Diffusion Resistance: Look for high values here. Low numbers mean the product lets moisture escape easily.
Statements about Occlusivity: Be wary of terms like ‘complete coverage’, ‘film-forming’, or ‘sealant’. They often indicate a non-breathable product.
Capillary Absorption: Check if the datasheet mentions capillary absorption. Low values mean the product doesn’t absorb moisture, trapping it in the wall instead.

Compatibility Testing and Small-Scale Trials Before Full Application
Before committing to a full application, run small mock-ups and trials on your surface to check adhesion, how it looks, how water behaves, and whether salt or efflorescence shows up. Document what you see and how the environment affects it. This helps catch issues early.
Keep notes on substrate, temps, humidity, and cure conditions and use these results to guide adjustments and avoid surprises later. It helps you decide if the product is suitable and how to proceed safely. Thorough documentation pays off when you scale up the job.
Simple DIY tests to try on a mock-up
Before you apply any sealer, set up a small mock-up area. This lets you test different sealers without affecting your whole wall.
Here’s what to check:
Water behaviour: Drip water onto the mock-up. Watch how it spreads and soaks in. A good sealer will let water bead up initially, but still allow it to penetrate over time.
Visual inspection: Check for any sheen or color shift after application. Lime plaster should look natural, not glossy.
Salt bloom: Observe the mock-up over weeks. If salt crystals form on the surface, that’s a sign of incompatible sealer or improper preparation.
When to commission professional hygrothermal or conservation testing
DIY tests are great for basic checks, but sometimes you need expert help. Here’s when:
Persistent damp: If your walls stay wet even after repairs, a specialist can find out why and suggest appropriate solutions.
Salts in the wall: Excess salts can damage plaster and cause efflorescence. Professionals can analyze salt content and advise on prevention or treatment.
Complex wall assemblies: If your walls have multiple layers, different materials, or unusual construction, a specialist can help ensure your sealer works with the whole system.
Professionals use tools like hygrothermal modeling to analyze capillary and vapor transport. They can provide detailed reports and tailored recommendations for your specific situation.
Application Methods, Preparation and Practical Tips
This section covers how to prep surfaces, mix and apply breathable coatings the right way, and how to follow the manufacturer guidance. You’ll learn to check the surface, mix per label, and apply using proper technique. It emphasizes weather checks and substrate readiness to avoid failures.
Doing it right saves you time and money and keeps the job breathable and durable. It matters because bad prep or sloppy mixing shows up as peeling, damp spots, or unclear breathability later. Always reference the product label and manufacturer instructions for specifics.
Tools and materials checklist
Before you start, make sure you have everything you need. This list covers the basics.
- Brushes: Natural bristle for lime-based products; synthetic for silicate coatings.
- Sprayer (optional): For large areas or even application; ensure it’s compatible with your chosen product.
- Mixing vessel: Large enough to hold your batch; a clean bucket will do.
- Protective gear: Gloves, goggles, and old clothes to protect from splashes.
- Tape measure: To ensure even coverage and check wall height.
- Drop cloths: To protect floors and furniture from drips.
- Ladder: For high walls; ensure it’s stable and secure.
- Product datasheet: Keep this handy for application guidelines and safety info.
Quick rule: Always check your product’s compatibility with tools before use.
Common application mistakes and how to avoid them
Even experienced applicators make mistakes. Here are some common ones to steer clear of.
- Over-thinning: Too much water weakens the sealer; check product guidelines for correct dilution ratios.
- Applying in wrong conditions: Too hot, cold, or humid can affect curing; apply when temps are between 50-80°F (10-27°C) and humidity is low.
- Inadequate substrate preparation: Dust, dirt, or grease can hinder adhesion; ensure walls are clean, dry, and free of contaminants before application.
- Applying too thickly: This can trap moisture and lead to issues; apply in thin, even coats and allow adequate drying time between coats.
If you notice any of these red flags during or after application, stop work immediately and reassess your approach.
Maintenance, Inspection and Repair of Sealed Lime Plaster
Regular inspections catch problems before they grow. Look for moisture stains, cracking, staining, blistering, or salt efflorescence on the plaster surface. For any signs, pause, note it, and check the product label or datasheet before proceeding with repairs.
Visual checkpoints for ongoing inspection
Regularly inspect your lime plaster to catch any issues early. Use this checklist seasonally.
- Wet patches: Check after rain or snow melt. Persistent dampness can lead to mold growth and damage.
- Crusting: Look for a hard, crusty layer forming on the surface. This could indicate salt efflorescence, which needs addressing.
- Color change: Discoloration might signal a problem with the coating or underlying plaster.
- Loss of cohesion: Gently press the surface. If it feels loose or crumbles, there’s a structural issue.
- Mold or mildew: Check for any fungal growth, which can cause damage and health issues.
- Cracking: Inspect for hairline cracks. These can widen over time, compromising the plaster’s integrity.
- Blistering: Bubbles or blisters on the surface indicate a problem with the coating or underlying plaster.
- Salt efflorescence: White, powdery deposits could signal water ingress and salt buildup.
Quick rule: Record conditions and seek assessment if you spot any of these issues. Early intervention prevents costly repairs.
Repairing and re-matching coatings on lime plaster
When coatings fail, follow this guide to repair and re-match the texture and color.
- Remove failed coating: Gently scrape off any flaking or peeling paint. Use a suitable solvent for stubborn areas.
- Prepare surface: Clean the area thoroughly. Lightly abrade with fine-grit sandpaper to improve adhesion.
- Match texture: Before applying new coating, use a trowel or brush to mimic the original texture.
- Match color: Test small patches of your chosen breathable treatment. Adjust color as needed before full application.
- Avoid non-breathable paints: Never use non-breathable paints, even for touch-ups. They can trap moisture and cause damage.
- Test small areas first: Always test new coatings on a small, hidden area to ensure compatibility.
- Monitor progress: Keep an eye on the repair as it dries and cures. Make adjustments if needed.
Quick rule: Patience is key in matching texture and color. Take your time, test small areas, and monitor progress closely.
Choosing the Right Sealer — a Practical Selection Guide
Choosing the right sealer is about matching a breathable option to your situation. Weigh building type, exposure, conservation status, aesthetics, and how much maintenance you can handle. Start with a breathable choice and narrow from there.
This framework helps you avoid overkill or underprotection and keeps moisture where it should be. Breathable coatings let moisture escape while still protecting the surface, which matters for longevity and look. When in doubt, check the product label or manufacturer instructions for specifics and follow local guidance.
Quick decision checklist: questions to ask suppliers or specifiers
Before you buy, get the facts straight. This checklist helps you validate claims and ensure the sealer is right for your lime plaster.
- Compatibility with lime: Ask if it’s specifically designed for lime-based plasters to avoid premature failure or discoloration.
- Vapor permeability: Check if it allows moisture to escape. Low SD values (less than 0.5) are good.
- Expected lifetime: Inquire about durability under your specific conditions to plan maintenance cycles.
- Substrate prep required: Find out what surface preparation is needed to ensure proper adhesion and performance.
- Safety data: Request a safety datasheet (MSDS) to understand handling, storage, and disposal guidelines. Skip this at your peril; it’s crucial for safe application.
- Color change: Ask if the sealer will alter the appearance of your plaster. Some may darken or yellow over time.
- Touch dry time: Enquire about how long it takes to touch-dry, so you can plan your work schedule accordingly.
- Cure time: Find out how long before the sealer reaches full cure and is resistant to water or heavy foot traffic.
Quick rule: Don’t rely solely on sales talk. Use this checklist to make an informed decision.
How to read technical datasheets and what parameters to prioritize
Technical datasheets are packed with info. Here’s how to navigate them and focus on key aspects for your lime plaster.
Vapor permeability: Look for the SD value (water vapor diffusion equivalent air layer thickness). Lower values mean better breathability. Prioritize this, especially in humid or climatically challenging areas.
Capillary absorption: Check how quickly water is absorbed into the sealer. Low absorption rates indicate better protection against liquid water ingress.
Adhesion to mineral substrates: Ensure the sealer adheres well to lime plaster. Poor adhesion can lead to delamination and failure.
Alkalinity compatibility: Confirm the sealer is compatible with alkaline surfaces like lime plaster to prevent chemical reactions that could compromise performance.
Safety/Handling: Review safety guidelines, storage conditions, and disposal instructions. This info is crucial for safe application and proper product stewardship.
For critical projects, don’t hesitate to request test reports. They provide deeper insights into a product’s performance under specific conditions.
Conclusion
Protecting lime plaster means choosing sealing that keeps the wall breathable while guarding against moisture, salts, and damage. Do it safely, test first, and you’ll keep the look and durability for years to come.
Test in a small, inconspicuous area, check compatibility with your plaster and finish, follow the chosen sealer’s instructions, dry thoroughly between steps, and observe after each stage for any color change or moisture trap. Start with a breathable option if you can, and only move to non-breathable options if you’ve confirmed the wall and climate truly need it.
Common mistakes to avoid are skipping the small-area trial, applying too thickly, and ignoring drainage or ventilation. Always work in clean, dry conditions, wear eye and skin protection, and keep kids and pets away during application and curing. If you’re unsure about your climate, wall condition, or the seal’s compatibility, pause and check with a seasoned pro before proceeding.
If in doubt about complexity, or if the wall shows active moisture, cracking, or efflorescence, bring in a professional. With careful testing, clean preparation, and measured steps, you can achieve a durable, breathable seal that protects and preserves the plaster. Stay deliberate, stay safe, and you’ll get steady, lasting results.
FAQ
How do I choose a breathable vs non-breathable sealer for lime plaster?
Read the product label and manufacturer instructions. Look for terms like breathable or vapor-permeable. If in doubt, ask the supplier and test on a small patch first.
Can I seal lime plaster after it cures, or should I seal it early?
Seal after the plaster has had a chance to dry and cure. If the wall still shows dampness, hold off and fix the moisture first. Don’t seal wet or damp plaster.
What small-scale tests should I run before full application?
Try the sealer on a hidden patch first. Observe moisture behavior and any changes in surface feel over a few days. Check adhesion and any whitening or staining, and document what happens.
What maintenance tips keep breathability after sealing?
Inspect for cracks or peeling during regular maintenance. Clean with a soft method and avoid harsh chemicals. Reapply per manufacturer guidance when performance declines or signs of wear appear.