

Introduction
Salt-finish concrete is a decorative surface created by applying and later washing away salt to expose a textured layer.
On small projects, it’s a practical way to add grip and character, but timing and technique matter for a clean look. Always check manufacturer guidelines for how long to work the surface, how to apply and wash away the salt, and what type of salt to use. If in doubt, follow local rules or consult the product label for specifics.
Keep the work area tidy as you go to prevent salt residue from dulling the finish. Rinse, neutralize if needed, and allow the surface to dry per instructions before sealing. If haze appears, use the recommended cleaner or light polishing as directed by the label, and verify sealing requirements with the product instructions and local guidelines.
Key takeaways
- Salt finish creates textured surface by broadcast salt during initial set, rinse after.
- Prepare tools and materials: brushes, hoses, squeegee, salt, sealer, pails, trowels, PPE.
- Timing matters: broadcast salt during early set, rinse promptly to avoid haze.
- Step-by-step workflow: keep slurry controlled, rinse thoroughly, avoid washing away salt.
- Cleanup and environmental care: collect slurry, dispose per local rules; prevent concrete wash into drains.
- Sealer choice and haze prevention: select breathable sealer, apply evenly, avoid high humidity.
Table of Contents
- Introduction
- Key takeaways
- What a Salt Finish Is and When to Choose It
- Tools, Materials Checklist, and Material Specs
- Timing: When to Broadcast Salt and Rinse for Best Results
- Step-by-Step Application Workflow for Small Pours
- Cleanup, Slurry Control, and Environmental Precautions
- Choosing a Sealer for Salt-Finished Concrete Without Haze
- Sealing Application Steps and Haze-Prevention Techniques
- Inspection, Troubleshooting, and Long-Term Maintenance
- Conclusion
- FAQ
What a Salt Finish Is and When to Choose It
A salt finish is a textured surface produced by broadcasting salt onto the surface while the concrete still has some bleed water. The result is a granular look with a tactile feel and a lighter texture compared to plain concrete. You’ll see salt exposure in the surface ridges and a subtle spark that helps hide small imperfections.
DIYers choose it for small projects when they want grip and character without heavy decorative work. You can expect two common outcomes: light salt exposure with gentle texture or a deeper aggregate reveal if the mix and timing allow it. Always check manufacturer guidance and local rules to confirm suitability for your space.
Definition and aesthetic effect
A salt finish is a decorative concrete technique that uses rock salt to create voids when rinsed, revealing the aggregate and texture beneath the surface.
The result is a unique, textured look with increased slip resistance. The salt creates small pits, exposing the aggregate and giving the concrete a rugged, natural appearance.
It’s important to note that this isn’t a smooth finish. If you’re looking for something sleek and even, a salt finish might not be right for your project.
Best small projects and surfaces for salt finish
A salt finish is perfect for small-scale outdoor projects where you want to add some texture and character. Think patios, steps, walkways, or small retaining walls.
It’s also great for indoor surfaces like basement floors or shower pans. Anywhere you want a bit of rustic charm and increased traction can benefit from a salt finish.
Just remember, it’s not ideal for large, smooth areas where the lack of uniformity might be more noticeable. It’s all about balance – too much salt can make the surface look unfinished, while too little won’t give you the desired effect.
Tools, Materials Checklist, and Material Specs
Gather a basic set of tools, including a broom, hand float, spray bottle, bucket, hose, and a stiff brush. Add personal protective equipment such as gloves, eye protection, and a mask for dust and fumes. Have a rule of thumb for clean water and a soft rag for cleanup during the process.
For salts and aggregates, note the type and grade of material on the product label or data sheet. Verify compatibility with your concrete mix and future sealer, and avoid ingredients that could cause staining or hazing later. Refer to the manufacturer instructions for any temp or weather cautions before you start.
Tools and consumables checklist
Before you start, make sure you have all the necessary tools and consumables on hand. Here’s a quick checklist to help you.
- Rakes: For spreading and leveling concrete. Check they’re in good condition with no bent tines.
- Trowels (hand and straight): For finishing and smoothing surfaces. Ensure they’re clean and undamaged.
- Brushes: For applying salt and cleaning up. Choose stiff-bristled ones for better control.
- Sprayers: For wetting down the surface before applying salt. Check spray patterns and pressure.
- Sieves (1/4″ to 1/2″ mesh): To sift rock salt. Verify they’re the right size for your chosen aggregate.
- Safety gear: Includes gloves, safety glasses, ear protection, and work boots. Don’t skip this!
- Rock salt (coarse or fine): Choose based on desired texture. Check it’s dry and free of lumps.
- Sealer (water-based, no haze): For protecting the finish. Ensure it’s compatible with your chosen salt type.
Quick rule: Double-check everything before you start. Missing or faulty tools can ruin your finish.
Salt and aggregate specs explained
Understanding your salt and aggregate types is key to a successful salt-finish project. Here’s what you need to know.
- Rock salt (coarse): Provides a rough, textured finish. Check particle size is consistent (1/4″ to 3/8″).
- Rock salt (fine): Gives a smoother, more subtle texture. Ensure particles are uniform (<1/8″).
- Aggregate (pea gravel, crushed stone, etc.): Affects appearance and rinsing behavior. Check it’s clean, dry, and within spec.
Quick rule: Match your salt and aggregate types to achieve the desired look and performance.
Mix and admixture considerations
Getting your concrete mix right is crucial for a good salt finish. Here are some key factors to consider.
- Water content: Too much water weakens the concrete; too little makes it hard to work with. Check your mix design and adjust as needed.
- Air entrainment: Helps resist freeze-thaw damage but can affect salt embedment. Ensure it’s within acceptable limits (4-7%).
- Admixtures: Can accelerate or retard setting time, affecting when you apply the salt. Check mix instructions and adjust as required.
Quick rule: Always follow your concrete mix instructions to ensure a successful pour and finish.
Timing: When to Broadcast Salt and Rinse for Best Results
Timing relative to the initial set is what drives embedment depth and the exposed texture. If you broadcast too early, the salt may wash away; too late, and you won’t get the desired aggregate reveal. Weather and ambient temperature influence how quickly the surface sets and accepts the salt.
Rely on visual checks rather than a clock. Look for a surface that looks firm to the touch but can still hold a slight indentation. For small pours, follow safe, practical cues from the surface feel and appearance and verify any specific guidance on the product label or data sheet.
Monitoring surface set and simple readiness tests
The key to a successful salt finish is knowing when your concrete’s surface has set enough to accept the salt. Here are some hands-off visual and tactile tests to help you decide:
Skin formation: Look for a thin, grayish ‘skin’ forming on the surface. This indicates that water is being pulled up from the mix, signaling that the concrete is starting to set.
Thumb-nail test: Gently press your thumbnail into the concrete at a 45-degree angle. If it leaves an impression but doesn’t crumble or break off, your concrete’s surface is ready for salt broadcasting.
Practical timing guidance for small projects
For small pours, a good rule of thumb is to broadcast the salt when the surface is firm enough to maintain a light impression but still feels somewhat plastic. This usually happens around 4-8 hours after pouring, depending on your mix and weather conditions.
Always check your cement or mixture instructions for specific set times. Keep in mind that hotter temperatures will speed up setting, while cooler temps will slow it down.
Remember, the goal is to embed the salt into the surface, not just sprinkle it on top. So, you want to catch it at that sweet spot where the concrete is still malleable but has started to set.
Common timing mistakes and how to avoid them
Even with the best intentions, it’s easy to make timing mistakes. Here are some common ones and how to steer clear:
- Adding salt too soon: If you add salt before the concrete has started to set, it will just sit on top and won’t embed properly. Solution: Wait for skin formation and a slight firmness before broadcasting.
- Adding salt too late: If you wait too long, the surface will be too hard, and the salt won’t penetrate. Solution: Check your concrete regularly with simple tests like the thumb-nail test.
- Not accounting for weather conditions: Extreme heat or cold can speed up or slow down setting times. Solution: Monitor ambient temperature and adjust your timing accordingly.
- Rinsing too early: Rinsing before the salt has had time to dissolve can leave a haze. Solution: Wait at least 24 hours after broadcasting before rinsing.
By avoiding these common pitfalls, you’ll be well on your way to achieving that perfect salt finish.
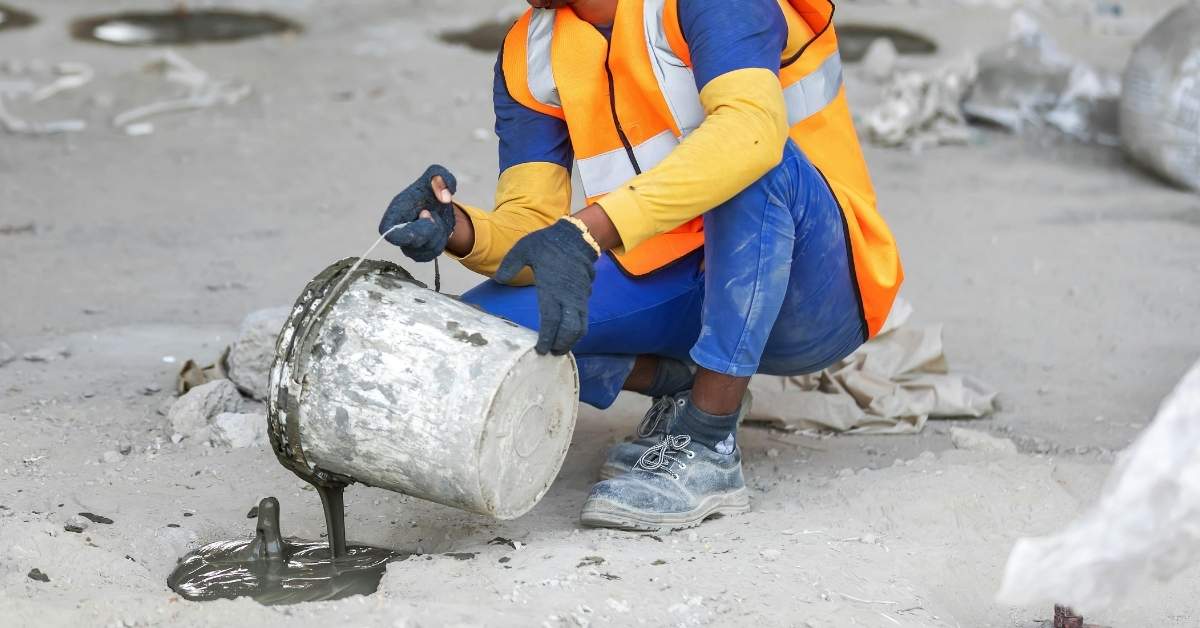
Step-by-Step Application Workflow for Small Pours
Start with a clean, swept surface after screeding and a light breeze to prevent dust settling. Broadcast salt evenly over the surface while it still holds a slight sheen, then allow a brief set period before a gentle rinse to embed the salt.
Rinse to reveal the texture, then perform a final finish as you would with a standard broom finish. Use short actions and check in at key points to confirm the salt is embedded and the aggregate is exposed where intended, adjusting as needed for your small pour.
Step-by-Step Pouring Process
This sequence guides you through preparing, pouring, and finishing a small concrete pour.
- Check safety: wear gloves, eye protection, and a dust mask. Keep the area clear of debris.
- Prepare forms: ensure they’re secure, level, and properly braced.
- Mix concrete: follow your mix’s instructions. Pour slowly into the forms, using a shovel to spread it evenly.
- Vibrate: use an electric vibrator to remove air pockets. Do this quickly to avoid overworking the concrete.
- Initial screeding and leveling: use a straight edge to level off the top of the pour. Let it set for 15-30 minutes before final floating.
Surface preparation and final floating
After initial setting, prepare your slab for salting by following these steps:
Edge preparation: Use a trowel to strike off the excess concrete from the edges of the forms. Ensure they’re clean and straight.
Jointing: Cut control joints using a grooving tool or saw to prevent random cracking during curing.
Final floating: Use a magnesium float to smooth out any imperfections on the surface, ensuring it’s even and level. Let it set for another 15-30 minutes before salting.
Broadcasting and embedding the salt
Spread the salt evenly across your slab’s surface using a fine-mesh screen or a salt spreader:
Coverage: Aim for about 1 lb of salt per 20 sq. ft. of concrete, adjusting based on your desired finish.
Embedding: Use a soft-bristle broom to lightly embed the salt into the surface without overworking it. Be gentle to avoid disturbing the concrete’s integrity.
Let the salt sit for 10-15 minutes before rinsing, allowing it to start dissolving and reacting with the concrete.
Rinsing out and revealing the finish
After the salt has sat, rinse your slab to expose the aggregate and reveal the final texture:
Timing: Rinse when the surface is still damp but not wet. This ensures you remove all loose salt without washing away too much.
Method: Use a garden hose with a nozzle, or a sprayer, to rinse the slab in even, controlled passes. Start from one end and work your way across.
Brushing: If needed, use a stiff-bristle broom to gently scrub any remaining salt from the surface. Be careful not to disturb the finish.
Cleanup, Slurry Control, and Environmental Precautions
Begin cleanup immediately after rinsing to remove fines and prevent laitance from forming. Use a stiff broom or brush to push fines into the wash and collect runoff where it won’t erode the surrounding soil. Protect nearby surfaces from splashes during rinsing.
Dispose of wash water according to local regulations and prevent runoff from carrying fines off the work area. Reducing slurry and fines now helps prevent haze on subsequent sealers and keeps the surface consistent for finishing later.
Immediate cleanup and surface sweeping/rinsing
Once you’ve rinsed off the excess salt, it’s crucial to clean up immediately. The concrete is still curing, so time is of the essence.
Sweep the surface gently but firmly with a soft-bristled broom to remove any loose salt and cement paste. Be careful not to damage the finish.
Rinse the area again gently, using a hose or spray nozzle set to a fine mist. This helps wash away any remaining fines without disturbing the surface too much.
The goal is to remove all loose material before it dries and becomes difficult to clean. This will also help prevent laitance or residue that could affect the final finish and make sealing more challenging later on.
Managing slurry, sediment, and runoff
Rinsing concrete generates a lot of water and slurry. It’s important to manage this properly to avoid staining and environmental issues.
Use plastic sheeting or tarps around the pour area to collect rinse water and capture slurry. This makes cleanup easier and prevents sediment from washing into drains or onto adjacent surfaces.
If possible, divert runoff away from sensitive areas like gardens, waterways, or neighbor’s properties. You can do this with channels, barriers, or by directing the water towards a collection point.
Regularly remove and dispose of collected slurry and sediment as needed. This will help keep your work area clean and prevent staining or damage to surrounding surfaces.
Disposal, site protection, and neighbor considerations
Proper disposal of slurry is important for both environmental and legal reasons. Check local regulations to ensure you’re following all guidelines.
Slurry can be dried out and disposed of in regular trash, but it’s often better to take it to a waste management facility if that option is available. Some facilities accept concrete washout for recycling, which is the most eco-friendly disposal method.
Protect adjoining surfaces and landscaping from runoff by using barriers or diverting water away. This can save you time and money in cleanup later on, and helps maintain good neighbor relations.
Communicate with your neighbors about what you’re doing and when. They might appreciate a heads-up if there’s going to be some noise, dust, or water runoff. Good communication goes a long way in maintaining good relationships.
Choosing a Sealer for Salt-Finished Concrete Without Haze
Compare penetrating sealers with film-forming sealers to understand how each interacts with exposed aggregate. Focus on products that minimize hygroscopic residues and visible haze on textured surfaces. Verify that the sealer is labeled for salt-exposed finishes and clean surfaces before applying.
Check the compatibility notes on the product label or data sheet with your concrete mix and salt finish. Look for guidance on bonded vs non-bonded films and any cautions about salt or aggregate exposure before making a choice.
Penetrating vs film-forming sealers: pros and cons
Both penetrating and film-forming sealers have their place, but they behave differently on salt-finished concrete. Here’s a quick rundown.
Pros of Penetrating Sealers
- Invisible finish – won’t change the look or feel of your surface.
- Breathable – allows moisture to escape, preventing trapped water from causing damage.
- Easy application – simply spray or roll on and let it soak in.
- Good for textured surfaces – seeps into pores, providing protection where you need it most.
Cons of Penetrating Sealers
- Limited stain resistance – may not protect against oil or grease stains.
- Wears off over time – will need to be reapplied periodically.
- Less durable – not ideal for high-traffic areas.
- May require multiple coats for full protection.
Film-forming sealers, on the other hand, provide a barrier on top of the surface. They’re great for protecting against stains and wear but can trap moisture and may show a slight haze on textured surfaces. Choose based on your project’s needs.
How to read sealer labels and pick the right product
Reading sealer labels might seem daunting, but it’s crucial for choosing the best product. Here are key items to check:
VOC (Volatile Organic Compounds) – Lower VOCs mean less harmful emissions. Choose a low or zero-VOC sealer if possible.
Flash Time – This is how long it takes for the sealer to dry. Make sure it fits your project timeline.
Temperature Range – Ensure the product can be applied and cures within your job site’s temperature range.
Recoat Time – If you need multiple coats, check how long you’ll have to wait between applications.
Also, look for compatibility with salt-finished surfaces. Some sealers may react poorly with exposed aggregate or leave a haze. Always test first if unsure.
Sealing Application Steps and Haze-Prevention Techniques
Plan sealing for a day with moderate humidity and stable temperatures to avoid moisture during application. Use a controlled spray or roller method and avoid over-application to reduce edging or puddling on textured surfaces. Allow appropriate curing time per manufacturer instructions before light traffic.
Perform a tack test and visually inspect for any early signs of haze before the sealer cures. Follow conservative application rates and always defer to manufacturer instructions for dry times and recoat windows.
Surface prep and moisture assessment before sealing
Before you start sealing, ensure your concrete slab is ready. It should be fully cured – usually 28 days after pouring. Use a simple moisture test: tape a clear plastic sheet to the surface for 24 hours. If it’s wet underneath, wait until it dries out.
Why check moisture? Too much moisture can cause blushing or haze when sealing.
Clean the surface first. Remove any dirt, debris, or residue from the final rinse. A clean surface ensures better sealer adhesion and reduces the risk of haze.
Application methods to minimize haze
Use a paint roller with a short nap cover for even application. Apply thin coats – about 1-2 mils wet. This helps prevent pooling and excessive buildup.
Flash off between coats: Allow the sealer to dry slightly before applying the next coat. This helps reduce haze caused by overlapping wet sealer.
Overlap your strokes, but don’t overlap too much. Too many overlaps can lead to excess material and haze. Follow manufacturer’s recommendations for drying times between coats.
Immediate fixes if haze appears during application
If you notice haze while applying the sealer, don’t panic. Here are some quick fixes:
Back-brushing: Use a soft bristle brush to gently back-brush the affected area. This can help distribute the sealer and reduce haze.
Wipe with an appropriate solvent: Some sealers allow you to wipe off excess material with a suitable solvent (like mineral spirits or denatured alcohol) before it fully dries. Always check your product’s instructions first.
Allow additional dry time: If the sealer is still wet, give it more time to dry. Sometimes, haze can disappear as the sealer cures.
Inspection, Troubleshooting, and Long-Term Maintenance
Look for a uniform texture and even salt exposure without bare spots or excess dusting as a sign of a successful finish. Check for residual salt crystals, efflorescence, or hazy patches that may require targeted cleaning or resealing.
Document simple maintenance steps and schedule follow-ups to recoat or refresh as needed on small projects. When issues seem persistent or affect adhesion, consider consulting a professional for advice or service.
Visual checkpoints and acceptance criteria
Once you’ve rinsed off the salt and applied your sealer, use this checklist to ensure a successful finish.
- Salt exposure: Check for even distribution of salt crystals. Inconsistencies may lead to patchy results.
- Sealer absorption: Verify that the sealer has been absorbed evenly. Pooling indicates too much sealer, which can cause haze.
- Haze or streaks: Look for any signs of haze or streaking, which could indicate improper application or inadequate surface preparation.
- Color consistency: Ensure the color is uniform. Inconsistencies may be due to uneven salt distribution or sealer absorption.
- Surface sheen: Check that the sealer has given a consistent, subtle sheen. Matte patches could indicate missed spots.
- Efflorescence: Inspect for any white powdery deposits, which can ruin the finish and should be removed before sealing.
- Delamination: Tap the surface to listen for a hollow sound, indicating possible delamination, which needs immediate attention.
- Edges and corners: Ensure these areas are well-sealed. They often get missed during application.
Quick rule: If anything looks off, don’t hesitate to redo or call a pro.
Fixes for common problems (residual salt, haze, patchiness)
If you notice any of these issues after sealing, don’t panic. Here’s how to address them.
- Residual salt: If you see white patches after sealing, the salt wasn’t fully rinsed off. Remove the sealer, rinse again, and reapply.
- Haze or streaks: Lightly sand any affected areas with 220-grit sandpaper, wipe clean, and touch up with sealer.
- Patchiness: If the color isn’t uniform, it’s likely due to uneven salt distribution. Remove the sealer, reapply salt, rinse, and reseal.
- Efflorescence: Remove any white deposits with a wire brush or acid etcher before resealing.
- Delamination: If you find delaminated areas, remove the loose concrete, patch, and reseal that section.
Quick rule: If problems persist after trying these fixes, it’s time to call a pro.
Routine maintenance and re-sealing recommendations
Regular upkeep will keep your salt-finished concrete looking great for years. Here’s how:
- Inspect annually: Check for any signs of wear, delamination, or efflorescence.
- Clean regularly: Sweep and hose down the surface to remove dirt and debris.
- Avoid de-icing salts: These can damage the sealer and cause efflorescence. Use sand for traction instead.
- Re-seal every 3-5 years: The exact timeline depends on traffic, weather, and initial sealer choice. Inspect for signs of wear to determine when to reseal.
- Address issues promptly: Don’t let small problems become big ones. Fix them as soon as you spot them.
Quick rule: Stay on top of maintenance, and your salt-finished concrete will stay looking sharp.
Conclusion
Getting a salt finish right matters for safety, durability, and the look of your small project, so stay deliberate and keep the goals in sight as you move from wet concrete to a durable, haze-free surface.
Check surface dryness and temperature, have tools ready, broadcast salt evenly during the specified window, rinse as directed, inspect for evenness and haze before sealing, choose and test a sealer on a small area, apply sealer per steps, clean up slurry and environmental precautions, and document any issues to guide future pours.
Avoid overbroadcasting salt or rinsing too early or too late, and don’t rush sealing with the wrong product; skip ventilation and PPE at your own risk, and don’t ignore surface testing or manufacturer guidelines. If you see persistent haze, cracking, or stains, or your project is larger than a simple test area, call a professional before proceeding, and remember that careful preparation now saves time and money later. Stay steady, follow the steps, and you’ll protect the look and life of your concrete.
FAQ
How do I know it’s safe to rinse the salt finish and how soon should I rinse after broadcasting?
Watch for the surface to set and the salt to start dissolving with the first light rinse. Don’t wait so long that the curing slurry dries hard. If in doubt, check the product instructions or manufacturer guidance for your salt and mixer type.
What should I do if I see powdery salt residue after the finish sets?
Rinse again to flush loose salt without overworking the surface. If residue sticks, a light skim or gentle brushing can help, but avoid aggressive scrubbing that can lift the finish. Recheck with the sealer instructions before sealing.
How can I prevent haze when sealing, and what signs should tell me to stop and rework?
Only seal when the surface is truly dry and the salt finish is fully cured to the manufacturer’s recommended state. If you see whitening, milky tint, or uneven sheen, pause and rework or test a small area first. Follow label directions for drying times and application temps.
Should I test a small patch before full application, and what should I look for during a test patch?
Yes. Apply sealer or finishing steps to a small, inconspicuous area first. Look for even color, no streaking, and no hazy film after curing. If the patch looks off, adjust your method or choose a different product per manufacturer instructions.