

Introduction
A V-groove is the angled notch you cut into concrete to give sealant a clean, tight bed.
Routing cracks this way helps the sealant adhere properly and stay in place. Always check the product label or manufacturer instructions for the recommended groove width, since exact sizes vary.
Do the job with a sharp chisel or router bit, keeping the groove clean and straight. Avoid over-deepening or under-cutting, and wire brush the dust before filling. If you’re unsure about local rules or best practices, consult the material instructions or your building code authority for safe, appropriate guidance.
Key takeaways
- Inspect substrate for cracks, moisture, and dust before routing and sealing.
- Choose V-groove width based on joint movement and sealant compatibility.
- Wear eye and skin protection when routing and applying sealant.
- Clean joints thoroughly; dry-fit sealant bead before committing to full cure.
- Protect cured work from weather during cure; document field performance.
- Identify common mistakes early and schedule maintenance for longevity.
Table of Contents
- Introduction
- Key takeaways
- Why Routing Cracks Before Sealing Improves Longevity
- V-Groove Geometry Fundamentals and Why It Matters
- Material-Specific Routing and Sealing Considerations
- Tools and Materials Checklist for Routing Cracks and Applying Sealant
- Step-by-Step Routing and Sealing Procedure
- Curing, Environmental Controls, and Field Performance Verification
- Common Mistakes, Troubleshooting, and Repair Strategies
- Inspection, Maintenance Schedule, and Ways to Optimize Longevity
- Conclusion
- FAQ
Why Routing Cracks Before Sealing Improves Longevity
Routing cracks is a preparatory step that sets the stage for better sealant performance. It helps the sealant adhere more reliably to the sides of the joint and reduces edge debonding over time.
This approach also controls the joint geometry, making movement joints predictable and easier to seal. Always compare your routing plan with the sealant manufacturer instructions to align preparation with product requirements.
How routing changes crack geometry and bonding surface
Routing a V-groove in a crack does more than just clean it out. It changes the crack’s geometry, creating a controlled shape that improves sealant adhesion.
The V-groove increases the contact area between the concrete and the sealant. More surface area means better bonding. Think of it like Velcro – more loops mean a stronger hold.
Routing also creates specific bonding angles. These angles promote full wetting, ensuring the sealant gets into every nook and cranny. No air pockets, no weak spots.
By controlling geometry this way, routing reduces stress concentrations at the crack’s edges. Less stress means less chance of the sealant failing under pressure.
Mechanical and environmental stresses that influence sealant life
Sealants face a tough job. They’ve got to withstand all sorts of mechanical stresses – movement, thermal cycling, vibration. Every time your concrete expands or contracts with temperature changes, the sealant has to stretch and compress right along with it.
Then there are environmental factors. UV rays can degrade sealants over time. Moisture can weaken them. Chemicals can corrode them. All these factors shorten a sealant’s lifespan if they’re not accounted for.
Routing cracks before sealing helps address these challenges. It gives the sealant a clean, controlled surface to bond with. And it allows you to choose a sealant that’s right for your specific conditions – one that can handle the expected movement and resist the local environmental factors.
Remember, the better you prepare the crack, the longer your sealant will last. It’s like building a house – if the foundation is solid, the rest of the structure has a fighting chance.
V-Groove Geometry Fundamentals and Why It Matters
A V-groove creates a defined trough with an apex and two flanks that influence how the sealant sits. The shape determines how thick the bead will be and where its strongest contact area lies.
Geometry affects adhesion surface and movement accommodation, so the proportions should reflect the chosen sealant type and the substrate being sealed. When in doubt, verify recommended groove dimensions with the product label or manufacturer guidance.
V-groove vs other groove profiles (U, rectangular, routed flat)
The shape of the groove is crucial. Here’s why:
V-grooves are best for flexibility and stress distribution. They create a wide base for sealant to bond with, accommodating movement better.
U-grooves and rectangular grooves can work but lack the same flexibility. Routed flat surfaces have no groove at all, making them hard to seal properly.
Choose your profile based on the substrate’s flexibility and expected movement.
Proportion principles (depth, width, and profile balance)
The size of the groove matters. Here’s how to get it right:
The depth should be enough for sealant volume needed for expected movement. Too shallow, it won’t last; too deep, it’ll overflow.
The width should provide a wide enough base for good adhesion but not so wide that it’s overfilled.
Balance depth and width based on the sealant type and substrate. Always check manufacturer guidelines for exact proportions.
Material-Specific Routing and Sealing Considerations
Different substrates respond to routing in distinct ways, so tailor your groove depth and width to the material at hand. Concrete, masonry, wood, and metal each have unique needs that impact performance.
Inspect the surface and test a small area if you’re unsure. Use manufacturer instructions or product data sheets to confirm acceptable groove sizes and acceptance criteria for the substrate.
Concrete and masonry: dealing with spalls, laitance, and efflorescence
Routing cracks in concrete or masonry surfaces requires careful preparation to ensure a long-lasting seal. Before you start, remove any loose material, such as spalls or flakes, using a chisel or wire brush.
Next, ensure the edges are sound and solid. Use a chisel or diamond routing tool to reach the solid substrate. This is crucial because laitance – the weak, cement-rich layer on the surface of concrete – can compromise your seal if not removed.
Efflorescence, the white powdery deposit often seen on masonry surfaces, doesn’t need removal unless it’s thick and flaky. It’s mainly a cosmetic issue that won’t affect your sealant’s performance.
Wood and timber: avoiding tear-out and controlling moisture
When routing wood or timber, there are a few common mistakes to avoid. These can lead to poor sealant performance and even structural issues.
- Avoid tear-out: Use sharp cutters and maintain a steady feed rate to prevent the router from grabbing the wood and tearing it out.
- Manage grain direction: Route with the grain whenever possible. Against-the-grain routing can cause splintering and reduce the lifespan of your sealant.
- Control moisture content: Ensure the wood is dry before sealing. Moisture content above 12% can lead to bond loss or decay over time.
- Avoid routing green wood: Freshly cut, unseasoned wood contains high moisture levels that can cause it to move and warp as it dries, breaking your seal.
In summary, sharp tools, careful routing technique, and proper moisture management are key to successful routing and sealing of wood and timber surfaces.
Metal and composites: corrosion, coatings, and thermal expansion
Preparing metal or composite surfaces for routing involves removing any existing coatings or corrosion. Use a wire brush or grinder to remove rust and old paint. This ensures your sealant adheres properly.
Before applying your sealant, use an appropriate primer to protect against further corrosion. This will extend the life of your sealant and prevent water from penetrating the surface.
Metal expands and contracts with temperature changes. When selecting your groove geometry, allow for higher thermal movement by using a wider or deeper V-groove. This accommodates the expansion and contraction without putting stress on the sealant.
Tools and Materials Checklist for Routing Cracks and Applying Sealant
Before you start, assemble the essential tools for routing and sealing, including cutting tools, shape guides, and measuring aids. Have a clean workspace and a place to set spent blades or bits as you work.
Gather consumables like replacement blades, sealant, backer rod if needed, and cleaning solvents. Always check the product label or manufacturer instructions for compatible tools and materials.
Routing tools, cutters, and portable equipment
Before you start routing cracks, make sure you have the right tools for the job. Here’s a checklist to ensure you’re well-equipped.
- Router: A variable-speed router is best for different substrate materials.
- Blades/Cutters:
- Concrete: Diamond or tungsten carbide blades
- Masonry: Diamond blades
- Wood: High-speed steel or carbide-tipped blades
- Metal: HSS or bi-metal blades
Wrong blade can cause excessive heat, dulling, and poor cuts.
- Collets: Ensure you have the right collet size for your router bit.
- Router bits: V-groove bits in various sizes (see ‘V-Groove Geometry Fundamentals’ earlier).
- Safety equipment: Safety glasses, hearing protection, and gloves.
- Portable power source: Extension cord or generator for remote sites.
- Clamps and supports: Secure workpieces to prevent movement during routing.
- Vacuum or dust collection system: To control dust and improve visibility.
Quick rule: Always match blade type to substrate material for best results.
Sealants, primers, backing materials, and compatibility
Choosing the right sealant is crucial. Here’s a checklist to ensure you’re using compatible products.
- Sealant type: Silicone, polyurethane, or other suitable for your substrate (see ‘Material-Specific Routing and Sealing Considerations’).
- Sealant color: Match to surrounding area for best appearance.
- Primer: Use when required to improve adhesion and seal porous surfaces.
- Backing rod: Use for wide gaps to support sealant and prevent sagging.
- Compatibility check: Ensure sealant, primer, and backing rod are compatible with each other and the substrate.
- Working time: Check pot life and working time at your job site temperature.
- Cure time: Allow sufficient time for sealant to cure before exposure to elements or traffic.
- Storage conditions: Maintain proper storage conditions (temperature, humidity) for sealants and primers.
Quick rule: Always verify compatibility between sealant, primer, backing rod, and substrate.
PPE, cleaning supplies, and site-prep items
Safety and cleanliness are key to a successful job. Here’s what you need.
- Personal Protective Equipment (PPE): Safety glasses, gloves, hearing protection, and respiratory protection for dusty environments.
- Cleaning supplies: Solvents or cleaners suitable for your substrate (e.g., concrete degreaser, soap and water for wood).
- Temporary protection: Drop cloths, tarps, or other materials to protect surrounding areas from dust or debris.
- Measuring tools: Tape measure, ruler, or caliper for accurate routing depth and width.
- Marking tools: Chalk line, pencil, or marker to mark routing lines.
- Inspection instruments: Flashlight, magnifying glass, or other tools to inspect cracks before routing.
- Site preparation: Ensure the area is clean, dry, and free of any obstacles.
Quick rule: Always prioritize safety and cleanliness for a smooth operation.
Step-by-Step Routing and Sealing Procedure
Begin with an assessment of the joint and any debris that could affect adhesion. Mark the groove outline and set the depth according to guidance from the sealant you chose.
Proceed with routing, clean the joint, and allow any dust to clear before applying sealant. Follow the sequence recommended by the manufacturer to maximize adhesion and durability, and document any deviations for future work.
Step-by-Step Process
This section guides you through the routing and sealing process, from preparation to cleanup.
- Inspect your workspace for safety. Remove any debris or obstacles.
- Put on appropriate PPE: gloves, goggles, and a dust mask.
- Check your tools and materials. Ensure everything is in working order and you have all necessary supplies.
- Mark the limits of your routing with a pencil or marker. Keep these marks visible throughout the process.
- Routing: Start at one end of the crack, maintain a steady feed rate, and keep the tool at a consistent angle. Work slowly and deliberately to avoid damaging the surface.
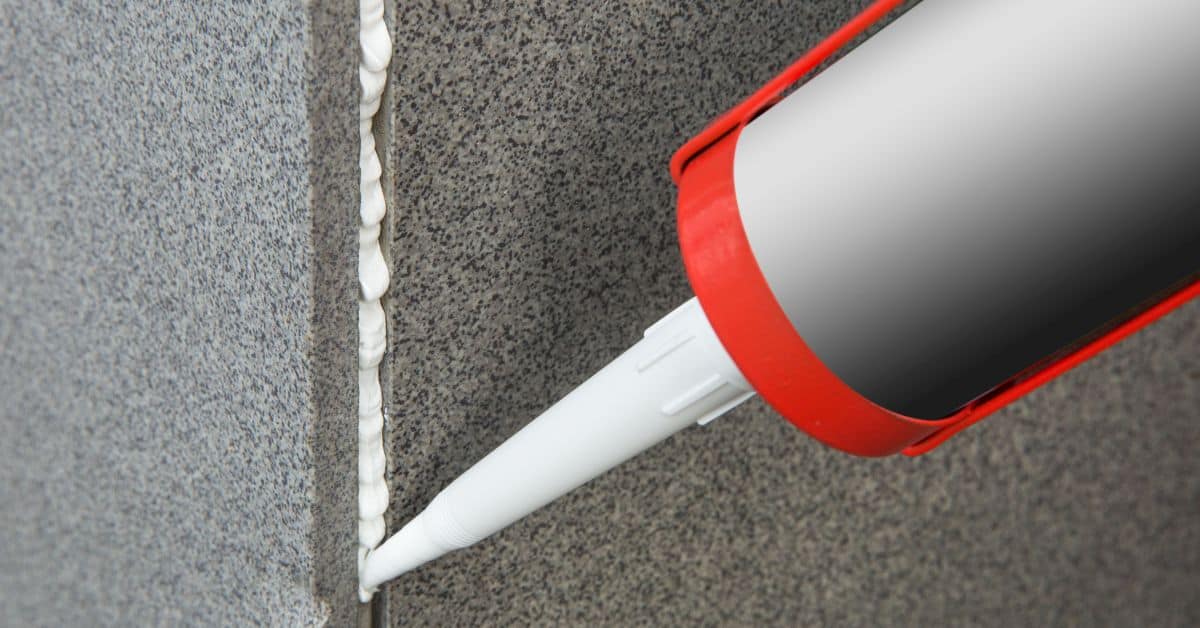
- Sealant application: Apply sealant according to the manufacturer’s instructions. Use a caulking gun or other recommended applicator.
- Tooling: Smooth out the sealant with a damp sponge or tooling blade, following the manufacturer’s recommendations for tooling time and technique.
- Clean up: Wipe away any excess sealant immediately to prevent it from setting. Dispose of used materials responsibly.
- Inspect your work. Ensure the routed groove is clean, the sealant has been applied evenly, and there are no signs of damage or improper curing.
Site assessment, marking, and determining whether to route
Before you start routing, it’s crucial to assess the crack thoroughly. This helps ensure that routing is the best solution for your specific situation.
Inspect the crack visually. Check its length, depth, and any visible signs of damage or deterioration. Use a magnifying glass if necessary.
Mark the limits of the crack clearly with a pencil or marker. These marks will serve as guides during routing.
Consider the cause of the crack. If it’s due to structural issues, routing and sealing may not be enough. In such cases, consult a professional for advice on repair or replacement.
Routing technique, speed, and control to avoid damage
Proper routing technique is key to preventing damage to the surface. Here are some common mistakes to avoid.
- Avoid rushing: Working too fast can lead to vibrations that cause damage or uneven grooves.
- Keep a steady feed rate: Maintain consistent pressure and speed for even results.
- Use the correct approach angle: Follow the manufacturer’s recommendations for your specific tool. Typically, this is around 30-45 degrees.
- Minimize vibration: Use a stable routing platform or support if possible. Vibrations can cause tear-outs and uneven grooves.
- Manage intersecting cracks: Be extra careful at intersections to avoid damaging the surface or creating weak points in your sealant.
Remember, patience and control are key when routing. Take your time to ensure a smooth, even groove that will provide a solid base for your sealant.
Cleaning, priming, sealant application, tooling, and curing oversight
After routing, it’s essential to clean the groove, apply primer if necessary, apply the sealant correctly, tool it properly, and monitor the curing process.
- Dust removal: Clean out the routed groove with a brush or compressed air. Ensure no debris remains that could compromise the sealant’s adhesion.
- Primer application (if required): Apply primer according to the manufacturer’s instructions. This improves sealant adhesion and helps prevent moisture migration.
- Sealant placement: Apply sealant evenly along the groove, following the manufacturer’s recommendations for bead size and placement.
- Tooling method: Use a damp sponge or tooling blade to smooth out the sealant. Follow the manufacturer’s guidelines for tooling time and technique.
- Curing oversight: Monitor the sealant as it cures. Check for any signs of improper curing, such as discoloration or bubbling. If necessary, adjust conditions (temperature, humidity) to facilitate proper curing.
- Optional tools: Consider renting a caulking gun with an adjustable bead size or a sealant applicator tool for better control and consistency in your application.
Curing, Environmental Controls, and Field Performance Verification
Ambient conditions influence how sealants cure, so monitor temperature and moisture where you’re working. Record site conditions that could affect performance for reference later.
Perform simple field checks like tack-free times and initial adhesion tests as recommended by the product instructions. If conditions aren’t ideal, adjust expectations or postpone sealing until they meet the allowed range.
What environmental conditions to monitor before, during, and after application
Before you start routing and sealing cracks, keep an eye on these key conditions:
Temperature: Most sealants work best between 50°F (10°C) and 90°F (32°C). Too hot or cold can slow cure time or cause poor adhesion.
Humidity: Low humidity can cause rapid curing, leading to a weak seal. High humidity can slow down cure time. Ideal range is between 40% and 70%.
Substrate Moisture: The surface should be dry before routing and sealing. Excess moisture can prevent proper adhesion.
Wind and UV Exposure: Strong winds can cause dust or debris to stick to the wet sealant, and direct sunlight (UV) can accelerate curing, leading to a weak seal. Protect the area if possible.
Simple field tests and checklists to verify adhesion and cure
Before you move on to other tasks or projects, make sure the sealant has cured properly. Here’s a simple checklist:
- Visual Inspection: Check for any signs of incomplete curing like tackiness or stickiness.
- Adhesion Pulls: If possible, perform adhesion pulls using a pull tester to ensure the sealant is properly bonded. If it’s too early, wait 24 hours and try again.
- Touch/Cure Feel Test: Gently touch the surface. It should feel firm and dry, not tacky or soft.
- Check for Bubbles: Bubbles under the sealant indicate trapped moisture or air, which can compromise adhesion.
- Look for Shrinkage: Excessive shrinkage can cause cracks in the sealant. This is more common with fast-curing products.
- Check for Contamination: Dirt, dust, or other contaminants on the surface can prevent proper adhesion.
- Inspect Joint Width and Depth: Ensure the joint is within the recommended width and depth for the sealant used. Too narrow or deep can cause problems.
- Check for Movement: If the substrate moves, it can cause stress on the sealant, leading to cracks or failure.
Quick rule: If you’re unsure about any aspect of the cure or adhesion, consult the product data sheet or contact the manufacturer. Better safe than sorry!
Common Mistakes, Troubleshooting, and Repair Strategies
Identify frequent errors such as an improper groove profile, insufficient cleaning, or substrate-incompatibility before sealing. Each mistake has a practical corrective path you can take on the spot.
When failures occur, decide between reworking the joint or targeted repairs by following the guidance in the product data sheet or manufacturer instructions. Document the issue and the chosen remedy for future maintenance.
Problems caused by over- or under-routing
Under-routing your concrete slab can lead to a weak bond with the base. This happens when there’s not enough aggregate exposed for the concrete to grip onto. You’ll see cracks and delamination, which is when the concrete peels off like wallpaper.
Check your base compaction. If it’s too soft, you’re asking for trouble. Make sure it’s properly compacted before you pour. If you’ve already poured, you might need to remove and replace the bad concrete, then redo the base.
Over-routing, on the other hand, can weaken your substrate or create excessive sealant thickness. This happens when you remove too much of the base material. The slab has nothing solid to sit on, so it cracks under pressure. Plus, excess routing leads to more concrete use and higher costs.
To fix this, stop routing immediately. If you’ve already poured, you might need to remove the bad concrete, then redo the base compaction and routing. Remember, it’s better to spend time getting the prep right than rushing through it and having to do it over.
Bond failure, edge lift, and poor tooling: causes and fixes
Bond failure happens when concrete doesn’t stick to the base. Edge lift is when concrete rises above formwork. Poor tooling leaves visible marks on the surface.
Bond failure: It’s usually due to a weak or dirty base, or no primer used. To fix:
- Clean and prep base: Remove dirt, grease, and loose material.
- Prime the base: Use a concrete primer to improve adhesion.
Edge lift: This happens when forms aren’t properly braced or base isn’t compacted enough. To fix:
- Check base compaction: Ensure it’s solid and dense.
- Brace forms: Secure them tightly to prevent movement.
Poor tooling: This is often from using worn tools or not troweling properly. To fix:
- Check and replace worn tools: Dull or damaged tools leave marks.
- Learn proper troweling techniques: Practice makes perfect with concrete finishing.
Inspection, Maintenance Schedule, and Ways to Optimize Longevity
Set an inspection cadence to catch early signs of wear, cracking, or edge debonding. Use simple visual checks and note any changes in joint appearance.
Keep sealant product records and track maintenance actions to inform resealing decisions. Use trigger points from your observations to plan timely maintenance and extend joint life.
Visual checkpoints and signs that resealing is needed
Regularly inspect your sealant to catch issues early. Here’s a simple checklist.
- Gap widening: If gaps are getting bigger, it could mean the substrate is moving or the sealant is failing.
- Cracking inside sealant: Internal cracks can indicate too much stress on the sealant. Reseal if you see these.
- Edge separation: If edges are lifting, it’s a sign that the bond is failing. Reprime and reseal.
- Staining or discoloration: These can indicate water intrusion or other issues that need addressing.
- Moisture inside joint: If you see moisture, it’s time to reseal. Moisture causes deterioration.
- Crumbling or flaking sealant: This is a clear sign of failure. Remove and replace the sealant.
- Mold or mildew growth: These can indicate moisture and need to be addressed promptly.
Quick rule: If you see any of these signs, don’t wait. Inspect further and reseal if needed.
Planned maintenance interventions and record-keeping
Maintain your sealant with regular cleaning and minor repairs to extend its life. Here’s how:
- Clean regularly: Keep dirt, debris, and contaminants away. Use a mild detergent and water.
- Inspect for damage: Check for cracks, gaps, or other signs of distress every few months.
- Perform minor spot repairs: If you catch issues early, you might only need to touch up the sealant.
- Document products used: Keep a log of the sealant product, brand, and type. This helps with future maintenance.
- Record dates of application: Knowing when sealant was applied helps plan future maintenance.
- Note environmental conditions: Record temperature, humidity, and other factors at the time of application and inspection.
Quick rule: Regular cleaning and minor repairs can extend your sealant’s life. Keep records for future reference.
Conclusion
Routing cracks before sealing pays off in safety, durability, and a clean, professional finish. When you respect groove size, clean surfaces, and proper cure, you get fewer failures and a lasting seal that looks good year after year.
Follow this practical checklist in order: verify the material and tool compatibility, inspect and dry the surface, set the V-groove to the recommended width and depth for the specific sealant, route cracks with steady, controlled motions, remove dust and debris, apply sealant into the groove, tool it flush, and then maintain proper curing conditions and timing while conducting a final surface inspection.
Avoid the common mistakes: widening cracks too much or unevenly, leaving dust or moisture in the groove, skipping masking or surface cleaning, rushing cure times, and using the wrong sealant for the material. Always wear appropriate PPE, keep the area ventilated, and work in dry, stable conditions to prevent trapping moisture or debris.
If you encounter large structural cracks, hidden deterioration, or you’re unsure about the substrate or coatings, call a professional rather than pushing ahead. When you do complete the steps safely and correctly, you’ll have a durable, long-lasting seal and peace of mind that your work will perform as intended.
FAQ
What V-groove size is acceptable if my sealant is self- leveling versus non-sag?
Check the sealant manufacturer’s label for guidance on groove width. If in doubt, aim for a groove that allows the sealant bead to sit cleanly without overflowing, and adjust based on how the product fills the gap as it cures. Local rules or project specs may have their own limits—verify on the label or with the supplier.
Can I route deeper gaps than the sealant’s backer rod is designed for?
Don’t assume. A deeper groove may trap voids or cause poor adhesion. Match the groove depth to the sealant’s recommended maximum groove depth on the product instructions, and consult the backer rod guidance if you’re using one.
Should I re-groove or widen a crack that’s already been routed and sealed?
Yes, if the old sealant failed or the crack widened. Remove the old sealant fully, clean the groove, and re-route to the new recommended size before resealing. Follow the sealant’s instructions and consider a fresh backer rod if required.
What signs indicate my V-groove size is wrong after sealing?
Look for excessive squeeze-out, poor adhesion, or a sealant that doesn’t fill the groove evenly. If you can notice the groove edges through the sealant or if the sealant looks shallow, re-check the manufacturer’s guidelines and adjust for the next pass.