

Introduction
Roof decking replacement means removing the old deck boards and installing new decking over the existing rafter system. This helps restore a flat, solid surface for roofing and prevent leaks. Plan to support the load, check for damage, and follow local rules.
A DIY approach requires careful inspection, basic tool setup, and safe working at height. You’ll need to verify board condition, spacing, and fastening methods, checking labels or manufacturer instructions for any limits. If you’re unsure, consult local building guidance and proceed with caution.
Key takeaways
- Inspect decking for rot or damage before removal to plan replacements.
- Mark joist directions and lay new decking with staggered ends for strength.
- Use proper ventilation and safety gear; fall hazards require harness on pitched roofs.
- Verify flashing and vent clearances after removing old decking to prevent leaks.
- Install underlayment and ice/water shield following manufacturer guidelines for coverage.
- Plan starter strip and edge fasteners to ensure shingle alignment and wind resistance.
Table of Contents
- Introduction
- Key takeaways
- When to Replace Roof Decking Vs. Repair
- Tools and Materials Checklist
- Preparing the Worksite and Safety Protocols
- Step-by-Step Decking Removal
- Installing New Decking: Layout and Fastening
- Dealing with Ventilation, Flashing, and Penetrations
- Underlayment, Ice/Water Shield, and Starter Strips
- Reinstalling Shingles or Roofing Covering
- Conclusion
- FAQ
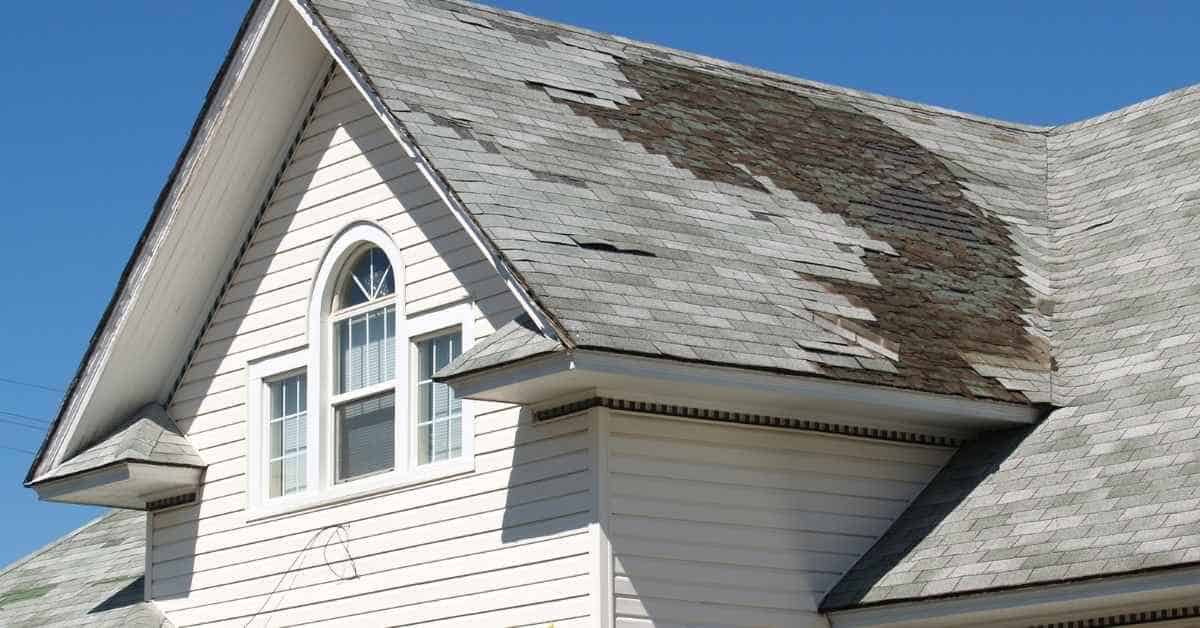
When to Replace Roof Decking Vs. Repair
Decking decisions hinge on safety, rot, and overall moisture history. Look for soft spots, widespread warping, and signs of progressive decay. Sagging framing or repeated leaks point toward replacement rather than patching.
Use objective checks like the condition of the plywood or OSB and the integrity of fasteners to gauge urgency. Verify with product labels, manufacturer instructions, or local building rules if you’re uncertain. If there is uncertain moisture history, consider a cautious approach and consult a pro for a formal assessment.
Visual and Tactile Inspection Checklist
Before you grab your tools, walk around your roof with a keen eye. This simple visual and touch test can save you from unnecessary repairs or worse, injuries.
- Soft spots: Press on the decking with your foot. If it feels soft or spongy, there might be rot underneath.
- Stains: Look for water stains around nails, at seams, or near roof penetrations. They could indicate leaks.
- Nail pops: Check if any nail heads are raised. This can happen when moisture gets in and causes the wood to swell.
- Cracked or split boards: Inspect for any cracks or splits, especially around the edges of the roof.
- Warping or cupping: Feel if the boards are warped or cupped. This can cause water to pool and lead to rot.
- Sagging areas: Check for any low spots that could indicate damaged rafters underneath.
- Nail heads below surface: If nail heads are below the surface, it’s a sign of excessive wear or rot.
- Walk test: Walk around the roof. Listen and feel for any squeaks or bounces that could indicate damaged decking.
Quick rule: If you find more than a few soft spots, stains, or other signs of damage, it’s time to consider full replacement.
Under-Roof Issues That Force Replacement
Sometimes, the problems aren’t visible from the top. Here are some hidden causes that might require a full decking replacement.
Prolonged leaks: If water has been leaking for a long time, it can cause extensive rot and damage to the rafters underneath. This is a safety hazard and needs immediate attention.
Mold and mildew: If you see or smell mold under your roof, it’s a sign of excessive moisture. Mold can weaken the structure and pose health risks.
Insect damage: Termites, carpenter ants, and other insects can cause significant damage to your roof decking. If you suspect insect activity, have it checked out immediately.
Compromised rafters: If the rafters underneath are damaged or rotted, they won’t support a new layer of decking. In this case, replacement is necessary.
When a Contractor Should Be Called Immediately
Some roof issues are too serious or unsafe for DIY repairs. Here are some red flags that require professional assessment and emergency measures.
Structural sag: If your roof is sagging, it’s a sign of severe damage to the rafters underneath. This is a safety hazard and needs immediate attention from a professional.
Large rot areas: If you find large areas of rot, it’s best to call in a pro. They have the tools and knowledge to assess the extent of the damage and make necessary repairs or replacements.
Active leaks causing interior damage: If water is leaking into your home, it can cause extensive damage to your walls, ceilings, and personal belongings. This requires immediate action from a professional roofer.
Tools and Materials Checklist
List essential items first: a solid ladder, PPE, pry bars, autility knife, and a circular saw or handsaw for decking. Add a drill with bits and a nail puller for fasteners. Include a pry bar, chalk line, and square for layout checks.
Optional but helpful items: a magnetic pry tool, cordless multi-tool, and a nailing ruler for consistent spacing. Safety gear such as gloves, eye protection, and a harness or fall-arrest system should be included. Always double-check the manufacturer instructions for any specific tool requirements.
Essential tools for demolition and installation
Before you start, make sure you have all the right tools. This checklist helps you stay organized.
- Pry bars: To remove old decking. Skip this, risk damaging roof structure.
- Circular saw: For cutting new decking to size. Wrong blade can damage material.
- Nailer (air or cordless): For quick, strong attachment. Wrong nails can split boards.
- Tape measure: To ensure accurate cuts and placement. Inaccurate measuring leads to waste.
- Speed square: For precise angles when cutting. Wrong angle affects water runoff.
- Chalk line: To mark out cuts accurately. Inaccurate marking wastes material.
- Safety glasses: Protect eyes from debris during demolition and installation.
- Work gloves: Protect hands from splinters, nails, and sharp edges.
- Ear protection: Reduce noise exposure when using power tools. Prolonged exposure causes hearing loss.
- Scaffolding or ladder: Safe access to roof. Wrong setup can lead to falls.
Quick rule: Always double-check your tools before starting work.
Recommended materials and decking types
Choose the right materials for a durable, long-lasting roof deck.
- Plywood: Common choice. 7/16″ or 1/2″ thickness recommended. Thinner plywood can sag over time.
- OSB (oriented strand board): Alternative to plywood. 7/16″ or 1/2″ thickness also recommended. OSB can swell if exposed to moisture.
- Decking grade: Use exterior-grade materials designed for roof use. Lower grades can warp, crack, or delaminate.
- Screw or nail fasteners: Both work. Screws resist wind uplift better; nails are faster to install.
- Underlayment: Install a water-resistive barrier before decking. Skipping this can lead to leaks.
- Drip edge flashing: Prevents water from getting under decking. Missing drip edge causes rot and leaks.
- Check local code: Ensure chosen materials meet building codes in your area. Non-compliance may result in fines or rework.
Quick rule: Always prioritize quality over cost when choosing materials.
Personal protective equipment and fall protection
Safety first. Here’s what you need to protect yourself from falls and injuries.
- Hard hat: Protects head from falling debris during demolition. No hard hat, risk of head injury.
- Safety harness: Secures you to the roof, preventing falls. No harness, serious fall risk.
- Anchor points: Secure harness to sturdy structure. Wrong anchor points can fail under load.
- Guardrails: Provide additional protection from falls. Missing guardrails increase fall risk.
- Eye protection: Goggles or safety glasses protect eyes from debris and harmful rays. No eye protection, risk of eye injury.
- Respirator: Protects lungs from dust and mold during demolition. No respirator, risk of respiratory issues.
- Work gloves: Protect hands from cuts, scrapes, and splinters. No gloves, increased hand injury risk.
- Steel-toed boots: Protect feet from falling objects and sharp edges. No steel-toed boots, risk of foot injury.
Quick rule: Never start work without proper PPE and fall protection.
Preparing the Worksite and Safety Protocols
Secure the work area with barriers or signage as needed to keep pets and curious neighbors out. Protect landscaping, siding, and interiors from debris with tarps and edge protection. Plan safe access and establish fall protection before removing any decking.
Coordinate with neighbors if dust or noise could affect them and contact utility companies if any lines are nearby. Follow local rules for permits or inspections as required. Always have a clear plan for weather changes and emergency steps.
Temporary Roof Covering and Weather Planning
Before you start tearing off the old decking, plan for weather. Rain can cause serious damage to your home’s interior.
Use tarps to cover the area. Secure them tightly with ropes or weights. Make sure they overlap enough to keep water out.
Schedule your work around forecasted rain. It’s better to wait a day than risk damaging your home.
Scaffolding, Ladder Use, and Site Barriers
Safety starts with stable access. Set up scaffolding or a sturdy ladder. Make sure it’s secure and level.
Use barriers to keep bystanders and pets away from the work zone. This could be cones, tape, or even a makeshift fence.
If you’re using a ladder, make sure it extends at least 3 feet above the roof edge. Secure it every 10 feet with a tie-off.
Electrical, Ventilation, and Utility Checks
Before you start working, check for any electrical fixtures on the roof. You don’t want to accidentally damage them or cause a short.
If there are vents or chimneys, make sure they’re protected. You might need to temporarily relocate them if they’re in your way.
Also, check for any utility lines. They could be damaged during work. If you’re unsure, contact your utility company for help.
Step-by-Step Decking Removal
Begin by removing shingles or roofing material to expose the decking edge. Work from the top down, carefully prying up the underlayment without tearing the roof structure. Remove nails and fasteners as you go to minimize damage.
Pattern your removal to keep the underlying framing intact, nudging decking boards free without splintering nearby edges. Keep debris organized for easy re-use or disposal. If you encounter compromised framing, halt and reassess the scope before continuing.
Step-by-Step Cleaning Process
Before you start tearing off your old roof, it’s crucial to follow a step-by-step process to ensure safety and efficiency. This sequence will guide you through preparation, main work, and final cleanup.
- Inspect the roof for any hazards like loose shingles or debris. Wear sturdy boots and gloves.
- Set up your workspace: lay out tarps at the base of your ladder to collect debris, and have a trash can nearby for nails and other small items.
- Start from the peak and work your way down in rows, removing shingles one by one. Use a pry bar or cat’s paw tool to lift them up, then slide them off.
- After each row, check for any remaining nails or debris that could cause injury. Use a magnetic nail finder to sweep the area.
- Once all shingles and underlayment are removed, inspect the roof deck for damage. If you find significant rot or structural issues, stop work immediately and consult a professional.
Shingle and Underlayment Removal Technique
Removing shingles and underlayment safely is key to preserving your roof’s structure. Here’s how to do it right.
Start at the peak, working down in rows. Use a flat pry bar or cat’s paw tool to lift each shingle up, then slide it off. Be careful not to damage the roof deck underneath.
Once all shingles are removed, you’ll see the underlayment. If it’s in good condition, carefully peel it off in large sheets. If it’s damaged or stuck, use a utility knife to cut it into manageable pieces before removing.
Never walk on the roof deck without proper footwear and caution. Wear soft-soled shoes to avoid damaging the decking, and watch your step to prevent falls.
Removing Damaged Decking and Assessing Framing
Now that you’ve removed the shingles and underlayment, it’s time to assess and remove any damaged decking.
Use a circular saw with a deep-cut blade to cut out bad sections of decking. Make your cuts along the rafters or joists for minimal damage. If you’re unsure about cutting, consult a professional before proceeding.
Once you’ve removed the damaged decking, inspect the rafters and joists underneath. Look for signs of rot, warping, or other structural issues. If you find any, stop work immediately and call a professional contractor.
Stop Point A: After Old Decking Removed
Before installing new decking, it’s crucial to inspect your roof structure and ensure everything is in good condition. Here are the tasks you must complete at this stop point.
First, check the rafters and joists for any signs of rot or damage. If necessary, use a moisture meter to test for excess moisture, which could indicate hidden leaks or water damage.
Next, inspect your roof’s ventilation. Ensure there are no obstructions in your soffit vents or ridge vent, and that they’re functioning properly. Good ventilation is key to preventing future issues with your new decking.
Installing New Decking: Layout and Fastening
Choose board orientation that suits the roof layout and ventilation needs, and plan starting edges accordingly. Space boards consistently to allow for drainage and expansion. Stagger seams to reduce weak points and follow a logical pattern across the deck surface.
Adopt a fastening pattern that matches your decking material and local guidance. Avoid common mistakes like over-tightening or driving nails too close to board edges. Verify fastening depth and alignment with the manufacturer instructions or local code references as needed.
Measuring, cutting, and fitting sheets
Start by laying out your plywood or OSB sheets on the roof. Make sure to stagger seams for strength.
Cut around any chimneys or vents using a circular saw with a fine-tooth blade. Ensure you have at least 2 inches of decking on each side of these openings.
For edge support, use blocking between joists and the first row of decking. This helps distribute weight evenly and prevents sagging.
Fastening schedule and nail/screw selection
Use 8d or 10d galvanized nails, or 2-inch screws for fastening. Nails are faster but screws provide better holding power.
Space fasteners every 6 inches along the joists and every 8-10 inches along the field of the decking. Always check local building codes for specific requirements.
Use a nail gun or drill/screw gun to drive fasteners flush with the surface, but be careful not to overdrive them into the roof structure.
Stop Point B: Structural and fastening inspection
Before moving on to the next step, it’s crucial to inspect your work. This helps catch any issues early.
- Check plumb lines: Ensure walls are straight using a level. If not, there may be rafter issues.
- Secure fasteners: Check that all nails or screws are driven flush and secure. Any wobbling could indicate a weak spot.
- Flat surface: Walk on the decking to ensure it’s flat and doesn’t sag or feel spongy.
- Rafter alignment: If rafters aren’t aligned, stop work immediately. This needs professional attention.
- Edge support: Check that blocking is secure along edges and around openings.
- Seam staggering: Ensure seams are staggered for strength. Avoid end-to-end or side-by-side seams.
- Fastener spacing: Confirm fasteners are spaced correctly according to your layout plan.
- Chimney/vent openings: Check that decking around these is secure and supported.
Quick rule: If you find any issues, pause work immediately. It’s better to address problems now than after installing shingles.
Dealing with Ventilation, Flashing, and Penetrations
Reinstall or replace roof vents and ensure vent pathways are clear and properly seated. Inspect and renew flashing where needed to direct water away from joints. Seal all penetrations to prevent leaks and maintain ventilation paths.
Align flashing with the new decking and ensure transitions are smooth across joints. Verify that any flashing materials meet manufacturer instructions and local code requirements. Double-check clearance around vents and chimneys before finishing.
Proper flashing installation around chimneys and skylights
Flashing is your first line of defense against water intrusion. Here’s how to install it right:
Chimneys: Use step flashing, base flashing, and counter flashing. Install step flashing up the sides of the chimney, overlapping each piece. Place base flashing at the bottom, lapping under the shingles. Secure counter flashing over the step flashing, bending it around the chimney.
Skylights: Use a combination of step and pan flashings. Install step flashing as with chimneys. For pans, place them under the skylight’s base, ensuring they’re sloped to direct water away from the opening. Seal all seams with roofing cement.
Re-establishing ridge, soffit, and eave ventilation
Maintaining proper airflow prevents moisture buildup. Here’s how to ensure your roof breathes:
Ridge vents: Install them along the peak of your roof. Ensure they’re well-sealed but allow for airflow. If you’ve added insulation that blocks intake vents, install baffles at the eaves.
Soffit and eave vents: These provide intake air. Make sure they’re not blocked by insulation or other obstacles. If necessary, add more vents to maintain a balanced system (equal intake and exhaust).
Stop Point C: Water-tightness verification
Before laying underlayment, check your work for leaks. Here’s how:
Inspect all flashings and penetrations. Look for any gaps or cracks. Use a garden hose to simulate rain, checking for leaks around chimneys, skylights, and vents.
If you find any issues, address them immediately. If you’re unsure, don’t hesitate to call a professional roofer. It’s better to be safe than sorry when it comes to your roof.
Underlayment, Ice/Water Shield, and Starter Strips
Select underlayment layers that suit your climate and roof setup, and place them in the correct order. Place ice and water shield in vulnerable areas per instructions, ensuring proper overlap and coverage. Apply starter strips to create a solid base for shingles and consistent edge alignment.
Follow the installation order for all layers and verify that overlaps and fasteners meet the product labeling. Do not skip required treatments in valleys or eaves; consult the label if you’re unsure. If in doubt, compare against manufacturer guidance or local building rules before proceeding.
Choosing the right underlayment for your climate
The first step in protecting your roof is choosing the right underlayment. You’ve got two main options: synthetic and felt.
Synthetic: These are more durable, tear-resistant, and can last longer than felt. They’re great for all climates but shine in hotter regions where they won’t degrade as quickly.
Felt: Felt underlayment is cheaper but less durable. It’s fine for cooler climates, but it degrades faster in heat and can absorb moisture, leading to mold or mildew growth.
Now, where does the ice/water shield come in? You’ll want that in vulnerable areas like eaves, valleys, and roof-to-wall transitions. It provides an extra layer of protection against water intrusion.
Installation best practices and overlap methods
Once you’ve picked your underlayment, it’s time to install. Start from the bottom up, working your way towards the ridge.
Overlaps: Overlap each sheet by at least 4 inches. For ice/water shield, overlap by 6 inches in vulnerable areas. This ensures no water can sneak through.
Fastener placement: Drive fasteners every 6-8 inches along the seams and edges. Keep them within 1 inch of the edge but not too close to avoid splitting the underlayment.
Keep your underlayment flat and wrinkle-free. Wrinkles can trap water, leading to leaks. If you’re working in windy conditions, consider using temporary fasteners to keep it secure until you can fully install it.
Stop Point D: Final pre-shingle inspection
Before you start slapping on those shingles, it’s time for a final check. This ensures your underlayment is doing its job and there are no surprises hiding underneath.
- Slope-drain clearance: Make sure nothing is blocking water from draining off the roof. Debris can cause water to back up and find its way into your home.
- Secure flashings: Check all flashings around chimneys, skylights, and vents. They should be securely fastened with no gaps or tears.
- Continuous underlayment: Ensure the underlayment is laid in continuous sheets with proper overlaps. Any gaps can let water in.
- Ice/water shield placement: Confirm the ice/water shield is installed correctly in vulnerable areas.
- Nail/screw heads: Check for any exposed nail or screw heads that could puncture the underlayment. If found, cover them with a washer.
- Wrinkles and tears: Inspect for any wrinkles or tears in the underlayment. These can trap water and lead to leaks.
- Proper ventilation: Ensure your roof has adequate ventilation to prevent moisture buildup in the attic.
- Professional review: If you find any issues, consider having a professional roofer take a look before installing shingles. It’s better to catch problems now than after you’ve spent money on new shingles.
Quick rule: If in doubt, don’t rush. A thorough inspection now can save you headaches later.
Reinstalling Shingles or Roofing Covering
Reapply shingles or your chosen roofing covering in alignment with the new decking layout and underlayment. Maintain consistent courses and staggered seams to enhance waterproofing. Ensure rows seat flush and secure without causing buckling.
Verify overlap and edge treatments follow the starter and flashing guidelines, and avoid overdriving fasteners. Check with the manufacturer instructions or local code references if you’re unsure about specific shingle replacement steps. Finalize with a careful inspection of all seams and penetrations.
Starter courses, field shingles, and ridge cap details
Start by laying your starter strips along the eaves. These are special shingles that provide a solid base for your roof covering.
Stagger your field shingles to create a tight, overlapping pattern. This helps keep water out and ensures longevity of your roof.
For ridge caps, use half-cut shingles or specialized ridge cap shingles. Secure them with extra nails for better wind resistance.
Integrating flashing and roof accessories
Step flashings should be installed along walls where the roof meets. They overlap your shingles and direct water away from wall surfaces.
Counterflashings go over step flashings, protecting them from weather damage. Make sure they’re tightly sealed to prevent leaks.
For chimneys and skylights, use flashing kits designed for those specific areas. Follow manufacturer’s instructions for a secure fit.
Final cleanup and waste disposal
Safely remove all debris from your roof and surrounding area. Use a tarp to collect materials for easy disposal.
Check local recycling options for old shingles. Some may be recyclable, depending on your location.
Restoring your site involves replacing any damaged landscaping or structures. Make sure everything is back in working order before you call it a day.
Conclusion
Safety and durability drive everything from the first cut to the last shingle. When you finish, your deck should look straight, seal water, and stay strong through weather without leaking or warping.
Check in plain terms: verify deck boards are solid and square, fasteners are driven flat, edge exposure is even, ventilation and flashing are properly sealed, underlayment and ice/water shield are laid out correctly, and the roofing cover is reinstalled with proper starter strips. Do the work in the same order you planned on site, test a small area first, and walk the edge for gaps or loose pieces before calling it done.
Common mistakes to avoid include skipping ventilation, underestimating the importance of proper flashing where pipes and chimneys pass through, and rushing the seal around penetrations. Always use the right fasteners for the deck material, keep hands, eyes, and ladder feet in good condition, and double-check heights and alignment before nailing final rows. If you’re unsure about weather exposure, roof slope, or flashing details, it’s wiser to call a pro than push ahead and risk leaks, collapse, or costly damage. Stay methodical, stay safe, and you’ll finish with a roof that holds up and looks right.
FAQ
What signs should trigger a stop to re-evaluate during decking removal?
If you find rotten framing, soft spots, or shadows that indicate moisture intrusion, stop and assess. Check for hidden damage beyond the first layer you can see. Refer to the decking and framing manufacturer instructions for repair limits before proceeding.
How do I verify the existing decking is suitable for a new installation?
Look for intact framing, uniform joist spacing, and no widespread rot or insect damage. If you see sagging, cracks, or a lot of flex, you may need to reinforce or replace framing first. Check the product labels or instructions on what to reuse and what to replace.
How should I handle ventilation openings, vents, and penetrations during replacement?
Plan around every vent, chimney, and pipe. Ensure you maintain proper clearance and reinstall flashing per manufacturer guidance. If flashing details aren’t clear, consult the vent or shingle supplier for their recommended method.
What checks should I do after installing new decking, before finishing?
Check for secure fasteners and a flat, evenly supported surface. Confirm misalignment or high spots are addressed and that there are no obvious gaps around penetrations. Review the underlayment, ice/water shield, and starter strips instructions to ensure compatibility with the new deck.