
Introduction
Replacing rusted metal lath in a small area means cutting out the corroded section, fitting a matching piece of new lath, and fastening it so the patch ties into solid surrounding material. Identify the rotted or rust-stained parts and pick a replacement lath type that matches or is compatible; check product labels or manufacturer instructions for specific thickness and corrosion resistance. Tools are basic site tools like snips, a pry bar, and a drill or hammer, plus personal protective gear.
Decide patch boundaries where the old lath is sound and the new piece can overlap onto solid backing; if you’re unsure how far to extend the patch, inspect the substrate and follow manufacturer or local guidance. For fasteners, use anchors or nails suitable for your substrate and the lath type and check the fastener instructions for length and spacing; if you can’t find that information, consult the product label or a local supplier. Keep the repair tidy so plaster or mortar keys into the new lath and matches the surrounding finish.
Key takeaways
- Inspect for rusted, bubbled, or loose lath edges along patch boundaries.
- Wear gloves and eye protection; isolate work area to prevent debris spread.
- Use a rigid, straightedge to check metal lath alignment and boundaried cuts.
- Secure new lath with corrosion-resistant fasteners per manufacturer instructions and load-bearing considerations.
- Patch boundaries must tie into existing substrate without creating gaps.
- Verify overall patch is flush before applying base coat and lath finish.
Table of Contents
- Introduction
- Key takeaways
- Assessment: Identifying Rusted Metal Lath and Scope of Damage
- Safety Precautions and Site Containment
- Tools and Materials Checklist
- Removing Damaged Metal Lath Without Harming Surrounding Substrate
- Preparing the Surface and Patch Boundaries for New Installation
- Choosing Fasteners for Small-Area Lath Repairs
- Installing Replacement Metal Lath and Finishing Integration
- Ensuring Structural Integrity and Long-Term Durability
- Conclusion
- FAQ
Assessment: Identifying Rusted Metal Lath and Scope of Damage
Start with a hands-on, layer-by-layer inspection: look for surface rust, areas where rust has eaten through the lath, loose or sagging plaster, and any deterioration of the backing behind the lath. Use a flashlight, straightedge, and gentle probing to test bond and soundness, and use a moisture meter where corrosion or damp stains are present.
Decide whether a small patch will do by documenting how much contiguous lath is compromised versus how much remains fully bonded; note signs that suggest hidden damage or active moisture intrusion that could require a larger repair or professional evaluation. Record the findings with photos (include a ruler or scale), labeled boundaries, measurements of the proposed patch, and a quick sketch showing layer conditions and any utilities or hazards behind the wall.
Visual signs of corrosion and lath failure
The first step is to visually inspect the affected area. Look for these common signs that indicate your metal lath is compromised:
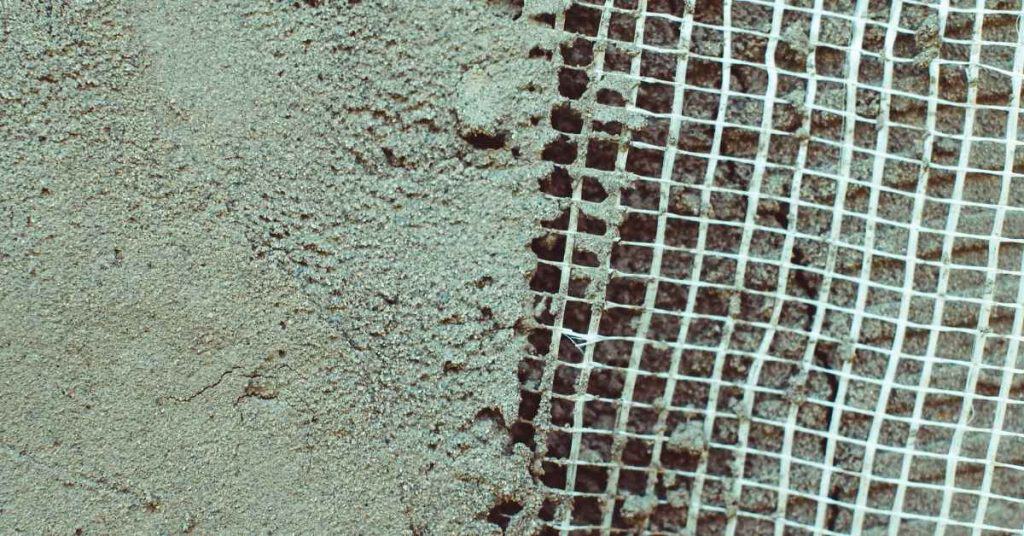
Rust staining: Brown or reddish stains on the surface of the plaster can signal rust from the lath behind.
Flaking and delamination: If large pieces of plaster are falling off, or you see cracks where the plaster is pulling away from the wall, this could mean the lath beneath is failing.
Loose or missing keys: Metal lath has ‘keys’ – small projections that help hold the plaster in place. If these are loose or missing, it’s a sign of trouble.
Probing and confirming hidden damage
After your visual inspection, use non-destructive methods to probe for hidden damage:
Gently tap the wall with a hammer. A dull thud could indicate a void behind the plaster, suggesting lath failure.
Use a small opening – like a tiny hole drilled or a small section cut out – to peek inside and check for rust on the ribs of the lath. Be careful not to damage any utilities that might be hidden behind the wall.
If you suspect more extensive damage, consider cutting a slightly larger test access to verify backing and rib corrosion. This will give you a better idea of the scope of the repair needed.
Safety Precautions and Site Containment
Protect yourself and occupants with appropriate PPE: safety glasses or face shield, cut-resistant gloves, hearing protection when using power tools, and a respirator fitted to the expected dust or lead/paint exposure—check product labeling and local rules for cartridge selection. Establish a fit-check protocol for masks and advise occupants to vacate or stay clear of the work zone while containment is active.
Contain dust and debris by sealing the work area with plastic sheeting, creating a negative-air or local exhaust flow if possible, and using HEPA-equipped vacuums for cleanup; prefer wet methods when practicable to reduce airborne dust. Post clear signage, protect HVAC intakes, establish a controlled waste stream for metal and any suspect coatings, and verify cleanup and air-quality considerations before restoring full access.
PPE, Ventilation, and Dust Suppression
Respiratory Protection: Use a respirator with appropriate cartridges for dust or paint. This could be an N95, P100, or a half-face respirator with organic vapor cartridges if you’re dealing with old paint.
Eye Protection: Wear safety glasses or goggles to protect your eyes from debris and metal fragments. If you’re using power tools, consider wearing a face shield as well.
Gloves: Use cut-resistant gloves to protect your hands from sharp edges on the rusted lath. Also, wear disposable gloves underneath for extra protection against any contaminants.
To reduce airborne particles and fumes during removal, consider using a HEPA vacuum or wet cutting methods where feasible. Keep windows open for ventilation if possible, but avoid creating drafts that could spread dust around.
Containment, Waste Handling, and Cleanup
Temporary Barriers: Use plastic sheeting or enclosures to isolate the work area from adjacent spaces. This helps contain dust and debris within the work zone.
Drop Cloths: Lay down drop cloths or tarps on the floor to catch any falling debris and make cleanup easier. These can be reused or disposed of with your waste materials.
Waste Handling: Rusted metal lath should be handled as hazardous waste due to potential lead or other toxic contaminants. Check local regulations for disposal methods. Contaminated plaster may also need special handling, so keep it separate from regular trash.
For cleanup, use a HEPA vacuum to remove any remaining dust and debris. Wipe down surfaces with a damp cloth to ensure all particles are removed. Always wear your PPE during these processes to protect yourself from any lingering contaminants.
Tools and Materials Checklist
Gather basic hand tools (hammer, pry bar, chisel, utility knife, jointer/spackle knife) and small power tools (drill/driver with low-speed control, oscillating tool, mixing drill) plus finishing tools (hawk, trowel); check blade sharpness and battery charge before starting. Include inspection tools—flashlight, straightedge, moisture meter—and an appropriate respirator and gloves for safety.
Compile replacement materials with options for different budgets: new metal lath or reinforced mesh, compatible patching compounds or plaster mixes, bonding agents, and corrosion-resistant fasteners or wire ties; read product data sheets to ensure compatibility. Prepare surface-cleaning supplies, rust-treatment options, and backup alternatives such as ready-mixed patches or polymer meshes for lower-cost repairs, and plan the installation sequence from clean substrate to final coat.
Essential Tools and Fastener Options
Before you start, ensure you have the right tools and fasteners for test fitting. Here’s a quick checklist.
- Snips: For cutting lath. Confirm they’re sharp to avoid dull cuts that weaken lath.
- Nibblers: For making small holes in lath. Ensure the blade is secure and in good condition.
- Drill: For pilot holes and driving screws. Check battery charge and bit condition.
- Hammer: For tapping lath into place. Confirm it’s not damaged to avoid damaging lath.
- Pliers: For bending wire ties. Ensure they’re sturdy enough to grip tightly.
- Fasteners (screws/nails/wire ties): Bring a variety for test fitting. Confirm they match your lath type and wall material.
- Tape measure: For accurate cutting and spacing. Ensure it’s calibrated correctly.
- Level: For ensuring lath is straight. Check it’s in good working order.
Quick rule: Always test fit your fasteners before starting to avoid delays.
Replacement Lath and Accessory Materials
Choose the right replacement lath and accessories for a durable patch. Here’s what you need:
- Metal lath or reinforced fiberglass mesh: Choose based on your budget and wall type. Metal is stronger, mesh is cheaper.
- Corrosion-resistant finish (for metal lath): Galvanized or stainless steel for longevity. Check the label to confirm.
- Plaster or patching compound: Choose one that matches your existing wall material and texture.
- Bonding agent or exterior-grade plaster mix: Essential for adhesion. Confirm it’s compatible with your chosen lath and compound.
- Corrosion-inhibiting wire ties or fasteners: For securing lath to the wall. Check they’re suitable for your wall material.
- Waterproofing/sealant (if required): Essential for exterior walls or areas prone to moisture. Choose one that’s compatible with your compound.
- Underlayment or scratch coat: For preparing the surface before applying lath. Ensure it matches your wall material and texture.
Quick rule: Always choose materials that are compatible with each other to avoid adhesion issues.
Removing Damaged Metal Lath Without Harming Surrounding Substrate
Map the damaged area and mark boundaries so you only remove the corroded lath and keep sound plaster intact; identify where the lath fastens to studs or sheathing and plan cut lines to leave clean, square edges. Turn off nearby power and wear eye and respiratory protection, then protect adjacent surfaces with tape, thin plywood, or drop cloths to prevent accidental gouging.
Use controlled techniques—score and cut small sections with an oscillating tool or carefully pry with hand tools instead of heavy hammer blows—to separate lath while minimizing vibration and cracking of surrounding plaster. Collect metal fragments as you go, inspect the exposed substrate for hidden rot or loose plaster, and document the condition and exact boundary for the re-lath and patching plan.
Cutting, disengaging, and removing the lath patch
Start by scoring the plaster along your mapped boundaries using a utility knife or oscillating tool with a fine-tooth blade. This helps prevent cracking as you remove the lath.
Use tin snips to cut the metal lath along these scored lines, ensuring you don’t cut into any solid framing members behind it. If you encounter nails or screws, use pliers or a screwdriver to carefully remove them without disturbing the surrounding plaster.
Once cut, gently pry the lath away from the substrate using a flathead screwdriver or a pry bar. Work slowly and deliberately to avoid damaging the surrounding area. If you encounter resistance, it might be due to rusted fasteners. In this case, be patient and work carefully to avoid breaking the plaster.
Collect all removed metal fragments as you go to prevent any substrate damage during removal or cleanup.
Minimizing damage to adjacent plaster and framing
To protect the surrounding plaster, apply painter’s tape along the edges where you’ll be working. This creates a barrier that helps prevent nicks and gouges.
For deeper cuts or when removing larger sections of lath, consider using temporary clamps or backing support. A piece of thin plywood or scrap wood can be clamped onto the surrounding plaster to distribute force evenly and prevent damage.
When cutting or prying, make sure your tools are sharp and in good condition. Dull tools require more force and can cause unnecessary damage. Also, keep your cuts shallow. Deep cuts into the substrate can compromise its structural integrity and lead to further issues down the line.
If you encounter any resistance or signs of hidden rot behind the lath, stop immediately and reassess the situation. It might be necessary to extend your repair area to ensure all damaged material is removed.
Preparing the Surface and Patch Boundaries for New Installation
Begin by removing loose rust and flaking material back to sound metal and wiping the area clean; photograph and note any moisture staining, hollow-sounding plaster, or compromised backing found during this prep. Use an appropriate rust converter or inhibitor per product instructions to stabilize remaining corrosion, and follow with a compatible primer when required to promote bond.
Repair any soft or crumbling substrate with a suitable patch or backer material, then lay out precise, square patch boundaries that provide secure anchorage for the new lath and permit feathering into existing plaster. Choose backing and fastener types that match the substrate and lath, roughen edges to aid adhesion, and apply any required bonding agent so the new lath and first coat will integrate without voids.
Rust treatment and substrate cleaning
Begin by removing loose rust with a wire brush or scraper. Use safety glasses to protect your eyes from debris.
Apply a rust converter to stop active corrosion. Follow the manufacturer’s instructions for application and drying times.
Next, clean the substrate using a suitable cleaner or degreaser. This ensures that any patching compounds or bonding agents adhere properly.
Edge preparation and backing reinforcement
Use a utility knife to cut clean, square edges around the repair area. This ensures a neat, even patch.
Install backing strips or clips along the edges where new lath will meet existing lath. These provide support and prevent bulging at the joint.
If required, apply a layer of fresh cement board or rigid foam insulation behind the repair area to provide additional support for the new lath.
Choosing Fasteners for Small-Area Lath Repairs
First identify the substrate (wood framing, concrete, or existing sheathing) and the environmental exposure (dry interior, damp area, or exterior-facing) so you can narrow fastener choices to compatible materials. Look for corrosion-resistant options—galvanized, stainless, or polymer-coated fasteners—and check manufacturer guidance or product data sheets to confirm suitability for your lath and substrate.
Consider head style, thread type, and required embedment to ensure good pull-out resistance without risking plaster cracking at the boundary; use secure spacing and proper bite into backing or framing. If unsure about local code or specific anchorage requirements, verify with product documentation or a professional and inspect installed fasteners for tightness and corrosion protection before finishing.
Fastener types and their pros/cons
When it comes to small-area lath repairs, you’ve got a few options for fasteners. Each has its own strengths and weaknesses.
Nails are quick and easy to drive in. They’re great for attaching lath to wood studs but can spin out if not driven straight or if the substrate is soft.
Screws provide better pull-out resistance than nails. They’re ideal for masonry and other hard substrates, but they take longer to install. Stainless steel screws offer excellent corrosion resistance, while galvanized ones are more affordable but less resistant to rust.
Other options include staples, which work well with thin lath and soft substrates, and toggle bolts, useful for hollow walls or where extra holding power is needed. Choose the right one based on your substrate and environment.
Fastener placement, spacing, and corrosion resistance
Proper placement and spacing of fasteners ensure a secure attachment. For lath repairs, aim for about 4-6 inches apart along the edges and 8-12 inches in the field.
Use stainless steel or polymer-coated fasteners in wet or exterior-exposed locations to resist corrosion. Keep them at least an inch away from moisture sources like plumbing leaks or exterior walls.
Consider using sleeve washers with your fasteners to distribute stress and protect the lath from cracking. Also, ensure your fasteners penetrate the substrate enough to provide proper anchorage – typically 3/4 inch into wood studs or fully embedded in masonry.
After installation, inspect your work for any signs of failure, such as cracks around the fasteners or plaster pulling away from the lath. Address these issues promptly to prevent further damage.
Installing Replacement Metal Lath and Finishing Integration
Fit the replacement lath so it aligns with the surrounding plane and ties into existing material with minimal overlap; select a lath type compatible with the existing plaster base and follow any local rules or product guidance for mesh size and corrosion resistance. Trim and pre-fit pieces, cut around openings, and maintain consistent spacing so the key for the plaster will form uniformly.
Fasten and tie the new lath into the backing and adjacent lath using specified ties or clips, keeping movement joints and corner beads in mind to avoid stressing the repair. Prepare the surface for the bonding/scratch coat per the patch system’s instructions, apply successive coats to achieve the desired thickness and texture, and plan curing and inspection steps to blend the repair seamlessly with surrounding finish.
Overlap, lapping patterns, and tie-in methods
When fitting new metal lath, avoid overlaps where possible. But if necessary, keep them small – no more than 2 inches wide.
Lap joints should run vertically to allow for expansion and contraction. Stagger lapping patterns on adjacent rows by half the mesh size for better strength.
Tie new lath into existing using tie wires or clips every 4-6 inches along edges and at intersections with old lath. Use a continuous run where possible to prevent cracking.
Applying scratch coat and blending finishes
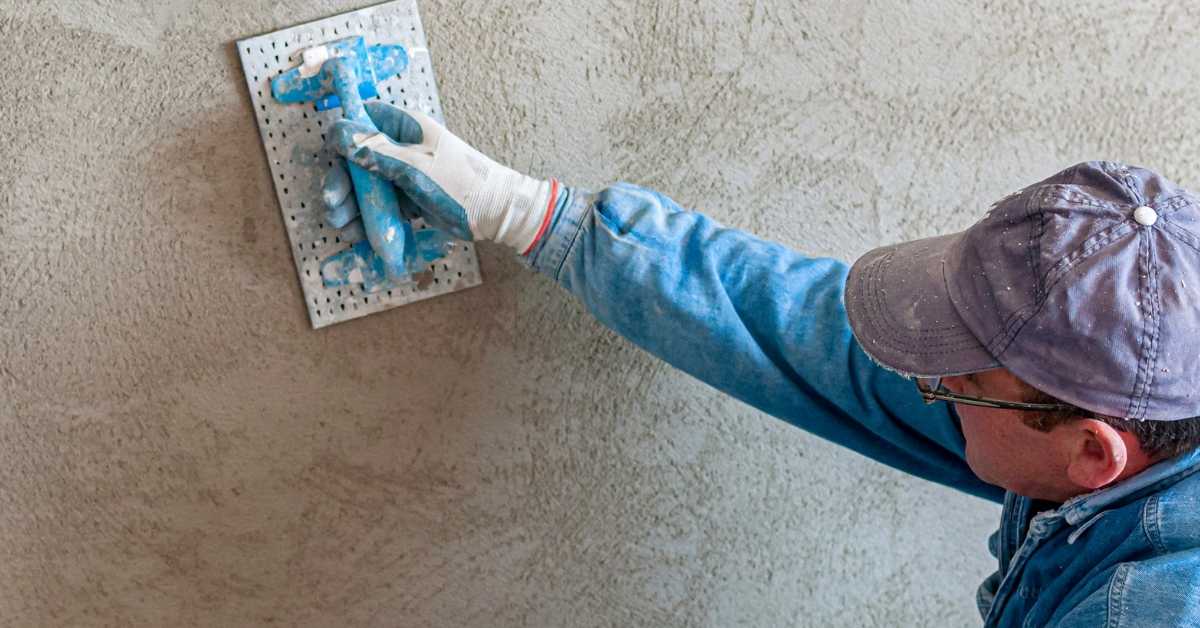
Apply a bonding coat first, ensuring it’s thick enough (around 1/8 inch) to key into the new lath. Use a trowel with deep teeth for better adhesion.
Next, apply the scratch coat. Work it into the mesh with a hawk and trowel, creating grooves (‘scratches’) that help lock in subsequent coats. Let it cure according to product instructions.
For the final finish coat, start at the bottom of the repaired area and feather outwards to blend with existing texture. Use a hawk and trowel or a hopping knife for best results. Keep a consistent pressure and speed to maintain an even texture.
Ensuring Structural Integrity and Long-Term Durability
Confirm that patch edges are clean, square, and well-prepared so new materials will form a continuous, bonded plane with the existing lath and plaster; feather edges and avoid large gaps that concentrate stress. Choose corrosion-resistant lath and reinforcement appropriate for the exposure—refer to product guidance when selecting galvanized, stainless, or polymer mesh for small-area repairs.
Address moisture control behind the repair by checking for drainage paths, sealing penetrations, and considering vapor control or flashing where water exposure is possible. Use compatible fasteners and bonding systems, plan for movement management with joints or crack-bridging approaches, and set a schedule for periodic inspection to catch early signs of corrosion or failure.
Reinforcement, bridging gaps, and backing checks
Before installing new lath, check for any large voids behind the patch. For gaps larger than 1/2 inch, use expansion foam or gypsum-based backing to fill them.
Verify the strength of your backing material. If it’s weak, reinforce it with wood or metal furring strips. This ensures proper load transfer and prevents the patch from failing again.
Use bridging lath where needed to span gaps between existing lath and provide additional support for your patch. This helps distribute loads evenly and reduces stress on the repair area.
Moisture management and corrosion prevention
Moisture is the root cause of rusted metal lath. To prevent repeat failures, control moisture behind your patch.
Install a vapor barrier behind the lath to stop moisture from penetrating. Use flashing at the edges to direct water away from the patch and ensure proper drainage paths.
Choose corrosion-resistant materials for your repair. For small-area repairs, consider using galvanized or stainless steel lath. If you’re using metal lath in a high-moisture area, consider reinforced polymer mesh as an alternative.
Apply a corrosion-inhibiting primer to the new lath before installation. This provides an extra layer of protection against moisture and corrosion.
Conclusion
The core idea is simple: replace only the rusted lath in a controlled patch, using proper fasteners and clean edges so the repair lasts and looks right, without compromising the substrate or safety.
Before you finish, confirm you have the right fasteners for the patch size, clean the patch boundaries to a true edge, secure the new lath without overdriving nails, and test the area for firmness and alignment. Work in a small area first, protect surrounding material, and document any unusual findings as you go.
Common mistakes to avoid include using the wrong fastener type or length, overcutting or undercutting patch edges, and skipping safety containment or proper support during removal. Wear goggles and gloves, keep a tidy workspace, and double-check your fastener schedule and substrate condition before finaling the install. If the damage extends beyond a small area, or the substrate shows deep deterioration, stop and call a professional to prevent costly failures later on.
If you do proceed, plan the steps, pace yourself, and verify every stage—you’ll finish with a durable repair that blends in and holds up. Stay focused, stay safe, and you’ll handle it like a pro.
FAQ
What kinds of metal lath might I find, and how can I spot rusted sections?
Metal lath comes in different forms, like expanded metal and welded wire varieties. Look for sections that are flaky, bubbled, or visibly rusty; rust often starts at edges or where fasteners were placed. If you can’t tell, check the manufacturer’s guidance for the exact type you have.
What tools do I need to patch a small area of metal lath, and what are the basic steps?
Have a pair of tin snips or aviation snips, hammer, needle-nose pliers, and a metal rasp or file. Cut a patch slightly larger than the damaged area, shape it to fit, and secure with appropriate fasteners. Follow the patching sequence from the patch boundary outward and avoid over-bending the lath.
How should I secure new lath pieces in a small repair area?
Use fasteners that are compatible with the existing lath type and substrate, and place them at regular intervals near the edges. Tie or wire the patch to the surrounding lath when needed to prevent sagging, then ensure the patch lies flat without sharp edges sticking out. Check manufacturer instructions or label guidance for correct fastener type and spacing.
What about materials and adhesion for the patch to ensure lasting durability?
Choose patch material that matches your lath (same gauge or close) and use a compatible contact patch adhesive if required by the system. Clean the area, avoid thick adhesive buildup, and follow the product label for cure times and surface prep. If in doubt, verify with the lath or plaster product instructions and local rules before proceeding.