
Introduction
Repairing drywall after a plumbing leak means drying the area, assessing damage, and preparing for a rebuild.
Start by removing standing water and letting the space dry thoroughly before touching the wall. Check for soft spots or blistering drywall and note any areas that need removal. Then look for mold signs like stains or musty odors and address them before rebuilding. Plan the rebuild by removing the damaged drywall, treating any affected framing if necessary, and installing new panels according to what the product label and local rules allow. If you’re unsure, pause and verify guidance with the label or your local building authority.
Key takeaways
- Shut off water at source immediately and secure area to prevent spills.
- Map moisture with two-directional tests; photograph spots for reference later purposes.
- Use dehumidifiers and air movers sized for room; orient for crossflow.
- Inspect for mold risk, conduct simple tests per label instructions; discard suspect material.
- Contain and remove moldy drywall with proper PPE; seal containment, minimize airflow.
- Rebuild steps: hang, tape, finish, and paint following manufacturer and code guidance.
Table of Contents
- Introduction
- Key takeaways
- Immediate Safety, Shut-Off, and Containment
- Initial Damage Assessment and Moisture Mapping
- Drying Strategy and Equipment Selection
- Mold Inspection, Risk Assessment, and Testing
- Containment, Removal, and Mold Remediation Best Practices
- Removing and Replacing Damaged Drywall
- Rebuild Steps: Hang, Tape, Finish, and Paint
- Tools and Materials Checklist; Material Specs and Standards Explained
- Conclusion
- FAQ
Immediate Safety, Shut-Off, and Containment
Act quickly to reduce risk to people and property. Shut off the main water supply and shut off power to the affected area if you can do so safely. If you’re unsure, call a licensed professional for the shut-offs and safety steps.
Look for electrical hazards and avoid standing water. Use PPE such as gloves, eye protection, and a mask, and set up containment to keep the area from spreading dust and moisture. If electrical panels or outlets are wet, treat them as a life-safety risk and contact a pro for assessment.
Turn off water and electricity
First, safety comes first. You need to isolate the water supply and cut power to wet areas.
Water: Find your main water shut-off valve, usually near where your main water line enters your home. Turn it clockwise to close it.
Electricity: If any outlets or switches are wet, do not touch them. Call a professional electrician immediately. Otherwise, locate your main electrical panel and turn off the power to affected areas.
Initial containment to prevent spread
Quick action can stop water damage from spreading. Here’s how:
Block off rooms: If possible, close doors and use towels or rags to block gaps under doors to contain the water.
Absorbent materials: Use old towels, rags, or even cut-up sheets to soak up standing water. Place them around the affected area.
Protect unaffected surfaces: Move furniture away from wet areas if you can. Cover dry furniture with plastic sheeting to protect it from potential water drips.
Documenting damage for insurance and planning
Photographing and noting the damage is crucial for your insurance claim and for contractors’ estimates.
Photographs: Take pictures of all affected areas, including water stains on ceilings or walls that may not be immediately visible. Also, photograph any obvious signs of where the leak started.
Locations and timestamps: Make note of exactly where the damage is located, and when you first noticed it. This can help your insurance adjuster determine the extent of the leak’s spread over time.
Preserve records: Keep all your notes, photos, and any communication with your insurance company or contractors in a safe place. You may need to refer back to them later.
Initial Damage Assessment and Moisture Mapping
Do a systematic walk-through to identify all affected spaces, including adjacent rooms that may be hidden from sight. Open access panels or replace drywall temporarily to check behind walls for moisture and staining. Note whether structural members show signs of warping, softness, or rust on metal components.
Use moisture-detection tools and a simple visual check to map the extent. Verify instrument readings against product labels or manufacturer guidance. If you suspect structural involvement, consult a professional before further work.
Visual inspection checklist
Before you start any repairs, use this checklist to assess visible damage from your plumbing leak.
- Ceiling stains: Check for water stains or discoloration on the ceiling. If present, they indicate a leak above.
- Wavy or buckled drywall: Feel and look for any warped or wavy sections. These are signs of hidden moisture.
- Baseboard swelling: Check baseboards for any signs of swelling or separation from the wall. This indicates water damage at floor level.
- Odor: Sniff around affected areas. A musty smell could indicate mold growth.
- Adjacent rooms: Inspect neighboring rooms for any signs of water intrusion, especially on ceilings and walls.
- Flooring issues: Check floors for soft spots, warping, or lifting, which can indicate hidden water damage.
- Electrical fixtures: Look at light switches and outlets. If they’re wet or discolored, turn off power to that circuit immediately.
- Structural members: Inspect visible framing, joists, and studs for any signs of water damage or weakening.
Quick rule: Don’t skip this step. Visible damage often points to hidden issues.
Using moisture meters and thermal imaging
Moisture meters and infrared (IR) cameras help you find hidden water pockets and assess their severity. Here’s how to use them.
Moisture meter: Press the probes into the drywall or press one probe against the wall while holding the other on the surface. A reading above 15-17% indicates a problem. If it’s higher, you’ve found a wet pocket.
Infrared camera: These devices show temperature differences, which can help locate hidden moisture. Look for cooler spots (blue or purple) on the screen, as water conducts heat away from the surface.
Remember, these tools only indicate moisture presence and severity. They don’t tell you where the water is coming from. Always follow up with a visual inspection to pinpoint the leak’s source.
Creating a moisture map and repair plan
Once you’ve found all the wet spots, it’s time to create a moisture map. This will guide your repairs and help you decide where to place drying equipment.
Mark each hotspot on a floor plan or take photos with notes. Record the moisture reading at each location. This will serve as your repair roadmap.
Demolition: Based on your map, mark out areas for demolition. Remember, it’s better to remove too little than too much drywall initially.
Drying placement: Place drying equipment (dehumidifiers, fans) near the highest moisture readings first. Move them as needed once those areas are dry.
Repair scope: Your map will help you determine the full extent of repairs needed. Be prepared to replace more than just the obvious damaged sections.
Drying Strategy and Equipment Selection
Choose a drying approach based on the size of the leak and the materials touched. Plan for a combination of dehumidifiers, air movers, and, if needed, a ventilation aid to keep moisture moving out of the space. Keep the area contained to prevent cross-contamination as you dry.
Match equipment to the space and material type, and follow the manufacturer instructions for setup and runtimes. Watch for excessive heat or noise, and check local rules or label guidance for safe operation in confined areas.
Air movers and dehumidifiers: types and placement
First, let’s understand your tools. Air movers are fans that dry surfaces by increasing air circulation. Dehumidifiers remove moisture from the air.
Placement: Place air movers along walls, pointing towards affected areas. Position dehumidifiers in open spaces, near but not too close to air movers. Change their locations every few days for even drying.
Combine them for best results: Air movers dry surfaces, pushing moisture into the air. Dehumidifiers then remove that moisture, preventing it from reabsorbing into materials.
HVAC, ventilation, and safe drying conditions
Use your HVAC system to help dry out the area. Set it to its lowest setting and direct airflow towards the affected rooms.
Ventilation: Open windows and doors if possible, but be mindful of outdoor humidity levels. If it’s high outside, keep them closed to prevent adding more moisture into your home.
Monitor adjacent areas too. High humidity can build up in nearby rooms, so use air movers and dehumidifiers there as well to maintain safe drying conditions.
Monitoring drying progress
Check your drying efforts regularly. Use moisture meters and thermal imaging cameras, just like you did during initial assessment.
Routine checks: Inspect the area daily. Track moisture readings to ensure they’re dropping over time. If not, adjust your equipment or strategy.
End active drying when materials reach a safe moisture content level (typically 16% for wood-based materials). Follow device manuals or consult with professionals if unsure about readings.
Mold Inspection, Risk Assessment, and Testing
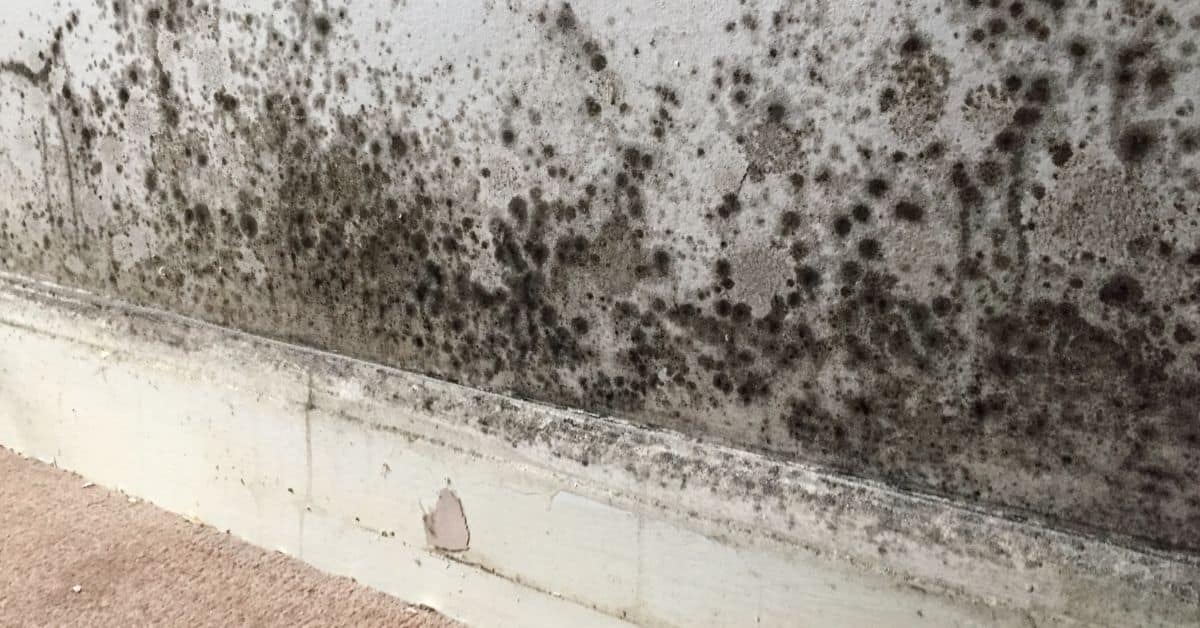
Look for visible mold growth and signs of persistent moisture, especially in concealed spaces. Investigate musty odors, staining, and any expanding patches on walls or ceilings. Consider whether hidden mold could involve insulation or framing members.
Testing can help confirm what’s present and where. If you pursue it, rely on qualified professionals and verify the lab or method standards they use. Check local regulations or site-specific requirements before proceeding with remediation decisions.
Visual and olfactory signs of mold
Before you start any repair work, walk through the affected area to identify visible and smellable signs of mold. This step helps you understand the extent of the problem.
- Musty odor: Persistent musty smells often indicate hidden mold growth. If it’s strong, don’t ignore it.
- Visible mold: Look for black, green, or white spots on walls, ceilings, and floors. Even small patches can signal a bigger problem behind the scenes.
- Water stains: Discoloration on walls, ceilings, or floors could be due to water intrusion, which might have led to mold growth.
- Bubbling paint: If your paint is bubbling, it’s a sign that moisture is trapped beneath it, potentially leading to mold.
- Warped or cracked materials: Mold can cause materials like wood and drywall to warp, crack, or crumble. Check for these signs of structural damage.
- Condensation: Excessive condensation on windows, walls, or pipes can indicate high humidity levels, a breeding ground for mold.
- Allergic reactions: If you notice increased allergy symptoms like sneezing, itchy eyes, or skin irritation in the affected area, it could be due to mold spores.
- Previous water damage: If the area has experienced water damage before, even if it was dried properly, there’s a higher chance of mold growth.
Quick rule: Trust your nose and eyes. If something looks or smells off, investigate further.
DIY testing vs. professional evaluation
Before you decide whether to test for mold yourself or hire a pro, consider the pros and cons of each approach.
- Home test kits: Inexpensive and easy to use, but results may not be reliable due to limited sampling area and potential user error.
- Professional air sampling: Certified inspectors use specialized equipment to collect airborne spores over a larger area, providing more accurate results.
- Surface sampling: Professionals can swab or tape-lift surfaces to identify mold species and concentrations, helping determine the extent of contamination.
- Infrared imaging: Some pros use infrared cameras to detect temperature differences that may indicate hidden moisture and potential mold growth.
- Limited scope of DIY tests: Home test kits only provide a snapshot in time, while professionals can give you a broader picture with multiple sampling methods.
- Professional interpretation: Mold inspectors interpret results based on industry standards and guidelines, providing clear recommendations for remediation.
- Cost difference: DIY tests are cheap, but professional evaluations can cost hundreds to thousands of dollars, depending on the size of the property and extent of testing needed.
- Regulations and standards: Professionals follow strict protocols and guidelines set by organizations like the IICRC or AIHA, ensuring accurate results and reliable remediation plans.
Quick rule: If you suspect extensive mold growth or have health concerns, always err on the side of caution and hire a certified professional for thorough testing.
Health-risk and scope assessment
Before diving into remediation, assess the extent of mold growth, potential health risks, and the scope of repairs needed to determine if you can handle it yourself or need a specialist.
- Size of affected area: If mold covers more than 10 square feet (about 3×3 feet), EPA guidelines recommend hiring a professional for remediation.
- Occupant health concerns: If anyone in the household has allergies, asthma, or a compromised immune system, consult a doctor before starting any work and consider hiring a pro.
- Mold species: Some molds are more toxic than others. If you suspect Stachybotrys (black mold) or other harmful species, leave remediation to the pros.
- Building materials affected: Mold in porous materials like drywall, wood, or carpet is harder to remove and may require professional help.
- HVAC system involvement: If mold is present in your HVAC system, it’s best to hire a specialist to prevent spores from spreading throughout the house.
- Previous water damage history: Recurring water issues may indicate a larger underlying problem that needs professional attention.
- Structural integrity: If mold has caused significant structural damage, it’s best to hire a contractor with experience in mold remediation and reconstruction.
- Local regulations and requirements: Some areas have specific guidelines for mold remediation. Check local laws before starting any work.
Quick rule: When in doubt, consult a certified mold inspector or contractor to assess the situation and provide expert guidance.
Containment, Removal, and Mold Remediation Best Practices
Set up containment to prevent dispersal of mold spores. Use plastic sheeting, create negative pressure if possible, and designate a clean transition area for tools and waste. Wear proper PPE and minimize disturbance of moldy materials.
Carefully remove and bag moldy drywall and insulation, following safe disposal practices. Clean around the area with appropriate methods and materials, and dispose of waste in sealed containers to reduce cross-contamination. Recheck the space for any remaining signs of mold after removal.
Setting up containment and PPE
First things first, safety. Mold spores are tiny and can travel easily through the air. So, we need to contain the affected area.
Set up a containment barrier using plastic sheets and tape around the damaged drywall. This stops mold spores from spreading to other parts of your home.
Negative pressure is key here. You want to create a slight vacuum in the contained area, so use a HEPA filter-equipped air scrubber to suck out contaminated air. This keeps spores from escaping while you work.
Now, PPE. Wear a respirator with an N95 or P100 filter to protect your lungs. Gloves and goggles are must-haves too. Cover any exposed skin to minimize contact with mold.
Cleaning methods and safe biocide use
For non-porous surfaces like metal or glass, use a solution of water and detergent to clean. Scrub gently with a soft brush or cloth.
When it comes to biocides, less is more. Overusing them can damage materials and harm your health. Always follow the manufacturer’s instructions on the label.
Dilute biocides properly. Too much can cause damage, too little won’t kill all the mold. Check local guidelines for specific recommendations.
Never mix bleach with ammonia or other cleaning products. The fumes are dangerous and can cause serious health issues.
Disposal and handling of contaminated materials
The right material choices make all the difference in mold remediation. Here’s how to handle and dispose of contaminated drywall and insulation.
- Drywall: Bag it up tightly in heavy-duty plastic bags. Label them ‘Mold-Contaminated’. If it’s a large amount, follow hazardous waste regulations in your area.
- Insulation: Same as drywall, bag and label. Some types like fiberglass can be reused if cleaned properly, but it’s usually best to replace.
- Flooring: If it’s porous like carpet or wood, it’s likely beyond saving. Bag, label, and dispose of according to local regulations.
- Personal Protective Equipment (PPE): Dispose of used PPE as hazardous waste. Don’t mix with other trash.
- Cleaning materials: If they’ve been in contact with mold, bag and label them too. Check local guidelines for disposal.
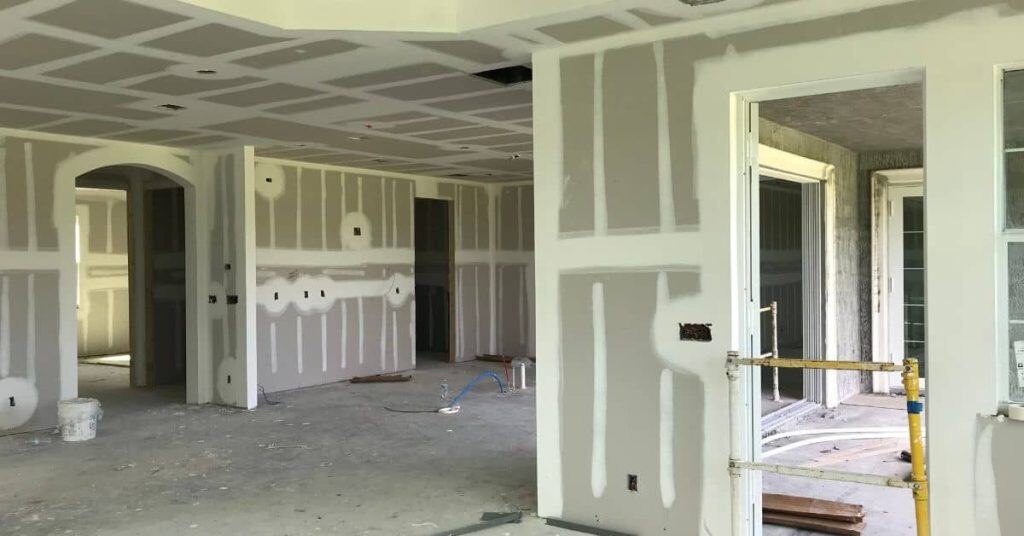
Removing and Replacing Damaged Drywall
Demolish carefully to remove only the damaged sections while preserving undamaged studs and framing. Cut along straight lines to create clean, square openings and avoid nicking electrical or plumbing runs. Keep debris contained and labeled for proper disposal.
Prepare the cavity for rebuild by ensuring all moisture is gone and framing is sound. Inspect for any remaining mold or moisture issues and address them before hanging new drywall. Plan for a proper seal around edges to minimize future moisture entry.
Demolition: where to cut and salvage
Start by turning off power to the affected area. Then, using a utility knife, score along the damaged drywall’s edges. Cut back to the nearest dry, sound material. Make straight cut lines for easier replacement.
Salvage what you can: If sections are only slightly damaged, save them for reuse. This saves money and reduces waste.
Be careful not to damage surrounding structure while cutting. Use a stud finder to locate framing members and avoid them when possible.
Inspecting studs, framing, and insulation
After removing the drywall, inspect the exposed studs for any signs of rot or corrosion. Tap them with a hammer; if they sound hollow or feel soft, they may be damaged.
Check insulation: Inspect the existing insulation in the cavity. If it’s wet, moldy, or compressed, replace it. Ensure it fills the space completely for optimal performance.
Document any repairs needed on studs or framing. Take photos and make notes to help with ordering materials and planning the rebuild.
Choosing drywall type and moisture-resistant options
When selecting new drywall, match the thickness of the existing panels to maintain a consistent look. For areas prone to moisture, consider using moisture- or mold-resistant boards. These have added protection against water damage.
Check local building standards and product specifications to ensure you’re choosing the right type for your area. Some regions may require specific materials due to climate conditions.
If unsure, consult with a local hardware store associate or a professional contractor. They can provide guidance based on your specific situation.
Rebuild Steps: Hang, Tape, Finish, and Paint
Hang new drywall in the correct orientation and snugly fasten without over-tightening screws. Stay mindful of aligning seams with existing joints to maintain a smooth surface. Apply tape and first coat of joint compound in a controlled sequence to avoid bulges or ridges.
Sand and finish in steps, then apply moisture-conscious primer and paint suitable for the area. Use finish techniques that help resist future moisture intrusion, and follow product labels or manufacturer instructions for curing times.
Hanging and fastening best practices
Start by aligning your drywall sheets along the ceiling and floor. Use a T-square to mark the stud locations on the wall.
Screw spacing: Drive screws every 12-16 inches along the studs, keeping them about 1/4 inch from the edge of the sheet. This ensures stability and prevents warping.
Joint alignment: Make sure joints don’t line up with each other on adjacent sheets to avoid weak points. Stagger them like bricks in a wall.
Use drywall screws, not nails, for better holding power and less chance of popping later.
Taping, mudding, and sanding workflow
Start with a thin layer of joint compound (mud) on your taping knife. Apply it to the seam, pressing firmly to ensure good adhesion.
Taping: Embed the tape into the mud, smoothing it out with your knife. Make sure there are no wrinkles or bubbles.
Mudding and drying: Apply a second coat after the first has dried (usually 24 hours). Feather the edges of this coat to create a smooth transition from seam to wall. Let dry again.
Sand lightly between coats with fine-grit sandpaper, wiping off dust with a damp sponge. Wear a dust mask for safety.
Primer, paint, and finishing choices
Use a quality primer to seal the drywall and provide a better surface for painting. Choose one that’s designed to block moisture and mold.
Paint selection: Opt for paints formulated for kitchens/bathrooms or high-humidity areas. They have better resistance to moisture and mildew.
Ventilation: Ensure good airflow during painting and drying. Keep windows open, use fans, or consider using a paint with low VOCs (volatile organic compounds) for faster curing.
Apply paint in thin coats, allowing adequate drying time between each to avoid drips and imperfections.
Tools and Materials Checklist; Material Specs and Standards Explained
Create a practical checklist that covers containment, drying, demolition, drywall, fasteners, and finishing supplies. Include items like PPE, plastic, dehumidifiers, air movers, drywall sheets, mud, tape, and primers. Keep the list organized by project phase for easy shopping.
Explain key material specs to verify before purchase, such as moisture resistance, thickness, and mold resistance when applicable. Always check the product label, manufacturer instructions, and any relevant local codes or standards before buying or using materials.
Tools list by phase (drying, demo, rebuild)
Before you start any work, gather these tools to ensure a smooth process.
- Drying setup: Dehumidifier, fans, moisture meters
- Safe demolition: Utility knife, circular saw, pry bar, safety glasses
- Moisture testing: Moisture meter, infrared camera (optional)
- Finishing work: Drywall screws, drywall tape, joint compound, sanding block
Quick rule: Don’t skip tools. Missing one can slow down your project or cause damage.
Material specs to verify (drywall, insulation, sealants)
Check these specifications on product labels before purchasing materials.
- Drywall: Moisture resistance rating, fire rating
- Insulation: R-value, moisture barrier presence
- Sealants: Compatibility with drywall and insulation, mildew resistance
Quick rule: Always check manufacturer literature if unsure about specifications. The wrong material can lead to mold growth or structural issues.
Conclusion
Safety matters first and last: if you don’t keep moisture under control, you’ll pay for it again in rot, mold, and drama later; stay disciplined and finish with durability in mind. With a solid plan, you can restore the room to look right, work right, and stay safe.
First, check off the steps in order: shut off the water if needed and confirm the area is contained and dry, map the moisture, choose drying gear appropriate for the space, monitor for signs of mold, isolate the work area, remove and dispose of damaged drywall and contaminated materials, treat the surfaces as needed, and then proceed with the rebuild in the Hang, Tape, Finish, and Paint sequence, finally inspecting all joints and surfaces against the material specs and standards explained. In practice, keep notes, test a small patch first, and proceed step by step so you don’t miss a hidden pocket of moisture or a mold risk.
Common mistakes to avoid are cutting corners on moisture control, skipping containment, or rushing the drywall finish without proper drying and mold checks; never skip testing, keep a realistic timeline, and use the right equipment for the space. Also, don’t ignore small leaks or DIY shortcuts that bypass safety—if in doubt, pause and recheck the moisture map and readings.
When to call a professional: if you see persistent moisture, active mold growth, complex plumbing, or structural concerns, or if electrical hazards are involved, step back and bring in a pro. Stay deliberate, follow the plan, and you’ll finish strong with a safe, good-looking result.
FAQ
How do I know when the drywall is dry enough to proceed with the rebuild?
Check for no visible damp spots and that the wall materials feel dry to the touch. Use a moisture meter or pinch test across the area to confirm readings are stable over a few days. If in doubt, err on the side of more drying time rather than rushing back in.
What signs mean I should treat for mold before finishing repairs?
Look for any musty smell, visible staining, or dark spots that won’t scrub away. If you see discoloration or suspect hidden growth, pause repairs and get a professional to inspect. Never seal in or cover mold-prone areas without remediation.
How should I handle the joints where new drywall meets the existing work?
Use proper backing, prime the edges, and tape carefully to minimize cracking. Sand lightly and clean dust before applying joint compound, and avoid overworking the mud at corners. A crisp edge helps the finish last longer.
What should I consider when choosing primer and paint after a moisture event?
Choose a primer designed for moisture-prone areas and compatible with your wall material. Follow the manufacturer’s instructions for drying times and recoat windows. If the surface still feels damp or shows sheen, hold off on paint until it’s completely dry.