
Introduction
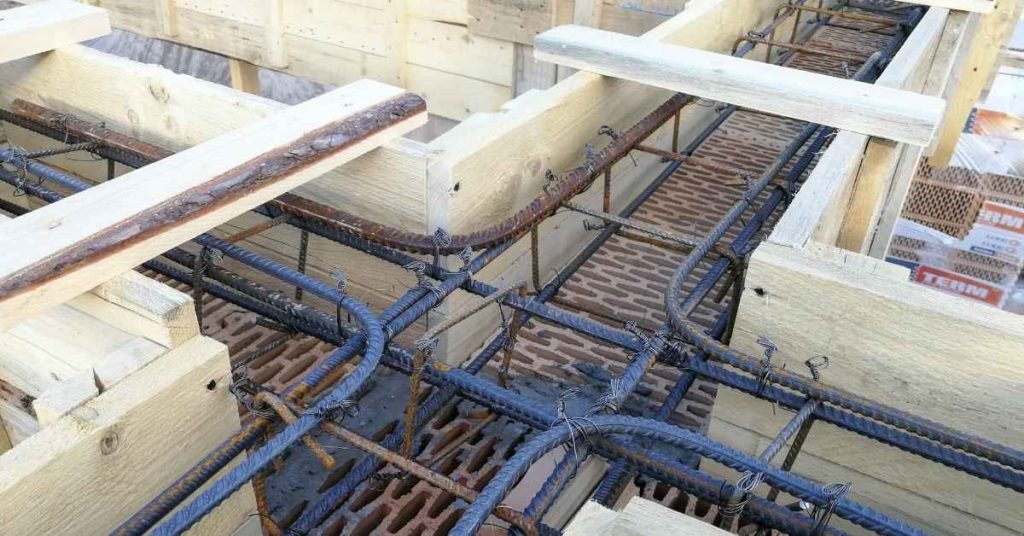
Rebar chairs are simple supports that hold the steel rebar off the ground so it stays centered in the slab. They keep the bars at the right height and prevent sagging or contact with the form. On a DIY slab, you install them along a grid to hold the rebars steady during pour.
Punching shear is a local failure risk around a embedded bar, so keeping the rebar supported above the bottom helps reduce it. Check the chair spacing and height against manufacturer instructions and local rules, and keep chairs level so the bar sits in the intended plane. If in doubt, plan a simple grid pattern and adjust based on the slab thickness and pour setup.
Key takeaways
- Punching shear is a concentrated failure around circular loads in slabs.
- Rebar chairs position and support critical concrete height to prevent punch-through.
- Optimal chair spacing should follow manufacturer guidance and project specifics.
- Set chairs at correct height so rebar remains embedded and covered.
- Inspect for loose chairs, misalignment, or accidental displacement during pour.
- Safety: keep formwork stable, avoid trips, and follow local codes.
Table of Contents
- Introduction
- Key takeaways
- What Is Punching Shear and Why It Matters
- Role of Rebar Chairs in Slab Performance
- Optimal Spacing for Rebar Chairs
- Methods to Prevent Punch-Through
- Materials, Specs, and Standards Explained
- Common Installation Errors and How to Fix Them
- Planning, Safety, Costs, and Case Studies
- Conclusion
- FAQ
What Is Punching Shear and Why It Matters
Punching shear is a failure mode where a slab crushes around a concentrated load, such as a column or post, rather than cracking across the surface. It concentrates stresses at a small area and can lead to sudden, localized failure. This matters because safety and serviceability are at stake in residential slabs and driveways around supports.
Think of a critical perimeter around the support where the load needs to transfer into the concrete. Proper reinforcement and chair height help spread that load into the slab and avoid spalling or excessive cracking. Check slab thickness, support size, and how your rebar is distributed, and note common mistakes like under-reinforcement or chairs that sit too low.
Definition of punching shear
Punching shear is a localized failure mode that occurs in slabs around concentrated loads, like columns or posts. Imagine it as a punch pushing through a piece of paper – the paper tears around the point of impact rather than ripping across.
In structural terms, punching shear happens when the shear stress around a concentrated load exceeds the slab’s shear strength. This causes the slab to crush and fail around the load instead of cracking across its surface.
Think of it like this: Imagine you’re standing on an ice sheet. If you step on one spot too hard, the ice will break around your foot rather than cracking under your full weight distributed evenly.
Signs and consequences in slabs
Punching shear can manifest in several ways. You might see cracks forming around a column or post, or the slab may start to deflect or sag under load. In severe cases, you could even notice pieces of concrete spalling off – that’s when chunks of concrete break away from the surface.
If left unaddressed, punching shear can lead to serious consequences. The slab might suddenly collapse under heavy load, posing a safety risk. Even if it doesn’t collapse, the slab may become unsafe for use due to excessive deflection or cracking, especially in high-traffic areas like driveways or mid-floor slabs with columns.
Remember: Punching shear isn’t always visible on the surface. It can be happening beneath your feet without any obvious signs until it’s too late.
Role of Rebar Chairs in Slab Performance
Rebar chairs secure and space reinforcement to maintain the required concrete cover and alignment within the slab. They keep bars from drifting during the pour, which is essential for crack control and load transfer. In short, chairs influence how well the slab carries loads indirectly through the reinforcement path.
Chair height and spacing relate to the needed cover values, and insufficient cover can increase corrosion risk and vulnerability to shear. Material choice and chair spacing affect how well the rebar stays in position and how evenly the load path remains continuous. Watch for excessively tall chairs, leaning setups, or chairs that intrude into the clear cover.
How chairs maintain cover and position
Rebar chairs play a crucial role in keeping your slab’s reinforcement right where it needs to be. They support the rebar vertically, preventing it from sinking into the wet concrete during the pour.
Chairs also hold the rebar at the correct height, ensuring the required concrete cover is maintained. This cover protects the rebar from corrosion and provides shear resistance.
Laterally, chairs space the rebar evenly across the slab formwork. This keeps the reinforcement aligned and prevents displacement that could compromise your slab’s strength and durability.
Effects on load transfer and crack control
Properly positioned rebar, thanks to the chairs, ensures even load distribution across your slab. This helps prevent overstressing of any one area, which could lead to cracking or failure.
Correct reinforcement positioning also controls where and how cracks form in your slab. By providing a continuous path for tension forces, properly placed rebar can direct cracks along the slab’s surface rather than through it, maintaining the slab’s integrity.
In the long term, well-positioned rebar supported by chairs helps maintain the slab’s expected load paths and cracking behavior. This contributes to the overall durability of your structure.
Optimal Spacing for Rebar Chairs
Chair spacing is driven by rebar size, slab thickness, load expectations, span, and chair type. Spacing decisions come from structural drawings and applicable codes rather than fixed numbers. Verify the plan and the code references before setting spacing on site.
Plan for the vertical height the chair must hold the rebar to achieve the required cover, and place chairs along the length and width to keep coverage consistent during pour. Consider practical constraints like form interference and compatibility with different bar sizes and coatings.
Spacing for different bar sizes and slab types
The spacing of rebar chairs depends heavily on the size of the reinforcement bars and the thickness of your slab. Heavier bars and slabs under higher loads need closer support.
Smaller bars (e.g., #4 or #5) can be spaced further apart because they carry less load. For these, you might see spacings up to 18″ or even 24″.
Larger bars (e.g., #8 or #9), on the other hand, need closer support – often as little as 6″ to 12″ apart. The same goes for thicker slabs under heavier loads.
Spacing near supports and load concentrations
Around columns, equipment pads, or other concentrated loads, you need to reduce chair spacing. These areas see higher stress and require more reinforcement.
Check your structural drawings for specific requirements, but as a general rule, reduce spacing by half in these zones. So if your normal spacing is 12″, go down to 6″ near supports.
Also, consider adding extra bars or using larger ones in these critical areas. Your structural engineer can provide specific details for your project.
Methods to Prevent Punch-Through
Punching through risk shows up near columns, edges, and long spans where load paths concentrate. Target reinforcement strategies at those critical zones to improve transfer into the surrounding concrete. Align design intent with field realizations to avoid a weak zone.
Use design-grade solutions such as appropriate shear reinforcement and proper concrete cover, while placing distributed chairs without blocking shear paths. Coordinate detailing, ensure correct chair height, and verify that the layout matches the structural drawings before pouring.
Design and Reinforcement Measures (Stirrups, Drops)
A structural engineer designs your slab to resist punching shear. Here’s what they do:
Shear Reinforcement: Engineers add stirrups or spiral reinforcement around columns and at slab edges. These catch the diagonal forces that cause punching.
Minimum Stirrup Spacing: They ensure stirrups are close enough to distribute shear resistance evenly. Typically, this is 1/4 of the slab’s thickness, but consult your engineer for exact spacing.
If you’re unsure about these details, consult your structural engineer. They’ll provide design-grade solutions tailored to your project.
Installation Best Practices (Tying, Securing Chairs)
Proper installation keeps rebar chairs in place and effective. Here’s how:
Tying Patterns: Tie chairs to reinforcement using a ‘figure-eight’ or ‘square-knot’ pattern. This secures them without obstructing concrete flow.
Securing Chairs: Use additional ties, wire, or even small pieces of rebar to secure chairs against displacement during pouring and curing.
Before pouring, do a pre-pour walkthrough. Check that all chairs are correctly placed, tied, and secured. This ensures they’ll maintain cover and position as intended.

Materials, Specs, and Standards Explained
Chair materials vary from plastic to metal and epoxy-coated options, each with trade-offs for corrosion resistance and load transfer. Evaluate compatibility with rebar sizes and the concrete mix you’re using. Choose materials that fit the exposure and environment of the project.
Know the relevant codes and project specs, and check shop drawings for embedment depth and cover requirements. Document chair type, spacing, and coating details to support QA/QC during a project and future inspections.
Common materials and corrosion considerations
Choosing the right material for your rebar chairs is crucial to prevent corrosion, maintain concrete cover, and ensure proper load transfer. Different materials have varying durability, compatibility with concrete mixes, and resistance to environmental factors.
- Plastic: Lightweight, non-corrosive, and compatible with most concrete mixes. Avoid in high-traffic areas due to potential damage.
- Steel (uncoated): Inexpensive but prone to corrosion. Use only if protected by sufficient concrete cover or in dry environments.
- Galvanized steel: Offers good corrosion resistance, but can still corrode over time. Ensure proper surface preparation before installation.
- Epoxy-coated steel: Provides excellent corrosion protection, especially in harsh environments. Verify coating date and type to ensure durability.
- Stainless steel: Highly resistant to corrosion but more expensive. Ideal for aggressive environments like swimming pools or coastal areas.
Relevant code references and what to verify
Before selecting rebar chairs, ensure you’re familiar with the relevant codes and standards. This helps maintain structural integrity, prevent punching shear, and comply with local regulations.
ACI 318 provides guidelines on reinforcement detailing, concrete cover, and punching-shear provisions. AASHTO offers standards for bridge construction, which can be useful for heavy traffic areas or unique loading conditions.
Regional building codes may have specific requirements, so always cross-check with local amendments. Verify the following in your project specifications:
Metal finish and coating type: Ensure chairs match the specified material and corrosion protection strategy.
Chair spacing/height notes: Confirm they align with optimal spacing for your rebar size and slab type.
Embedment depth and concrete cover: Verify these meet code requirements to prevent corrosion and maintain structural integrity.
Anchorage details: Check that chairs can securely hold rebars in place.
Compatibility with footing/slab formwork: Ensure chairs won’t interfere with formwork removal or cause damage.
Common Installation Errors and How to Fix Them
Frequent installation errors include insufficient chair density, misaligned placement, and chairs that tilt or collapse during pour. Each issue can create weak load paths and raise punching-shear risk. Link fixes to pre-pour planning and ongoing monitoring.
Use a pre-pour checklist to verify layout, spacing, and chair integrity, and monitor during the pour to keep chairs stable. If deviations occur, apply practical, non-rework fixes and document the adjustments for accountability and future prevention.
Misplaced or Insufficient Chairs
Ensure chairs are evenly spaced and properly positioned to maintain slab integrity. Here’s how to spot and fix issues:
Insufficient density: If chairs are too far apart, rebar may sag, reducing cover and weakening the slab. Solution: Add more chairs or use supplemental supports like wire mesh or additional rebar.
Misplaced chairs: Chairs should align with rebar and maintain consistent spacing. If not, load transfer is compromised. Solution: Reposition misaligned chairs, tie them securely to rebar, or consult a structural engineer for design adjustments.
Improper Tying or Chair Collapse During Pour
Chair collapse disrupts slab integrity and can lead to punching shear. Here’s how to prevent and address this:
Causes of collapse: Inadequate tying, weak chairs, or excessive vibration during placement. Prevention: Use strong, durable chairs; tie them securely to rebar with wire ties or clamps; avoid over-vibrating concrete.
If collapse occurs: Inspect the slab immediately after pour. If chairs have collapsed, quick fixes include temporarily shimming chairs back into place, re-seating them within acceptable tolerances, or shallow grouting where permitted. Document voids and consult a structural engineer for further guidance.
Planning, Safety, Costs, and Case Studies
Develop a planning checklist that covers chair type, count, height, and integration with the rebar grid. Include procurement specs, shop drawings, and a standard for documentation. This foundation helps keep projects organized from start to finish.
Outline safety protocols for handling rebar and chairs, and summarize cost considerations without tying to specific prices. Include brief case studies that illustrate a failure mode and the corrective actions taken to prevent recurrence, using them as lessons for future projects.
Planning checklist for different slab sizes and purposes
Use this checklist before starting any slab work to ensure you’ve covered all bases.
- Slab type: Identify if it’s a one-way, two-way, or waffle slab. Each has unique chair needs.
- Load conditions: Check where heavy loads will sit. More chairs are needed under these areas.
- Chair schedule: Calculate how many chairs you need based on spacing rules (see earlier).
- Inspection points: Mark where inspections will occur to ensure chairs and rebar are correctly placed.
- Formwork coordination: Work with the formwork team to ensure chairs fit within the formwork design.
- Rebar grid integration: Ensure chair spacing aligns with your rebar grid plan.
- Slab thickness check: Verify chairs are tall enough for your slab’s thickness. Too short can cause punch-through.
- Shop drawings and specs: Produce detailed drawings and procurement specifications for chairs.
- Documentation standard: Set a standard for recording chair types, counts, spacings, heights, and any issues encountered.
Quick rule: Skipping these steps can lead to misplaced chairs, insufficient support, or even slab failure.
Safety precautions and PPE when handling chairs and rebar
Safety is paramount when working with reinforcement. Here’s what you need to know.
PPE: Wear steel-toed boots, safety glasses, hard hat, and gloves. For lifting, use a harness or other fall protection gear near edges.
Handling rebar: Never touch freshly cut ends with bare hands due to sharp burrs. Use gloves and wear long sleeves for protection.
Handling chairs: Be careful when stacking and moving chairs. They can shift suddenly, causing injury or damage. Always use proper lifting techniques and equipment.
Cost considerations and a brief case study of failure due to inadequate chairs
Main cost drivers for chairs include material, fastening method, shipping, waste, and labor. Consider these when budgeting.
Case Study: A project used low-cost plastic chairs that were too flexible. During the pour, they bent under pressure, causing punch-through. The fix involved jackhammering out the damaged concrete, replacing the chairs with sturdier metal ones, and repouring. Total rework cost was $15,000.
Preventive actions: Always choose chairs suitable for your slab’s thickness and load conditions. Regularly inspect chairs during installation to ensure they’re in good condition and properly placed.
Conclusion
Getting the rebar chairs set right is the backbone of a safe, durable slab. When spacing and chair height are correct, you protect the concrete from punch-through, keep rebar in the right position, and reduce costly fixes later.
First, verify the chair height and spacing against the plan, start with a small test area to confirm stability, then secure and align chairs so the chairs and rebar stay in place during concrete pour. Keep the chairs clean and on firm ground, maintain proper concrete cover, and inspect for any loose or misaligned chairs before you pour.
Common mistakes to avoid: too few chairs or incorrect height, chairs resting on soil or debris, dirty or corroded parts, and moving rebar after setup. Safety rules: wear eye and hand protection, double-check against the plan, test in a small area first, and don’t rush the formwork or pour until everything is stable and tested.
If the plan calls for complex spacing, unusual slab thickness, or you’re unsure about the stand height and cover, call a professional to confirm the specs and standards. With careful setup and attention to detail, you’ll keep the slab solid, finish cleanly, and avoid expensive mistakes—you’ve got this.
FAQ
What is punching shear and how does it threaten a slab?
Punching shear is a local failure around a concentrated load, like a pillar or footing that sits on the slab. It can cause a circular hole to form and the surrounding concrete to spall or crack out. It’s a failure mode you don’t want to see in a DIY slab.
Why do rebar chairs exist in a slab?
Rebar chairs hold the steel in the right places off the bottom of the slab. They keep the bars from resting on the mud or sitting too low. That spacing helps the rebar do its job when load comes on the slab.
How should rebar chairs be spaced and at what height to prevent punch-through?
Follow the chair manufacturer’s instructions and your project plan. In general, chairs should keep the rebar elevated and evenly supported across the deck, not bunched up or spread too thin. If you’re unsure, check the label and local rules for spacing and height guidelines.
What practical steps prevent punch-through?
Use stable chairs, don’t overload a chair row, and verify the entire grid sits evenly before pouring. Inspect for wobble, misalignment, or damaged chairs, and fix them now. Confirm the rebar stays in the correct position during the pour with a quick pre-pour check.