
Introduction
This is the process of removing deteriorated caulk around a stucco window and replacing it with proper backing and sealant. You will inspect the edge, cut out the old caulk, and prepare the gap for new material. The goal is a clean joint that stops water intrusion and allows for flexible, long-lasting sealing.
Next, remove the old caulk and any backing that has degraded. Prepare the edge by cleaning and drying, then add appropriate backing if required by the joint. Apply the sealant per product instructions and tool it to a smooth, continuous bead, checking for gaps.
Key takeaways
- Inspect stucco edges for moisture damage before removing old caulk.
- Gather proper tools and materials, including backer, sealant, primer, and tools.
- Protect surrounding siding and use painter’s tape to control sealant flow.
- Remove old caulk with careful cutting to avoid stucco damage; wear eye protection.
- Install proper backer and repair substrate to support a durable joint.
- Verify flashing integration and perform moisture barrier checks after sealing.
Table of Contents
- Introduction
- Key takeaways
- Initial Inspection and Diagnosis
- Tools and Materials Checklist
- Safe Removal of Old Caulk Without Damaging Stucco
- Backing Repair and Correct Backer Installation
- Flashing, Substrate Repair and Integration with Stucco
- Selecting Sealant and Primer for Stucco-to-Window Joints
- Correct Sealant Joint Design and Application Technique
- Verification, Troubleshooting and Maintenance Plan
- Conclusion
- FAQ
Initial Inspection and Diagnosis
Begin by examining the window edges for cracked or peeling caulk and gaps that admit moisture. Look for staining, softness in the stucco, and any signs of efflorescence near the edge. Check for failed flashing or water intrusion around the sill and jambs.
Note any underlying substrate concerns, such as damaged lath or loose stucco. When substantial damage is found, or if leaks persist after resealing, consider bringing in a professional roofer or window contractor for a formal assessment. Use product labels or manufacturer instructions to confirm recommended remedies and scope of work.
Visual and probe checks for failure
Before you start resealing, use this checklist to identify failed caulk and substrate damage.
- Cracks in caulk: Check for hairline or wide cracks. These indicate failed sealant.
- Staining around caulk: Look for water stains on the wall or window frame, which may suggest water intrusion.
- Soft spots on stucco: Gently press on the stucco near the caulk. Softness indicates potential substrate damage.
- Delamination: Check if the paint or finish is peeling off. This could signal underlying issues.
- Rotten wood: Probe suspect areas with a flathead screwdriver. If it goes in easily, there may be rot.
- Missing caulk: Check for gaps where caulk should be present.
- Bubbling or peeling caulk: These are signs of failed sealant.
- Mold or mildew: Presence of mold or mildew indicates moisture intrusion and potential substrate damage.
Quick rule: If you find rot, delamination, or other significant issues, consult a professional roofer or window contractor before proceeding.
Tracing the water path and common leak sources
Before resealing, determine if the joint failure is cosmetic or due to underlying issues by checking these common leak paths.
- Water stains: Look for stains on walls or ceilings near windows. These indicate water intrusion.
- Mold or mildew: Presence of mold or mildew suggests moisture intrusion and potential leaks.
- Flashing condition: Inspect the flashing around windows to ensure it’s intact and properly installed.
- Weep holes: Check if weep holes are present and unobstructed. Clogged weeps can cause water backup.
- Window perimeter: Ensure there’s no missing sealant at window perimeters, which could allow water intrusion.
- Siding or stucco cracks: Check for cracks in siding or stucco that might be allowing water to enter.
- Roof issues: Inspect the roof above windows for potential leaks that could be causing water intrusion.
Quick rule: If you find flashing/weep issues, address these before resealing the caulk to prevent recurring problems.
Tools and Materials Checklist
Gather hand tools such as putty knives, utility blades, and scrapers, plus a caulk removal tool if available. Include a cordless or corded drill for preparing surfaces and cleaning tools. Have PPE on hand: gloves, eye protection, and a respirator or dust mask if dust is present.
Stock cleaning agents, backer materials, sealants, primers, and temporary protection for surrounding surfaces. Check labels for compatibility with stucco and window materials, and verify required primers or special backer sizes with manufacturer instructions. Consider a small test area before full application.
Essential Tools and Safety Gear
Having the right tools ensures a smooth and safe job. Here are essentials to gather:
- Utility Knife: For cutting old caulk; use sharp blades.
- Scraper or Paint Scraper: To remove loose material; choose a sturdy, flat-bladed one.
- Caulking Gun: For applying new sealant; consider a model with adjustable pressure for better control.
- Respirator: Protects from dust and fumes; use a half-face respirator with P100 filters.
- Safety Glasses: Shields eyes from debris; consider using goggles for added protection.
- Work Gloves: Provides grip and protects hands; choose ones that fit well and allow dexterity.
- Dust Control: Use a wet/dry vacuum or damp cloth to minimize dust.
- Optional: Oscillating Multi-Tool: For faster scraping; consider renting if not a regular DIYer.
Materials and Consumables to Buy
Choosing the right materials ensures lasting results. Here’s what you’ll need:
- Backer Rod: Supports sealant; choose a foam or rubber rod compatible with your sealant.
- Bond-Breaker Tape: Prevents adhesion to substrate; select one rated for exterior use and your chosen sealant.
- Sealant: For filling gaps; opt for a silicone or polyurethane sealant suitable for stucco and exterior use.
- Primer: Prepares surface; choose a primer that’s compatible with your sealant and substrate.
- Surface Cleaner: Removes dirt, grease, and old sealant; select one that’s safe for stucco and effective against mold/mildew.
- Masking Materials: Protects adjacent areas; use painter’s tape and drop cloths suitable for exterior use.
- Optional: Sealant Applicator Gun: For easier application; consider renting if not a regular DIYer.
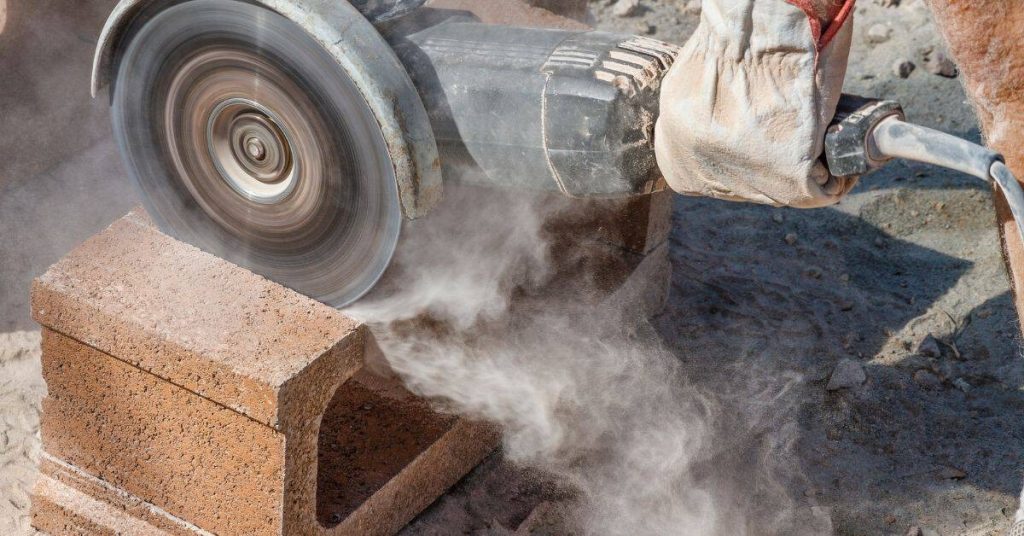
Safe Removal of Old Caulk Without Damaging Stucco
Cut and lift old caulk with care to avoid pulling on the stucco surface. Use a sharp blade at a shallow angle to minimize gouging the edge. Work in small sections to control dust and debris.
Keep the edge clean and dry as you proceed, and remove residual material with a gentle scraper. If the caulk is stubborn, consider a dedicated caulk removal tool designed for delicate edges. Always follow equipment manufacturer guidance to protect the lath and stucco substrate.
Best cutting tools and techniques
The first step in removing old caulk from stucco window edges is selecting the right tool for the job. The ideal tool should be sharp, sturdy, and capable of making clean cuts without damaging the surrounding surface.
- Utility Blades: These are inexpensive and easy to find. Choose a sharp, sturdy blade with a comfortable handle. Cut at a 45-degree angle, pulling the blade towards you in short strokes. Pro tip: Always cut away from your body for safety.
- Oscillating Tools: These versatile tools can make quick work of old caulk. Select one with adjustable speed and a suitable blade for cutting caulk. Work slowly and steadily, following the caulk line. Quick tip: Start at a low speed to avoid kicking up dust.
- Hand Tools: For tight corners or delicate areas, hand tools like chisels or scrapers can be useful. Use gentle, controlled strokes to avoid damaging the stucco.
- Rentable Tools: If you don’t own these tools, consider renting them. This can be more cost-effective than buying, especially for infrequent use.
- Tool Check: Before starting, ensure your tools are clean and free of debris. Inspect their condition, sharpness, and suitability for the task at hand.
Surface cleanup and residue removal
Before reinstalling new caulk, it’s crucial to clean the surface thoroughly. This ensures proper adhesion of the new sealant and prevents future leaks.
Mechanical cleaning can be done using stiff-bristled brushes or scrub pads. These tools can remove loose residue effectively. Always rinse the area thoroughly with water afterwards to remove any remaining debris.
Chemical cleaners can also be used, especially for stubborn residues. Apply a suitable cleaner, following the label instructions carefully. Allow it to sit on the surface for the recommended time before scrubbing and rinsing. Pro tip: Always test cleaners on a small, hidden area first to ensure they don’t cause any adverse reactions.
After cleaning, allow the surface to dry completely. This is crucial as moisture can interfere with the adhesion of new caulk. Use a moisture meter if available to confirm the joint is dry before proceeding.
Backing Repair and Correct Backer Installation
Inspect the existing backer rod for compression loss or damage; replace if it is brittle or missing in places. Understand how backer rod and bond-breaker contribute to joint performance and watertightness. Prepare a continuous, properly sized backing before resealing.
Install new backer material so it sits behind the sealant with appropriate depth and alignment. Ensure a clean surface and consistent contact with the joint walls. Refer to product data sheets and manufacturer instructions to confirm backing specifications.
Choosing the right backer material
The choice of backer rod and tape significantly impacts the longevity and performance of your joint. Incorrect materials can lead to cracking, staining, or weak bonds.
- Open-Cell Backer Rod and Tape: Ideal for joints subject to structural movement due to their greater compression and expansion capabilities. However, they offer less moisture resistance compared to closed-cell options.
- Closed-Cell Backer Rod and Tape: Recommended for high-moisture or frequently changing temperature environments. They provide superior moisture resistance but may lack the flexibility of open-cell materials.
- Compatibility: Ensure the chosen material is compatible with both stucco and frame materials to prevent adhesion issues.
- Avoid Incompatibility: Incorrect backer rod or tape can result in joint failure. Inspect packaging for clear indications of open-cell vs. closed-cell properties, and verify product labels and datasheets for compatibility.
Proper placement and compression of backer rod
The correct placement and compression of the backer rod are crucial to prevent water intrusion and joint failure. Here’s how to achieve this:
Recessment: Recess the backer rod slightly from the face of the joint, typically around 1/4″ to 3/8″. This allows for proper caulk application and prevents over-compression.
Seating: Seat the backer rod firmly within the joint without over-compressing it. Over-compression can lead to insufficient space for caulk, resulting in weak bonds or water intrusion.
Bond-Breaker Tape: If using bond-breaker tape, position it along the frame side of the joint to prevent three-sided adhesion. This ensures the tape doesn’t interfere with the backer rod’s function and allows for proper caulk application.
Flashing, Substrate Repair and Integration with Stucco
Inspect metal or non-metal flashing for corrosion, lifts, or gaps that could channel water behind the stucco. Check housewrap, sheathing, and edge terminations for damage or detachment. Plan to repair or replace compromised components before resealing the joint.
Integrate flashing with proper terminations at the stucco edge, ensuring a smooth transition to the window frame. Verify installation guidance from relevant manufacturers or building codes to match your system. Reconfirm that all corrective steps align with local rules and best practices.
Inspecting and repairing flashing and pans
Begin by visually inspecting the head and sill flashing around your window. Look for gaps, holes, or rust that could allow water intrusion.
Pro Tip: Use a probe to check adhesion and integrity of the flashing. Press gently along the edges to ensure it’s securely attached.
If damage is found, replace or repair using matching material and appropriate fasteners. Ensure proper overlap with adjacent components and slope toward the exterior drainage plane for effective water direction.
Rebuilding damaged substrate and stucco edges
Before reinstalling backing, inspect your window’s substrate. Knock on it to listen for hollow spots indicating decay or damage.
Pro Tip: Probe suspect areas with a flathead screwdriver to check for softness or crumbling that may require repair.
If damaged, cut out and replace decayed sheathing or patch stucco edges using appropriate materials. Ensure the repaired substrate is clean, dry, and structurally sound before installing backer rod and sealant to prevent future leaks.
Selecting Sealant and Primer for Stucco-to-Window Joints
Compare sealant chemistries such as silicone, polyurethane, and hybrid MS polymers, noting adhesion, paintability, and UV resistance considerations. Use the guidance on substrate compatibility and environmental exposure from the manufacturer. Avoid mixing products unless explicitly allowed by instructions.
Identify whether a primer is required for your chosen sealant and verify compatibility with stucco, backing, and flashing. Check labels or data sheets for surface preparation, cure times, and recoat windows. If in doubt, consult the product instructions or a professional for confirmation.
Sealant Selection Criteria
Choosing the right sealant for your stucco-to-window joints is crucial for long-lasting performance and preventing water intrusion. Review the label or datasheet to ensure material compatibility and assess performance claims.
The sealant’s elasticity should match the substrate movement to prevent cracking under stress. Check adhesion to stucco, metal, and window frames by performing a small test application on scrap materials. Ensure the sealant is paintable for touch-ups and has suitable UV/weather resistance for your local climate.
If the sealant is too rigid or soft for substrate movement, choose one with matching elasticity. If it does not adhere well to involved materials, consider using a primer or choosing an alternative sealant.
Primer and Compatibility Checks
Using a primer and compatible materials helps prevent premature sealant failure. Before applying to the entire joint, perform a small adhesion test on scrap materials.
Check if a primer is required for adequate adhesion by consulting product datasheets or manufacturer’s instructions. Verify that both the primer and sealant are compatible with stucco, metals, and window frames using the same sources.
If a primer is required, apply it according to the manufacturer’s instructions. If the sealant and primer are not compatible with involved materials, choose alternative products that are compatible and reapply following proper procedures.
Correct Sealant Joint Design and Application Technique
Proper sealant joint design and careful application technique are essential to prevent water intrusion and premature failure. Ensure the joint has adequate depth and width, with depth at least 1/4 inch and width in the range of 3 to 6 times its depth, and follow a consistent application sequence and tooling method. If the joint geometry isn’t right, fix it before applying sealant.
A well-planned joint design supports the sealant’s movement and longevity, reducing the risk of cracking or sinking after cure. This matters for DIY projects because an experienced installer can confirm that the joint geometry allows enough sealant volume and movement space, and a proper check helps catch issues early. If the joint is too narrow or shallow, expand it to meet recommended dimensions, and if sealant appears sunken or cracked after application, remove and reapply using the correct geometry.
Joint geometry and backing depth guidance
The proper relationship between joint width and depth is crucial for optimal sealant performance. A good rule of thumb is to maintain a ratio of about 1:3 or 1:4, meaning the depth should be at least three times the width.
To set the backing depth, follow these steps:
Measure the joint width and mark it on the backing material. Then, calculate the desired depth using the 1:3 or 1:4 ratio. Finally, cut the backing material to this depth.
Always verify the sealant manufacturer’s recommendations for joint dimensions to ensure optimal performance and longevity.
Applying, tooling and protecting the new bead
Proper application of sealant is key to a successful installation. Here are the steps to follow:
- Caulking gun technique: Hold the gun at a 45-degree angle to the joint. Squeeze evenly, applying steady pressure and maintaining a consistent bead size.
- Smoothing (tooling): Use a damp sponge or tool designed for the job to smooth out the bead immediately after application. This ensures adhesion to the sides only and removes excess material.
- Masking: Apply masking tape along both edges of the joint before applying sealant. Ensure it’s applied cleanly for crisp lines.
- Temporary protection: Keep the area dry and free from debris while the sealant cures to prevent contamination or damage.
- Optional tools: Consider using a caulking gun with an adjustable nozzle for better control, or a sealant smoother tool for easier application. These can be rented or borrowed if needed.
Verification, Troubleshooting and Maintenance Plan
Establish a simple verification routine to check for watertightness, including visual inspection and non-destructive tests recommended by the manufacturer. Consider a hose test only if appropriate for the system and in accordance with safety guidelines. Document findings for future reference.
Identify common failure modes like joint cracking, adhesion loss, or flashing detachment, and outline corrective actions. Create a maintenance schedule that includes periodic inspections and prompt resealing when needed. Use product labels and instructions to guide ongoing care and compliance with local requirements.
Testing the reseal and diagnosing leaks
After completing your resealing work, it’s crucial to test the integrity of your new seal. This will help ensure that water won’t intrude into your window edges.
Visual Inspection: Start by visually inspecting the sealed area for any cracks, gaps, or discoloration. These could indicate potential leaks or inadequate adhesion.
Hose Test: Conduct a simple hose test to confirm the seal’s watertightness. Spray water along the joint from 1-2 feet away while observing for any signs of leakage. If leaks are present, re-evaluate and repair your flashing or substrate as needed.
If leaks persist after these checks, consider hiring a professional to identify and address underlying issues.
Long-term maintenance and record keeping
Maintaining your resealed window edges over time is essential for preventing water damage. Establish a simple inspection and record-keeping routine to support future repairs or warranties.
Inspection Schedule: Inspect your seals seasonally for signs of wear, damage, or deterioration. Look for cracks, peeling, or discoloration during each inspection.
Record Keeping: Document the materials used, dates of application and any repairs, and note any issues encountered. This information will be invaluable for future maintenance work or warranty claims.
Promptly address any damage found during inspections to maintain seal integrity over time.
Conclusion
Re-sealing old stucco window edges requires careful prep, proper backing, and a correctly chosen sealant to ensure long-term performance and a clean, durable appearance. Prioritize safety and avoid forcing components or materials that don’t fit the joint or substrate.
Before proceeding, confirm you have the right tools and materials, inspect for underlying damage, remove old caulk without harming stucco, repair any backing and substrate issues, address flashing, and select a compatible sealant and primer. Then follow a disciplined sequence: verify the joint design, apply primer and sealant in the correct order, cure as required, test a small area first, and then complete the joint with a consistent bead and finish that matches the surrounding surface.
Common mistakes include skimping on backing or flashing, using the wrong sealant for stucco-to-window joints, and applying sealant over damp or dirty surfaces. Always work clean surfaces, follow manufacturer instructions, and allow adequate curing time. If you’re unsure about flashing details, backing repair, or substrate integration, stop and reassess rather than forcing a seal that won’t last; take малень steps or consult a professional as needed.
When in doubt about flashing integrity, large-scale backing repair, or integrating with existing stucco, consider bringing in a qualified pro rather than risking water intrusion or costly damage. With careful planning and steady execution, the finished joints will provide durable protection and a seamless appearance that lasts.
FAQ
How do I verify the sealant and primer choice will be compatible with stucco and the window frame?
Check the product label or manufacturer instructions for compatibility with exterior stucco and the window frame materials. Look for guidance on substrate compatibility, cure times, and any required primer. If in doubt, contact the manufacturer or consult local building guidance for your project.
What signs indicate that backing, flashing, and integration with stucco are properly addressed after resealing?
Look for a continuous seal along the joint with no gaps or squeezing out of sealant. Ensure the backing supports the sealant thickness and that flashing is integrated with the stucco and window edge as designed. Any recurring cracking, water staining, or peeling paint suggests a revisit to the addressing steps may be needed.