

Introduction
Plaster over old wallpaper glue means applying plaster over a surface with wallpaper adhesive still present. This can work, but you need to test the bond first and clean or pretreat areas that are soft or gummy. In practice, you’ll scratch, wash, or skim coat to improve grip.
To test bond, apply a small plaster patch and check after it cures. If the patch delaminates or peels, address the glue by preparing the surface per manufacturer instructions and local rules before continuing. Always verify your prep steps and safety, and avoid over-wetting the wall.
Key takeaways
- Assess plaster over glue when walls are sound, dry, and not peeling.
- Test adhesion with simple scratch and scrape before plastering.
- Remove loose glue, clean dust, and consolidate flaky areas with appropriate product.
- Use bonding agents recommended for over-glue projects per manufacturer.
- Apply plaster in thin coats and monitor for signs of delamination during curing.
- Wear PPE and ensure ventilation; stop work if wallpaper adhesives smell strong.
- Conduct visual checks after each coat to catch delamination early.
Table of Contents
- Introduction
- Key takeaways
- When It’s Acceptable to Plaster over Old Wallpaper Glue
- Tools and Materials Checklist
- How to Identify the Type and Condition of the Wallpaper Glue
- Simple Adhesion Tests to Perform Before Plastering
- Preparing the Surface: Cleaning, Consolidating, and Repairs
- Choosing Plaster Mixes and Bonding Agents for over-Glue Applications
- Application Techniques That Reduce Delamination Risk
- Visual Checkpoints and Tests During and After Curing
- Conclusion
- FAQ
When It’s Acceptable to Plaster over Old Wallpaper Glue
Start by judging surface stability. If the wall feels firm and the wallpaper is well adhered, plastering over can be workable. Check the glue itself for looseness, softness, or peeling edges. Consider room use, humidity, and potential movement before deciding.
Use clear indicators to decide between overplastering and stripping. Look for bubbling, significant moisture damage, or loose substrate that could fail under a skim coat. If in doubt, test a small area and compare to manufacturer guidance or local rules before committing to plastering over glue.
Surface-stability checklist
Before you grab your plaster, make sure the wall can handle it. Here’s a quick checklist to ensure your surface is stable and ready.
- Rigidity: Gently push on the wall. It should feel solid, not spongy or soft.
- Absence of movement: Check for any cracks or gaps that might indicate movement. A stable surface won’t have these.
- Sound substrate: Tap the wall. You should hear a solid sound, not a hollow one.
- No dampness: Check for any signs of moisture. Plastering over damp walls can lead to mold and delamination.
- No loose paper: The old wallpaper shouldn’t be peeling or coming off in places. If it is, remove those pieces first.
- Even surface: The wall should be relatively even. Major imperfections might need to be addressed before plastering.
- No hairline cracks: These can widen over time and cause your new plaster to crack as well.
- No blistering: If the old wallpaper is bubbling or blistering, it’s a sign of underlying issues that need to be addressed.
Quick rule: If you’re unsure about any aspect, it’s better to err on the side of caution and remove the old glue first.
Red flags that require removal instead
Sometimes, the old wallpaper glue just won’t cooperate. Here are some signs to look out for that might mean you should remove the glue before plastering.
Soft or tacky: If the old glue feels soft or tacky to the touch, it’s likely not stable enough to support new plaster. Remove it first.
Powdering: If the old wallpaper or glue turns to dust when you touch it, it’s too degraded to support new plaster. It needs to be removed.
Widespread blistering: If large areas of the wall have blisters under the old wallpaper, it’s a sign that there are underlying issues with the surface. Remove the glue and address these issues before proceeding.
Tools and Materials Checklist
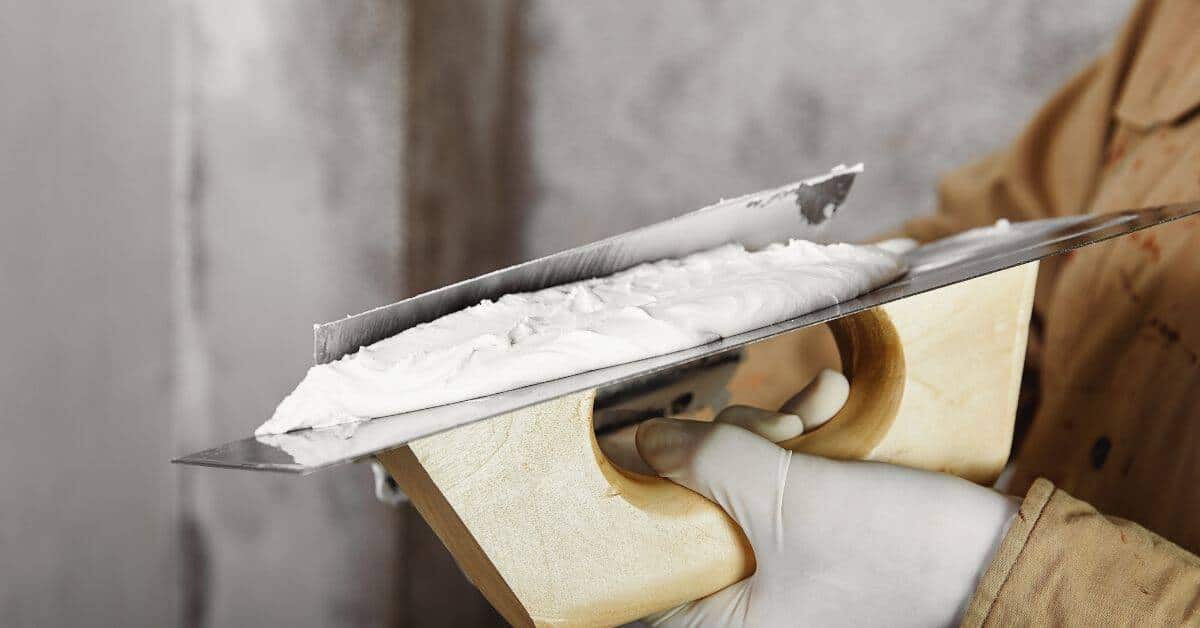
Gather the basics: a sturdy putty knife, stiff-bristle brush, damp sponge, and buckets with clean water. Add a margin trowel, hawk, and a damp cloth for cleanup. Have a drill or mixer, variable-speed if possible, and a plastering trowel for finish coats.
Stock the essentials for prep and bond: plaster mix or pre-mixed base coat, bonding agents or consolidants as recommended, and any mesh or scrim for reinforcement. Include PPE like gloves and eye protection, masking tape, drop cloths, and a cleanable work surface. Always confirm with product labels or manufacturer guidelines before use.
Essential tools and PPE
Before you start, make sure you have all the necessary tools and protective gear to ensure a safe and efficient job.
- Scraper: To remove any loose wallpaper or glue. Skip this and you’ll be fighting with stubborn residue later.
- Brushes (stiff and soft): For cleaning and applying primer. Soft brush for details, stiff for general cleaning.
- Trowels (straight edge and hawk): For mixing and applying plaster. A straight edge trowel helps with smooth application.
- Mixing buckets: To prepare your plaster mix. Don’t skimp on size, you’ll need it for larger areas.
- Sanding tools (sponges or poles): For smoothing out rough spots after plastering. Skip this and you’ll have a bumpy finish.
- Respirator: To protect against dust when sanding and scraping. Don’t forget to wear it!
- Gloves: To protect your hands from chemicals in the plaster mix. Wear them, trust me.
- Lighting (torch or headlamp): For inspecting hard-to-reach areas and dark corners. You’ll thank me later when you find that hidden hole.
Quick rule: Always check your tools before starting. A broken tool can ruin your day.
Materials and bonding products
Choose the right materials to ensure a strong bond between the old wallpaper glue and your new plaster.
- Plaster type: Consider using a multi-purpose or bonding plaster for better adhesion. Skip this and you might end up with delamination.
- Primer/consolidant: To seal the surface and improve adhesion. Don’t skip this step, it’s crucial!
- Bonding agent (if needed): For extra adhesion strength. Check if your plaster needs one before applying.
- Reinforcement mesh (optional): For added strength in areas with high stress or damage. Not always necessary, but can prevent cracks later on.
- Cleaners (diluted detergent or wallpaper remover): To clean the surface before plastering. Skip this and you’ll have a weak bond.
Quick rule: Always check manufacturer instructions for compatibility and usage guidelines.
Visual checkpoints and measuring aids
Use these simple tools to document your progress and monitor results throughout the job.
- Magnifier (or magnifying glass): To inspect small areas for damage or residue. Miss something tiny, and it could cause big problems later.
- Moisture meter (optional): To check for dampness before plastering. Skip this and you might end up with mold growth.
- Tape measure: To ensure even coverage when applying plaster. Don’t guess, measure!
- Masking tape: To mark test spots or protect areas from plaster. A little tape goes a long way in keeping things clean.
Quick rule: Regularly inspect your work and document any issues. Prevention is always cheaper than cure!
How to Identify the Type and Condition of the Wallpaper Glue
Know the common adhesive classes you might encounter: starch or paste, cellulose-based adhesives, and PVA/latex mixes. Each behaves differently under moisture and heat, which affects prep needs. Look and feel can hint at the glue’s nature, but testing is key.
Use simple checks to inform your prep plan. A damp rag and light rubbing can reveal residue texture; a small dampened edge can show how it softens. The results will guide whether you need consolidants, extra etching, or a specific bonding agent for the plaster coat.
Step-by-Step Process
Identifying the type and condition of wallpaper glue is crucial before plastering. This step-by-step guide helps you achieve that.
- Prepare your workspace: Clear the area, wear gloves to protect your hands, and have a damp cloth ready for testing.
- Visual inspection: Look at the wallpaper’s edges and any exposed areas of the glue. Note its color, texture, and any visible signs of deterioration.
- Touch test: Gently rub the glue with your gloved fingers to feel its texture and tackiness. Be careful not to damage the surface.
- Moisture test: Lightly dampen a cloth and press it onto the glue. Observe how it reacts. If it softens or becomes more tacky, it’s likely a water-based glue like PVA/latex.
- Scrape test: Use a sharp tool to scrape a small, hidden area of the glue. If it flakes off easily in large pieces, it’s old and brittle. If it comes off in small crumbs or remains tacky, it’s likely still in good condition.
Clues to the glue type
Wallpaper glue types can be identified by their appearance, feel, and typical locations. Here’s what to look for:
Paste-based glues (starch/paste) are usually yellowish, have a gritty texture when dry, and were commonly used in older homes (pre-1960s).
Cellulose glues are typically brown or tan, feel smooth and papery, and were common from the 1960s to the 1980s.
PVA/latex glues are usually white or clear, have a smooth, tacky feel when wet, and are commonly used today. They’re often used with modern, pre-pasted wallpapers.
Assessing glue age and condition
The age and condition of the glue greatly influence how well new plaster will bond. Here’s what to look for:
Brittle glue: If the glue flakes off easily or crumbles when scraped, it’s old and brittle. This can lead to poor adhesion with new plaster.
Gummy tack: If the glue feels very sticky or ‘gummy’ even after drying, it may not have cured properly or has been exposed to high humidity. This can cause delamination issues.
Re-solubilized residue: If the glue becomes soft and tacky when dampened, it might be re-solubilizing, which indicates it’s still in good condition but could benefit from a primer before plastering.
Simple Adhesion Tests to Perform Before Plastering
Carry out practical, non-destructive tests like a scratch or key test to gauge roughness and bonding potential. Apply a thin coating of plaster and observe how it grips the prepared surface in a controlled spot. Document the initial results for future comparison.
Interpret the outcomes to decide next steps. If adhesion seems weak, plan for additional consolidating steps or a bonding agent. Keep a simple record of each test area, date, and observed behavior.
Tape pull / peel test
Before you start plastering, do a simple tape pull test to check the bond of your old wallpaper glue. Here’s how:
1. Clean the wall with a damp cloth to remove any dust or dirt.
2. Apply a strip of painter’s tape (about 2 inches wide) onto the wall, pressing firmly to ensure good contact.
3. Let it sit for at least 24 hours to allow the adhesive on the tape to bond with the old glue.
4. Peel off the tape quickly and sharply at a 90-degree angle.
If the tape pulls off cleanly, leaving no residue or surface material behind, your old glue has good adhesion. If it leaves residue or removes wallpaper or paint, you’ll need to prep more or consider using a bonding agent.
Scratch and scrape test
The scratch and scrape test helps reveal the integrity of your old wallpaper glue’s bond with the underlying substrate. Here’s how:
1. Using a utility knife or a 5-in-1 tool, score the surface lightly in a cross-hatch pattern (about 1/8 inch apart).
2. Try scraping off some of the scored material with your thumbnail or a scraper.
If the old glue scrapes off easily and reveals sound underlying substrate, you’re good to go. If it’s difficult to remove or the substrate underneath is damaged, you’ll need to prep more or consider using a bonding agent.
Small patch/bonding-primer trial
Before committing to plastering the whole wall, do a small test patch. This helps you check the adhesion of your chosen primer and plaster after curing. Here’s how:
1. Choose an inconspicuous area (like behind a piece of furniture or in a corner).
2. Apply your chosen bonding primer according to the manufacturer’s instructions.
3. Let it cure for the recommended time.
4. Apply a small patch of your chosen plaster, again following the manufacturer’s instructions.
5. Let it cure completely.
6. Check the bond by trying to scrape off or pull at the edge of the patch.
If the patch adheres well and doesn’t peel or flake, you’re good to proceed with plastering the rest of the wall. If there are signs of poor adhesion, consider using a different primer or bonding agent, or prep the surface more thoroughly.
Preparing the Surface: Cleaning, Consolidating, and Repairs
Begin with a thorough cleaning to remove residues and contaminants. Scrape away loose glue and paper, then rinse and let it dry. Consolidate fragile spots with a suitable product before proceeding.
Repair substrate failures as needed, and test small areas first to confirm the approach. Reattach any loose sections and fill cracks or gaps to create a solid, uniform base. Document your prep steps for reference during plastering.
Cleaning and Degreasing Methods
Start by removing any loose wallpaper with a scraper. Then, tackle the residues left behind.
For gummy residues, use a mild detergent or a mixture of water and white vinegar. Apply it with a soft brush, let it soak for 10-15 minutes, then scrub gently. Rinse thoroughly.
For dusty residues, vacuum first to remove loose particles. Then, use a damp cloth or sponge with mild detergent to wipe the surface. Avoid overwetting as it can damage the substrate.
Never use aggressive solvents like paint thinners without checking compatibility first. They can dissolve old glue but may also damage your walls.
Consolidation and Priming Options
Before plastering, you might need to consolidate fragile areas. Use a consolidant or dilute PVA (Polyvinyl Acetate) if the old glue is crumbling or powdery.
Apply with a brush, following manufacturer’s directions. Let it soak in and dry completely before proceeding. This helps to stabilize the surface and prevent delamination.
In some cases, you might need a bonding primer. It promotes adhesion between old glue and new plaster. Use it when the old glue is in good condition but you’re unsure about its bonding capabilities.
Always check compatibility with your chosen plaster before applying any consolidant or primer.
Repairing Soft Spots, Holes, and Seams
Remove any badly damaged sections with a scraper or chisel. If the substrate is soft or crumbly, you might need to replace it entirely.
For holes, use a suitable patching compound. Apply it with a trowel or putty knife, following manufacturer’s instructions. Let it dry completely before sanding smooth.
For seams or large areas of damage, consider using a backing or mesh. This provides extra support and helps distribute stress evenly across the repaired area.
Ensure all repairs are sound and dry before applying any consolidant, primer, or plaster.
Choosing Plaster Mixes and Bonding Agents for over-Glue Applications
Outline the main plaster categories you’ll consider: base coats, skim coats, and finish coats, along with bonding products designed for problematic surfaces. Selection depends on substrate condition and the desired final texture. Make sure the chosen mix tolerates the underlying glue and any consolidants used.
Always verify key product details before purchase. Check pot life, cure time, and substrate compatibility on the labels or data sheets. When in doubt, call the manufacturer or consult the instructions for your specific situation.
Basecoat vs skimcoat considerations
The substrate’s condition dictates your plaster choice. If the glue is old and brittle, a thicker basecoat provides better support. It fills voids, evens out surfaces, and improves adhesion.
For newer, well-adhered glue, a thin skim coat might suffice. It gives a smooth finish and reduces material waste.
Remember, basecoats are typically applied at 12-15mm thickness, while skim coats range from 3-6mm.
Bonding agents and primers — pros and cons
Bonding agents and primers enhance adhesion, especially over old wallpaper glue. They create a better bond than relying on the glue’s residual adhesive.
Pros
- Improve plaster adhesion
- Seal porous surfaces
- Promote faster drying times
- Help prevent delamination
- Can create a mechanical key for better grip
- Easy application, often by roller or brush
Cons
- Add extra cost and time
- May require additional preparation steps
- Some may have strong odors during application
- Incorrect choice can lead to poor bonding
Use a primer or bonding agent when the glue is old, porous, or has weak adhesion. For newer, well-adhered glue, you might get away without one, but it’s always safer to apply.
Compatibility and manufacturer checks
Ensure your chosen plaster and primer are compatible with the old wallpaper glue. Some plasters may not bond well over certain glues, leading to delamination.
Always check manufacturers’ guidelines. They provide compatibility information and application instructions tailored to their products.
If unsure, perform a small-sample trial in an inconspicuous area. Apply the primer and plaster as you would on the wall, then assess adhesion after drying. This step can save you from costly mistakes.
Application Techniques That Reduce Delamination Risk
Use surface scoring or keying to create a mechanical grip between coats. Apply a thin scratch coat to establish a solid bond before layers build up. Consider embedding mesh at joints or transitions to prevent future cracking.
Control the environment during application. Maintain reasonable temperature and humidity as recommended on the product guidance. Keep notes on any deviations and verify with the label or manufacturer instructions as you go.
Creating a mechanical key and scratch coats
The old wallpaper glue can make it tough for new plaster to stick. We need to give the plaster something to grab onto. That’s where creating a mechanical key comes in.
Scoring: Use a scraper or a scoring tool to create shallow grooves in the surface. This increases the area for the plaster to bond with, improving adhesion. Be careful not to go too deep though, we don’t want to damage the substrate.
Scratch coat: Apply a thin layer of plaster over the scored surface. This is called a scratch coat because you should lightly score it again before it dries completely. This creates even more nooks and crannies for the final coats to bond with.
Layering strategy and drying management
Plaster needs time to cure properly, that’s why we apply it in layers. This gives each layer a chance to dry and gain strength before the next one goes on.
Start with a thin base coat. Let it dry completely according to the manufacturer’s instructions. Then apply a slightly thicker second coat. Again, let it dry fully before applying the final skim coat.
This staged approach helps prevent moisture from getting trapped and causing problems later on. It also gives you more control over the final finish.
Using reinforcement (mesh, tapes)
Plaster can crack or peel if it’s not supported properly. That’s where reinforcement comes in. We use fiberglass or paper mesh to control movement and cover seams.
Seams: Apply mesh tape over any seams or joints before applying the first coat of plaster. This helps prevent cracking along these weak spots.
Corners: For corners, use a flexible corner bead. It’s like a reinforced mesh tape that goes around the corner. This gives extra support and prevents cracks from forming in high stress areas.
Visual Checkpoints and Tests During and After Curing
Inspect the plaster during the curing window for signs of blistering, shrinkage, or separation. Note any areas that look different from the rest of the surface. Plan remedial work early if issues appear.
After curing, perform adhesion checks on test patches and monitor the surface over time. Document problem spots and outcomes to guide future repairs or refinishing. Keep a simple log of observations to reference later.
Early-warning signs to monitor
Check for these issues within the first few hours after application. Catching them early prevents major problems.
- Bubbles: Check for air pockets or blisters forming on the surface. If present, prick and press to release air and prevent delamination.
- Soft patches: Feel for any soft spots that didn’t harden properly. If found, scrape off the affected area and reapply.
- White powdering: Look for white efflorescence on the surface. This indicates excess water or salt. If seen, wipe off and monitor.
Quick rule: Address any issues within 24 hours to prevent them from worsening.
Post-cure adhesion verification
After the recommended cure time, perform these checks to ensure a strong bond. If failures are found, rework is necessary.
- Knock test: Gently knock on the plaster with your knuckles. Listen for a solid sound. A hollow sound indicates poor adhesion.
- Small edge lifts: Try lifting a small edge of the plaster. If it lifts easily, reapply and reinforce that area.
- Test cuts: Make a few small cuts into the plaster at varying depths. Check for any signs of separation or crumbling.
Quick rule: If adhesion checks fail, address immediately to prevent further issues.
Conclusion
Handling old wallpaper glue is about reliability and safety. Do the tests, prepare properly, and you protect the finish from delamination and costly fixes.
Proceed in plain terms: start with a small test patch to confirm bond, clean and consolidate the surface where needed, choose a plaster mix and bonding agent suited to the glue type, apply in thin, controlled coats, and verify the bond through curing and final checks before moving to full areas.
Avoid these mistakes: never guess the glue type or skip the adhesion tests, never plaster over a damp or rotted backing, and never rush curing or skip PPE and ventilation. Keep to simple safety rules—work dry, work clean, and keep a close eye on edge details and surface flatness as you go.
If the tests show weak bonding, or the glue is unusual or extensive, consider calling a pro rather than forcing a DIY fix. Stay practical, stay patient, and you’ll finish with a solid, lasting surface you can be proud of.
FAQ
Can old wallpaper glue cause delamination even after you start plastering?
Yes. glue left behind can weaken the plaster bond and lift if the surface isn’t prepared. Test spots and follow up with proper surface treatment as needed.
How should I test bond strength without tearing into a full patch job?
Do small adhesion tests on inconspicuous areas. Use a gentle pry or finger pressure to feel if the plaster grip is holding. If it peels easily, address the glue first before continuing.
What steps help consolidate and prepare glue-coated surfaces before plastering?
Lightly abrade the surface to create a tooth, then clean thoroughly to remove dust and grease. If the glue is flaky, consolidate it with a suitable primer or bonding agent per the label instructions, and let it dry before applying plaster.
What common mistakes raise the risk of delamination, and how can I avoid them?
Avoid using plaster on a surface with loose glue or non-primed, glossy residue. Don’t skip surface preparation or randomly mix plaster without checking manufacturer guidance. Always follow product labels and local guidance for best results.