
Introduction
A feathery transition blends into the surrounding plaster, while a sharp transition leaves a crisp, defined edge. That choice changes how visible the repair is and how easy it feels to the eye. As a DIYer, your pick depends on wall texture, room style, and how the surface will be used.
When you repair, start with a light touch to feather the edge and avoid hard lines. Compare the result to the surrounding finish and adjust if needed before it cures. If you’re unsure, test on a hidden spot and follow the plaster product instructions and local rules.
Key takeaways
- Choose feathering for subtle repairs; keep transitions gradual and uniform.
- Sharp edges suit high-contrast repairs; clean lines demand precise blade work.
- Prep substrate by removing loose material and cleaning dust before mudding.
- Allow proper set times per product instructions to avoid cracking.
- Safely mask adjacent surfaces and ventilate; use eye protection when finishing.
- Inspect texture match under raking light and rework rough spots promptly.
Table of Contents
- Introduction
- Key takeaways
- Overview: What Feathery and Sharp Transitions Are and Why They Matter
- Deciding Factors: When to Choose Feathering Vs a Crisp Edge
- Tools, Materials, and Mixes (DIY-Friendly Checklist)
- Preparing the Substrate and Edges
- Technique: Step-by-Step for Feathery Transitions
- Technique: Step-by-Step for Sharp Transitions
- Matching Textures, Paint, and Final Inspection
- Troubleshooting, Common Mistakes, and Repair Escalation
- Conclusion
- FAQ
Overview: What Feathery and Sharp Transitions Are and Why They Matter
Feathery edges blend plaster into the surrounding surface with gradual thinning, while sharp edges show a clean, defined line. The choice changes how the repaired area reads in photos and in real life. It also affects how much finish work you’ll have to do later.
Think about where the repair sits and how much movement nearby you expect. Use cases vary from low-visibility patches to high-traffic areas where impact is a concern. This quick overview helps you weigh appearance against durability and effort.
What is a feathery transition
A feathery transition, also known as feathering, is a technique used to blend repairs into existing surfaces. It’s called ‘feathery’ because it creates a gradual taper of compound into the surrounding surface, much like the tail feathers of a bird.
The key here is gradual. Instead of stopping abruptly at the edge of the repair, a feathery transition tapers off, making the seam less visible and helping the repair blend in with the rest of the wall or ceiling.
Feathering is typically used when you want to maintain a smooth finish. It’s great for touching up small holes or cracks where you don’t want to see any lines left behind.
What is a sharp transition
A sharp transition, on the other hand, creates a defined edge. Unlike feathering, it doesn’t taper off gradually but rather stops abruptly at the edge of the repair.
Sharp transitions are often used when you need to preserve a crisp profile or where a thin feather would fail. For instance, if you’re repairing a corner where two walls meet, using a sharp transition will help maintain that 90-degree angle.
They’re also useful in architectural features like crown moldings or baseboards where a clean, defined edge is needed. Just remember, sharp transitions are more noticeable than feathery ones, so they require more precise work to ensure the repair blends well with the surrounding area.
Deciding Factors: When to Choose Feathering Vs a Crisp Edge
Size and depth of the patch are the first clues. Larger or deeper repairs tend to benefit from feathering to reduce abrupt transitions. Smaller patches often look better with a crisp edge for a clean, built-up look.
Consider adjacent textures, trims, and any expected movement or cracking. If a substrate is flexible or binds differently, a crisp edge may crack sooner without a stop or backing. Decide with the goal of minimizing future repairs while matching the surrounding finish.
Patch size, depth, and shape
The size and depth of your patch are key factors when deciding between feathering and a crisp edge. Here’s what to consider:
Small, shallow patches (< 1/2″ deep) usually favor feathering. It helps blend the repair into the surrounding wall, minimizing the appearance of a repair.
Deep or edge-constrained repairs may require a defined stop or re-profiling. This is where you’d use a sharp transition to maintain structural integrity and prevent further damage.
Adjacent finishes and architectural details
Nearby textures, trim, beads, and joint lines can influence your choice of edge strategy. Here’s how:
If you’ve got uniform textures or trim, feathering might be the way to go. It helps preserve those profiles and maintains a cohesive look.
But if there are distinctive details or joint lines, consider using a sharp transition. This can help maintain those unique features and prevent them from getting lost in a blended repair.
Movement, joints, and crack history
Assessing existing movement or cracks is crucial before making your decision. Here’s why:
If there’s likely movement, a strategic stop or backing may be required to prevent re-cracking. A crisp edge can help accommodate this movement without compromising the repair.
Similarly, if you’re dealing with multiple cracks or joints, consider using a sharp transition. It can help maintain those lines and prevent further cracking.
Tools, Materials, and Mixes (DIY-Friendly Checklist)
Start with a basic lineup of compounds, knives, and mixing containers. Choose products compatible with the edge style you plan to use. Check labels for application guidance and compatibility with existing plaster or backing materials.
Keep a small collection of finishes for feathering or edging work, plus a sanding system that won’t clog easily. Always verify manufacturer instructions for setting times and hardening behavior before you apply a second coat.
Compounds and additives
Before you start mixing or applying any compounds, use this checklist to ensure you’ve got the right products for your job. This will save you time, money, and prevent costly mistakes.
- Premixed Topping Compounds: Check label for ‘ready-to-use’ or ‘premixed’. Ensure it’s suitable for your project (e.g., self-leveling, textured finish).
- Setting-Type Compounds: Verify it’s a two-part system (resin + hardener). Check expiration dates and ensure both parts are present.
- Bonding Primers/Aditives: Confirm it’s designed for your substrate (e.g., concrete, plywood, metal) and the compound you’re using.
- Mix Ratios: Check manufacturer instructions. Common ratios are 1:1 or 2:1 (resin:hardener).
- Pot Life: Note how long your mixed compound stays usable. Work within this timeframe to avoid waste.
- Working Time: Check how long you have before the compound sets. Plan your work accordingly.
- Curing Time: Ensure you allow enough time for the compound to fully cure before applying sealers or foot traffic.
- Cleaning Agents: Have appropriate cleaners (e.g., acetone, denatured alcohol) ready for tools and spills.
Quick rule: Always follow manufacturer instructions. They know their product best and can help you avoid common pitfalls.
Tools and blade selection
Before you start your drywall finishing project, use this checklist to ensure you have the right tools and blades for a smooth, professional finish.
- Taping knives: Check you have both 6″ and 12″ taping knives. The 6″ is ideal for tight edges and corners, while the 12″ is perfect for large areas.
- Feathering knife (4″ or 6″): Ensure you have one with a flexible blade for creating smooth, seamless feathered edges.
- Corner tool: Verify you have a corner tool to create sharp, clean inside and outside corners.
- Sanding block: Check your sanding block is suitable for the grit of sandpaper you’ll be using (usually 120 or 150).
- Blade width for feathering: Confirm your feathering knife blade is between 4″ and 6″. This width allows for easy control and smooth feathering.
- Blade width for tight edges: Ensure your taping knife blades are 6″ or less for tight edge work. Wider blades can be unwieldy in small spaces.
- Blade condition: Inspect all blades for nicks, bends, or dullness. Replace any damaged blades to prevent poor finishes and rework.
- Blade sharpness: Test blade sharpness by lightly dragging it across your thumbnail. It should leave a clean mark without snagging.
Quick rule: Always use the right tool for the job. A 6″ taping knife is ideal for tight edges and corners, while a 12″ knife is perfect for large areas. For feathering, use a flexible blade between 4″ and 6″.
Safety and surface protection
Before you start sanding or finishing your concrete surfaces, use this checklist to ensure safety for yourself and protection for the surrounding area.
- Personal Protective Equipment (PPE): Check that you have a dust mask, safety glasses, work gloves, and ear protection. Ensure they’re in good condition and fit properly.
- Dust Control: Inspect your vacuum or dust collection system to ensure it’s working correctly. Have extra filters on hand if needed.
- Sanding Equipment: Check that your sanders are in good working order and have the correct grit of abrasive paper (start with 36-grit for initial roughing, then progress to finer grits).
- Protect Surrounding Finishes: Cover nearby walls, floors, and furniture with plastic drop cloths or sheets. Secure them in place.
- Seal Off Areas: If possible, seal off the work area from other parts of the house to contain dust. Use door draft excluders if necessary.
- Moisture Check: Before sealing or applying any finish, check for moisture using a concrete moisture meter. The reading should be below 4 lbs per 1000 sq ft (2 kg/m²).
- Surface Preparation: Inspect the surface for any cracks, holes, or contaminants. Clean and repair as needed before sanding.
- Test Area: Before applying finish to the entire area, test it on a small, hidden part of the surface to ensure compatibility and desired outcome.
Quick rule: Always prioritize safety first. Skipping PPE or dust control can lead to serious health issues, while neglecting surface protection may result in expensive damage to surrounding areas.
Preparing the Substrate and Edges
Assess the wall for soundness first and mark any loose plaster to remove. Clean the surface to remove dust, oils, and flaking paint that can trap voids. Backing or mechanical stops should be installed where needed to support the edge.
A good prep work plan prevents failures no matter which edge you choose. If something looks questionable, pause and verify it before you start applying compound. The goal is a solid, clean base for the repair.
Testing adhesion and removing unsound material
The condition of your substrate significantly impacts the success of your repair. Poor adhesion leads to cracks, peels, and weak bonds.
- Scratch test: Use a screwdriver or utility knife to score the surface. Sound plaster will not flake off. Look for areas that crumble or powder. Avoid testing too deeply, as this can cause damage.
- Tapping test: Gently tap the wall with a hammer or knuckle. Hollow sounds indicate loose material. Spec for solid, dull thuds. Tip: Tape off areas to prevent dust spread.
- Moisture check: Inspect for signs of water damage like stains, warping, or mold. Rating for dry surfaces is crucial. Avoid repairing wet plaster until the source is fixed.
- Remove loose material: Chip off friable plaster using a hammer and cold chisel. Use gloves and safety glasses. Spec for a smooth, clean surface. Tip: Vacuum up dust to prevent inhalation.
- Clean contaminants: Remove paint, grease, or dirt using appropriate solvents or cleaning agents. Use drop cloths and proper ventilation. Rating for a clean surface is vital. Avoid applying new compound over contaminants.
Installing backing, beads, or stops
Backing materials and mechanical stops provide support for sharp transitions and prevent cracking. Install them before applying new compound.
Corner beads: Use when repairing corners to create a smooth, durable edge. Spec for the right size and type (paper-faced or mesh-backed). Tip: Align the bead with the corner’s edge before securing it.
Metal stops: Apply where walls meet ceilings or other surfaces to create a crisp line. Use them when transitioning from one finish to another (e.g., plaster to paint). Avoid using too wide a stop, as this can cause visible lines in the finished surface.
Backing material: Apply backing compound or tape to create a stable base for sharp transitions. Spec for products designed for your application (e.g., joint compound, setting-type compounds). Tip: Apply backing materials evenly and smoothly to prevent visible lines.

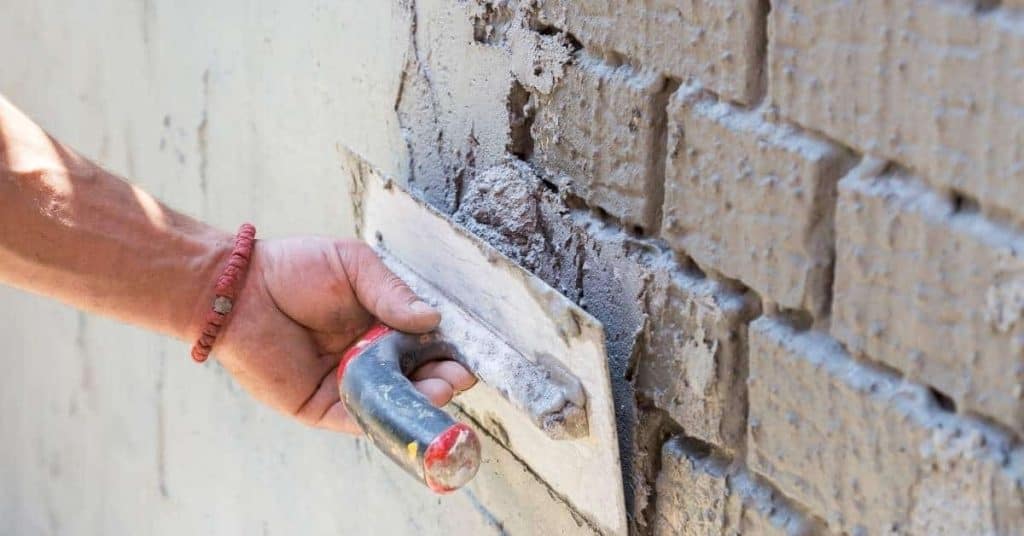
Technique: Step-by-Step for Feathery Transitions
Apply the compound in thin, successive passes, letting each layer set as you work. Feather each pass wider than the last to blend into the surrounding surface. Finish with controlled sanding to minimize ridges and telegraphing.
Regularly check thickness and alignment to avoid bumps that telegraph through paint. Small, careful adjustments during application save big work later. This workflow keeps the edge soft and nearly invisible when done.
Step-by-Step Process
This sequence guides you through creating a feathery transition, from prep to finish.
- Prep the area: Clear debris, protect surfaces, and ensure safety. Why: A clean, safe workspace ensures quality work.
- Check adhesion: Test substrate with a damp cloth. Why: To confirm your patch will stick.
- Maintain thin layers: Apply compound in thin passes, feathering each wider than the last. Why: Thin layers prevent ridges and ensure strength.
- Smooth with sandpaper: Lightly sand between coats to remove ridges. Why: Smoothing helps blend edges and eliminate imperfections.
- Final check: Inspect for thickness, telegraphing, or missed spots before finishing. Why: Early detection prevents costly rework.
Layering and feathering sequence
Building thin, strong layers is key to a smooth feathery transition. Start with a thin base coat, tapering it wider as you go.
Tip: Use a flexible trowel for better control over thin layers.
Each subsequent layer should be thinner and wider than the last, gradually building up to your desired feather width. Remember, patience is key in achieving a smooth finish.
Sanding, blending, and visual smoothing
Sanding helps blend the feathered edge while minimizing dust. Use fine-grit sandpaper (120-220) for best results.
Tip: Wet-sanding reduces dust but may require additional drying time.
Work in small sections, using gentle, even strokes to avoid removing too much material. Regularly check your progress and adjust as needed to maintain a smooth, blended edge that matches the surrounding texture.
Technique: Step-by-Step for Sharp Transitions
Set up a mechanical stop or bead to establish a true edge. Load the compound and strike the plane to a clean, crisp line. Reinforce as needed so the edge resists movement or impact during use.
Maintain a consistent thickness along the edge and along the surrounding surface. Wipe away excess material to keep the line sharp and visually separate from the patch. Recheck alignment before it hardens fully.
Step-by-Step Process
The following steps will guide you through creating sharp transitions in your plaster repairs, ensuring a clean and professional finish.
- Inspect the area for any movement, joints, or cracks. Refer to our earlier section on preparing the substrate if necessary.
- Gather your tools: stiff knife, mechanical stop or bead, trowel, joint tape (if needed), and compound. Ensure you’ve followed the DIY-friendly checklist for materials and mixes.
- Set up a mechanical stop or bead along the edge where you want your sharp transition. This will guide your knife and help create a clean line.
- Apply compound to the required plane using your trowel, ensuring it’s smooth and even. Remember to strike a clean edge as you work towards the stop or bead.
- Use your stiff knife to strike a final, sharp edge against the mechanical stop or bead. Work in small sections at a time for best results.
- Allow the compound to set slightly, then reinforce the edge with a corner guard or tape if necessary. This will help resist impact and movement over time.
- Inspect your work and make any final adjustments before the compound fully sets. If you’re unsure about any step, don’t hesitate to call a professional for advice.
- Once satisfied with your sharp transition, clean up your tools and workspace. Don’t forget to safety check your area before leaving it.
Forming and finishing crisp edges
Creating a clean, sharp edge in your plaster repair involves using the right tools and techniques. Here’s how to achieve it:
Start by applying a mechanical stop or bead along the edge where you want your sharp transition. This will serve as a guide for your knife.
Use a stiff knife to apply compound directly against the stop or bead, working in small sections at a time. Press firmly and evenly to create a clean, crisp edge.
Once you’ve finished applying the compound, use a damp sponge or cloth to wipe away any excess compound from the surface of the mechanical stop or bead. This will help minimize paint adhesion issues and shadows in your final finish.
Sealing and protecting sharp edges
Maintaining a sharp profile over time requires proper sealing, reinforcement, or corner guards where high wear or impact is expected. Here’s how to protect your sharp edges:
After creating your sharp transition, allow the compound to fully set and cure according to the manufacturer’s instructions.
If you expect high wear or impact in the area (e.g., near doorways, corners, or high-traffic zones), apply a corner guard or tape along the edge. This will help reinforce the sharp transition and protect it from damage.
For added protection, consider applying a sealer specifically designed for plaster or your chosen finish. This will help lock in moisture, prevent cracking, and maintain the sharp profile over time. Always follow the manufacturer’s instructions when using sealers.
Matching Textures, Paint, and Final Inspection
Choose texture methods that mirror the surrounding wall, whether stomp, knockdown, or spray. Prepare the patch so the texture sits at the same plane as the adjacent surface. Primer and paint should be compatible with the texture you’ve chosen.
Use a visual checklist before painting: seams, shadowing, and any bumps should be addressed. Tap or run a finger lightly to feel for hidden ridges. The goal is a seamless transition that the eye reads as part of the wall, not a repair.
Reproducing textures over feathered and sharp edges
Before you start matching textures, decide if you’re working with feathered or sharp edges. Each has its own approach.
- Stomp texture: Use a stomp brush to mimic surrounding texture. Feathered edges need more blending; sharp ones require precise application.
- Knockdown texture: Apply with a knockdown knife. Feathered edges need gradual pressure changes; sharp ones require steady, light pressure.
- Spray texture: Use a hopper gun for even coverage. Feathered edges need overlapping passes; sharp ones require careful masking.
- Avoid overworking: Too much work can ruin the texture. Know when to stop.
- Match sheen: Ensure your repair matches the surrounding wall’s sheen for a seamless look.
- Test first: Always test your technique on a small area before committing to the entire patch.
- Avoid mismatched colors: Ensure your texture color matches the surroundings. Use a sample board if needed.
- Check for lumps and bumps: Feel the surface after texturing. Smooth out any imperfections.
Quick rule: Always test your texture-matching technique on a small area first to avoid costly mistakes.
Primer, paint, and long-term performance
Before painting, ensure your repair is ready for primer. Follow this checklist to achieve uniform sheen and adhesion.
- Check for dust: Wipe down the area with a damp cloth. Dust can interfere with paint adhesion.
- Inspect texture: Ensure your texture matches the surrounding wall. Make any necessary adjustments.
- Apply primer: Use a primer suitable for your wall type and paint choice. Apply evenly, following the manufacturer’s instructions.
- Allow primer to dry: Follow the recommended drying time before painting. Rushing can cause adhesion issues.
- Check for missed spots: Inspect your work for any areas that need more primer or touch-ups.
- Paint in thin coats: Apply paint in multiple thin coats rather than one thick coat. This ensures even coverage and better adhesion.
- Allow paint to dry between coats: Follow the recommended drying time before applying additional coats. Rushing can cause drips or poor adhesion.
- Inspect for bubbles or wrinkles: These indicate issues with your primer or paint application. Sand and reapply if necessary.
Quick rule: Regularly inspect your repair for signs of wear, such as cracking or peeling paint. Address these issues promptly to prevent further damage.
Troubleshooting, Common Mistakes, and Repair Escalation
Common problems include visible seams, cracking, shadowing, or bulges. Identify the root cause, such as insufficient prep, poor backing, or improper edge setup. Fixes often involve re-prepping, backing reinforcement, or re-scribing the edge plan.
Know when to call a pro: persistent cracks, movement, or large areas beyond your comfort zone. Use practical, staged fixes and document what you did to prevent repeats. Prevention starts with proper edge decisions and solid prep.
Diagnosing visible seams and telegraphing
Visible seams and telegraphing on your concrete surface can be a real eyesore. They’re usually caused by poor feathering, insufficient sanding, or substrate movement. Let’s tackle each issue.
Poor Feathered Edges: This happens when the concrete mix isn’t properly blended at the edges. To fix, you’ll need to grind down the high spots and reapply a thin layer of slurry. Use a feather edge tool for better control.
Insufficient Sanding: Not sanding enough can leave your surface rough, showing every little imperfection. To correct, you’ll need to resand the area, making sure to get into all those nooks and crannies. Use a soft-bristle broom for even distribution.
Substrate Movement: This is when your base moves, causing cracks or seams in your concrete. To prevent this, always check base compaction before pouring. If it’s already happened, you might need to remove and replace the affected area. It’s a pain, but it’s the only way to ensure a solid foundation.
When to call a pro or use structural repair
If you’ve found extensive cracking, recurring moisture, or large delaminations in your concrete, it’s time to consider professional help. These aren’t simple fixes and could indicate serious issues.
Extensive cracking might be due to settling or movement beneath the slab. This isn’t something you can fix with a quick patch job. You need to check base compaction and possibly consider underpinning or other structural repairs.
Recurring moisture can lead to serious damage over time. It could be due to poor drainage, which might require professional waterproofing or grading work. Large delaminations mean the concrete is separating from itself or its base, which is a sign of significant distress and needs immediate attention.
Don’t try to tackle these issues on your own. They’re beyond simple DIY repairs and could lead to further damage if not handled properly. Always consult with a professional when dealing with structural concerns.
Conclusion
Choosing the right edge strategy matters for safety, durability, and how the repair looks when it dries. Feathery transitions save material and hide small flaws, while crisp edges lock tight and feel solid in high-traffic spots. Make the call with a practical eye on the substrate and the room you’re in.
First, inspect and prep: test in a small area, clean the surface, and dampen where needed; decide feathering or a crisp edge based on the joint, motion, and expected wear; gather the DIY-friendly tools and mixes, mix per instructions, and plan your sequence from substrate preparation to final texture matching; then apply with the chosen technique in controlled strokes, feather or rake to blend, check texture with your sight and touch, allow cure time, and complete with matching paint and a final inspection for damage or gaps.
Avoid these traps: rushing the edge or over-wetting the joint, skipping proper substrate preparation, or ignoring curing times and paint compatibility; always wear eye protection and a dust mask, keep the work area ventilated, and test a small area before scale repair to prevent irreversible damage or unsightly repeats.
If the patch is large, the substrate shows signs of instability, or you’re dealing with structural cracks or water damage, stop and call a pro. With careful prep, steady hands, and these rules in mind, you can finish clean, durable repairs and move on with confidence.
FAQ
When should I use a feathery edge vs a crisp, sharp edge?
Feathery edges blend into the surrounding wall and hide slight imperfections. Sharp edges give a clean, defined line for patches that need to stand out or match a hard edge. If the repair area is large or irregular, feathering is usually the safer, more forgiving choice.
What concrete signs tell me I need to adjust my edge technique?
Look for visible ridges, hollow spots, or a patch that stands out against the rest of the wall. If the surface feels smooth and the patch sits flush after smoothing, a feathered transition is often enough. If the damaged area is close to a strong line, a crisp edge might be needed to keep things looking right.
What should I check on my tools and mixes to match the edge type?
Follow the product label and manufacturer instructions for mixing and application. For feathering, you’ll want a slurry or finishing pass that eases into the surrounding texture. For sharp edges, use controlled trowel pressure and a clean edge tool to define the line.
How do I ensure a paintable finish after either edge type?
Back-prime or seal the repaired area if the product calls for it, then let it dry as directed. Lightly feather the edges with a dry sponge or fine sandpaper to remove tool marks, then finish with your chosen paint coats. If the texture doesn’t take paint evenly, recheck the surface prep and patch thickness.