
Introduction
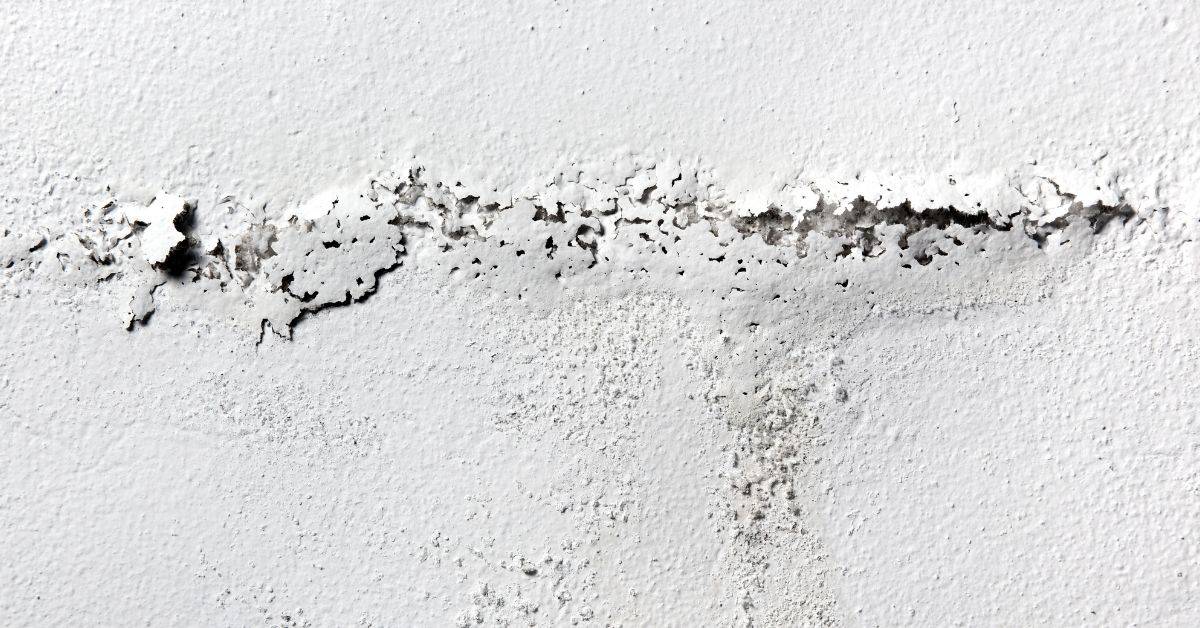
Efflorescence is the chalky salt stain that forms on interior concrete walls when water carries soluble salts to the surface. It’s a surface phenomenon, not a stain from dirt, and it can reappear if moisture keeps moving through the wall. To clean it without driving salts deeper, use a light touch, rinse thoroughly, and let the wall dry before any sealing.
Identify and address the moisture source before cleaning to prevent recurrence. Clean with a mild cleaner and a soft brush, rinse well, and dry the wall completely. After it’s dry, seal the surface following the product label and local rules to slow future moisture ingress.
Key takeaways
- Identify efflorescence vs other white stains by chalky, powdery texture and mineral residues.
- Prevent moisture intrusion during framing and masonry to reduce future salt migration.
- Clean interior walls with gentle, non-acidic methods to avoid driving salts deeper; wear PPE.
- Address the moisture source first; sealing without moisture control may fail.
- Use manufacturer-approved cleaners and test on a small area before full cleaning.
- Evaluate long-term protection options (sealers and densifiers) with local code guidance.
Table of Contents
- Introduction
- Key takeaways
- What Is Efflorescence on Interior Concrete Walls?
- Identifying Efflorescence Vs Other White Stains
- Root Causes — Where the Salts and Moisture Come from
- Why Cleaning Can Worsen the Problem — Risks of Driving Salts Deeper
- Safe Cleaning Methods for Interior Concrete Walls
- Fixing the Moisture Source — Permanent Solutions Before Sealing
- Long-Term Protection: Sealers, Densifiers, and Coatings for Interior Walls
- DIY Vs Professional Treatment — Decision Guide and Cost Considerations
- Conclusion
- FAQ
What Is Efflorescence on Interior Concrete Walls?
Efflorescence on interior concrete walls is a white crystalline deposit that forms when water moves salts from the material to the surface. It is not a mold or a stain from paint, and it does not indicate a stand-alone disease in the wall itself. Understanding it helps you diagnose moisture movement rather than diagnosing a disease.
Factors inside buildings—humidity, vapor drive, concrete porosity, finish coatings, and indoor moisture sources—shape how salts migrate and where they appear. Recognizing the appearance, texture, and location helps assess aesthetics and potential moisture issues behind the scenes. Use efflorescence as a clue for moisture control planning before cleaning or repairing, not as a sole fix.
How efflorescence forms in concrete
Efflorescence happens when water moves through concrete. This is called capillary action.
Water picks up dissolved salts as it travels. These salts come from the concrete mix or from soil moisture.
When water reaches the surface, it evaporates. As it does, it leaves behind salt crystals. That’s efflorescence.
Types of salts and how they behave
Efflorescence can be caused by different types of salts. The most common are sulfates, chlorides, and nitrates.
Sulfates often cause a chalky white deposit. They’re common in concrete made with certain cements or exposed to soil moisture.
Chlorides can lead to more persistent efflorescence. They come from de-icing salts, seawater, or contaminated concrete mix.
Identifying the salt type helps you choose the right cleaning method and prevent recurrence.
Identifying Efflorescence Vs Other White Stains
Start with practical tests to tell efflorescence from paint residue, lime bloom, mold, or mineral stains. Check whether cleaning reveals new salts or simply removes a surface layer of coating. Observe patterns to distinguish moisture-driven movement from isolated stains.
Visual cues matter: efflorescence is typically powdery and follows moisture paths, while paint or lime bloom has different textures and locations. Use simple checks like a dry brush test or a light damp wipe to guide you toward the right treatment. Decide on next steps based on whether the result points to efflorescence or another issue requiring paint, mold remediation, or mineral cleaning.
Simple on-site tests and observations
First off, let’s do some quick checks to confirm if what you’re seeing is efflorescence. It’s a simple process that won’t take much time.
Dry rub: Gently rub the stain with a dry cloth or brush. If it’s powdery and comes off easily, it might be efflorescence – salts tend to leave a residue when rubbed.
Solubility test: Moisten a cotton swab with water and dab the stain. If it dissolves and turns the water cloudy or milky, you’re likely dealing with soluble salts from efflorescence.
Moisture probing: Use a moisture meter to check the wall’s humidity levels. Efflorescence thrives in damp environments, so if your readings are high, it could be a sign of efflorescence.
When staining signals deeper damage
Now, not all stains are just surface issues. Some can indicate serious problems beneath the concrete’s surface. Here’s what to look out for:
Repeated deposits: If you’re constantly cleaning off efflorescence and it keeps coming back, there might be a moisture issue that needs addressing at the source.
Flaking or spalling: If the concrete is flaking off or crumbling (spalling), it’s a sign of serious damage. This could be due to salt crystals expanding and contracting over time, pushing the concrete apart.
Salt ingress: If you notice white deposits forming on cracks or joints, it might indicate that salts are migrating into the concrete from outside, causing internal damage.
Root Causes — Where the Salts and Moisture Come from
Interior salt sources include cementitious materials, aggregates, groundwater moisture, contaminated backfill, and deicing salts migrating through slabs or walls. Each source sets up different pathways for movement of moisture and salts. Identifying the dominant source helps you plan the right remediation.
Moisture pathways involve capillary rise, vapor diffusion, condensation on cool surfaces, hydrostatic pressure, and leaks. Indoor contributors such as humidity, poor drainage, and temperature gradients can amplify staining. Use a diagnostic checklist with moisture meters and simple tests to map the routes and prioritize fixes before cleaning.
Construction and material sources of salts
The materials used during construction can introduce salts into your concrete walls. Here’s how:
- High-salt aggregates: Some aggregates contain high levels of soluble salts. Use low-salt aggregates to avoid this.
- Contaminated mixes or mortar: Salts can be introduced during mixing if the water used is contaminated. Ensure clean water is used for mixing.
- Stored materials: Materials stored in humid conditions can absorb salts from the air. Keep materials dry and covered when not in use.
- Poor material selection: Using low-quality or improperly rated materials can lead to cracking, staining, and weak bond strength.
- Inadequate curing: Insufficient curing allows salts to migrate towards the surface. Curing should be done properly to prevent this.
Interior moisture sources and vapor drive
Moisture in your interior can come from various sources, driving salts towards the surface. Here are some common culprits:
Plumbing leaks: Water leaks from pipes or fixtures can introduce moisture into your walls.
Condensation: Warm, moist air coming into contact with cooler surfaces can cause condensation, leading to moisture buildup.
Capillary rise from slabs: Moisture from the slab below can wick up through the pores in your concrete walls.
Poor exterior drainage: Water not properly drained away from your foundation can seep into your walls over time.
HVAC issues: Improperly vented or maintained HVAC systems can introduce moisture into your interior.
Why Cleaning Can Worsen the Problem — Risks of Driving Salts Deeper
Excess water, high-pressure cleaning, or the wrong cleaners can push soluble salts further into concrete pores. This creates hidden pockets that can recur after cleaning. Salts may reappear as you dry and re-crystallize in new pore spaces.
Watch for signs that cleaning is making things worse, such as fresh salt bloom after washing or damp patches after a scrub. Avoid tools and methods that spray or soak aggressively, and focus on safer cleaning approaches that minimize water movement. If the problem looks extensive, pause and seek professional evaluation.
Why pressure washing and excess water are problematic
High-pressure jets or soaking can force soluble salts deeper into the concrete’s capillary pores, making efflorescence removal harder. Here’s why:
Capillary action is like a tiny straw sucking up water. High pressure pushes water (and dissolved salts) downwards, driving them further into the concrete.
Too much water also increases capillary suction. This pulls more moisture and dissolved salts in, creating hidden pockets of efflorescence that’ll recrystallize later.
How to recognize you’ve driven salts deeper
After cleaning, look for these signs indicating salts remain within the slab:
Renewed efflorescence appearing soon after washing suggests salts were pushed down but not removed.
Stains reappearing or haloed stains emerging beneath surface staining indicate salts are still present, recrystallizing at new pore surfaces.
Delayed emergence of deposits, even weeks later, can also signal that salts were driven deeper during cleaning and are now migrating back out.
Safe Cleaning Methods for Interior Concrete Walls
Start by confirming the wall isn’t actively damp and identify the water sources to prevent re-deposition. Clarify that efflorescence is salts, not just surface staining, and that dry methods are preferred when possible. Establish a dry approach priority before any wet cleaning.
Follow a dry-cleaning sequence: dusting, sweeping, and vacuuming with a HEPA filter, then light brushing with microfiber pads to lift salts. Reserve moisture for controlled applications only if needed, using minimal, targeted poultice methods under careful supervision. Ventilate and monitor for new salt deposits during the process.
Dry removal, brushing, and HEPA vacuuming
Start by removing loose surface deposits with a stiff-bristled brush or dry scraping tool. Be gentle to avoid pushing salts deeper.
Use a HEPA filter vacuum to suck up the loosened particles. This helps contain dust and prevents further spread of salts.
For tougher spots, use a soft-bristled brush or microfiber pad in circular motions to lift off more deposits without wetting the surface.
Low-water cleaning and reagent options
Minimize water usage by starting with pH-neutral cleaners or mild acids/chelating agents. Always test on a small, inconspicuous area first.
Follow product labels strictly for dilution rates and application times to avoid driving salts deeper.
Rinse sparingly and only when necessary. Use a damp cloth or sponge, not a power washer or high-pressure stream.
Poultices and absorbent extraction techniques
A poultice is an absorbent compound applied to the wall to draw out salts. It’s a low-moisture, controlled method.
Mix the poultice according to instructions, apply it thickly onto the affected area, and let it dwell for the recommended time (usually 24-72 hours).
Remove the poultice gently with a trowel or scraper. Vacuum up any residue. Repeat if necessary, but avoid over-wetting.
Fixing the Moisture Source — Permanent Solutions Before Sealing
Diagnose exterior and interior moisture sources comprehensively, including grading, gutters, downspouts, flashing, condensation, and hidden leaks. Consider drawing a quick moisture map to track each source. Use this framework to guide repairs before sealing interior surfaces.
Prioritize durable exterior fixes first: improve drainage, regrade soil, extend downspouts, seal exterior cracks, and repair flashing. Interior remediation follows once moisture is controlled: install or upgrade vapor barriers, ensure proper ventilation, and use dehumidification to balance the interior environment. Reference sealing choices that suit the fixed moisture condition and avoid trapping moisture when the source isn’t resolved.
Interior moisture control: dehumidification and HVAC tweaks
Efflorescence on interior concrete walls is often driven by excess humidity. To tackle this, you’ll need to reduce vapor pressure and slow salt migration.
Dehumidifiers are your first line of defense. Place them in affected areas, ensuring they’re properly vented to the outdoors. Maintain relative indoor humidity below 50% for best results.
Improve ventilation by opening windows when possible and using exhaust fans in kitchens and bathrooms. For serious issues, consider installing a whole-house ventilation system.
Adjust your HVAC system to help control moisture. Set the thermostat fan to ‘on’ instead of ‘auto’ for continuous air circulation. Consider upgrading to a humidity-sensing thermostat that automatically adjusts based on indoor humidity levels.
Exterior fixes: grading, drainage, and waterproofing
The key to preventing interior efflorescence is controlling exterior moisture. Start by ensuring your property has proper positive grading. Soil should slope away from the foundation at a minimum of 6 inches over 10 feet.
Check and maintain gutters and downspouts. Ensure they’re free of debris, securely attached, and extenders are directing water well away from the walls – ideally at least 5-10 feet.
Inspect your foundation for cracks or gaps that could allow water entry. Seal these with an appropriate exterior sealant or contact a professional if repairs are extensive. Also, ensure your roof and gutters are in good repair to prevent water from entering via the top of the wall.
Consider applying a waterproof coating to your foundation walls if they’re above ground. This can help prevent moisture from being drawn into the concrete by capillary action.
Structural and plumbing repairs, and capillary breaks
Hidden leaks or damaged plumbing can contribute to efflorescence. Inspect your pipes, both visible and hidden, for signs of damage or corrosion. Repair any issues promptly.
If you suspect moisture is coming from outside the wall, consider adding a capillary break layer. This could be a waterproof membrane or a layer of gravel between the foundation and the backfill to prevent moisture wicking into the wall.
If contaminated backfill is identified as the source, it may need to be removed and replaced with clean material. This can be a significant project, so consider hiring a professional if you’re unsure about how to proceed.
Regularly inspect your walls for new cracks or signs of water entry. Address these promptly to prevent further moisture intrusion and salt migration.
Long-Term Protection: Sealers, Densifiers, and Coatings for Interior Walls
Compare penetrating sealers, densifiers, and topical coatings for interior walls, focusing on performance and vapor-permeability. Consider how moisture management and porosity affect effectiveness when choosing options around humidity and history of efflorescence. Use this as a guide to match product type to your wall conditions.
Weigh trade-offs like odor, finish feel, application ease, maintenance, and potential salt beading under different conditions. A practical matrix can help you decide based on permeability, appearance, salt migration risk, and compatibility with existing finishes. Include prep, substrate condition checks, and curing considerations to avoid trapping salts. Plan for ongoing maintenance and re-evaluation to catch changes early.
How to choose a penetrating sealer or densifier
When selecting a penetrating sealer or densifier for your interior concrete walls, consider these factors:
Vapor Permeability: Opt for products that allow moisture vapor to escape. This helps prevent trapped moisture and further efflorescence.
Salt Tolerance: Choose sealers or densifiers with good salt tolerance to minimize the risk of driving salts deeper into the concrete.
Substrate Condition: Evaluate your wall’s condition. If there are cracks or laitance, consider a densifier first to improve the substrate before applying a sealer.
Always perform adhesion and moisture tests before application to ensure compatibility with your specific surface and conditions.
When topical coatings or finishes are appropriate
Topical coatings can be used to protect and finish interior concrete walls, but they should not be your first line of defense against efflorescence. Here’s when to use them:
Vapor-Permeable Paints: If your wall has low to moderate moisture vapor drive, a breathable paint can help protect the surface while allowing moisture to escape.
Impermeable Coatings: For walls with high humidity or significant efflorescence history, consider impermeable coatings. However, be aware that these can trap moisture and may exacerbate underlying problems if not addressed.
Hiding Residual Salt Problems: Topical coatings can hide residual salt stains, but they do not address the root cause of efflorescence. Ensure you’ve fixed any underlying moisture issues before applying coatings to prevent recurring problems.
Timing and compatibility after cleaning
Before applying any protection or finish, ensure your wall is dry and free from salts:
Dry Wall: Confirm the wall is completely dry before application. Use a moisture meter to check for any remaining dampness.
Salt-Reduced Surface: After cleaning, perform a salt test (like the Silver Nitrate Test) to ensure salts have been adequately removed.
Test Patches and Manufacturer Guidance: Always do test patches to check for compatibility with your chosen product. Follow manufacturer guidelines for dry time and surface preparation to achieve optimal results.
DIY Vs Professional Treatment — Decision Guide and Cost Considerations
Clarify which tasks are safe to tackle DIY and which call for a licensed professional, with red flags for moisture intrusion or mold. Use a quick decision framework to separate scope clarity from guesswork. Ground your choices in safety and effectiveness.
Run through a diagnostic checklist: moisture sources, salt extent, and surface vs substrate penetration. Outline DIY steps (ventilated cleaning, non-acid cleaners, safe brushing) and clearly define professional tasks (moisture control, vapor barriers, structural repairs, and penetrating sealers). Discuss cost drivers—no fixed prices—by explaining how salt load, moisture repair needs, and protection choices influence outcomes. Include a list of tools, safe cleaners, and reputable resources to consult if escalation is needed.
Tasks suitable for homeowners
DIYers can tackle several efflorescence cleaning tasks safely. Start by visually inspecting your concrete walls to assess the extent and location of salt deposits.
Dry brushing: Use a stiff-bristled brush to remove loose salts. Be gentle, as harsh scrubbing can damage the surface.
Poultices: For small areas with heavy salt buildup, apply a poultice made from powdered cleaner mixed with water. Let it sit, then scrape off and vacuum.
Dehumidification: If interior humidity is high, use a dehumidifier to reduce moisture levels before sealing. Always test sealers on small patches first.
When to hire a professional
Some efflorescence issues require expert intervention. If you notice any of the following, don’t hesitate to call a licensed specialist.
Recurrent efflorescence: Persistent salt deposits may indicate underlying moisture problems that need professional diagnosis and repair.
Structural spalling: Large pieces of concrete flaking off could signal serious structural issues, demanding immediate attention from a pro.
Major exterior remediation: If the source of moisture intrusion is outside, you’ll need professionals to address grading, drainage, or waterproofing.
Tools and materials checklist
Before starting any DIY efflorescence cleaning task, ensure you have the right tools and safety gear. Here’s a handy checklist.
- Safety glasses: Protect your eyes from debris during brushing and vacuuming.
- Gloves: Use rubber or nitrile gloves to protect your hands from cleaning agents.
- Respirator: Wear a respirator when using powders or chemicals to avoid inhalation.
- Moisture meter: Check for hidden moisture before and after cleaning.
- Stiff-bristled brush: For dry brushing and scrubbing salts off the surface.
- HEPA vacuum: Clean up dust and debris after brushing.
- Powdered cleaner: Choose a low-dust, non-acidic cleaner for poultices or light scrubbing.
- Sealer: Select a penetrating sealer suitable for your concrete type and moisture conditions.
Quick rule: Always wear appropriate PPE when handling chemicals or dust. Rent specialty equipment if needed, but ensure you’re comfortable using it before starting.
Conclusion
Keep the goal clear: stop driving salts deeper, restore appearance, and keep interior concrete walls durable by tackling the moisture first and using safe, proven cleaning and sealing steps.
To do this, run a simple, practical check sequence in this order: verify the moisture source is addressed, test a small hidden area with any cleaner and brief exposure, use the recommended interior cleaning method without harsh scrubbing, rinse and dry thoroughly, and then recheck for any lingering signs before applying a sealer or densifier after the wall is dry. If moisture or salts keep returning, reassess the source before sealing and consider opting for a damp-proofing fix or professional guidance rather than rushing to finish it.
Two common mistakes to avoid are trying to wipe away salts with excessive force or cleaners that introduce more moisture, and sealing a wall that is still damp or actively leaking water. Always ventilate well, wear eye protection and gloves, test in a hidden spot first, and never seal a wet surface. If you see active leaks, standing water, or mold growth, pause and call in a pro instead of pressing on.
If the issue remains unresolved after attempting the house-wide approach, or if the wall shows complex moisture paths, cracks, or unusual staining, get professional help to pinpoint the source and choose appropriate long-term protection. With patience and the right sequence, you can restore the look and longevity of interior concrete walls and avoid costly mistakes.
FAQ
What actually causes efflorescence on interior concrete walls during construction?
Efflorescence happens when moisture moves through the wall and brings soluble salts to the surface. When the water evaporates, the salts are left behind as a white stain. This process is tied to moisture sources inside or around the wall and the cement chemistry.
How can I prevent future efflorescence during construction?
Control moisture early: use proper vapor barriers, John-grade moisture control methods, and ensure good drainage around the foundation. Keep interior humidity low during curing and seal surfaces only after the wall can dry. Check manufacturer instructions and local practices for any specific steps.
What is the proper way to clean interior efflorescence without driving salts deeper?
Use dry or lightly damp methods first—brush or wipe with a dry cloth, then a minimal amount of cleaner per label. Avoid soaking the wall; extra moisture can push salts inward. If you must use a cleaner, follow the product label and stop if it reappears after drying.
Which sealing techniques help prevent recurrence after cleaning?
Choose a breathable sealer and apply only after the wall is fully dry. Avoid sealers that trap moisture or create a slick, non-porous surface if interior humidity remains high. Always follow the sealer’s label and consider local conditions and recommendations.