

Introduction
Painting textured ceilings means using the right roller nap and loading technique so the paint covers peaks and valleys without leaving unpainted spots called “holidays.” Think in practical terms: pick a nap length suited to your texture and follow the product label for compatible paints and thinning, and check manufacturer instructions if unsure. A good setup and steady technique matter more than fancy tools.
This is a hands-on DIY job you can do without contractors if you prepare: protect floors and furniture, use an extension pole, and work in consistent passes while keeping a wet edge. If you hit trouble—sputtering roller, sagging paint, or missed areas—stop and reassess nap, loading, and technique rather than pushing more paint on and making the problem worse.
Key takeaways
- Test a small patch: check texture adhesion and avoid peeling during roll.
- Choose roller nap based on ceiling texture and avoid overloading roller.
- Maintain consistent paint load and avoid heavy pooling that causes holidays.
- Use overlapping passes, light pressure, and keep a wet edge while rolling.
- Cut in edges with brushes or mini-rollers to prevent gaps.
- Inspect under light, repair holidays promptly, and wear PPE during touchups.
Table of Contents
- Introduction
- Key takeaways
- What Textured Ceilings Are and Why ‘Holidays’ Happen
- Tools and Materials Checklist for Textured Ceilings
- Choosing the Right Roller Nap and Cover Material
- Proper Roller Loading and Paint Consistency
- Rolling Techniques and Patterns to Minimize Holidays
- Cutting In, Edges, and Using Brushes or Mini-Rollers
- Troubleshooting, Inspection, and Repairing Holidays
- Prep, Priming, Drying Conditions, and Visual Checkpoints
- Conclusion
- FAQ
What Textured Ceilings Are and Why ‘Holidays’ Happen
Textured ceilings include sprays, stipple, popcorn, knockdown, and other profiles that create peaks and valleys on the surface. A “holiday” is a missed spot or thin area where the texture doesn’t get covered, visible as a gap when viewed in certain light.
Holidays usually come from physical issues: the wrong roller or cover, inconsistent loading or pressure while rolling, and application techniques that fail to reach recessed areas. Lighting can hide those gaps until the paint dries, so identify causes on the wet coat and adjust tools or technique accordingly.
Common texture types and how they affect paint application
Textured ceilings come in various types, each with its unique surface profile. Understanding these differences helps you choose the right roller nap and technique.
Orange Peel: This fine, textured finish resembles an orange peel’s skin. Use a short-nap roller (3/8″ to 1/2″) for even coverage.
Knockdown: With its distinctive, lightly troweled look, knockdown texture needs a medium-nap roller (3/4″ to 1″). Work in small sections and use light pressure.
Popcorn/Stomp: These heavily textured surfaces require a long-nap roller (1-1.5″) for proper coverage. Apply paint in multiple thin coats, allowing each to dry before the next.
What is a ‘holiday’ and how to spot it early
A ‘holiday’ in painting is a missed spot or gap, often invisible until the paint dries. Here’s how to identify them early:
First, check your work while the paint is still wet. Look for any areas where the texture isn’t fully covered or appears lighter.
Next, use a flashlight at an angle to cast shadows and reveal any gaps. This technique works best in low light conditions.
Lastly, step back and examine your work from different angles. Holidays can be tricky to spot head-on, so change your perspective to catch any missed spots.
Tools and Materials Checklist for Textured Ceilings
Gather rollers, frames, extension poles, brushes, mini-rollers, trays or buckets, drop cloths, ladders, and PPE before starting to avoid mid-job compromises. Include products intended for textured ceilings—check the paint and primer product label or data sheet for suitability and recommended number of coats.
Pick roller covers and brushes appropriate for rough surfaces, and have a grid or pan that supports even loading. Also prepare cleaning rags, a light source to inspect wet coverage, and patching materials in case repairs are needed.
Roller covers, frames, and pole recommendations
Before you start painting your textured ceiling, make sure you’ve got the right tools for the job. This checklist will help you choose the best roller covers, frames, and extension poles.
- Roller cover: Choose a medium to heavy nap cover (3/4″ to 1″) for most textures. It helps fill in valleys and hide imperfections.
- Frame: Opt for a sturdy, adjustable frame. It should fit your roller cover snugly and allow you to adjust the handle height.
- Extension pole: A good quality extension pole (6″ to 12″) will give you reach without compromising control. Avoid cheap poles; they can wobble and make painting difficult.
- Frame with pole adapter: Ensure your frame has a pole adapter that fits your extension pole securely.
- Pole length: Consider the height of your ceiling. You’ll need a longer pole for higher ceilings to avoid using a ladder.
- Avoid cheap covers: They can shed fibers, leaving unwanted ‘hairs’ on your ceiling and causing extra work.
- Check cover condition: Inspect your roller cover before use. If it’s damaged or worn, replace it to avoid inconsistent coverage.
Quick rule: Invest in quality tools. They’ll make the job easier and give you better results.
Paints, primers, and additives to consider
Choosing the right paint and primer is crucial for a smooth finish on your textured ceiling. Here’s what to look for.
- Primer: Use a primer designed for textured surfaces. It helps seal the surface, improves paint adhesion, and reduces the amount of paint needed.
- Ceiling paint: Choose a paint with ‘hide’ properties to help disguise imperfections. Latex paints are usually best for ceilings due to their durability and easy cleanup.
- Sheen: Opt for a flat or eggshell sheen. They hide imperfections better than higher sheens.
- Flow improver additives: Consider using flow improvers to help paint level out on the textured surface. Always follow manufacturer instructions.
- Avoid low-quality paints: They can leave ‘holidays’ (unpainted spots) and may not adhere well to the texture.
- Check paint condition: Before use, stir your paint thoroughly. If it’s lumpy or separated, don’t use it.
Quick rule: Always follow manufacturer instructions for best results.
Choosing the Right Roller Nap and Cover Material
Roller nap length and cover material must match the texture depth and the paint’s body: thicker naps reach recesses while smoother covers lay down paint on peaks. The cover material (synthetic vs natural) affects paint pickup and release—check the manufacturer’s guidance for compatibility with your paint base.
Test the chosen nap and cover on a hidden or scrap area to confirm penetration into valleys and uniform appearance on peaks. Use that test to decide if you need a different nap length or a specialized textured ceiling cover before proceeding over the whole ceiling.
Nap length guidance (short, medium, long) without strict specs
The nap on your roller cover is like the brush’s bristles. It picks up and holds paint.
Short naps (1/4″ to 3/8″) are best for slight textures or smooth ceilings. They hold less paint but give a smoother finish.
Medium naps (3/8″ to 1/2″) work well with most common textures. They hold more paint, reducing the number of trips to your tray.
Long naps (1/2″ and up) are for heavy textures or popcorn ceilings. They hold plenty of paint but can leave lines if not used carefully.
Cover materials: microfiber vs synthetic vs natural
The material of your roller cover affects how much paint it holds and releases, plus how it feels to use.
- Microfiber: Pros: Holds more paint, less linting. Cons: Can be too smooth for textured surfaces, causing slippage.
- Synthetic: Pros: Good balance of pickup and release, durable, affordable. Cons: Some linting may occur.
- Natural (e.g., lamb’s wool): Pros: Excellent paint pickup, soft feel for delicate surfaces. Cons: Can be expensive, may shed fibers, less durable.
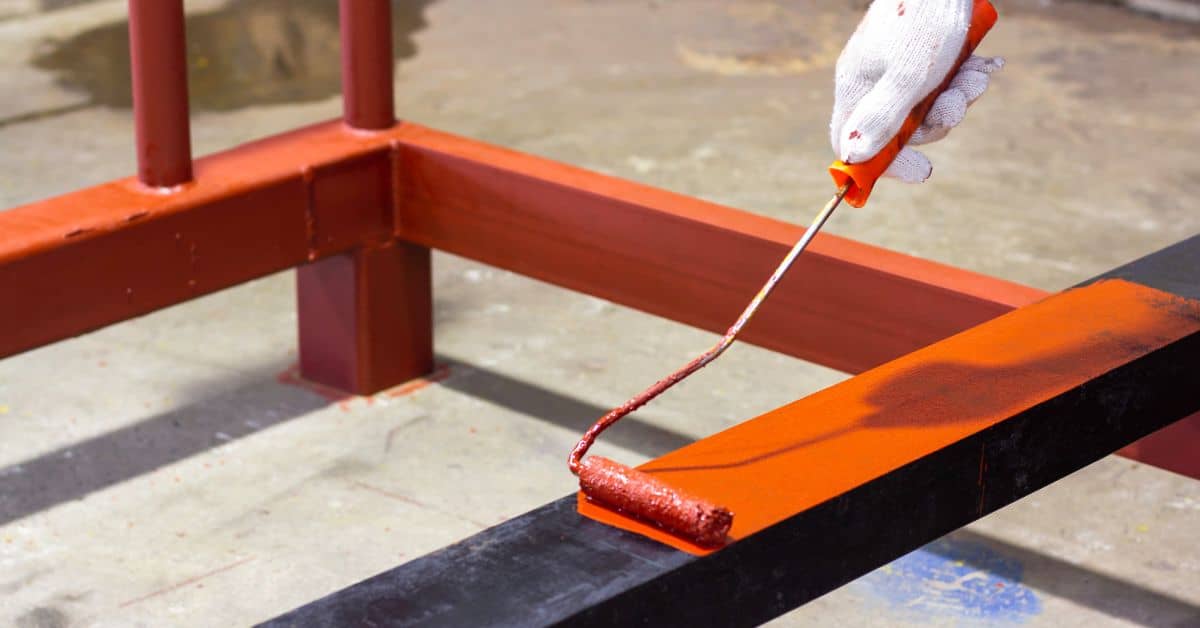
Proper Roller Loading and Paint Consistency
Load the roller by rolling it in the tray or bucket grid until it holds paint evenly without dripping, transferring paint to the cover rather than dunking repeatedly. Avoid overloading, which causes runs and splatter, and under-loading, which leaves holidays in recesses.
Paint viscosity affects how the cover releases paint—consult the product label or data sheet for thinning recommendations if necessary. Use a grid or pan to control the amount on the cover and periodically re-check loading as you work to keep coverage consistent.
Loading technique and avoiding overloading
Avoid these common mistakes: overloading, which causes drips and ‘holidays’, and underloading, leading to patchy coverage.
- Overloading: Too much paint leads to drips. Saturate the cover, don’t drown it.
- Underloading: Not enough paint results in patchy coverage. Ensure the cover is evenly coated.
- Uneven loading: Inconsistent paint distribution causes visible streaks. Roll slowly and evenly.
- Loading on dry cover: Starting with a dry roller cover leads to uneven absorption. Always wet the cover first.
To load properly, saturate the cover in the pan, roll out excess on the grid or newspaper, then test on a scrap area before starting.
Adjusting paint consistency and using pans/grids
Paint viscosity affects roller loading. Too thick, thin it; too thin, use a flow improver.
Thinning: Add water or recommended thinner to improve spreadability. Be careful not to make it too runny.
Flow improvers: Use additives to enhance paint flow and leveling. Follow manufacturer’s instructions for mixing ratios.
Roller pans with grids help control paint amount on the cover. Pour paint into the pan, roll through the grid to remove excess, then apply evenly to the ceiling.
Rolling Techniques and Patterns to Minimize Holidays
Use movement patterns that maintain a wet edge and provide even pressure: light, consistent pressure and overlapping passes help lay paint into both peaks and valleys. Keep strokes systematic across the ceiling so you don’t miss areas, and pause to inspect from a low angle with a work light if coverage looks uneven.
Adjust your pressure based on texture—more pressure for deeper recesses, less on raised areas to avoid buildup. Plan your sequence so each pass blends into the next while the paint is still wet to reduce visible gaps when it dries.
Best rolling patterns and overlap strategy
Textured ceilings need a consistent, methodical approach to minimize ‘holidays’. Here’s how:
Directional passes: Start at one corner, roll along the ceiling in straight lines. This helps paint penetrate the texture evenly.
Cross-pass technique: After directional passes, go back over the area with perpendicular strokes to ensure full coverage and remove any streaks.
Consistent overlap: Overlap each pass by about 50%. This ensures no gaps and helps maintain a smooth, even finish. Work in sections to keep a ‘wet edge’ – don’t let paint dry out before rolling over it again.
Pressure, speed, and stroke length for textured surfaces
Rolling on textured ceilings requires finesse. Here’s how to apply even pressure and maintain a steady pace:
Light but firm pressure: Too much pressure can cause paint to splatter or miss recesses. Too little, and it won’t fill the texture. Find that sweet spot.
Keep your stroke length consistent – about 18-24 inches is good for most ceilings. This helps maintain an even coat.
Speed matters too. Go slow enough to let paint penetrate the texture but fast enough to keep a steady rhythm. Too fast, and you’ll miss spots. Too slow, and you’ll overwork the paint.
Cutting In, Edges, and Using Brushes or Mini-Rollers
When cutting in around walls, fixtures, and seams, use an angled brush or a mini-roller sized for textured surfaces to reach tight spots without overworking the main field. Work from the perimeter inward and feather the cut-in area to blend with the roller-applied paint.
For edges that border a different surface, test the brush or mini-roller to ensure it matches the texture coverage from the main roller. If you need to touch recessed areas, use a small brush to press paint into the recesses rather than skimming over them.
Masking vs Freehand Cutting In
When tackling textured ceilings, you’ve got two main options for painting the edges: masking or freehand cutting in. Both have their uses.
Masking is your best bet when dealing with intricate patterns or complex shapes. It ensures sharp lines and prevents paint from getting where it shouldn’t. Use painter’s tape, press down firmly to seal, then apply the paint.
For simple edges like walls or straight lines, freehand cutting in is quicker and easier. Dip your brush into the paint, then lightly touch the edge of your wall. Pull the brush along slowly, using just the tips of the bristles. This gives you a smooth, blended line that matches the rolled area.
Using Brushes and Mini-Rollers for Texture Recesses
Textured ceilings have their quirks. Sometimes, you’ll need more control than a regular roller can provide to fill those deep recesses.
A brush is great for small-scale touch-ups or when you need precise control. Dip it into the paint, then gently dab and stroke the texture until it’s filled. Work in small sections at a time.
For larger areas that still require precision, reach for a mini-roller. It gives you more coverage than a brush but better control than a regular roller. Load it lightly, then roll gently into the texture, using short strokes and light pressure to avoid leaving marks.
Troubleshooting, Inspection, and Repairing Holidays
Inspect ceilings with raking light while the paint is still wet to find holidays; note their location and probable cause—tool choice, loading, or technique. For small missed spots, a targeted touch-up with a loaded brush or mini-roller pressed into the recesses can often fix the issue without re-coating the whole ceiling.
For larger areas, determine whether another full coat is safer than piecemeal repairs, and test repairs on a spare area first. If the cause is equipment or paint selection, correct that before repairing to avoid repeating the problem.
Immediate fixes while paint is wet
Use this checklist when you spot holidays right after rolling. Quick action prevents touch-ups from being obvious.
- Check holiday size: Small spots can be re-rolled, larger ones need feathering.
- Re-roll small spots: Gently roll over the spot with your roller to blend it in. Use light pressure.
- Avoid overworking: Too much rolling can remove paint and create a new holiday.
- Feather edges: For larger holidays, use a brush or mini-roller to feather the edges into surrounding paint.
- Use light touch: Gently blend the holiday into the wall without disturbing wet paint around it.
- Check texture depth: Ensure your roller covers all textured areas. If not, use a brush or mini-roller to fill recesses.
- Inspect from different angles: Check holidays from various positions to ensure they’re blended in.
- Wait before touching: Let paint set for 15-30 minutes before re-checking and touching up if needed.
Quick rule: The sooner you fix a holiday, the less noticeable it’ll be. But be gentle – too much touch-up can create new problems.
Repairing holidays after paint has dried
Use this checklist when you find dry holidays. Patience and careful work will help blend touch-ups seamlessly.
- Sand lightly: Gently sand the holiday with fine-grit sandpaper to smooth any raised edges.
- Avoid sanding too much: Over-sanding can remove too much paint and create a new problem.
- Dust off: Remove sanding dust with a soft brush or vacuum.
- Spot prime: Apply a thin layer of primer to the holiday using a small brush. This helps paint adhere better.
- Let primer dry: Follow manufacturer’s drying time guidelines before proceeding.
- Repair texture (if needed): If texture is missing, use joint compound or spackling to fill the area. Let it dry and sand smooth.
- Re-coat carefully: Using a small brush or mini-roller, apply paint to the holiday, feathering edges into surrounding wall.
- Inspect from different angles: Check your touch-up from various positions to ensure it blends seamlessly with the rest of the ceiling.
Quick rule: Dry holidays require more careful work. Take your time, and remember that patience is key to a seamless finish.
Prep, Priming, Drying Conditions, and Visual Checkpoints
Proper prep includes cleaning, repairing loose texture, and removing dust so paint adheres uniformly; prime if the surface or product instructions indicate it. Check the primer and paint product guidance for compatibility with textured surfaces and for recommended application conditions.
Control temperature and humidity per the product instructions to avoid slow drying, sagging, or uneven sheen that can reveal holidays. Before declaring the job done, inspect for uniform coverage, consistent sheen, and absence of thin spots under angled light.
Surface preparation and priming best practices
Before you start applying your textured ceiling finish, use this checklist to ensure a clean, primed surface that promotes adhesion and hides any imperfections.
- Remove dust and dirt: Use a damp cloth or mop with mild detergent to wipe down the entire ceiling. Allow it to dry completely before proceeding.
- Check for loose material: Gently tap the ceiling with a broom handle or similar tool. If you hear hollow sounds, there may be loose material that needs to be scraped off.
- Repair cracks and holes: Use a joint compound or spackling paste to fill in any cracks or holes. Allow it to dry according to the manufacturer’s instructions before sanding smooth.
- Sand lightly: Lightly sand the entire ceiling with fine-grit sandpaper (120-grit or finer) to create a smooth surface for better primer adhesion. Wipe off any dust with a damp cloth.
- Inspect for stains: Look for water stains, mold, or mildew. If present, treat these areas with a suitable cleaner and allow them to dry completely before priming.
- Choose the right primer: Select a primer specifically designed for textured ceilings. It should be able to penetrate the texture and provide a uniform base for your finish coat.
- Apply primer evenly: Using a roller or sprayer, apply the primer in even strokes, ensuring full coverage of the ceiling surface. Allow it to dry according to the manufacturer’s instructions.
- Avoid over-priming: Be careful not to apply too many coats of primer, as this can cause the texture to become overly saturated and lead to poor finish results.
Quick rule: Always remember that proper surface preparation is key to a successful textured ceiling project. Skipping these steps can result in poor adhesion, visible imperfections, and even premature failure of your finished ceiling.
Environmental factors and drying—what to watch
Use this checklist before, during, and after applying concrete sealers or coatings. It’ll help you avoid common mistakes that can lead to costly rework.
- Check temperature: Ideal application range is usually between 50°F (10°C) and 90°F (32°C). Too cold, and the product won’t cure properly. Too hot, and it can dry too fast, leading to poor film formation.
- Monitor humidity: Low humidity (<40%) can cause rapid drying and poor adhesion. High humidity (>75%) can slow down drying and increase the risk of mildew growth. Always check the product label for specific recommendations.
- Ensure proper ventilation: Good air circulation helps control temperature and humidity. Avoid applying in enclosed spaces without adequate ventilation to prevent excessive moisture buildup.
- Check wind conditions: Wind can cause rapid drying, leading to poor film formation and increased dusting. It also increases the risk of overspray. Apply when winds are light (less than 10 mph or 16 km/h).
- Inspect surface for moisture: Before applying any product, ensure the surface is dry. A simple moisture test kit can confirm this. Moisture in the substrate can cause blistering and delamination.
- Verify surface temperature: The surface should be within the same temperature range as the air (50°F/10°C to 90°F/32°C). Use a non-contact infrared thermometer for quick, accurate readings.
- Avoid applying in direct sunlight: Sunlight can cause rapid drying and poor film formation. It also increases the risk of overspray due to increased surface temperature. Apply in shaded areas whenever possible.
- Check product label for specific conditions: Always follow the manufacturer’s recommendations for application conditions. Some products may have unique requirements or restrictions.
Quick rule: If you’re unsure about any condition, check the product label and adjust your working pace accordingly. Rushing through poor conditions can lead to expensive rework.
Visual checkpoints and final inspection checklist
Before you sign off on your concrete job, use this checklist to ensure everything is up to par. Perform these checks after the concrete has cured for at least 72 hours.
- Check surface consistency: Look for any variations in color or texture that could indicate inconsistent mixing or placement. Use a tape measure to check for levelness and smoothness.
- Inspect control joints: Ensure they’re clean, straight, and cut to the proper depth (usually 1/4 to 3/8 of slab thickness). Check for any cracks or gaps that could lead to random cracking.
- Check for holidays: Use a black light or water to reveal any areas where the sealer didn’t adhere properly. These “holidays” can cause moisture issues and affect the finish’s longevity.
- Inspect overlaps: Check where different pours meet. Ensure they’re well-bonded, level, and have no visible seams or cracks that could compromise the slab’s integrity.
- Check sheen differences: Inspect for any variations in gloss or matte finish. This can indicate inconsistent application of sealers or curing compounds.
- Inspect edges and corners: Ensure they’re well-formed, level, and free from cracks or chips. These areas are prone to damage and need extra attention.
- Check for efflorescence: Look for white powdery deposits on the surface, which can indicate excess moisture within the slab. This may require additional drying time or remediation.
- Document problem areas: Photograph any issues and note their locations. This will help you and your contractor address them promptly to avoid costly rework.
Quick rule: Always compare your finished concrete with the approved plans or samples. If it doesn’t match, double-check your materials, methods, and conditions to ensure they comply with the specifications.
Conclusion
Finish that ceiling with steady hands and a clear plan, and you’ll get an durable, even look that lasts without costly fixes. Safety and proper technique keep damage and hazards to a minimum while you stay productive.
Execute this plan in order: verify the surface is prepped and primed, confirm the room is ventilated and dry, choose the right roller nap and cover, load the roller correctly and keep the paint at a consistent viscosity, roll with steady pressure and full, overlapping passes to avoid lines, cut in edges with a brush or mini-roller before or after rolling as needed, inspect for holidays and touch up while the paint is still workable, then give the ceiling time to dry per the product guidelines and do a visual check before any second coat or final cleanup.
Common mistakes to avoid are rushing the job, overloading the roller or using the wrong nap for the texture, skipping prep or primer, and skipping the visual checks while the paint is wet. Follow the safety rules: wear a mask if dust is present, keep ladders stable and away from traffic, guard floors and furniture, and never work beyond the paint’s documented drying conditions or temperature limits. If any repair or restoration is beyond your comfort—such as large repairs, stubborn holidays, or high ceilings—call a professional instead of pushing on and risking damage.
When in doubt about scope or safety, a pro can save time and money in the long run, and you’ll finish with confidence. Stay steady, stay patient, and you’ll turn a textured ceiling into a clean, durable finish you can be proud of.
FAQ
How do I tell if my textured ceiling is suitable for roller painting without creating more holidays?
Start with a small test spot on a low-traffic area. If the texture takes a roller well and you see consistent coverage, you’re likely good to proceed. Check the paint label for recommended application on textured surfaces and follow the manufacturer’s instructions.
What’s the safe way to handle corners and edges to avoid new holidays near seams?
Use an edging tool or a brush for the edges first, then roll the field with a long nap roller. Keep light, even pressure and maintain a wet edge as you move away from the corner. Don’t press hard into the texture; let the tool do the work.
How can I avoid leaving roller marks or holidays when applying multiple coats?
Keep the roller evenly loaded and avoid overworking a single area. Roll in consistent passes with a wet edge between strokes, and don’t rush the second coat until the first is dry to the touch per the product instructions. If you see an inconsistency, back off and rework the spot lightly.
What should I do if I spot a holiday after the paint dries?
Inspect the area and confirm it’s a holiday, not a texture imperfection. Tidy the edge, then apply touch-up paint with the same technique used originally. If the texture shows through, you may need to recoat that section in a controlled pass, following product guidance.