
Introduction
Painting over powder-coated metal is applying a new finish on top of a powder-coated surface after proper prep. The job hinges on scuffing the surface, choosing a compatible primer, and knowing when painting isn’t worth the effort. Take time to clean and dry the metal before you start.
This DIY introduction walks you through basic scuffing, primer choice, and paint considerations. Check product labels and manufacturer instructions for surface prep, compatibility, and cure times, and be prepared to stop if the coating is peeling or damaged. If in doubt about local rules or best practices, consult the label or a pro before proceeding.
Key takeaways
- Scuff metal thoroughly and clean before primer to improve adhesion.
- Choose primer compatible with powder coating and follow manufacturer instructions.
- Test adhesion on a small area and inspect after curing.
- Avoid painting on warped or damaged finishes; prioritize safety and surface repair.
- Use proper surface cleaning, scuffing, and repairs before applying primer.
- Inspect painted surface for adhesion and wear, and recoat when needed.
Table of Contents
- Introduction
- Key takeaways
- Understanding Powder-Coated Metal and Adhesion Challenges
- When to Skip Painting (Alternatives and Criteria)
- Tools and Materials Checklist
- Surface Preparation: Cleaning, Scuffing, and Repair
- Choosing and Applying the Right Primer
- Paint Selection and Application Techniques
- Testing Adhesion and Visual Checkpoints
- Curing, Maintenance, and Troubleshooting
- Conclusion
- FAQ
Understanding Powder-Coated Metal and Adhesion Challenges
Powder coating is a dry, free-flowing coating that is baked on to create a hard, uniform surface. It forms a smooth, chemically cured finish that resists chipping and corrosion. This sleek surface can be stubborn for ordinary paints to stick to.
Painting over powder coating requires considering how the cured layer interacts with adhesives and coatings. Check the product label or manufacturer instructions to confirm compatibility and any special steps. Local rules or data sheets can also guide the proper approach.
Powder-coat composition and surface characteristics
Powder coating is a dry finishing process that uses electrically charged powders to coat metal. These powders are made up of resins, pigments, and other additives.
The surface finish of powder-coated metal can vary – smooth, textured, or glossy. Each finish affects how paint adheres differently:
Smooth surfaces need more mechanical keying (light sanding) for better adhesion. Textured and glossy finishes may require different primers to ensure proper bonding.
Common adhesion failure modes
Paint can fail to adhere to powder coat due to several reasons:
Poor mechanical keying – Insufficient surface preparation (like not sanding enough) leads to weak bond strength.
Contamination – Dirt, grease, or other substances on the surface prevent paint from sticking properly.
Incompatible chemistries – Using the wrong primer or paint can cause adhesion failure. Always check compatibility before painting.
When to Skip Painting (Alternatives and Criteria)
There are times when repainting is unlikely to meet expectations or will not address the underlying condition. If the powder coat is deeply damaged or the substrate shows signs of failure, skip repainting and plan a different route. Consider options like touch-up or re-coating instead of a full repaint.
Use clear criteria to decide: the level of adhesion, the extent of wear, and the intended use of the item. Verify with product instructions, and if in doubt, consult a pro or compare alternatives with the supplier guidance.
Signs that painting is not recommended
Before you grab your paintbrush, step back and assess the condition of your powder-coated metal. Painting might not be the best solution if:
Structural corrosion is present. This means the metal itself is damaged, and painting won’t fix that. It’s like putting a band-aid on a broken bone.
Extensive delamination or peeling has occurred. If large areas are already lifting off, painting won’t help. It’ll just be a temporary fix at best.
There’s been severe heat or chemical exposure. High heat can warp metal and damage the powder-coat. Chemicals can eat away at it. Painting over damaged areas is like putting a fresh coat of paint on a crumbling wall.
Alternatives to painting: repair, touch-up, replacement, or decals
If painting isn’t the best option, here are some alternatives:
Spot touch-up is great for minor chips and scratches. Just clean the area, sand it lightly, and apply a bit of matching powder-coat.
For larger damaged areas or worn-out parts, consider replacement. It’s often cheaper and easier than trying to repair or paint.
If the part is still in good shape but the finish is faded or dull, you might want to look into powder-coat reconditioning. This involves stripping off the old coat and applying a new one.
For areas that don’t need to be functional but could use some aesthetic improvement, consider protective overlays or decals. These can add color and protection without the hassle of painting.
Tools and Materials Checklist
Assemble a concise kit: abrasives, cleaners, primers, topcoats, and applicators. Include PPE such as gloves, eye protection, and a suitable respirator. Have rags and masking materials on hand for clean edges and spills.
For each item, verify the label and data sheet for surface compatibility and safety directions. If a specification is unclear, check the manufacturer instructions or local product requirements before proceeding.
Abrasives, cleaners, and adhesion promoters to consider
Before you start painting, use this checklist to prep your powder-coated metal surface. This ensures better paint adhesion.
- Abrasive: Lightly scuff the surface with a fine-grit sandpaper (220-320 grit) or abrasive pad to improve paint adhesion.
- Cleaner: Use a degreaser or soap and water solution to remove dirt, grease, and dust. Ensure it’s compatible with your powder-coat finish.
- Adhesion promoter (optional): Apply an adhesion promoter like a bonding primer if you’re unsure about paint adhesion or using a different paint type.
- Tack cloth: Use a tack cloth to remove any remaining dust or debris after sanding and cleaning.
- Wet-dry vacuum: Vacuum the surface to ensure no residual particles remain.
- Ph level test (optional): Check the pH of your cleaned surface. It should be neutral (pH 7) for best results. If not, adjust with a suitable cleaner.
- Dry time: Allow the surface to dry completely before painting. This could take several hours or even overnight.
Quick rule: Always follow manufacturer guidelines for specific product use and compatibility.
Primer and topcoat options plus application gear
Choose the right primer and topcoat, along with appropriate application tools, for your painting project.
- Primer type: Consider using a bonding primer or an oil-based primer to improve paint adhesion on powder-coated metal. Check compatibility with your chosen topcoat.
- Topcoat type: Choose between latex, acrylic, or oil-based paints based on your desired finish and durability. Ensure it’s suitable for the existing powder-coat layer.
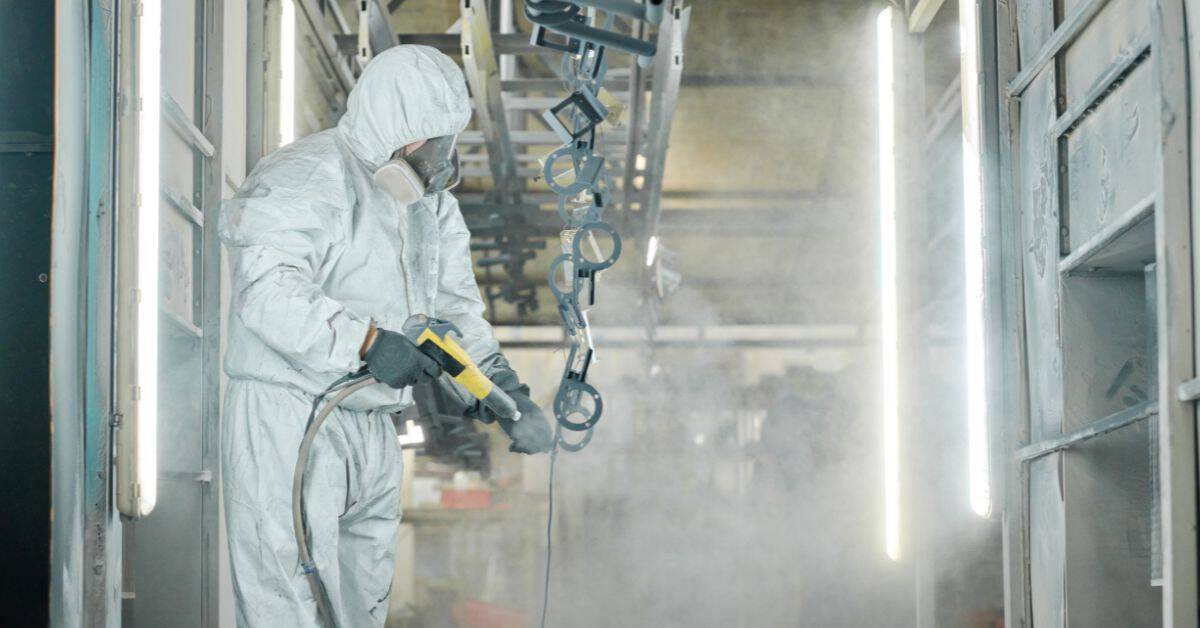
- Spray application (optional): For a smooth, even finish, consider using an HVLP spray system or aerosol cans. Follow manufacturer guidelines for use and safety.
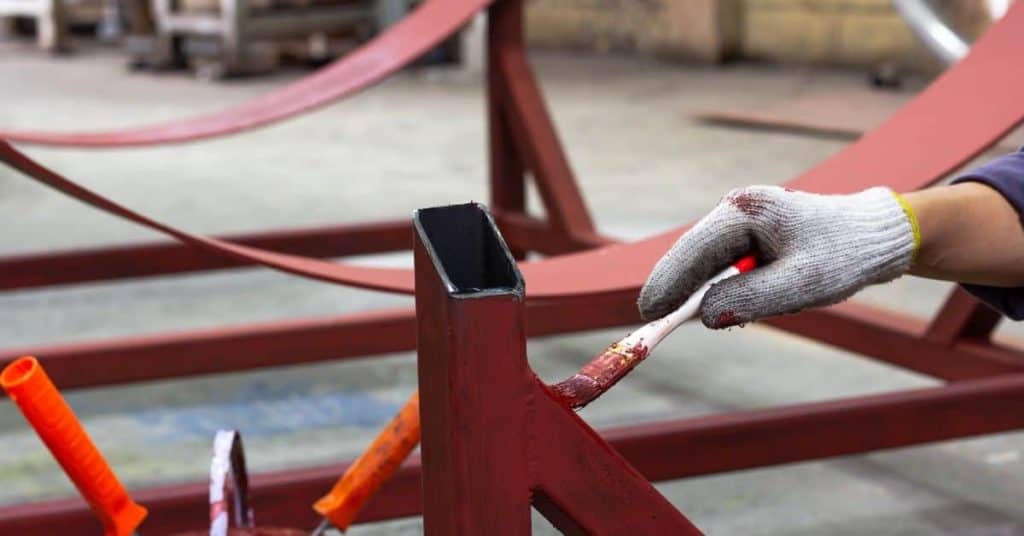
- Brush application: Use high-quality paintbrushes suitable for your chosen topcoat. Synthetic bristles work well with latex and acrylic paints, while natural bristles are better for oil-based paints.
- Roller application (optional): For large surfaces, use a roller with a suitable nap length for your paint type. Ensure the roller cover is compatible with your chosen topcoat.
- Safety gear: Wear appropriate personal protective equipment (PPE), including gloves, safety glasses, and a respirator if using spray application or harmful chemicals.
Quick rule: Always test your chosen primer and topcoat on a small, hidden area first to ensure compatibility and desired results.
Surface Preparation: Cleaning, Scuffing, and Repair
Start with degreasing to remove oils, waxes, and contaminants. Use a cleaner compatible with metal surfaces and the powder coat finish. Rinse or wipe clean as directed by the product label.
Next, scuff the surface with the appropriate abrasive to break the slick coating. Address any chips, dents, or corrosion before moving to primer or paint. Follow the product instructions for recommended methods and via what to check on data sheets.
Cleaning and Degreasing Best Practices
Start by removing any loose dirt with a dry, soft brush. Then, use a suitable cleaner to tackle oils, mold release, and wax.
Degreasers like citrus or solvent-based cleaners work well. Apply, let it soak for a few minutes, then scrub gently with a non-abrasive pad. Rinse thoroughly.
To verify a residue-free surface, perform a simple wipe test. Use a lint-free cloth dampened with your chosen cleaner. Wipe the surface; if no residue is left behind, you’re good to go.
Scuffing Methods and Aggressiveness
Start with light scuffing using fine-grit sandpaper (220-320 grit) or a scuff pad. These help to create a ‘key’ for better paint adhesion without damaging the powder coat.
If needed, increase aggressiveness gradually. Try 180-220 grit sandpaper next, then mechanical abrasion tools like orbital sanders, or chemical etchants as a last resort. Always follow manufacturer guidance.
Remember, less is more. Only scuff as much as needed to promote adhesion. Over-scuffing can damage the powder coat and create visible imperfections.
Repairing Chips, Rust, and Substrate Damage
For rust, use a wire brush or sandpaper to remove it. Apply a corrosion converter like phosphoric acid to prevent further rusting. Let it dry.
Use a compatible filler to repair chips and small substrate damage. Ensure the filler matches the powder coat’s composition for best results. Sand smooth once cured.
If damage is extensive, you may need to repair or replace the substrate before painting. This ensures a solid base for your new paint job.
Choosing and Applying the Right Primer
Primers on powder-coated metal help create a bonding bridge between the substrate and topcoat. Different primer chemistries promote adhesion in various ways, so matching to the topcoat matters. Look for guidance on compatibility with powder finishes and metal substrates.
Select a primer that aligns with your topcoat and substrate, and verify label or data sheet notes on adhesion, curing, and recoat windows. If instructions aren’t clear, compare options with the manufacturer’s recommendations or local guidelines.
Primer chemistries and compatibility considerations
Primers play a crucial role in painting over powder-coated metal. They improve adhesion, seal the substrate, and provide a better surface for topcoats.
There are several types of primers:
- Etching Primers: These remove contaminants and create microscopic pits to enhance adhesion.
- Epoxy Primers: They offer excellent corrosion resistance and adhesion, ideal for metal substrates.
- Adhesion Promoters: These are usually solvent-based and promote bonding between the substrate and the primer.
Check compatibility with your existing powder coat and chosen topcoat. Manufacturers often provide guidelines or you can ask at paint stores.
Primer application and cure guidance
Applying primer correctly is key to a successful painting job:
- Apply thin, even coats. Too thick can lead to runs or peeling.
- Use a suitable applicator – brushes, rollers, or spray guns depending on the primer type.
- Follow manufacturer guidelines for flash times between coats. This allows the primer to dry slightly before applying the next coat.
Cure times and recoat windows vary by primer type and manufacturer. Don’t assume one-size-fits-all:
- Cure time: The time needed for the primer to fully harden and be ready for topcoats.
- Recoat window: The time frame during which you can apply additional coats without affecting adhesion or finish quality.
Always check manufacturer guidelines to ensure optimal results.
Paint Selection and Application Techniques
Choose a durable topcoat suited for metal and the expected environment. Consider gloss level, UV resistance, and flexibility as you decide. Do not assume a finish will behave the same as other coatings without confirming specifications.
Use practical application methods that suit the project, such as brushing, rolling, or spraying, and follow the primer’s recoat and drying times. Always verify with the topcoat label and data sheet for compatibility and instructions before proceeding.
Topcoat types for durability and appearance
Choosing the right topcoat is crucial to protect your powder-coated metal and maintain its appearance. Here’s a quick rundown of common options:
Acrylics are water-based, easy to clean up, and offer good adhesion. They’re great for indoor use but may not hold up as well outdoors.
Urethanes provide excellent UV resistance and durability. They’re ideal for outdoor applications and can mimic the look of glossy automotive finishes.
Alkyds are oil-based, offering good adhesion and color retention. They’re versatile but have a longer drying time compared to other options.
Specialty coatings like epoxies or polyurethanes offer superior corrosion resistance and durability in harsh environments. Always check product data sheets for specific performance details.
Spray, brush, and roll application tips
Applying paint correctly ensures a smooth, even finish. Here are some tips for each method:
Spraying gives you the most control over the final result. Use light, steady passes, overlapping each one by about 50%. Keep the nozzle moving to avoid runs and orange peel.
Brushing allows for better control in tight spaces but can leave visible strokes if not done properly. Use long, smooth strokes, working from one side of the surface to the other. Avoid overbrushing, which can cause runs.
Rolling is best for large, flat surfaces. Use a roller cover suitable for your paint type and apply even pressure. Work in ‘W’ or ‘M’ patterns to ensure full coverage and avoid lap marks.
Regardless of the method you choose, always follow the manufacturer’s recommendations for application passes and drying times.
Testing Adhesion and Visual Checkpoints
Perform simple adhesion checks before committing to full coverage. A basic tape or fingernail test can reveal weak spots if the coating peels or lifts. Note any areas that require touch-ups after initial testing.
Look for uniform color, texture, and flow, as well as any drips or orange-peel effects. Use these visual cues to decide if surface preparation or coating steps need adjustments based on manufacturer guidance.
Performing small-scale adhesion tests
Before you start painting, perform these simple tests on an inconspicuous area to ensure your primer and paint will stick.
- Tape test: Apply a piece of painter’s tape, press down firmly, then pull off quickly. If any paint comes off, you need more prep.
- Crosshatch test: Use a utility knife to score the surface in a crosshatch pattern. Tape over it, pull off, and check if any paint sticks to the tape. If so, re-evaluate your prep.
- Check for moisture: Ensure there’s no hidden dampness that could cause adhesion issues later.
- Inspect surface profile: Feel with your fingers or use a magnifying glass to ensure the powder coat has been properly scuffed and is ready for primer.
- Test paint compatibility: Apply a small amount of your chosen paint, let it cure, then perform tape and crosshatch tests again. If it passes, you’re good to go.
Quick rule: If any test fails, re-evaluate your prep or consider changing products.
Visual inspection checklist after application
After applying primer (or paint), perform this visual check to ensure a successful outcome and avoid costly rework.
- Poor wetting: Check for areas where the primer/paint didn’t spread evenly. Sand lightly, clean, and spot-prime before proceeding.
- Blistering: If you see raised, bubble-like defects, sand, clean, and reapply primer to affected areas.
- Fisheyes: These are small circular craters caused by contaminants. Sand, clean, and spot-prime before proceeding.
- Runs: Long, thick streaks indicate too much product was applied at once. Lightly sand, clean, and reapply primer to affected areas.
Quick rule: Address any defects immediately to prevent them from worsening or causing further issues down the line.
Curing, Maintenance, and Troubleshooting
Follow curing guidance from the coating system to achieve full hardness and durability. Curing conditions depend on temperature, humidity, and bake or air-dry settings per the product data sheet. Do not bypass recommended cure times or methods.
Plan routine maintenance to extend life, and keep an eye on signs of failure such as cracking, peeling, or rust at edges. For issues after application, use manufacturer instructions or local code guidance to troubleshoot and decide on repair or recoating options.
Curing considerations and environmental effects
Temperature, humidity, and dust play a big role in how your paint cures. Too hot, too cold, or too humid can mess with the cure. Check your product’s cure schedule to know what conditions it needs.
Too high temp speeds up cure but can cause stress cracks. Too low slows down cure and might not set properly. High humidity can lead to poor adhesion or even peeling. Keep dust away, as it can stick to the wet paint.
Avoid handling or moving painted items until they’re fully cured. It’s tempting, but wait it out to prevent damage.
Common problems and corrective actions
Peeling, flaking, poor adhesion, or uneven gloss can happen. Here’s how to fix them:
Peeling/Flaking: This happens when paint doesn’t stick. Strip off the bad paint, clean the surface, and start over with a good primer.
Poor Adhesion: If paint isn’t sticking, it’s likely a prep issue. Clean better next time. If it’s already painted, strip back to powder coat and try again.
Uneven Gloss: This is usually due to inconsistent application or dust/dirt. Lightly sand, clean, then repaint the affected areas.
Conclusion
Getting a durable, good-looking finish on powder-coated metal is about careful prep, the right primer, and smart, controlled application. Safety and staying within realistic limits protect you from costly mistakes and repeated work.
Proceed by cleaning and scuffing as needed, repairing any damaged spots, then let the surface dry fully. Test a small area for adhesion before committing, choose the primer and paint suited to metal, and apply thin coats evenly, allowing proper cure time between steps. Finish with a gentle inspection for flaws and a routine maintenance plan to keep the result looking solid.
Common mistakes to avoid are skipping the scuff or repair steps, using the wrong primer for the metal type, and overloading paint or rushing coats. Always wear eye protection and a respirator where indoors, work in a ventilated area, and work in small sections to prevent runs and misses. If the job requires structural work or you’re unsure about the coating’s compatibility, don’t push ahead—call a professional and save the risk of damage or injury.
If it makes sense to bring in help, do so when you’re unsure about adhesion tests, complex repairs, or large items. Stay patient, follow the checks in sequence, and you’ll finish with confidence and a turnout that lasts. You’ve got this, and the next step is just one careful move forward.
FAQ
Do I need to sand or scuff the powder-coated surface before painting, or can I paint right over it?
You should scuff the surface to give the new coating something to bite into. A light, even scuff with a dedicated pad or fine abrasive helps adhesion. If the coating is highly glossy or you’re unsure about the finish, follow the manufacturer’s instructions or test a small area first.
What primers work best on powder-coated metal, and how do I pick one?
Choose a primer that is labeled for metal and compatible with powder coatings. Read the product label for adhesion claims and cure requirements. Always follow the primer maker’s instructions and test a small area before committing to the full job.
How can I tell if the primer has properly adhered after application?
Do a simple adhesion check per the product guidelines. If you see edges lifting or flaking, you may need to lightly re-sand and re-prime. If in doubt, verify with the primer’s instructions or the manufacturer’s data sheet.
When should I skip painting and consider an alternative, rather than trying to coat over powder-coated metal?
Skip painting if the powder coating is peeling, flaking, or badly damaged. In those cases, adhesion is unlikely to hold. Consider alternatives or repairs per local guidance and the coating manufacturer’s recommendations. Check the coating’s condition and follow any safety or warranty notes from the product labels.