
Table of Contents
- Introduction
- Preparing Concrete Surfaces for Painting
- Selecting the Right Paint for Concrete
- Choosing the Best Stencils for Concrete
- Techniques to Prevent Paint Bleeding
- Ensuring Stencils Lay Flat and Stay in Place
- Alternatives to Paint and Stencil Markings
- Safety Precautions When Painting on Concrete
- Cost Analysis and Long-Term Maintenance
- Conclusion
- FAQ
Introduction
To paint lines and numbers on concrete, use stencils and high-quality outdoor paints designed for durability. This article will guide you through selecting the right materials, preparing the surface, and applying the paint effectively for long-lasting results.
Preparing Concrete Surfaces for Painting
Preparing concrete surfaces for painting involves several crucial steps to ensure a long-lasting and durable finish. Key tasks include thoroughly cleaning the surface, repairing any imperfections, and applying a suitable primer to enhance paint adhesion.
Proper preparation is essential for achieving a professional-looking result and preventing future peeling or cracking. By taking the time to prepare the surface correctly, you ensure that the paint will adhere properly and withstand the test of time, making your effort worthwhile.
Cleaning and Repairing the Surface
Start by giving the concrete a thorough cleaning. Use a pressure washer to remove dirt, grime, and loose particles. If you don’t have one, a stiff-bristled brush and some elbow grease will do the trick. Make sure to wash off any oil stains with a degreaser. A clean surface ensures the paint sticks properly.
Once clean, inspect the surface for cracks or holes. Small cracks can be filled with concrete patching compound. For larger areas, you might need a more robust repair method. Don’t skip this step; ignoring repairs leads to peeling paint down the line. Let the repairs cure completely before moving on.
Finally, check for any uneven spots. Use a concrete grinder to smooth out any rough patches. This step is crucial for a uniform finish. Remember, a well-prepared surface makes all the difference in how your paint job turns out.
Priming the Concrete
Before you jump into painting, make sure to apply a primer. Skipping this step is a rookie mistake. A primer creates a solid base for your paint, ensuring it adheres properly and lasts longer. Without it, your paint might peel or flake off, wasting your time and money.
Choose a primer that’s specifically designed for concrete surfaces. These primers are formulated to handle the unique challenges of concrete, like moisture and alkalinity. Apply it evenly across the surface. Use a brush for corners and edges, and a roller for larger areas. This will help seal the concrete and provide a uniform surface for the paint.
After applying the primer, give it sufficient time to dry. Rushing this process can ruin your paint job. Check the manufacturer’s instructions for drying times, but generally, you should wait at least 24 hours. This patience will pay off with a smoother, more durable finish.
Preparing a Warehouse Floor for Concrete Painting
Getting a warehouse floor ready for painting requires careful preparation to ensure a durable and professional finish. The large surface area and potential for heavy foot and machinery traffic mean you can’t cut corners. Follow these steps to make sure your warehouse floor is primed and ready for a successful paint job.
- Clear the Area: Remove all equipment, pallets, and debris from the floor. A clutter-free space allows you to work efficiently and spot any areas needing repair.
- Inspect for Damage: Check the floor for cracks, chips, or holes. Use a concrete patching compound to repair any damage. Allow it to cure fully before proceeding.
- Thorough Cleaning: Use an industrial-grade floor scrubber or pressure washer to remove dirt, grease, and old paint. A clean surface is crucial for paint adhesion.
- Check for Moisture: Ensure the floor is completely dry before painting. Use a moisture meter if necessary, as damp concrete can cause paint to peel.
- Apply a Concrete Primer: Choose a primer designed for high-traffic areas. This will help the paint adhere better and last longer. Follow the manufacturer’s drying time recommendations.
- Plan Your Layout: Mark out the lines and areas you plan to paint with chalk or tape. This helps avoid mistakes and ensures precision.
- Ventilation: Ensure the warehouse is well-ventilated. Use fans or open doors to circulate air, reducing fumes and helping the paint dry evenly.
Choosing the Right Tools
Using the correct tools can make a big difference in your project’s outcome. Opt for high-quality rollers and brushes designed for concrete surfaces. For large areas, consider using a paint sprayer for even coverage and efficiency.

Selecting the Right Paint for Concrete
When it comes to painting concrete surfaces, choosing the right type of paint is crucial for achieving the desired results. Options like epoxy, acrylic, and latex paints each offer unique benefits and are suited for different applications, whether you’re working on an indoor floor or an outdoor patio.
Understanding the advantages and disadvantages of each paint type can help ensure a successful project. Factors such as durability, weather resistance, and ease of application are essential to consider. Proper surface preparation and the use of primers can also enhance paint adhesion and longevity, making your concrete surfaces look great for years to come.
Types of Concrete Paints
When you’re picking paint for concrete, you’ve got a few options. Acrylic latex paint is a popular choice. It’s easy to apply and dries quickly. It’s great for indoor spaces and areas that don’t face harsh weather. But, it might not hold up as well outdoors where it’s exposed to the elements.
For outdoor concrete, consider epoxy-based paint. This type is durable and resists stains and chemicals. It’s perfect for garage floors or driveways. The downside? It can be a bit tricky to apply and usually costs more. Make sure you prep the surface properly, or you’ll waste your time and money.
If you need something for a high-traffic area, look into masonry paint. It’s designed to handle wear and tear. It provides a strong bond to concrete surfaces, but it might need a primer coat first. Don’t skip this step, or you’ll end up with peeling paint.
Eco-Friendly Paint Options
When choosing paint for concrete, think about the environment. Look for low-VOC (volatile organic compounds) paints. These release fewer harmful chemicals into the air, making them safer for you and the planet. Many brands now offer eco-friendly lines that perform just as well as traditional options.
Consider paints made from natural ingredients. These often use plant oils or minerals instead of synthetic chemicals. They might cost a bit more, but they’re a solid choice if you’re aiming for sustainability. Plus, they usually have less odor, making your painting experience more pleasant.
Always read the label. Check for certifications like Green Seal or EcoLogo, which indicate a product meets environmental standards. Don’t just trust the marketing; these labels are your assurance of quality and eco-friendliness.
Choosing the Best Stencils for Concrete
Choosing the best stencils for concrete involves understanding the variety of options available, such as reusable, adhesive, and custom-cut stencils. It’s crucial to select stencils made from durable materials that can withstand outdoor conditions and frequent use. Additionally, the size and scale of the stencil should match the specific application, whether it’s for large parking lot numbers or smaller pathway lines.
For DIY enthusiasts and professionals alike, using stencils with precise cutouts ensures clean lines and accurate representations, which is essential for a polished finish. Balancing cost with quality is also important, as stencils come in a range of prices. By selecting the right stencils, you can achieve a professional look while staying within budget, making your concrete projects both efficient and effective.
Material and Durability
Choosing the right stencil material is crucial for durability and achieving a quality finish on your concrete project. The material impacts how well the stencil holds up during application and how the final result looks.
- Plastic Stencils are great for beginners. Look for UV-resistant plastic to prevent warping. Avoid thin sheets; they can tear easily.
- Mylar Stencils offer flexibility and strength. Check for thickness around 10 mils for durability. Ideal for repeated use without losing shape.
- Paper Stencils are cheap but disposable. Use for one-time projects. They can absorb moisture, leading to distortion.
- Vinyl Stencils stick well to surfaces. Ensure they have a strong adhesive backing. Perfect for intricate designs but can be costly.
- Metal Stencils are the most durable. Look for rust-resistant metals. Best for heavy-duty projects, but they are heavier and harder to handle.
- Rubber Stencils provide excellent flexibility. Check for tear resistance. Good for curved surfaces but may be pricier.
- Polypropylene Stencils are lightweight and durable. Look for a thickness of at least 15 mils. Great for repeated use but can be slippery.
- Acetate Stencils are clear and easy to position. Ensure they are solvent-resistant. Avoid in high-temperature applications; they can warp.
Pro tip: Store stencils flat or rolled loosely to prevent creases. Always clean them immediately after use to extend their lifespan.
Reusable vs. Disposable Stencils
When choosing between reusable and disposable stencils, consider how often you plan to use them. Reusable stencils are a solid investment if you’re tackling multiple projects or a large area. They’re made from durable materials that withstand repeated use, saving money in the long run. However, they require thorough cleaning after each use to maintain their longevity.
On the other hand, disposable stencils are perfect for one-time projects or smaller jobs. They’re typically cheaper upfront, but costs can add up if you need many. The downside is they can tear easily, especially if the concrete surface is rough or uneven. This means you might need to buy extras to cover any mishaps.
Think about your project scope and budget. If you’re a DIY enthusiast planning multiple projects, reusable might be the way to go. But if you’re just sprucing up the patio once, disposable stencils can do the trick without breaking the bank. Just remember, for both types, check base compaction and ensure the surface is prepped properly to avoid stencil damage or poor results.
Choosing the Right Stencil Material for Your Concrete Project
Picking the right stencil material is crucial for the success of your concrete painting project. Different projects demand different stencil qualities, whether you’re dealing with high-traffic areas or decorative touches. Here’s how to match your stencil material to your project’s needs.
- High-Traffic Areas: Use metal or thick Mylar stencils. These materials are durable and can withstand repeated use without warping or tearing, ideal for areas like parking lots or warehouse floors.
- Decorative Applications: Opt for vinyl or rubber stencils. They offer flexibility and precision, perfect for intricate designs on patios or garden paths.
- Temporary Markings: Paper or thin plastic stencils work well. They’re cost-effective for short-term projects but ensure the surface is smooth to avoid tearing.
- Curved Surfaces: Rubber stencils are your best bet. Their flexibility allows them to conform to uneven surfaces, ensuring clean lines on curved concrete.
- Reusable Needs: Choose Mylar or polypropylene stencils. These are easy to clean and store, making them ideal for projects requiring multiple uses.
- Budget-Friendly Options: Consider acetate stencils. They’re affordable and suitable for basic projects, but avoid using them in high-temperature or high-traffic areas as they may warp or wear out quickly.
Maintaining Your Stencils
To extend the life of your stencils, clean them immediately after use and store them flat. Avoid folding or rolling to prevent creases. Proper maintenance ensures your stencils remain in top condition for future projects.
Techniques to Prevent Paint Bleeding
Paint bleeding on concrete surfaces can be a common issue when using stencils, often caused by the porous nature of the material. To achieve clean, crisp lines, it is crucial to choose the right stencil material and secure it firmly to prevent any movement during painting. Additionally, using the appropriate type of paint and applying it in light, even coats can significantly minimize the risk of bleeding.
Understanding these techniques is essential for anyone looking to enhance the durability and appearance of their stencil projects on concrete. By following these strategies, DIY enthusiasts and professionals alike can ensure a more professional finish and extend the life of their painted designs. Proper preparation and execution not only save time and resources but also result in a more satisfying and long-lasting outcome.
Proper Stencil Placement
Positioning your stencil correctly is crucial to avoid paint bleeding. Start by ensuring the surface is clean and dry. A dirty or wet surface can cause the stencil to slip, leading to uneven edges. Align the stencil carefully with the area you want to paint, making sure it’s flat against the surface. Any gaps can allow paint to seep underneath, ruining your design.
Once aligned, secure the stencil firmly. Use painter’s tape to hold it in place, applying pressure along the edges. This creates a seal that helps prevent paint from leaking. If you’re working on a larger project, consider using a spray adhesive for extra security. Remember, a well-secured stencil is your best defense against bleeding.
Before painting, double-check the stencil’s position. Even a small shift can cause a big mess. Take a step back and ensure everything looks right. If you’re not confident, adjust it now rather than regretting it later. Proper placement is half the battle in achieving clean, crisp lines.
Using Spray Boxes and Nozzles
To keep your paint job clean and professional, using spray boxes and nozzles can make a world of difference. A spray box acts like a shield, catching any stray paint particles that might otherwise land where they shouldn’t. Position the box around your work area, ensuring it covers all sides where overspray might occur. This simple setup can save you a lot of cleanup time and frustration.
Nozzles are your next line of defense. Choose a nozzle that matches the type of paint and surface you’re working with. A fine mist nozzle gives you more control, reducing the risk of paint bleeding beyond your intended area. Always test the nozzle on a scrap piece before starting your main project. This helps you adjust the spray pattern and pressure to get the cleanest lines possible.
Remember, the goal is to control the paint application as much as possible. If you’re not careful, overspray can ruin your hard work. So, take the time to set up your spray box properly and select the right nozzle. Trust me, it’s worth the effort.
Mastering Stencil Techniques for Concrete Floor Designs
Using stencils on concrete floors can transform a drab surface into a striking feature. Whether you’re marking parking spaces or adding decorative elements, the right approach ensures a clean, professional look. Follow these steps to make sure your stencil work stands out for all the right reasons.
- Choose the Right Stencil: Opt for durable materials like Mylar or vinyl that can handle rough surfaces. These materials are less likely to tear and can be reused for future projects.
- Prepare the Surface: Clean the floor thoroughly and ensure it’s dry. Any dust or moisture can cause the stencil to slip, leading to uneven lines.
- Secure the Stencil: Use painter’s tape or a light adhesive spray to keep the stencil in place. Ensure it’s flat against the surface to prevent paint from seeping underneath.
- Apply Paint Evenly: Use a roller or spray gun for a smooth finish. Apply paint in thin, even coats to avoid drips and ensure a crisp edge.
- Remove Stencil Carefully: Once the paint is dry to the touch, gently peel the stencil away. Pulling too quickly can smudge your design.
- Seal the Design: Protect your work with a clear sealer. This step is crucial for durability, especially in high-traffic areas.
Common Mistakes to Avoid
Rushing the process is a common pitfall. Take your time with each step to ensure the best results. Skipping surface preparation or using the wrong paint can lead to peeling and fading, wasting your effort.
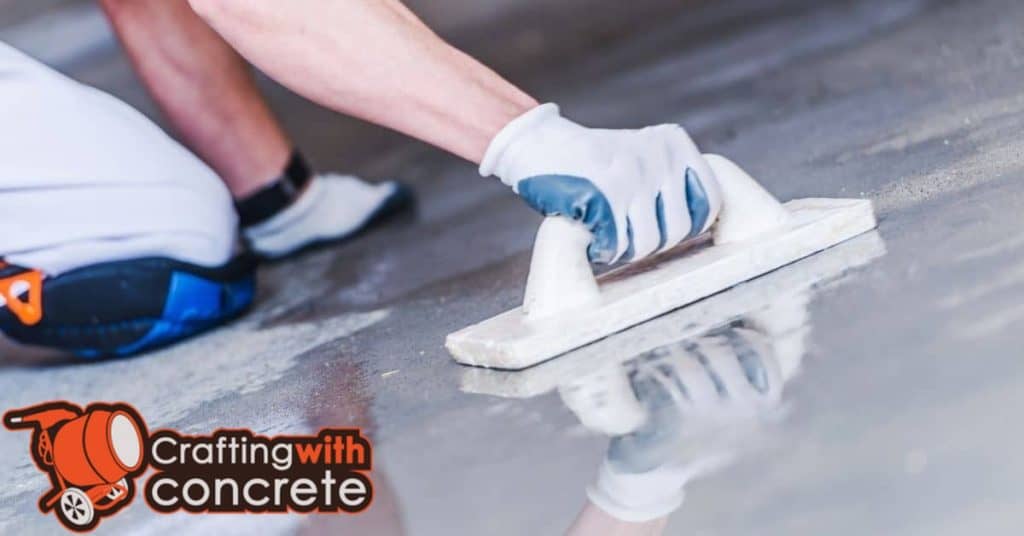
Ensuring Stencils Lay Flat and Stay in Place
To ensure stencils lay flat and stay in place during the painting process, it’s crucial to start with a clean and prepared concrete surface. Utilize adhesive spray or tape to secure the stencils, preventing any movement while you work. Choose stencil materials that are designed to resist curling and lay naturally flat.
Properly securing stencils enhances the precision and quality of your paint job, reducing the risk of smudges or uneven edges. By smoothing out air bubbles and wrinkles, and weighing down stencils with small weights or sandbags, you ensure a professional finish. Testing stencil placement and adhesion on a small area first can save time and effort, ensuring your project goes smoothly from start to finish.
Securing Stencils with Tape or Adhesive
To keep your stencils from shifting on concrete, use tape or adhesive. Start by choosing a tape that’s strong enough to hold the stencil but won’t leave a sticky residue. Painter’s tape is a good option. Apply it along the edges of the stencil, pressing firmly to ensure it sticks well. If you’re working on a larger area, add a few extra pieces in the middle for added security.
For a more robust hold, consider using a spray adhesive. Make sure to pick one that’s suitable for concrete surfaces. Spray a light, even coat on the back of the stencil, then press it down firmly. Be careful not to use too much adhesive, as it can seep under the stencil and ruin your design. Always test the adhesive on a small area first to avoid any nasty surprises.
Remember, the goal is to keep the stencil flat and secure. If you notice any lifting or bubbling, adjust the tape or reapply adhesive as needed. Don’t rush this step; a well-secured stencil is crucial for a clean, professional finish. Avoid using duct tape or other strong tapes that might damage the surface or the stencil itself.
Storing and Maintaining Stencils
To keep your stencils in top shape, store them flat. Avoid rolling or folding them, as this can cause creases and make them difficult to use. Place them between two sturdy pieces of cardboard or in a flat storage container. This prevents warping and keeps them ready for your next project.
Keep your stencils clean before storing. Residue from paint or adhesive can build up and affect their performance. Gently wash them with warm, soapy water and let them dry completely. This simple step extends their lifespan and ensures they lay flat when needed.
Store stencils in a cool, dry place. Humidity and heat can warp and distort them, making it hard to secure them properly when working. If you notice any damage, like tears or bends, fix them immediately. A little maintenance goes a long way in keeping your stencils usable.

Alternatives to Paint and Stencil Markings
When it comes to marking concrete surfaces, there are several alternatives to traditional paint and stencil methods. Options like adhesive vinyl, chalk sprays, and concrete etching offer flexible and durable solutions for both temporary and permanent needs.
These alternatives are particularly beneficial for DIY enthusiasts and jobsite workers seeking efficient and adaptable marking methods. For instance, reflective tape enhances visibility in low-light conditions, while digital projection technology provides a versatile option for temporary markings. By exploring these methods, users can achieve precise and effective results tailored to their specific requirements.
Adhesive Tapes and Floor Signs
Adhesive tapes and floor signs are a quick fix when you need to mark areas without the hassle of painting. They’re perfect for temporary setups or when you want to avoid the mess and downtime of paint drying. Just peel and stick. But before you start, make sure the surface is clean and dry. Dust and moisture can make the tape peel off faster than you’d like.
Choosing the right tape is crucial. Go for high-quality, durable options that can withstand foot traffic and machinery. Cheap tapes might save you money upfront, but they’ll wear out quickly and need frequent replacement. For floor signs, pick ones with clear graphics and text. They should be easily visible to anyone walking by, even from a distance.
Remember, adhesive tapes and floor signs are not a one-size-fits-all solution. They work best in controlled environments. If you’re dealing with heavy-duty areas, consider more robust alternatives. But for most DIY projects, these are a practical and efficient choice. Just keep an eye on wear and tear, and replace them as needed to maintain safety and order.
Custom-Printed Floor Markings
Custom-printed floor markings are a smart choice for anyone looking to provide clear and durable visual cues in their space. Unlike paint and stencil markings, which can be messy and time-consuming, custom prints offer precision and consistency. You can design them to fit specific needs, whether it’s safety instructions or directional arrows. This flexibility makes them a versatile option for various environments, from warehouses to retail spaces.
Durability is a key advantage of custom-printed markings. They’re often made from materials that can withstand heavy foot traffic and resist wear and tear. This means you won’t have to constantly replace them, saving both time and money in the long run. When choosing custom-printed markings, make sure they’re made from high-quality materials that suit your environment. Skimping on quality might save a few bucks upfront, but you’ll end up paying more with frequent replacements.
Installation is straightforward. Most custom-printed floor markings come with a strong adhesive backing, similar to the adhesive tapes and floor signs mentioned earlier. Just ensure the surface is clean and dry before applying. A poorly prepared surface can lead to peeling and reduced lifespan. So, take the time to properly prepare your floors for the best results. If you’re unsure, consult with a professional to avoid costly mistakes.
Safety Precautions When Painting on Concrete
When painting on concrete, adhering to safety precautions is crucial to protect both workers and the environment. Essential measures include wearing personal protective equipment (PPE) such as gloves, masks, and goggles to prevent inhalation of fumes and skin contact with paint. Ensuring proper ventilation in the work area is also vital to minimize exposure to harmful fumes.
Choosing eco-friendly and non-toxic paints can significantly reduce environmental impact, making it a responsible choice for any project. Proper preparation of the concrete surface, including thorough cleaning and drying, ensures better paint adhesion and longevity. Additionally, safe handling, storage, and disposal of paints and materials are necessary to prevent spills, accidents, and to comply with environmental regulations.
Cost Analysis and Long-Term Maintenance
When considering the cost of painting concrete surfaces, it’s essential to compare the initial expenses of different paint types such as acrylic, epoxy, and latex. Each option varies in price and durability, influencing the overall cost-effectiveness of your project. Similarly, stencil materials like mylar, cardboard, and plastic come with different price points and longevity, impacting your budget and project outcome.
Understanding the long-term maintenance requirements of paints and stencils is crucial for maximizing their lifespan. Regular maintenance, such as sealing and touch-ups, can extend the durability of painted lines and numbers, potentially saving money over time. Investing in higher-quality materials may have a higher upfront cost, but it often results in reduced maintenance expenses, making it a wise choice for both DIY enthusiasts and professionals.
Cost-Effective Solutions
When it comes to concrete painting, you don’t need to break the bank to get good results. First, focus on quality over quantity. Invest in a high-quality primer and paint specifically designed for concrete surfaces. These may cost a bit more upfront, but they last longer and protect better, saving you money on frequent repaints.
Another smart move is to prepare the surface properly. Clean and repair any cracks or damage before painting. A well-prepped surface ensures the paint adheres properly, reducing the chance of peeling and the need for touch-ups. Skimping on prep work is a rookie mistake that leads to higher costs down the line.
Finally, consider doing the job yourself if you have the time and ability. Hiring professionals can be costly, and many concrete painting tasks are manageable for a dedicated DIYer. Just make sure you follow the right steps and use the right materials to avoid costly errors.

Conclusion
Getting those lines and numbers just right on concrete is about more than just looks—it’s about ensuring durability and safety. A well-prepared surface and the right materials mean your work will last and look professional.
Start by thoroughly cleaning and prepping the concrete surface. Choose a paint specifically for concrete and select stencils that are durable and appropriate for your design. Ensure the stencils are flat and secured to prevent paint bleeding. Always test your setup on a small area first to avoid surprises. Consider alternatives if paint isn’t suitable for your needs.
Avoid common mistakes like rushing the prep work or using the wrong type of paint. Remember, safety comes first: wear protective gear and ensure proper ventilation. Skipping these steps can lead to costly errors and potential hazards.
If you find yourself overwhelmed or unsure, it might be time to call in a professional. Keep your goals in sight and take it one step at a time. You’ve got this!
FAQ
What type of paint should I use on concrete?
Use a high-quality, outdoor acrylic or epoxy paint. These paints stick well to concrete and handle weather changes. Don’t use cheap paint; it’ll peel and crack quickly.
Can I use any stencil for painting numbers and lines?
No, not all stencils are suitable. Use durable, reusable stencils made for concrete. Flimsy stencils will move and ruin your work.
How do I prepare the concrete surface before painting?
Clean the surface thoroughly with a pressure washer or a stiff brush and detergent. Remove all dirt, grease, and loose particles. Skipping this step will cause paint to flake off.
Do I need to seal the paint after applying it?
Yes, sealing is crucial for longevity. Apply a clear concrete sealer to protect the paint from wear and weather. Without sealing, your paint job won’t last long.
How long should I wait before walking on the painted surface?
Let the paint dry for at least 24 hours before walking on it. If the weather is humid, wait a bit longer. Rushing this step can ruin your hard work.