

Introduction
Painting kitchen cabinets is the process of applying a new layer of paint to the cabinet faces, doors, and frames to change color or update the look. This article gives practical steps for a smooth, durable finish you can actually do yourself. Key moves include protecting surfaces, removing doors and hardware, and taking care of grease and grime before you start.
Protecting the surrounding surfaces and floors helps keep dust and drips off what you don’t want painted. Removing doors and hardware makes it easier to reach every edge and avoids uneven edges at hinges or hardware mounts. For a solid result, clean grease from surfaces and fill holes or dings as needed, then follow the product label and manufacturer instructions for the best prep and application guidelines in your area.
Key takeaways
- Protect surfaces during coating by laying drop cloths and labeled masking.
- Remove doors and hardware to create flat painting edges and minimize drips.
- Clean grease from cabinets with degreaser before prep to improve adhesion.
- Fill holes and dings flush with surrounding surface; sand smooth before priming.
- Sanding, dust control, and vacuuming between coats; wear mask and goggles.
- Choose compatible primer and topcoat; test adhesion on inconspicuous area.
Table of Contents
- Introduction
- Key takeaways
- Prep and Protect: Staging, Covering, and Labeling
- Cleaning and Degreasing for Lasting Adhesion
- Repair, Fill, and Prep Surfaces for a Smooth Base
- Sanding, Stripping, and Dust Control
- Priming: Adhesion, Stain Blocking, and Durability Foundation
- Choosing Paint and Topcoats for a Hard, Long-Lasting Finish
- Application Methods: Spray, Mini-Roller, and Brush Workflows
- Between Coats, Final Inspection, and Troubleshooting
- Conclusion
- FAQ
Prep and Protect: Staging, Covering, and Labeling
Set up a clean, organized workflow with a dedicated prep zone, a separate finish area, and a central command center for tracking doors, drawers, and hardware. Keep a rolling cart or lightweight worktable for sanding, filling, or priming, plus a labeled bin system for small parts. Label and protect components as you remove doors and hardware, using color-coded notes and tape to ensure proper reassembly.
Protect countertops, backsplashes, and floors cost-effectively with rosin paper, painter’s plastic, or drop cloths, and add inexpensive foam corner guards to reduce edge damage. Plan multi-day steps to minimize kitchen downtime, maintaining access to utilities and a ready cleanup routine. Establish ventilation and odor-control steps to keep the space usable during the project.
Protect countertops, floors, and adjacent surfaces
Start by laying down rosin paper or painter’s plastic on your countertops. Tape it securely to prevent any slippage. Make sure it overlaps the edges slightly to catch drips.
For floors, use drop cloths. Secure them with tape if necessary. Keep a few inches of overlap near walls and cabinets to protect from dust migration.
Protect backsplashes using the same method as countertops. If you have open shelving or other adjacent surfaces, wrap them in plastic or cover with cardboard to prevent damage.
Ventilation is key. Make sure your covering allows for airflow while protecting surfaces. Use a box fan in a window to help circulate air.
Remove, label, and organize doors, drawers, and hardware
Start by removing all cabinet doors and drawer fronts. Use a screwdriver to remove the screws holding them in place.
Number each door and drawer as you remove it. This will help you reassemble everything correctly later. You can use painter’s tape and a marker for this.
Label each part with color-coded sticky notes or tape. This helps you keep track of which parts go where. Use masking tape to shield adjacent edges from paint.
Store screws and hardware in labeled bags or containers. Keep them organized on your workstation or command center. This will make reassembly much easier.
Cleaning and Degreasing for Lasting Adhesion
Grease, oils, waxes, and surface contaminants prevent primer and paint from bonding, which can lead to peeling later. A thorough cleaning sequence helps ensure a solid base for adhesion. Any residue left on the surface can sabotage the finish.
Use proven cleaners and methods such as a degreaser or a modern cleaner, along with warm water and mild soap for a final rinse. Wipe with isopropyl or denatured alcohol for a final wipe, then rinse thoroughly and dry with a clean microfiber cloth. After cleaning, follow test-patch guidelines to verify adhesion before priming.
Best cleaners and when to use stronger solvents
Start with mild, non-damaging cleaners like heavy-duty dish soap or a degreaser. These are safe for most surfaces and won’t strip finishes.
TSP (Trisodium Phosphate) is a powerful cleaner but can strip some finishes if used improperly. Test it first on a hidden spot before full cleaning.
For tough grease or wax, use isopropyl alcohol or denatured alcohol. They’re strong solvents but won’t damage most surfaces. Always test first to ensure they don’t dissolve your finish.
Safety, ventilation, and PPE for chemical use
Always work in a well-ventilated area. Open windows or use fans to ensure good airflow.
Wear gloves when handling chemicals to protect your hands. Use eye protection like safety glasses or goggles to shield your eyes from splashes.
Read product labels and Material Safety Data Sheets (MSDS) before using any cleaner. They’ll tell you what hazards to expect and how to handle spills safely.
Repair, Fill, and Prep Surfaces for a Smooth Base
Inspect cabinet components for dents, holes, loose hardware holes, and open-grain areas. Decide which defects require filling, patching, or panel replacement, noting any softwood bleed-through. Determine when open-grain areas need grain-filling and ensure adhesive compatibility with the chosen primer and topcoat.
Test fillers and primers on a small, inconspicuous patch to verify color and texture match when dry. Remove old hardware, clean surfaces, and lightly abrade glossy areas before filling; let patches cure fully before sanding. Sand patched areas flush and seal to prevent staining, then document repairs and plan the sequence to minimize rework.
Filling holes, dents, and changing hardware locations
Inspect your cabinets for any holes, dents, or stripped hardware holes. These need to be filled before painting.
Use a suitable filler like wood putty or spackling compound for smaller defects. For larger holes, consider using a two-part epoxy filler.
Tip: When changing hardware locations, use a countersink bit to recess the new screw heads below the surface before filling.
After filling, let it dry completely according to the manufacturer’s instructions. Then, lightly sand the area flush with the surrounding surface using fine-grit sandpaper.
Addressing open-grain woods and panel seams
Open-grain woods like oak or pine have visible pores that can show through paint. To prevent this, you’ll need to fill the grain.
Use a grain filler specifically designed for your wood type. Apply it with a brush or squeegee, let it soak into the grain, then wipe off excess with a damp cloth. Let it dry completely.
For panel seams, use a good quality wood glue and apply it with a small paintbrush. Wipe away any excess with a damp cloth. Allow it to dry according to the manufacturer’s instructions.
Note: Filling grain will give a smoother finish but may slightly alter the natural look of the wood. If you prefer to let the grain show, consider using a paint that emphasizes texture or apply a glaze after painting.
Sanding, Stripping, and Dust Control
Define a clear sanding plan that decides when to strip factory finishes versus scuff-sand, then outline a progression from coarse to fine grits. Prepare for a smooth finish by planning a final de-dusting pass before priming. Establish a dust-control workflow to keep particles from ruining adhesion.
Keep a vacuum with a fresh filter, use tack cloth between stages, and remove dust before each coat. Choose appropriate grits and maintain light, consistent strokes with the grain to avoid gouges. Cover countertops, remove doors and hardware, and label parts to sustain a clean, organized workflow while you work.
Sanding strategy and choosing abrasives
Start with a coarse grit to improve the profile of your cabinets. The goal is to remove any existing finish, not to sand through the wood. Use 120–180 grit for initial scuff-sanding.
For intermediate sanding, use 220–320 grit to refine the surface. This step helps to smooth out any remaining imperfections.
Finally, use 400–600 grit for a smooth, refined finish. Be careful not to over-sand or round off edges at this stage. Always follow product guidance and sand with the wood grain.
Vacuuming, tack-cloth alternatives, and workspace cleanliness
Use a high-quality vacuum with a fresh HEPA filter to remove dust between sanding stages. Start at the top of your cabinets and work your way down to avoid redistributing dust.
After vacuuming, use a tack cloth or a damp (not wet) rag to wipe away any remaining particles. This helps to ensure a smooth finish when you apply primer.
Before starting each sanding stage, clean the workspace thoroughly. Remove any dust that has settled on countertops or floors to prevent it from getting into your freshly sanded surfaces.
Priming: Adhesion, Stain Blocking, and Durability Foundation
Using a dedicated primer on cabinets helps with adhesion, stain blocking, and creating a stable base for the topcoat. Assess the wood type and any previous coatings to decide on water-based or solvent-based primers based on compatibility and odor. This step sets up long-term durability for the finish.
Choose primer types such as shellac or bonding primers depending on the surface, and use stain-blocking primers where needed. Ensure the primer is compatible with the chosen topcoat, and perform a small adhesion test and dry-time check before full application. Clean, sand, and prepare surfaces, address open grain or repairs, then apply an even coat and allow proper cure time.
Primer selection and compatibility testing
Choosing the right primer is crucial for a successful cabinet painting job. Start by reading the labels to ensure the primer is compatible with your cabinet’s substrate – whether it’s pine, maple, birch, or plywood.
Check if there are any previous coatings on your cabinets. If so, you’ll need a primer that adheres well to those finishes. Also, consider the topcoat you plan to use. Water-based primers work best with water-based topcoats, while solvent-based primers are ideal for oil-based or lacquer topcoats.
Always perform a small adhesion test on a hidden area before applying the primer to your entire cabinet. This helps ensure that the primer adheres well and doesn’t cause any unwanted reactions with your topcoat. Also, check the dry time of the primer to ensure it’s compatible with your painting schedule.
Spot-priming and problem-area strategies
Knots, stains, and patched areas can cause issues during the priming and painting process. To tackle these problems, use a spot primer specifically designed for these trouble spots.
Apply the spot primer to knots and other problematic areas using a small paintbrush. This helps seal in tannins and prevents them from bleeding through your topcoat. For patched areas, apply the spot primer after sanding and before applying your regular primer coat.
After spot priming, allow the area to dry completely. If necessary, lightly sand the primed area with fine-grit sandpaper to smooth out any raised grain. Wipe off any dust with a damp cloth, then proceed with your regular painting process.
Choosing Paint and Topcoats for a Hard, Long-Lasting Finish
Cabinet and trim paints differ from standard wall paints in resin systems and durability. This helps cabinetry resist scraping and staining over time. Understanding these differences guides a smarter selection for a hard, repairable finish.
Consider topcoats or conversion finishes such as clear polyurethanes, water-based poly, or conversion varnishes, and understand gloss levels for durability and cleanability. Make sure primers are compatible with the chosen topcoat and follow curing instructions for best results. This foundation supports long-term performance and easier maintenance.
Paint types and what to check on labels
Before you pick up that paint can, here’s a quick checklist to ensure you’re getting the right stuff for your cabinets.
- Intended use: Look for ‘cabinet’ or ‘trim’ on the label. These are formulated differently than wall paints.
- Resin system: Check if it’s alkyd, polyurethane, or acrylic-based. Cabinet-grade formulas often have tougher resins.
- Scrub resistance: This tells you how well the paint resists cleaning and wear. Higher is better.
- Application method: Make sure it’s suitable for brushing (most cabinets) or spraying, if that’s your plan.
- Dry time: Faster drying means quicker progress, but not at the cost of durability.
- Coverage: Check how much area one coat covers. More coverage saves you money and time.
- Sheen level: Choose based on your preference and cleaning needs. Higher sheens are easier to clean but show imperfections more.
- VOC content: Lower VOCs mean less harmful fumes, especially important in small spaces like kitchens.
Quick rule: Always follow the manufacturer’s guidelines for application and drying times. Skipping this can ruin your finish.
Topcoats, sealers, and curing vs maintenance
A topcoat or sealer isn’t always necessary, but it can boost durability and longevity. Here’s why:
Durability: Topcoats often have tougher resins that resist wear and tear better than paint alone.
Sheen level: A topcoat can enhance or change the sheen of your finish, making it easier to clean or more resistant to moisture. It can also even out any inconsistencies in your paint job.
Curing and maintenance: Always follow manufacturer guidelines for curing times and recoating intervals. Skipping these can lead to a subpar finish that’s harder to maintain over time. Regular cleaning with mild, non-abrasive products will keep your cabinets looking their best.
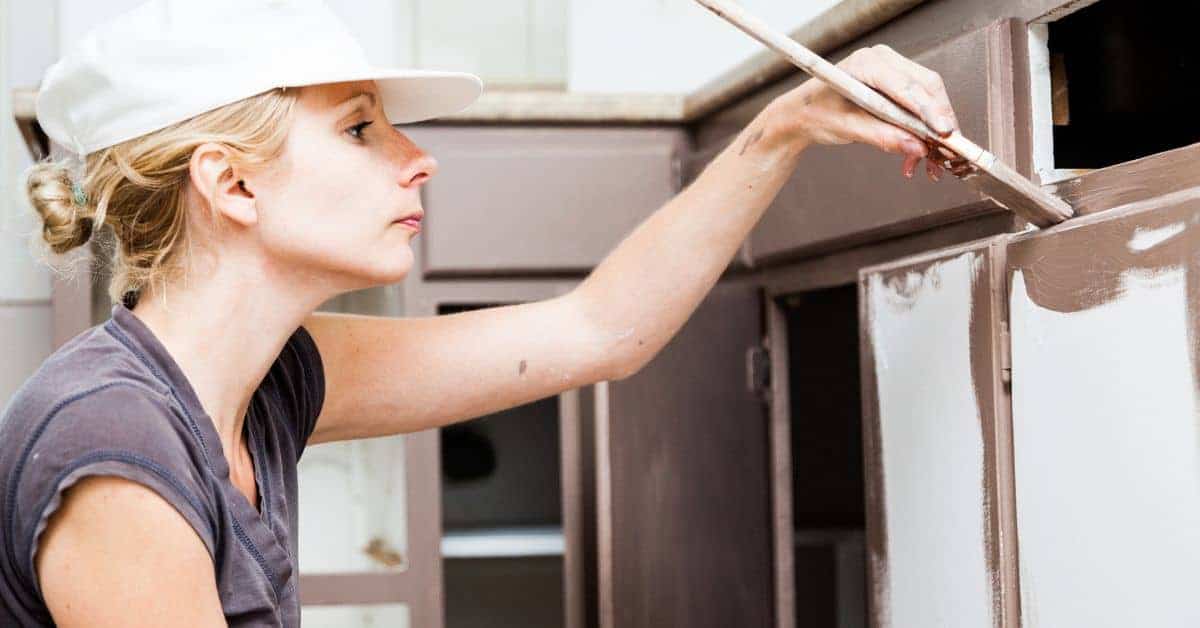
Application Methods: Spray, Mini-Roller, and Brush Workflows
Compare the pros and cons of spraying, mini-roller, and brushing for doors, drawers, and frames, aiming for a factory-like hard finish without a pro spray booth. Choose the method that best suits component size, surface texture, and your space. Match each method to expected results and workflow.
Set up appropriate environments and controls, including ventilation and dust containment, and consider improvised spray booth alternatives. Cover edges, mask carefully, and plan a sequence to minimize brush marks or roller stipple. Prepare surfaces with compatible primers and topcoats, and follow recommended thinning, sanding, and between-coat steps for best results.
Spraying workflow and practical tips for DIYers
Before you start spraying, check your concrete mix design to ensure it’s suitable for spraying. Now, let’s dive into the workflow.
Preparation:
– Check base compaction. Spraying won’t fix a poor subgrade.
– Mask off areas not being sprayed using plastic sheets or paper.
– Wet the surface with a fine mist of water to prevent dust and improve adhesion.
Thinning and Testing:
– Follow your concrete pump’s manual for thinning requirements. It’s usually around 3-5 gallons of water per yard.
– Test spray on a small, hidden area first. Adjust water content if needed.
– Always keep your spray nozzle clean to maintain consistent output.
Spraying:
– Start from the farthest corner and work your way out.
– Hold the nozzle about 12-18 inches away from the surface for even coverage.
– Overlap each pass by about half to ensure full coverage.
– After spraying, check for proper consolidation. Use a vibrator if needed.
Roll-then-brush and brush techniques for edges and panels
After spraying your paint, use a mini roller to lay down a smooth, even coat. Here’s how:
Start in the top corner of your panel, rolling from side to side. Work your way down, using long, steady strokes. Keep a wet edge to avoid lap marks.
Now, grab your brush. Use it to smooth out any ridges or bubbles left by the roller. Here’s where you follow the panel direction:
For vertical panels, start at the top and work your way down. For horizontal ones, start on one side and move across. This helps avoid marks and buildup on edges.
Between Coats, Final Inspection, and Troubleshooting
Define a sand-between-coats workflow with the right paper grit and dust removal to avoid edge wear or new scratches. Inspect under bright light to catch defects before the final topcoat. Address identified issues before moving forward.
Learn spot-sanding and feathering techniques to fix dents, holes, or grain telegraphing, using compatible primers or putties. If needed, strain paint and use conditioners to improve flow, then prep the surface for the final coat with cleanliness and edge maintenance in mind. Document fixes to ensure nothing is missed at the final inspection.
Sanding between coats and visual checkpoints
Before applying the next coat, follow this checklist to ensure a smooth finish.
- Light scuff-sand: Use 220-grit sandpaper in circular motions to lightly scuff the surface. This helps the new coat adhere better.
- Check for ridges: Feel the surface with your hands or use a flashlight to detect any raised areas where paint has built up.
- Inspect for dust nibs: Use a bright light and magnifying glass to spot any tiny dust particles that can cause imperfections in the next coat.
- Check thin spots: Look for areas where the previous coat is too thin, as it may not provide adequate coverage or protection.
- Inspect edges: Ensure edges are smooth and even. Sand lightly if necessary.
- Remove dust: Vacuum and wipe with a tack cloth to remove all sanding residue.
- Check for runs: Inspect for any drips or runs that may have occurred during application.
- Inspect for dry paint: Ensure the previous coat is completely dry before sanding and applying the next one.
Quick rule: Always inspect under bright light to catch any issues you might miss with the naked eye.
Straining paint, using conditioners, and fixing application defects
Before applying the topcoat, strain your paint and address any application defects.
- Strain paint: Strain short-nap and aluminum oxide-particle paints to remove lumps and ensure a smooth finish. Use a fine-mesh paint strainer.
- Use conditioners: Add flow and leveling conditioners to improve the paint’s application properties, especially for high-gloss finishes or when using a mini-roller.
- Fix runs: Lightly sand and spot-prime any areas with runs before applying the next coat.
- Address sags: Use a dry brush to gently lift excess paint from sagging areas. Sand lightly and re-prime if necessary.
- Fix orange peel: Lightly sand and spot-prime any areas with an orange-peel texture before applying the next coat.
- Check adhesion: Use a sharp object to gently scratch the surface. If paint comes off, re-sand, prime, and repaint that area.
- Inspect for dents or holes: Fill any defects with a compatible primer/putty before sanding and painting again.
- Check grain telegraphing: Ensure wood grain is not visible through the paint. If so, use a grain filler or sealer before painting.
Quick rule: Always address application defects between coats to avoid compounding problems in the final finish.
Conclusion
Good results come from thorough prep, careful coating, and patience. When you protect the area, clean for adhesion, repair where needed, and follow the right ordering of priming, painting, and between-coat care, you’ll get a durable, smooth finish that lasts.
Check this flow in plain terms: mask and cover the room, degrease and prep every surface, repair and sand as needed, apply a quality primer, choose compatible paints and topcoats, use the spray, mini-roller, or brush in steady passes, sand lightly between coats, and inspect after each step for flaws or drips before moving on. Test a small area first and work in good light with ventilation; keep each coat within the manufacturer’s guidance and let it cure before the next step.
Two common missteps to avoid are rushing the process and skipping compatibility checks. Don’t skip masking or ventilation, and don’t load coats too thick or you’ll get runs and poor adhesion. A simple safety rule: if something seems off—earthy smell, unusual bubbling, or paint that won’t level—stop, reassess, and fix it before proceeding. If in doubt about surface repair, sealers, or optimal topcoats for your cabinet style, call in a pro and avoid costly mistakes.
When the job calls for unfamiliar hardware, large or high-traffic cabinets, or you’re unsure about spray setup or ventilation, it makes sense to hire help rather than push on. Stay steady, stay safe, and finish with confidence knowing you’ve controlled the process from prep to final cure.
FAQ
Should I remove doors and hardware before painting the cabinets?
Yes. Take doors off, remove hinges, handles, and knobs. Label each piece so you know where it goes. If you can’t remove hardware, mask it well and tape cleanly, then work around it carefully.
How do I protect surfaces during the coating process?
Mask everything you don’t want painted. Use painter’s tape and drop cloths to cover nearby walls and countertops. Keep rags and brushes clear of fresh edges to avoid drips and smears.
What’s the best way to clean grease from cabinet faces before priming?
Wipe with a degreasing cleaner or soap and water, then rinse with clean water. Dry thoroughly before you prime. If grime is stubborn, repeat the wipe and give it extra drying time.
How should I handle filling holes and dings before finishing?
Fill with a compatible filler that accepts stain or paint as you need. Sand smooth after it dries, then wipe clean before priming. Check the filler’s instructions for dry time and compatibility with your paint.