

Introduction
Mineral paint on stucco provides a durable, breathable finish that can outlast typical acrylic when the surface is prepped properly. In plain terms, you start with clean, sound stucco, protect surrounding areas, and choose a mineral-based paint designed for masonry. The prep and technique matter more than color or brand.
The application hinges on how you treat the chalky or smooth surface, matching primer or sealer if recommended, and using steady, even coats. Know the difference between chalk-type and mineral paints if you see two options, and follow the manufacturer’s instructions for timing and layering. Check the product label for prep steps and any local rules that may affect painting stucco.
Key takeaways
- Review mineral vs acrylic benefits for stucco before starting any coating project.
- Prepare surface thoroughly: clean, remove loose material, and repair cracks as needed.
- Choose breathable mineral paints and compatible primers per manufacturer guidelines.
- Follow proper application techniques: thin coats, even coverage, and curing time guidelines.
- Be mindful of site features: mobile menu, before header, and site footer.
- Safety: wear eye protection and respirator during prep and cleanup.
Table of Contents
- Introduction
- Key takeaways
- Why Mineral Paint Can Outlast Acrylic on Stucco
- Which Stucco Surfaces Are Right for Mineral Paint
- Tools, Materials, and Product Selection for Stucco Mineral Paint
- Step-by-Step Prep for Stucco Before Applying Mineral Paint
- Application Techniques for Mineral Paints on Stucco
- Enhancing Durability and Long-Term Maintenance
- Costs, Lifecycle, and When Mineral Paint Is More Cost-Effective Than Acrylic
- Safety, Common Mistakes, and Troubleshooting
- Conclusion
- FAQ
Why Mineral Paint Can Outlast Acrylic on Stucco
Mineral paints cure through a chemistry that relies on silicate or alkali reactions, which creates a bond that becomes part of the masonry rather than just sitting on the surface. This calcification process helps the film stay breathable while sealing micro pores in textured stucco. You’ll notice the difference over time in how the coating responds to weather and moisture compared with water-based acrylics.
Start with a honest assessment of the stucco condition and clean surface, then check for efflorescence and moisture concerns. Test the surface porosity to predict how deeply the coating can penetrate and where bonding might be strongest. Expect mineral finishes to interact with existing coatings differently, so plan for the possibility of a bonding primer or adjusted prep approach if the current layer is non-porous or stubborn.
Breathability and moisture management
Mineral paints are vapor-permeable, allowing your stucco to breathe. This means excess moisture can escape, reducing the risk of blistering or freeze/thaw damage.
Key benefit: Better moisture management prevents peeling and cracking in cold weather.
However, this breathability also makes proper prep crucial. Ensure your stucco is dry before painting to avoid trapping moisture beneath the paint film.
UV, alkali and mold resistance advantages
Mineral paints are resistant to alkalis found in cement-based stucco. This means they won’t break down or discolor over time like some acrylics might.
UV stability: Mineral paints hold their color better under sunlight, fading less than acrylics.
Moreover, mineral paints have natural resistance to biological growth, unlike acrylics which can support mold and mildew growth in damp conditions.
When acrylic still makes sense
Acrylic paints may be preferable for non-masonry substrates, like metal or plastic. They’re also great for flexible requirements, as they can stretch and move with the substrate.
Quick recoat: Acrylics dry faster, allowing for quicker touch-ups or additional coats.
However, keep in mind that acrylics don’t bond as well to masonry long-term compared to mineral paints. They’re also less resistant to UV and alkali, and can support mold growth if not properly maintained.
Which Stucco Surfaces Are Right for Mineral Paint
Think in terms of surface categories: new unpainted stucco, previously painted stucco, cementitious board, and patched areas. Mineral coatings tend to perform well on bare or properly prepared masonry, while tricky or non-porous old coatings may demand primers or alternative systems. Patched sections should be feathered and uniform so the mineral layer can bond evenly across the whole surface.
Suitability hinges on the texture, porosity, and adhesion history of each area. Some surfaces will benefit from a penetrating or bonding primer, while others can accept mineral paint directly after cleaning and moisture checks. Use primers and prep steps as a tool to tailor the approach to each category and coordinate with product data sheets for substrate compatibility.
Absorbent vs. non-absorbent stucco
Before applying mineral paint, test your stucco’s absorbency with a simple water-drop test. This helps you decide if primer or direct application is needed.
Dampen a sponge and gently press it onto the surface. If water soaks in quickly, your stucco is absorbent and ready for mineral paint. If water beads up, it’s non-absorbent and needs a penetrating primer first to improve adhesion.
Absorbency can vary even on uniform-looking surfaces. Test multiple spots to ensure consistent results.
Assessing previous coatings and surface integrity
Inspect your stucco for any existing coatings or damage that could affect mineral paint adhesion. Here’s what to look for:
Existing films: Check for acrylic/latex films, glossy surfaces, or non-porous areas. These may require a bonding primer to ensure proper adhesion.
Loose paint: Inspect for flaking or peeling paint. Remove any loose material and sand smooth before proceeding.
Efflorescence: Look for white, powdery deposits. Remove with a wire brush and clean the area to prevent mineral paint discoloration.
Structural cracks: Inspect for deep or wide cracks. Fill these with an appropriate patching compound before painting.
Special cases: EIFS, synthetic stucco, and cement board
Some surfaces like Exterior Insulation Finishing Systems (EIFS) or synthetic stucco may require specific primers or alternative coatings. Always check manufacturer guidance for these products.
Cement boards are typically compatible with mineral paints but may need a sealer first to prevent moisture penetration and swelling. Again, consult the manufacturer’s recommendations.
If unsure about your surface type, it’s best to err on the side of caution and use a suitable primer or alternative coating system.
Tools, Materials, and Product Selection for Stucco Mineral Paint
Safety gear comes first: respirator, eye protection, gloves, and good ventilation are non-negotiable. Have drop cloths, masking, and proper containment ready, and plan for weather windows that suit exterior work. Keep a clear workflow that avoids rushing in damp or windy conditions to protect the coating’s performance.
Assess the stucco for porosity and cracks, and determine if a primer is required. Read data sheets to match primers, breathable sealers, and mineral paints to the substrate. Know the product types and their exterior suitability so you can select the right combination for your project.
Product Selection Checklist
Before you buy, use this checklist to ensure your mineral paint is a good match for your stucco and job conditions.
- Substrate compatibility: Check if the product’s data sheet (TDS) lists stucco as a suitable substrate. Wrong match can lead to poor adhesion or premature failure.
- Recommended primer: See if a specific primer is suggested for your surface type and condition. Skipping this may result in reduced paint performance.
- Dilution ratio: Verify the recommended dilution rate for your application method (e.g., brush, roller, spray). Incorrect dilution can affect coverage and durability.
- Coverage method: Ensure the product’s TDS mentions your chosen application method. Some paints may not perform well when sprayed or rolled.
- Warranty terms: Check if the warranty covers labor, defects, and specific conditions (e.g., alkali resistance). Skipping this might leave you unprotected against future issues.
- VOC content: Review the product’s VOC levels to ensure compliance with local regulations. High VOCs can contribute to poor indoor air quality.
- Cure time: Note the recommended cure time before recoating or exposing the surface to moisture. Rushing this process can compromise paint performance.
- Safety notes: Read and follow all safety instructions on the TDS to protect yourself and others during application.
Quick rule: Always read and understand product data sheets before making a purchase. It’s your best guide to successful application.
Tools and Equipment
Having the right tools makes prep work and painting easier, ensuring a professional finish.
- Pressure washer: Use to clean stucco. Opt for one with adjustable pressure settings to avoid damaging textured surfaces.
- Scrapers: To remove loose material and prep edges. Choose ones with replaceable blades for durability.
- Masonry brushes: For applying primer and paint. Select stiff-bristled, flagged brushes designed for textured surfaces.
- Rollers: For large areas. Use roller covers rated for textured masonry to ensure even coverage.
- Masonry sprayer: For applying paint evenly over large or complex surfaces. Choose one with adjustable settings for various paint viscosities.
- Trowels/putty knives: For minor repairs and applying patching mortars. Select ones with comfortable grips for easy handling.
- Buckets: For mixing and carrying materials. Choose durable, easy-to-clean buckets to prolong their lifespan.
- Mixers: To blend paint and additives thoroughly. Battery-powered mixers offer convenience on large jobsites.
Optional/rentable tools: Extension poles for hard-to-reach areas, scaffolding or lifts for high walls. Realistic prices vary but expect to spend around $20-$100 per day renting these.
Materials and Consumables
The right materials ensure your prep work and painting go smoothly, delivering a durable finish.
- Micro-adhesion primers: To improve paint adhesion on challenging surfaces. Choose one with good reviews and suitable for your substrate type.
- Patching mortars: For repairing cracks or holes. Select a fast-setting, flexible mortar to prevent future cracking.
- Cleaners: To prep the surface. Use a cleaner designed for stucco to avoid damaging the surface and remove all dirt and contaminants.
- Masking supplies: For protecting adjacent areas. Use painter’s tape, drop cloths, and plastic sheets to prevent overspray and staining.
- Sprayer replacement parts: Keep extras on hand for your sprayer (e.g., tips, filters) to minimize downtime during application.
Wrong materials lead to: Cracking (wrong patching mortar), staining (ineffective cleaner), weak bond (incompatible primer). Always choose materials suited to your specific job conditions.
Step-by-Step Prep for Stucco Before Applying Mineral Paint
Do a quick site audit to catch cracks, delamination, and moisture issues before touching anything. Note where drainage or flashing might be letting water in, and plan your repairs accordingly. This helps you avoid sealing in problems with the new coating.
Clean the surface thoroughly to remove dirt, growth, and efflorescence. Repair defects with appropriate patching compounds and allow proper curing times. A breathable primer may be required to ensure good adhesion and moisture management before the mineral paint goes on.
Step-by-Step Process
This section guides you through a clear, numbered sequence of practical steps for preparing your stucco surface before applying mineral paint.
- Start by conducting a quick site condition audit to assess the current state of your stucco, moisture levels, and your DIY capabilities. This helps you understand what repairs are needed and if you’re ready to tackle this project.
- Perform moisture diagnostics and exterior drainage checks. Look for persistent moisture, water intrusion paths, and ensure proper slope away from the wall. Flashing integrity is crucial here; check it thoroughly.
- Repair and patch defects using appropriate stucco patch or elastomeric filler. Re-embed loose areas and allow full cure as per product specifications to ensure a durable substrate.
- Clean and prepare the surface by removing dirt, organic growth, efflorescence, and any chalky mineral deposits. Rinse thoroughly and let it dry completely before proceeding with priming.
- Choose and apply the right primer and sealer for your mineral paint. Use a breathable, bonding primer compatible with mineral coatings on stucco. Consider using a stain-blocking option if needed to prevent future issues.
- Verify adhesion and moisture readiness by performing a small adhesion test and moisture check after priming. This ensures that your surface is ready for painting and helps you finalize the timing based on weather windows and cure conditions.
Inspect and Repair
Before starting any prep work, it’s crucial to inspect your stucco surface for any defects that need repairing. This ensures a durable substrate for your mineral paint.
Check for: loose plaster, cracks, delamination, and other signs of damage. These issues can compromise the adhesion of your paint and lead to further problems down the line.
For cracks, use a suitable stucco patch or elastomeric filler. Apply according to the manufacturer’s instructions, ensuring you fill the crack completely and allow it to cure fully before proceeding.
If you find any loose plaster or delaminated areas, re-embed them using a suitable repair material. Again, follow the manufacturer’s guidelines for application and curing times.
Cleaning and Efflorescence Removal
Proper cleaning is vital to ensure your mineral paint adheres well and lasts. This section guides you through the process of removing dirt, organic growth, and efflorescence from your stucco surface.
Start by using a low-pressure wash to remove any loose dirt or debris. Be careful not to damage the stucco surface with high pressure.
For more stubborn stains, use a masonry cleaner. Apply it according to the manufacturer’s instructions and allow it to sit for the recommended time before rinsing off. This helps to remove any remaining dirt, organic growth, and efflorescence.
If you notice white, powdery deposits (efflorescence), these are water-soluble salts that need to be removed. You can use a masonry cleaner or a solution of muriatic acid diluted with water (follow safety guidelines). Neutralize the surface with a solution of baking soda and water after cleaning to ensure it’s ready for painting.
Primer and Surface Conditioning
Choosing the right primer is crucial for ensuring good adhesion of your mineral paint. This section explains when to use a mineral-compatible primer or adhesion primer, and how to pre-wet or condition surfaces based on absorbency tests.
Use a mineral-compatible or adhesion primer that’s breathable and compatible with mineral coatings on stucco. This ensures that your paint adheres well and allows the surface to breathe, preventing moisture buildup.
If you’re dealing with stains or previous paint issues, consider using a stain-blocking primer. This can help prevent these problems from bleeding through your new paint.
Before priming, perform an absorbency test by sprinkling some water on the surface. If it’s absorbed quickly, pre-wet the surface with clean water before applying the primer to improve adhesion. However, if the water beads up and doesn’t absorb, you can apply the primer directly without pre-wetting.
Application Techniques for Mineral Paints on Stucco
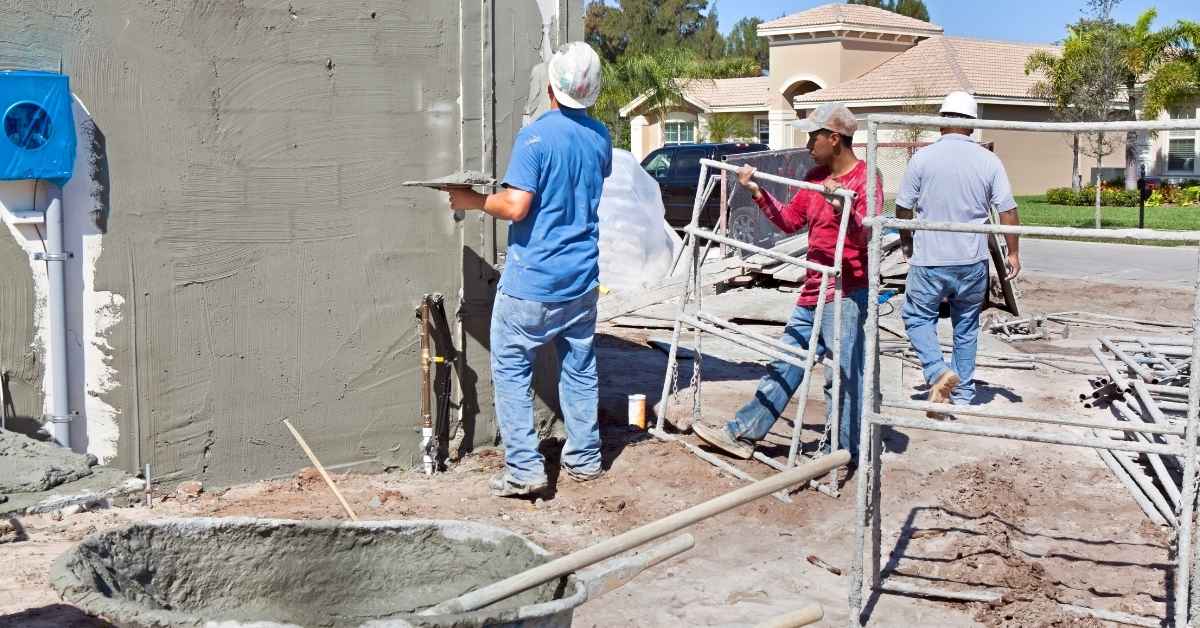
Brush, roller, and spray each have places on textured stucco. Brush work handles edges and rough patches, rollers cover flat and broad areas, and sprays can help with even penetration on highly textured surfaces. Expect texture to influence the look and coverage, and plan accordingly.
Follow the recommended coat sequence for mineral paints, including any bonding bases and subsequent passes. Dilution guidelines must come from the TDS, so confirm whether thinning is advised and how it affects adhesion and drying. Use careful passes to reach cavities and avoid obvious lap marks in recesses.
Brush and roller methods
When using brushes and rollers on textured stucco, remember: rough surfaces need extra attention. Load your brush or roller well, but not too much – you don’t want to drip.
Work in small sections, about 3×3 feet. This helps avoid lap marks and ensures the mineral paint fills those tiny pores. Press the roller or brush into the texture, then pull it out gently. That’s how you get full coverage.
For best results, use a 9-inch roller with a 3/8-inch nap cover for textured surfaces. And don’t forget to back-roll – that means rolling over what you’ve just painted to ensure even coverage and to work the paint into the texture.
Spraying mineral paint on textured surfaces
Using a sprayer on textured stucco? Great! But remember, follow your manufacturer’s equipment guidance. They know their paint best.
Airless sprayers are usually the way to go for textured surfaces. They give you that even coverage you need. Just be careful not to overspray – it’s easy to do on rough textures.
And here’s a pro tip: start at the top and work your way down. That way, any drips will be covered by the next pass. And always keep your nozzle moving – that helps avoid over-application.
Wet edge, coats, and coverage checks
Maintaining a wet edge is key to avoiding lap marks. That means keeping the leading edge of your brush or roller wet as you work.
As for coats, follow the manufacturer’s recommendations. Typically, it’s one coat of primer or bonding base, followed by two topcoats with a light sanding in between. But always check their TDS – they might have specific guidelines for textured surfaces.
Before you start painting, apply test patches to ensure adequate coverage and film build on those deep crevices. Let it dry, then check it. If it’s not fully covered, you might need another coat or a different application method.
Enhancing Durability and Long-Term Maintenance
Before you start, verify the stucco is sound, dry, and free of active moisture issues. A moisture test or drainage checks can help you plan the right timeframe for the coating to cure. The goal is a stable base that accepts the mineral paint without trapping moisture.
Apply compatible primers and maintain proper technique during application to preserve breathability and adhesion. Plan for routine inspections and timely touch-ups to keep the finish uniform. Cleaning should be gentle and equipment selection should minimize surface wear while preserving the mineral film.
Protection from water and detailing
Preventing water intrusion is crucial for your mineral paint’s longevity. Here’s how:
Flashing: Install flashing at corners, windows, and doors to direct water away from the stucco.
Caulking: Seal gaps around openings with a compatible caulk to stop water penetration.
Substrate drainage: Ensure your walls have proper slope and drainage to prevent water pooling near the base, which can lead to moisture issues.
Touch-up and repainting guidance
Mineral paint touch-ups should blend seamlessly. Here’s how:
First, match the color using the same batch or follow manufacturer guidelines for color-matching.
Use a small brush to feather the edges of your touch-up area, applying light coats and allowing proper drying time between each coat.
For full repaints, follow the original application process, ensuring you use the correct primer, mix paints as instructed, and maintain proper wet-edge and temperature/humidity conditions.
Warranty, expected life, and documentation
Understanding your mineral paint’s warranty and expected lifespan helps with future maintenance:
Documentation: Keep records of product batch numbers, application dates, and Technical Data Sheets for reference.
Expected life: Mineral paints typically outlast acrylics but still require regular inspections. Expect a lifespan of 10-20 years with proper maintenance.
Warranty specifics: Check your manufacturer’s warranty details, as coverage may vary and often requires proper application and maintenance.
Costs, Lifecycle, and When Mineral Paint Is More Cost-Effective Than Acrylic
Evaluate the broader picture by considering material costs and the projected coverage for mineral versus acrylic coatings. Labor and preparation time can influence overall value, especially on rough stucco where extra passes or edge work are needed. Look at how coatings wear over time in your climate to gauge long-term value.
Think through maintenance frequency and durability, then translate these into lifecycle expectations. A higher upfront mineral price may be justified if recoats are less frequent and the coating holds up better under local conditions. Use a practical decision framework to align the choice with your project’s demands and warranty considerations.
Upfront vs long-term cost factors
When comparing mineral paint to acrylic, consider both upfront and long-term costs.
Product price: Mineral paints are generally more expensive per gallon than acrylics. But remember, you might need fewer coats due to better coverage and adhesion on stucco.
Prep/repair scope: Both require surface cleaning and patching. However, mineral paint’s breathability can help prevent efflorescence, reducing prep time in the long run.
Specialized equipment might be needed for spraying mineral paints, adding to upfront costs. But if you’re hiring pros, they’ll likely have this covered.
Estimating ROI and payback considerations
To estimate return on investment (ROI), consider the years-to-repaint for each paint type.
Mineral paints typically last longer, reducing repainting frequency. For instance, while acrylic might need recoating every 5-7 years, mineral could extend that to 10-20 years or more.
Use conservative and optimistic repaint intervals to run scenarios. If mineral paint doubles your time between repaints, it might halve your total cost of ownership over 15 years, despite a higher upfront price.
Example: Acrylic at $30/gallon, 2 coats needed ($60/sq ft). Mineral at $45/gallon, 1.5 coats needed ($67.50/sq ft). If acrylic needs recoating every 5 years and mineral every 10, over 15 years, you’d spend $90/sq ft on acrylic vs $67.50/sq ft on mineral.
Financing choices and contractor vs DIY economics
Hiring experienced applicators ensures quality work, but it comes at a higher labor cost. They might charge $20-$40 per square foot for application alone.
DIY can save you this labor cost, but you’ll need to invest time in learning proper techniques and potentially buy equipment. Plus, DIY may void warranties if not done correctly.
Consider your skills, available time, and budget. If you’re confident in your abilities and have the time to learn, DIY can save you money. But for a complex job or high-value property, hiring pros might be worth it.
Tip: Even if you DIY, consider hiring for prep work like patching and cleaning to ensure a solid foundation for your paint job.
Safety, Common Mistakes, and Troubleshooting
Safety starts with dust control, PPE, and proper ventilation, plus careful handling of chemicals and cleaners. Protect yourself and nearby landscaping from splashes and debris during prep and application. Plan for safe storage and disposal of materials to minimize hazards on site.
Document common mistakes like skipping cleaning, applying over damp surfaces, or using the wrong primer. If issues arise, follow troubleshooting steps for peeling, blistering, or staining, and know when to seek professional help or patch replacement. A quick on-site safety and prep checklist can guide decisions without stopping work.
Personal and site safety
Respirator: Wear a respirator rated for dust to protect from silica and other particles. A P100 or N95 mask is recommended.
Eye Protection: Use goggles or safety glasses with side shields to prevent eye irritation from dust and chemicals.
Ladders & Scaffolds: Inspect before use. Secure them properly, and maintain three points of contact while climbing.
Environmental Precautions: Cover drains to prevent cleaner runoff into water systems. Dispose of materials responsibly according to local regulations.
Common application mistakes to avoid
To ensure your mineral paint job lasts, steer clear of these common pitfalls:
- Insufficient cleaning: Skipping or rushing the cleaning process can lead to poor adhesion. Always clean and etch the surface thoroughly.
- Non-compatible coatings: Painting over incompatible materials can cause peeling. Ensure your substrate is compatible with mineral paint.
- Inadequate priming: Skipping primer can result in uneven finish and poor adhesion. Always use a suitable primer or sealer.
- Incorrect dilution: Following the wrong mixing ratios can affect paint performance. Always follow the manufacturer’s guidelines.
Addressing these issues upfront will save you time and money in the long run.
Diagnosing adhesion and finish problems
If your paint isn’t performing as expected, follow these steps to diagnose and fix the issue:
Peeling: Check for moisture or incompatible substrate. If it’s a small area, try removing the failed film, reconditioning the substrate, and repainting.
Chalking: This is usually due to applying too thick coats or using old product. Remove the chalky layer, clean, re-etch, and recoat with fresh paint.
Uneven finish: Check for air bubbles or texture inconsistencies caused by improper tools. If it’s a small area, try lightly sanding, cleaning, and repainting.
Conclusion
Takeaway: mineral paint on stucco pays off in durability and long life when you prep right and follow the basics. Prioritize safety, test a small area first, and keep the surface clean and dry for the best results.
First, inspect the stucco and fix any damage, gather the right tools and products for mineral paint, and plan your steps in the correct order before you start. Clean and dry the surface, repair cracks, mask surrounding surfaces, and choose the right mineral paint and primer if one is recommended. Check compatibility with the substrate, weather windows, and safety gear, then proceed with a simple, methodical prep and application routine.
Common mistakes to avoid are skipping testing, applying over damp or dirty surfaces, and rushing the coat work. Safety rules are simple: wear eye and skin protection, cover nearby plants and surfaces, and work during favorable weather with proper ventilation. Never force coats or rush drying times, and always verify the surface is sound and compatible with mineral paint before proceeding.
If the surface shows unusual damage, or you’re unsure about substrate compatibility, or the job is large or exposed to harsh conditions, consider hiring a pro. A correct prep, correct product choice, and careful application will keep the finish looking good for years. Stay steady, follow the plan, and you’ll have durable, solid results you can be proud of.
FAQ
What are the main benefits of mineral paint over acrylic on stucco?
Mineral paint tends to breathe better, which helps stucco release moisture. It often has stronger adhesion to porous surfaces and can look flatter longer, resisting typical chalking and fading a bit longer than some acrylics. Check the label for your exact project; performance varies by product and surface conditions.
How should I prep the stucco before applying mineral paint?
Clean the surface to remove dirt, dust, and loose particles. Repair cracks and smooth rough areas, then let repairs dry fully. Follow the product instructions for any bonding primers or sealers, and test a small area first to confirm adhesion.
What’s the proper application process and technique for mineral paint on stucco?
Apply with a stiff brush, roller, or spray as the product directs, using even strokes and working in manageable sections. Do not apply too thick in one coat; multiple thin coats usually perform better. Let each coat dry per the manufacturer’s guidance before adding another.
What’s the difference between chalk-type and mineral paints, and why should I care?
Chalk-type paints sit on the surface and can wear faster on rough stucco. Mineral paints penetrate and bond with the substrate, which can improve durability. Always verify the type on the label and follow the exact application steps they recommend.