
Introduction
Matching lace and skip-trowel stucco means using hand tools and mixing consistency to recreate the same rhythm of bumps and voids so patch edges disappear into the existing wall. I’ll describe the basic hand techniques, the common tools and materials you’ll need, and what to watch for so the repair blends instead of standing out. This is practical advice for a homeowner who wants a clean patch without pretending to be a pro.
Start by studying the existing texture and practicing on scrap board to match the pattern, then work wet-to-wet where possible so the new material keys into the old. Check product labels and manufacturer instructions for setting times and compatible mixes, and avoid common mistakes like feathering too thin, overworking the surface, or using the wrong trowel angles. If you run into uncertainty about a product or local requirement, stop and confirm with the manufacturer or local authority before continuing.
Key takeaways
- Understand lace and skip-trowel textures before patching to guide hand work.
- Inspect substrate, weather, and existing texture to plan patching steps safely.
- Gather trowels, brushes, hawk, mud pans, mixing stick, and a sprayer.
- Practice feathering and stippling motions to blend edges without obvious lines.
- Use compatible basecoat and finish coats to prevent delamination and cracking.
- Label patches, cure times, and safety reminders to avoid moisture damage or hazards.
Table of Contents
- Introduction
- Key takeaways
- Lace and Skip-Trowel Stucco Basics
- Preparing for a Patch: Planning and Inspection
- Tools and Materials Checklist
- Hand Techniques to Recreate Lace and Skip-Trowel
- Edge-Blending Methods to Hide Patches Seamlessly
- Advanced Matching Techniques and Troubleshooting
- Safety, Curing, and Maintenance After Repairs
- Cost, When to DIY Vs. Hire a Pro, and Project Estimating
- Conclusion
- FAQ
Lace and Skip-Trowel Stucco Basics
Lace and skip-trowel are both hand-applied decorative stucco finishes that rely on motion and tool control rather than molds or stamps. Lace creates a delicate, open, almost web-like pattern by lifting and dragging thin mortar, while skip-trowel is made with light, irregular trowel passes that leave scattered flat ridges and exposed background.
These finishes form irregular patterns of depth, shadow, and grain that break up large flat areas, which is why patches stand out if the pattern, edge treatment, or depth differs. When evaluating an existing finish, look for scale (how big the gaps and skips are), density (how many marks per square foot), aggregate visibility, and the directionality of strokes to plan a matching strategy.
What is Lace and Skip-Trowel?
Lace and skip-trowel are hand-applied stucco textures, each with its unique look and formation.
Lace gets its name from the delicate, open-lattice patterns created by troweling. It’s like a fine mesh or net, with voids between raised strands. The lace effect comes from quick, light passes of the trowel, barely skimming the surface.
Skip-trowel, on the other hand, is characterized by wider, irregular spaces between trowel marks. It’s created by pressing the trowel flat against the wall and lifting off with a slight twist, leaving ‘skips’ or gaps. Key visual markers include skip spacing, voids in lace, and raised lace strands.
Surface and Substrate Considerations
The base you’re working on makes a big difference in how your patch blends. Here’s what to consider:
Substrate type: Lace and skip-trowel work best over solid, flat surfaces like concrete or plywood. Avoid using them over existing textures as they won’t blend well.
Basecoat thickness: A consistent basecoat layer is crucial for even texture application. Too thin, and you’ll see the substrate; too thick, and your texture will be uneven.
Existing layering: If you’re patching over an existing lace or skip-trowel finish, ensure the new surface matches the old in terms of layers. A single-coat patch on a multi-coat surface won’t blend well.
Preparing for a Patch: Planning and Inspection
Start by inspecting every affected area for loose stucco, underlying substrate damage, moisture, efflorescence, or rot and document these findings on a simple sketch or grid. Photograph each patch area from multiple angles and note environmental factors like sun exposure and recent weather that will affect adhesion and curing.
Decide whether to blend into the existing panel or remove and replace an entire section based on the extent of damage and pattern complexity, and make a materials-and-methods list before touching the wall. Include reference samples or test panels to trial texture, color, and cure behavior; check product labels or the manufacturer data sheet for application and drying guidance before final batching.
Inspecting damage and matching profile
Before you start patching, use this checklist to assess the damage and determine your match strategy.
- Check crack depth: Use a utility knife or probe to measure. Deep cracks need more material.
- Define edge profile: Look at edges under different angles. Sharp, rounded, or beveled?
- Measure pattern scale: Use a ruler or tape measure. Match this in your patch.
- Note aggregate size: Check existing texture for large or small aggregates. Match these.
- Check sheen level: Observe how light reflects off the surface. Match this in your mix.
- Evaluate color variation: Stucco can vary. Note differences and plan to match.
- Assess substrate condition: Tap with a hammer. Solid? Hollow? Repair as needed.
- Check for moisture risks: Look for efflorescence, peeling paint, or dampness. Address these first.
Quick rule: The more you match in your inspection, the better your patch will blend.
Creating a mock-up/test patch
Before diving into visible repairs, create a small test patch to perfect your mix and technique.
- Choose an inconspicuous spot: Somewhere hidden or hard to see. A corner, behind a pipe, etc.
- Prepare the surface: Clean, prime, and sand like you will for the real patch.
- Mix your stucco: Follow your planned mix ratio. Adjust as needed based on test results.
- Test application tools: Try different trowels, brushes, or stencils to achieve the desired texture.
- Practice hand motions: Rehearse your troweling, brushing, or stippling technique.
- Let it cure: Allow the test patch to dry and cure like the real thing will.
- Inspect results: Check for color match, texture accuracy, and adhesion strength.
- Adjust and retry: Make changes based on your inspection. Repeat until satisfied.
Quick rule: A good test patch saves time and materials in the long run.
Tools and Materials Checklist
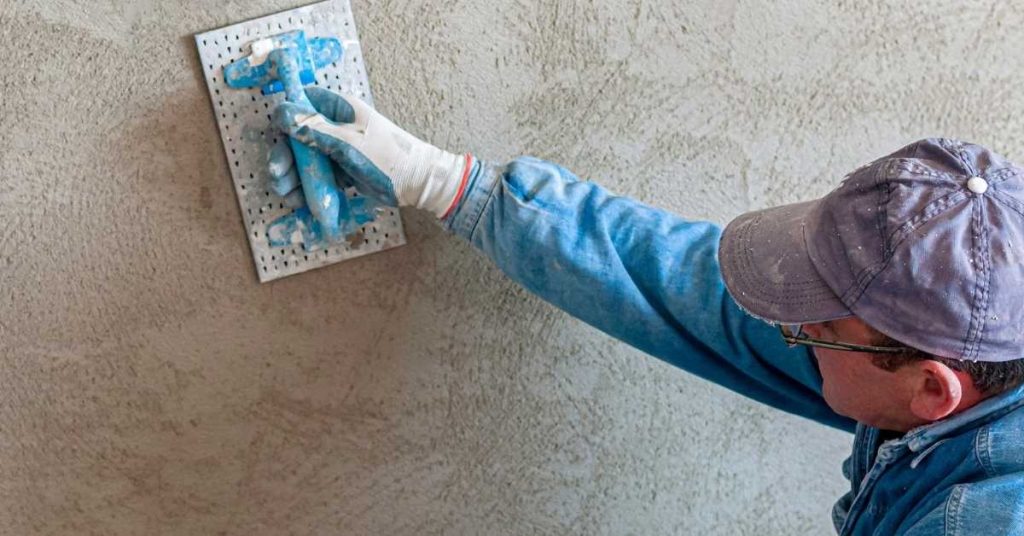
Gather core hand tools such as chisels, cold chisels, sculpting rakes, tuck knives, and putty knives sized for fine control when recreating lace or skip-trowel marks. Select finishing tools—small steel or magnesium trowels and narrow floats—for feathering edges; lighter, narrower tools are typically easier to use for delicate lace patterns.
Prepare mixing tools (buckets, mixing paddles, drill attachments) and PPE (goggles, respirator/dust mask, gloves) and pick a stucco mix compatible with the existing substrate and finish—verify compatibility on the product technical sheet. Batch test mixes with matching cement color and aggregate size, pre-wet substrate as recommended, and document the recipe and sample results for consistent patches.
Hand tools and finishing trowels
Before you start, gather these hand tools and trowels to create lace and skip-trowel textures by hand.
- Hammers (2-3 sizes): For chipping away excess material and creating texture. Choose a smooth face for tapping and a waffle or textured face for adding pattern.
- Chisels: Various sizes to create deep, narrow grooves in ‘lace’ patterns.
- Putty knives (3-4 sizes): For spreading and smoothing material. Use wider blades for larger areas and narrower ones for detail work.
- Sculpting rakes: To create ‘skip-trowel’ patterns, choose comb-like tools with varying spacing between teeth.
- Steel trowels (3-4 sizes): For initial application and spreading. Use larger trowels for basecoats and smaller ones for finish coats.
- Magnesium or synthetic trowels: For final finishing. These are lighter, more flexible, and easier to control than steel.
- Texture brushes: To add fine detail and mimic natural stone textures.
- Taping knives (2-3 sizes): For smoothing edges and creating sharp lines in ‘lace’ patterns.
Quick rule: Choose tools based on the desired texture. Lace requires narrow, deep grooves; skip-trowel needs wider, spaced-out strokes.
Material types, mixes, and color matching
Select the right materials to match your existing stucco and achieve a seamless patch.
- Basecoat mix: Choose a cementitious or polymer-modified basecoat that matches your existing substrate’s composition. Test small batches for adhesion and compatibility.
- Finish coat mix: Select a compatible finish coat to match the sheen of your existing stucco.
- Colorants/additives: Use pre-mixed or custom colorants to match your existing hue. Additives like aggregates can enhance texture and color.
- Cement color matching: Match the cement color by comparing samples under natural light. Adjust with white or gray pigments if needed.
- Aggregate matching (size, texture, hue): Inspect your existing stucco to match aggregate size, shape, and color. Use a magnifying glass if necessary.
- Pre-wetting substrate: Lightly mist the patch area before application to improve adhesion and prevent suctioning.
- Batching samples: Mix small batches of your chosen materials to test color, texture, and workability before full application.
- Document recipes: Record exact mix ratios for each material used in your patch. This ensures consistency if further repairs are needed.
Quick rule: Always test small batches first to ensure color, texture, and compatibility match your existing stucco.
Hand Techniques to Recreate Lace and Skip-Trowel
Recreating these textures depends on repeatable hand movements: trowel angle, wrist flick, stroke length, and cadence control the look more than tool type. For lace, use lighter pressure and skim motions to open delicate voids; for skip-trowel, employ short, irregular passes that leave scattered ridges and flat spots.
Work in small, consistent sections matched to the original pattern scale and keep an eye on the material open time—adjust stroke speed for warmth or humidity changes. Use micro-sequences (embed, sculpt, feather) and check edges frequently, making small touch passes rather than heavy reworking that changes depth or sheen.
Stroke patterns and timing
The key to recreating lace and skip-trowel finishes lies in your stroke pattern and timing. Here’s how:
For lace, start with a series of short, quick strokes, then follow up with longer, slower ones. This creates the distinctive ‘lacy’ effect.
With skip-trowel, use long, steady strokes, varying speed to create wider or narrower skips. Faster for smaller skips, slower for larger.
Remember, timing matters. Work faster when it’s hot, slower in cold conditions. Keep an eye on the stucco’s cure stage too; slow down as it starts to set.
Controlling compaction and skip spacing
The pressure you apply and how far apart your strokes are (skip spacing) determine the final texture.
For lace, use light pressure to keep voids small. Close stroke spacing creates fine lace lines.
With skip-trowel, increase pressure for larger, more compact skips. Wider stroke spacing gives bigger skips.
Play around with these variables until you match the existing texture. Remember, less is more; start light and build up.
Working with drying/time windows
Stucco has a limited working time before it sets. Recognizing these windows is crucial for successful retexturing.
Start by checking the weather forecast. Hotter, drier conditions speed up set time; cooler, wetter ones slow it down.
To slow set time, mist the surface lightly with water or use a retarder additive in your mix. To accelerate, increase temperature (if possible) and reduce humidity.
Work quickly but carefully within these windows to achieve consistent texture across patches.

Edge-Blending Methods to Hide Patches Seamlessly
Edge-blending hides patch boundaries on lace and skip-trowel finishes by matching texture, profile, and sheen at the repair edge. Feathering thins the patch material gradually, micro-blending copies the surface micro-texture with small tools or brushes, and transitional tapering creates a gentle slope so the eye loses the edge.
Prep and the right tools matter: clean, scuff, and prime if the product calls for it, then apply, feather progressively with a wide blade or trowel, and finish with light texture-matching passes until shadows and pattern lines disappear. Watch for common mistakes like over-feathering (creating a visible halo), mismatched sheen, or working against curing times—check the product datasheet for timing and adjust technique if the patch reads different in natural light.
Feathering and Feather-Edge Approaches
Feathering is the key to hiding patch edges on lace and skip-trowel surfaces. It’s about tapering thickness and texture density at the perimeter so your eye can’t detect abrupt changes.
Start by applying a thin layer of stucco along the edge, no more than 1/8 inch thick. This is your feather-edge. Use a trowel with a flexible blade to ensure smooth application.
Next, gradually increase thickness as you move away from the edge, following the existing texture’s pattern. Aim for a seamless transition between the patch and the original surface.
Remember, feathering isn’t just about thickness; it’s also about matching texture density. Use light, delicate strokes near the edge, gradually increasing pressure as you move away to mimic the surrounding skip-trowel or lace pattern.
Scoring, Stippling, and Micro-Blending Techniques
Micro-blending involves subtle surface manipulations to mimic surrounding patterning. It’s crucial for making your patch blend seamlessly with the rest of the wall.
Scoring is about creating fine lines in the stucco to match existing patterns. Use a straight edge or scoring tool to create these lines, following the direction and spacing of the original texture.
Stippling involves applying small dots or dashes of material to mimic the look of aggregate in the stucco. This technique is particularly useful for lace finishes where you want to replicate the random distribution of larger particles.
For micro-blending, use a stiff-bristled brush or a trowel with a flexible blade to lightly stipple and blend the edges, removing any excess material and creating a smooth, seamless transition. The goal is to make the patch virtually indistinguishable from the surrounding surface.
Advanced Matching Techniques and Troubleshooting
When a first pass doesn’t match, build texture in controlled multi-pass layers: establish a matched base depth, add a mid-layer to recreate primary pattern amplitude, then finish with the lace or skip-trowel surface pass. Use overlays, stippling, or directional brushing to fine-tune texture, keeping records of tool angles and stroke cadence so you can reproduce successful sequences.
If differences persist, diagnose root causes such as substrate moisture, mix variation, or drying speed by comparing test panels and checking environmental conditions. Decide to rework if edges remain noticeable or texture scale is off; otherwise accept slight variation if it falls within the homeowner’s tolerance—document decisions and steps for future maintenance.
Layering, texture overlays, and in-situ adjustments
To refine your patch without starting over, use thin corrective layers and texture overlays. This lets you adjust scale and depth without redoing the entire area.
Start with a base coat, applying it evenly across the patch. Let it set slightly before moving on to the next layer. This gives you time for adjustments.
Mid-layer: Apply this pass perpendicular to your base coat. Focus on building texture and hiding seam lines. Use a lighter touch to avoid over-compacting the material.
For the final pass, use a skip-trowel or lace tool to create your desired pattern. Work in small sections, feathering edges to blend with existing texture. Overlaying helps hide patch seams and creates a seamless look.
Fixes for common mismatch problems
When you spot issues like scale mismatch, color drift, or edge shadowing, don’t panic. Here are some fixes:
Scale Mismatch: If your patch looks too coarse or fine compared to the surrounding area, adjust your tool angle and pressure. For coarser texture, use a steeper tool angle. For finer, use a shallower angle.
Color Drift: If colors shift, recheck your mix. Ensure you’re using the same materials and proportions as before. If needed, apply a thin corrective layer with adjusted color.
Edge Shadowing: This happens when light hits edges differently. To fix, feather edges more, creating a smoother transition. You can also adjust your lighting to reduce shadows.
Safety, Curing, and Maintenance After Repairs
Prioritize PPE—safety glasses, respirator or dust mask, gloves—and safe ladder or scaffold practices before any hand stucco work; check for electrical hazards near the work area. Control the site by protecting surrounding finishes, containing dust, and planning work to avoid adverse weather during initial cure periods.
Follow product guidance for curing practices: protect new patches from rapid drying or freezing and use misting or coverings as recommended by the manufacturer to manage moisture. Inspect patches during the first weeks for cracking or edge separation, perform gentle clean-ups only, and keep a short maintenance log with photos and any adjustments needed to preserve the blend.
Personal protective equipment and safe working practices
Safety is paramount when working with stucco. Here’s what you need to protect yourself and your surroundings.
- Eye Protection: Safety glasses or goggles prevent debris from getting into your eyes. Choose ones that fit well and provide good visibility.
- Hand Protection: Gloves protect your hands from cement burns and cuts. Opt for a pair with good grip to handle tools safely.
- Respiratory Protection: A dust mask or respirator is crucial when mixing, applying, or sanding stucco. Choose one rated for silica dust.
- Hearing Protection: Wear earplugs or earmuffs when using power tools like mixers or grinders to prevent hearing damage.
- Ladder/Scaffold Safety: Always use a sturdy ladder or scaffold. Secure it properly, and maintain three points of contact while climbing.
- Stable Footing: Ensure your work surface is stable and level. Use platforms or stabilizers if needed.
- Electrical Hazards: Check for any electrical hazards before starting work. Keep power tools away from water sources.
Curing, sealing, and recommended maintenance schedule
Proper curing is vital to ensure your patch blends seamlessly with the existing stucco. Here’s how:
Curing: New patches need time to cure – usually 28 days in ideal conditions (70-90°F, 40-60% humidity). Keep them moist using a fine mist spray or covering with plastic sheeting.
After the initial curing period, apply a sealant or paint to match your existing stucco’s sheen and color. This protects the patch from moisture and staining.
Maintenance Schedule: Inspect your work weekly for the first month, then every 3-6 months. Look for cracking, edge feathering, or delamination. Clean gently with a soft brush and mild detergent if needed. Re-mist or re-seal as required.
Cost, When to DIY Vs. Hire a Pro, and Project Estimating
Estimate cost drivers by listing materials, prep time, pattern-matching effort, access requirements, and any specialty tools or scaffolding that might be needed. Choose DIY for small, low-risk patches where you can reproduce the pattern reliably; hire a pro for structural issues, complex match work across large panels, or where warranties and code compliance matter.
When getting quotes, provide clear photos, sketch patch locations, and ask contractors for materials, process steps, contingency allowances, and warranty terms. Create a simple scope checklist (patch sizes, texture type, number of coats, cleanup) and use visual checkpoints—test panels and before/after photos—to compare estimates and set expectations.
Time and cost factors to estimate for DIY
The time and cost of a DIY lace and skip-trowel stucco repair depend on several variables. First, size matters. Larger patches take longer to prepare and apply.
Texture complexity also plays a role. Complex textures require more time to match and can increase the cost of materials like texture overlays.
Accessibility is another factor. If you need scaffolding, that’s extra time and cost. Check local rental rates or labor costs for access equipment.
Lastly, expect some trial-and-error. DIY often involves learning as you go. Account for this in your timeline and budget by adding a contingency.
When to hire a pro and what to ask for
Hiring a professional is wise when the job’s beyond your skill or comfort level. Signs include structural concerns, difficult textures, large patches, or lead paint/ASB considerations.
Before hiring, ask for proof of similar jobs they’ve done. Request before/after photos or videos to see their work quality firsthand.
Ask for a mock-up. A small test patch lets you see how well they can match your texture and color before committing to the full job.
Inquire about warranties. A good contractor stands behind their work. Ask what’s covered and for how long.
Conclusion
You now have a practical, repeatable path to blend patches so they disappear with the surrounding lace and skip-trowel textures. Prioritize safety, then test your technique in a small, inconspicuous spot before committing to the full patch.
Check each step in sequence: inspect the area and plan your patch, set up with the right tools and materials, practice the lace or skip-trowel strokes on scrap material or a test panel, apply the patch with consistent pressure, and blend the edges by feathering and texturing until it matches the existing surface. Keep rechecking moisture, curing times, and any edge transitions as you go to prevent cracks or delamination. If something feels off, pause, reassess, and don’t push through a bad path.
Two common mistakes to avoid are over-wetting the patch and rushing texture work, which can wash out detail or show edges. Never skip curing steps or skip safety gear, and never work on damaged substrate without addressing the underlying issue. A simple safety rule is to protect nearby surfaces, wear eye and skin protection, and test on a small area first before scaling up any patch. If you notice severe cracking, moisture intrusion, or color mismatches beyond quick adjustments, stop and reassess immediately.
If the patch involves structural concerns, difficult textures, or large areas, consider hiring a pro rather than forcing a DIY fix. When in doubt, weigh the cost of corrective work against the risk of damaging adjacent surfaces. Stay methodical, pace yourself, and you’ll finish with a durable, seamless look you can be proud of.
FAQ
What are the main textures you’ll encounter with Lace and Skip-Trowel stucco, and how do they differ?
Lace texture is light and irregular, with thin, lacy shadows. Skip-trowel is heavier, built up with short, random trokes that create a mottled surface. Understand which texture your patch should mimic by inspecting the surrounding wall and matching the depth of the patterns.
What hand techniques work best to match Lace and Skip-Trowel textures on patches?
For Lace, use a light, random tapping or dragging motion with a soft trowel to create delicate gaps. For Skip-Trowel, apply short, quick pushes or flips with the trowel to leave dry, raised ridges. Practice on a scrap board first to dial in pressure and motion before working the patch.
What tools and materials do I need to repair a patch and blend the edges?
You’ll want a skim coat or setting-type plaster mix, a trowel or hawk and trowel, a sponge float, a stiff brush, and a spray bottle for mist. Keep a straight edge or tool for feathering edges and a small amount of the original mix color or pigment if permitted by the product label. Refer to the patch product instructions for any specific tool recommendations.
What are the common mistakes when patching stucco and how can I avoid them?
Avoid over-smoothing and creating a hard edge that stands out. Don’t apply too thick a patch or let it dry unevenly. Maintain proper curing conditions and keep the texture consistent with the surrounding surface by comparing while the patch is still workable.
How do I maintain stucco after a patch and ensure long-term look and durability?
Keep the area clean and inspect for cracks after curing. Seal or treat per manufacturer guidance if the surface requires it and avoid aggressive cleaning that can loosen the joint around the patch. Document patch details and schedule periodic checks for hairline cracks or texture changes.