
Introduction
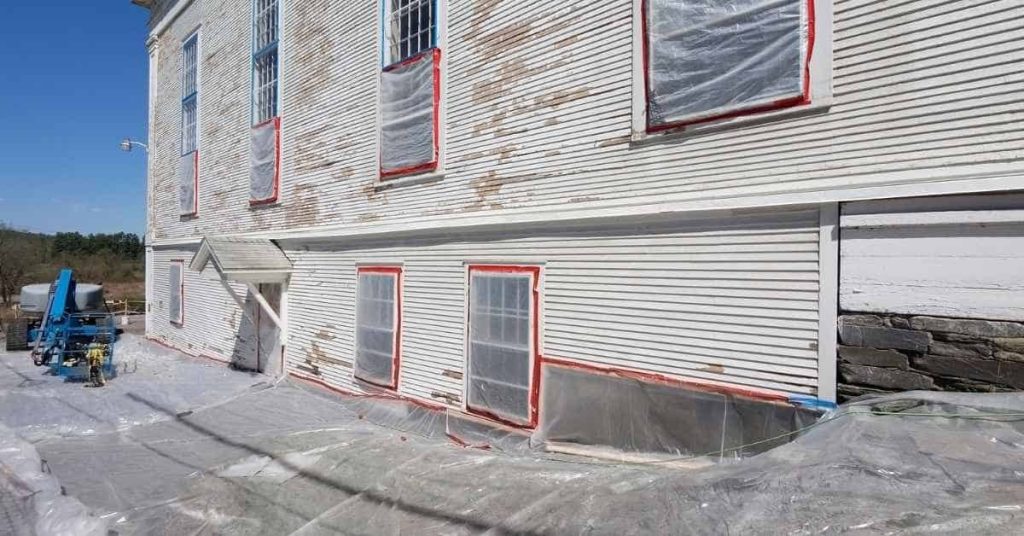
Masking plastic vs paper is about choosing the right sheet for catching overspray while avoiding static-attracted dust — plastic resists moisture and makes a light, slippery barrier, while paper lays down with less static so dust won’t cling as much. Think of plastic for areas that need water resistance and containment, and paper for surfaces where dust control matters; check product labels for tack, weight, and any antistatic features. I recommend testing a small area to see how each material behaves with your paint and environment.
Run it like a jobsite: overlap seams, secure edges, and keep walk paths clear to prevent trips and painted footprints. If static dust is a concern, consider using low-static paper or grounding techniques and read manufacturer instructions for handling and disposal; when in doubt, ask a supplier or check local rules. Practical experience beats theory—pick the material that handles your paint type and site conditions with the fewest surprises.
Key takeaways
- Always wear PPE and ventilate area when masking and sanding near dust.
- Choose masking film for overspray control with low static properties and mobility.
- Paper masking reduces static dust risk but degrades with moisture exposure.
- Verify adhesive edges seal well to prevent bleed and migration under finishes.
- Anti-static treatments offer options but may affect surface finish or adhesion.
- Inspect visually during workflow; perform touch tests and reapply masking as needed.
Table of Contents
- Introduction
- Key takeaways
- Why Overspray Control and Static Dust Matter in Finishing
- Direct Comparison — Plastic Masking Films Versus Paper Masking
- How Static Charge and Dust Behave with Masking Materials
- Anti-Static and Surface Treatments: Options and Tradeoffs
- Adhesives, Edges, and Cling Methods to Prevent Overspray Migration
- Application Techniques, Workflow, and Equipment to Minimize Static Dust
- Testing, Visual Checkpoints, and Troubleshooting Common Defects
- Tools and Materials Checklist Plus Material Specs and Standards Explained
- Conclusion
- FAQ
Why Overspray Control and Static Dust Matter in Finishing
Overspray and dust show up as scratches, fish-eyes, or textured spots that force sanding and rework—real time and material costs on a job. Picking the right masking materials reduces those defects at the source rather than masking symptom after symptom.
Material choice affects how well edges seal, how much particulate the mask sheds, and whether the mask itself attracts dust; check product labels or the technical data sheet to confirm shed, tack, and surface properties before committing. Use that information to weigh operational impacts like touch-up frequency and overall finish uniformity.
Who benefits from this guidance
This guide is for anyone involved in painting, finishing, or coating surfaces. That includes:
Professional Painters: You’ll learn how to reduce defects and rework, saving time and money.
Body Shops: Minimize overspray and dust inclusions to improve your finish quality.
Industrial Finishers: Discover ways to enhance productivity and lower defect rates in high-volume operations.
DIY Homeowners: Achieve professional-looking results with practical masking solutions for your home projects.
Key outcomes to expect
By understanding and implementing the right masking materials, you can achieve significant improvements:
Fewer Dust Inclusions: Reduce defects caused by static-attracted dust with the right material choice.
Easier Cleanup: Some materials are easier to remove than others, saving you time and effort.
Predictable Masking Performance: Know what to expect from your masking materials, helping you plan and execute jobs more efficiently.
These outcomes translate into better finish quality, lower rework costs, and increased productivity.
Direct Comparison — Plastic Masking Films Versus Paper Masking
Plastic films tend to block liquid overspray and resist permeation, while paper offers better tear control and may absorb stray spray; handling and conformability vary by film thickness and paper grade. Evaluate both for how they drape, stick at edges, and whether they release fibers or cling electrostatically to nearby surfaces.
For dust behavior, consult manufacturer instructions or the product data sheet to learn whether a film is treated for antistatic behavior or if paper is surface-sealed—those treatments change the tradeoffs. Match the material to the use case: flat large-area protection, tight contours, or delicate substrates where adhesive choices matter more than raw barrier strength.
Strengths and weaknesses of plastic films
Plastic masking films, like polyethylene, have their pros and cons. They’re strong – you can tear them without worrying about ripping. That’s a plus when you’re working on rough surfaces.
Translucence is another advantage. You can see through them to ensure your lines are straight. But they’ve got downsides too. Static cling can be a pain, attracting dust and making it hard to keep things clean.
Plastics also interact with solvents. Check your paint’s composition before using. And be careful around heat sources – plastics can melt or warp. Safety first!
Strengths and weaknesses of paper masking
Paper masking, like crepe or Kraft paper, has its own set of strengths and weaknesses. It’s breathable – that means moisture can escape, reducing the risk of mildew or warping.
Paper also doesn’t generate much static, so it won’t attract dust like plastic films might. But it’s not as resistant to water when wet paint is involved. And if you’re not careful, fibers from the paper could transfer onto your surface – not ideal for a smooth finish.
Lastly, paper isn’t as durable as plastic. It can tear more easily on rough surfaces or sharp edges. But with proper care and application, it can still get the job done right.
Use-case matrix (best-fit scenarios)
Choosing between plastic and paper depends on your specific job. For large areas, plastic might be the way to go – it’s easier to handle in big sheets.
But for tight radii or intricate details, paper could be better. It conforms more easily around curves and corners. Plus, paper’s low static tendency makes it great for powder coating, where dust can ruin a finish.
For solvent-based paints, plastic might be your best bet due to its resistance to solvents. But always test on a small area first – different substrates react differently to masking materials.
How Static Charge and Dust Behave with Masking Materials
Materials gain static by friction, peeling, or rapid movement and then attract charged particles and loose fibers like a magnet—this increases visible contamination during spraying. Smooth plastics often hold charge longer, while porous materials can shed particulates or allow migration of overspray through capillary action.
Practical indicators of a static problem include tiny specks clustering on edges, fine fibers lining seams, or attraction of dust when you remove the mask; if you see those signs, check the product label or supplier notes for antistatic claims. Addressing static early in the sequence prevents defects that are costly to remove later.
How static builds on masks and tools
Static electricity is a common issue when working with masking materials. It can build up on surfaces, attracting dust and other particles that can ruin your finish.
- Unrolling plastic: As you unroll plastic sheeting, friction creates static charges. Tip: Unroll slowly to minimize charge buildup.
- Rubbing surfaces: Rubbing masks or tools together can also generate static. Warning: Avoid rubbing paper masks as it sheds fibers.
- Low humidity: Dry conditions increase static buildup. Tip: Use humidifiers in your workspace to keep moisture levels up.
- Using anti-static tools: Rentable anti-static guns and brushes can help reduce static charges. Price: Around $50-$100 per day for rentals.
- Handling materials carefully: Rough handling can generate static. Tip: Be gentle when handling masks to minimize charge buildup.
How dust is attracted and transferred to finishes
Static charges attract dust particles, leading to contamination. This can happen during handling or from ambient dust in your workspace.
Particle attraction: Charged surfaces pull in dust like a magnet. Tip: Keep your workspace clean to minimize dust levels.
Fiber shedding: Paper masks shed fibers when rubbed, which can stick to wet paint. Warning: Avoid rubbing paper masks before painting.
Transfer from handling or ambient dust: Dust can transfer onto your finish during application or drying. Tip: Use proper ventilation and air filtration systems to control dust levels.
Simple ways to detect static and dust risk in-shop
Detecting static and dust risks early can help you avoid costly mistakes. Here are some simple checks:
Visual inspection: Look for dust on surfaces or masks. Tip: Use a bright light to spot hidden particles.
Cling behavior when peeling masks: If the mask clings tightly, it’s likely charged. Warning: Charged masks can attract more dust.
Trial-spray panels: Spray test panels to see if they pick up dust. Tip: Use these tests before painting your final project.
Anti-Static and Surface Treatments: Options and Tradeoffs
Treatments include factory-applied antistatic coatings, conductive additives in film, and onsite antistatic sprays—each reduces charge but brings different lifespan and compatibility considerations with paints and cleaners. Some treatments can attract surface moisture or interact with certain topcoats, so cross-check the coating and paint manufacturer instructions before use.
Topical sprays are easy to apply but may need reapplication and can affect adhesion or surface chemistry; conductive films can be durable but cost more and may not be suitable for all shapes. Choose a solution by balancing longevity, compatibility with your paint system, and how often you can realistically re-treat on the job.
Anti-static plastic film choices
When it comes to anti-static masking, you’ve got two main types of plastic films to choose from. Each has its own strengths and best use cases.
Coated Anti-Static Films: These are your standard plastic films with a special coating that dissipates static charge. They’re great for most jobs because they’re durable, easy to apply, and have a decent shelf life. Just remember, the coating can wear off over time or with heavy use.
Inherently Conductive Films: These are made from materials that naturally conduct electricity, like carbon-filled plastics. They’re more expensive but offer better durability and longer shelf life than coated films. Use them when you need top-notch static protection, like in sensitive electronics manufacturing or high-end finishing work.
Anti-static paper and low-charge alternatives
Paper might seem old-school, but it’s still a solid choice for anti-static masking. Here are your options:
Treated Papers: These papers have been treated with chemicals to reduce static charge. They’re cheaper than plastic films but not as durable. Use them when you need to mask large areas or when cost is a factor.
Low-Friction Papers: These papers are designed to minimize fiber transfer, reducing the risk of dust and debris getting into your finish. They’re great for high-end work where you can’t afford any imperfections. Keep in mind, they might not be as effective at preventing static charge as treated papers or plastic films.
When to use topical antistatic products and how to apply them
Topical antistatic products like sprays or wipes can be a useful supplement to your masking materials. They work by applying an anti-static agent directly to the surface you’re working on.
When to Use: Use these products when you need extra static protection, like when working with sensitive electronics or in high-humidity conditions. They’re also great for touch-up jobs where you don’t want to apply a full masking film.
How to Apply: Always test your paint and product compatibility before use. Apply the product lightly and evenly using a clean cloth or spray applicator. Let it dry completely before painting. Remember, these products won’t replace proper masking; they’re just an added layer of protection.

Adhesives, Edges, and Cling Methods to Prevent Overspray Migration
Tape selection and edge sealing determine whether overspray creeps under the barrier; low-tack options protect delicate finishes, while higher-tack tapes give better edge hold on rough substrates. Consider static-cling films where adhesives would damage a surface, but verify that the cling material doesn’t itself attract dust or leave residue.
Edge techniques—mechanical pressing, overlap patterns, or using a sealing bead—reduce migration without excessive adhesion; confirm tape tack and substrate compatibility with the manufacturer instructions. For delicate trim, test a small area to find the minimum tack that holds through the job without pulling paint on removal.
Choosing tapes and adhesives by surface sensitivity
When it comes to masking, not all surfaces are created equal. Some are delicate, others robust. Your tape choice should reflect this.
Low-tack tapes are gentle on surfaces but may not stick as well in high-heat or humid conditions. High-tack tapes offer better adhesion but can be harsh on sensitive materials, potentially damaging them or causing paint lift.
Rule of thumb: Test your tape on an inconspicuous area first. This way, you’ll know if it’s too aggressive before applying it to the whole surface.
Edge sealing and overlap techniques
Proper edge sealing is crucial for preventing overspray creep. It’s like a fortress around your work area, keeping enemies (overspray) at bay.
Use wide tape to create overlaps at edges. This helps seal seams and prevent dust ingress. For corners, fold the tape back on itself to create a tight seal.
Seam tapes can also be used for extra protection. They’re applied over existing tape seams, creating an additional barrier against overspray.
Static-cling vs adhesive-backed masking comparison
Static-cling masks are like Velcro for your surfaces. They stick without leaving residue behind, making them great for delicate jobs.
The downside? They can still hold a static charge, attracting dust like a magnet. This isn’t ideal if you’re trying to avoid dust problems.
Adhesive-backed masks, on the other hand, stick firmly but require careful tape selection to avoid damaging surfaces. They don’t usually hold as much static charge as their cling counterparts.
Bottom line: Choose based on your surface’s sensitivity and your dust tolerance level.
Application Techniques, Workflow, and Equipment to Minimize Static Dust
Workflow matters: unroll and lay materials slowly, keep films flat to avoid rubbing, and sequence tasks so you minimize handling between masking and spraying. Use grounded reels or antistatic tools where available and avoid rapid peeling that builds charge just before spraying.
Plan equipment placement and personnel movement to limit crosswinds that lift dust; if you’re unsure about a product’s antistatic claims, refer to the technical data sheet or manufacturer guidance. Consistent routines—mask, tack, inspect, then spray—cut down on surprises and rework.
Handling and placement best practices
When working with anti-static masking materials, gentle handling is key to minimizing static charge. Start by unrolling the material from the center outwards, not from one end to another. This helps distribute any static charge evenly across the surface.
Smooth the material onto your work surface using a soft, smooth motion. Avoid rubbing or stretching the material as this can generate static and lift fibers, leading to dust pickup.
Avoid unspooling the material at high speeds. Keep it slow and steady to prevent excessive charge buildup.
Useful tools and small equipment
Having the right tools can make a big difference in your masking job. Here are some useful ones:
- Applicator wands: These help apply the material smoothly and evenly, reducing handling-related static.
- Soft squeegees: Useful for smoothing out wrinkles and bubbles without generating too much static.
- Low-static blowers: These can be rented and are great for removing dust from surfaces before applying the mask. They typically run around $50-$100 per day to rent.
- Anti-static brushes: These help remove any remaining dust or fibers, further reducing static buildup.
- Static-dissipating gloves: Wearing these can help prevent your own body from generating and transferring static charge onto the material. They usually cost around $20-$50 per pair.
Booth, airflow, and humidity controls that help
Controlling your spray booth’s environment can significantly reduce static buildup and dust pickup. Here’s how:
Airflow: Maintain a consistent, low-velocity airflow pattern in your booth. This helps keep dust particles suspended in the air where they can be filtered out, rather than settling onto your masked surfaces.
Humidity: Maintain moderate humidity levels in your booth, typically between 40% and 60%. This helps prevent static buildup by reducing the dryness of the air. Always check with your paint supplier for their specific product recommendations.
Testing, Visual Checkpoints, and Troubleshooting Common Defects
Run a short mock-up: apply the mask, spray a small test area, then remove and inspect for edge seepage, fiber pickup, or speckling—this gives a quick read on material performance under your conditions. Create checkpoints: pre-spray surface sweep, mask edge inspection, and post-mask lift review to catch problems early.
Common fixes include switching tape tack, adding a secondary overlap, or using an antistatic wipe if you spot clustering; consult product labels or supplier guidance when changing materials. Keep a simple log of failures and fixes so you can reproduce what works next time.
Pre-job test panel and inspection checklist
Before starting any spraying job, set up a small-scale trial to check your masking materials’ performance.
- Masking material: Test different types of anti-static plastic film or paper on scrap panels.
- Edge seep: Check for any overspray migrating under the edges. Use edge sealing techniques if needed.
- Static cling behavior: Observe how well the material adheres to the surface without lifting or wrinkling.
- Dust inclusions: Inspect for any dust particles getting trapped between the mask and the surface. Use anti-static treatment if necessary.
- Adhesive strength: Ensure tape holds firmly but peels off cleanly after spraying.
- Surface sensitivity: Check if the mask leaves any residue or damages the surface upon removal.
- Spray pattern: Test different spray techniques to see which works best with your chosen mask material.
- Dry time: Monitor how quickly the sprayed area dries under the mask. Too slow may lead to dust pickup.
Quick rule: Always test before you spray to avoid costly mistakes.
Common problems and corrective actions
During or after spraying, look out for these common issues and their fixes.
- Edge seep: If overspray migrates under the mask, try using edge sealing tape or overlap techniques.
- Fiber inclusions: If dust particles are getting trapped, use anti-static treatment on the surface before masking.
- Static attraction: If the mask is lifting due to static, switch to a higher charge material or use an anti-static spray.
- Mask lifting: If the mask isn’t adhering well, try using adhesive-backed masking instead of static-cling.
- Residue left behind: If the mask leaves residue, clean the surface before spraying and use a different tape or edge sealer.
- Damage to surface: If the mask is damaging the surface, switch to a gentler material or use a topical anti-static product.
- Uneven drying: If some areas are drying slower than others, adjust your booth airflow and humidity controls.
Quick rule: Catch problems early to minimize rework and waste.
Documenting outcomes and iterating materials
Keep records of your trials and results to build a shop-specific best-practices guide.
- Material type: Note down the exact type and brand of masking material used.
- Batch number: Record the batch number for consistency in future purchases.
- Process conditions: Document booth temperature, humidity, and airflow settings.
- Spray technique: Describe the spray technique used (e.g., wide fan, narrow fan, etc.).
- Results: Note down any issues faced and how they were resolved.
- Final outcome: Record whether the job was successful or if there’s room for improvement.
- Date: Mark the date of the trial to track progress over time.
Quick rule: Knowledge is power. Document your trials to improve future jobs.
Tools and Materials Checklist Plus Material Specs and Standards Explained
Have on hand a selection of films and papers, tapes with varying tack, antistatic sprays or wipes, grounding straps for large plastic rolls, and basic inspection tools like a light and magnifier. For each item, note the spec terms you should confirm—tack rating, antistatic treatment, tear strength, and fiber-shedding claims—by checking the product data sheet or label.
Suppliers can clarify spec language and recommended uses; if any term is unclear, ask them to point to a technical bulletin or test result. A compact checklist on the jobsite reduces wrong purchases and helps you pick materials that fit the paint type and process you’re running.
Essential tools and consumables checklist
Before you start masking, make sure you have all these essentials on hand. This list will help you prevent dust and overspray issues.
- Masking film/paper: Different types for different surfaces. Don’t skip this to avoid paint bleeding.
- Tapes: Various widths and adhesives for edges, corners, and overlaps. Miss this and you’ll have gaps.
- Applicators: Brushes, rollers, or sprayers for applying treatments. Without these, application will be messy.
- Antistatic products: Sprays or wipes to reduce static buildup. Skip this and dust will stick around.
- Test panels: Essential for pre-job testing. Don’t skip to avoid costly mistakes.
- Scissors/utility knife: For cutting materials to size. Without these, you’ll waste time and material.
- Safety gear: Gloves, goggles, and respirator for protection. Don’t skip to ensure safety.
- Measuring tape: To get accurate cuts and placement. Miss this and your masking will be sloppy.
Quick rule: Always check your supplies before starting a job to avoid delays and rework.
Material spec terms to understand on datasheets
When ordering materials, understanding these specs will help you choose the right products for your job.
- Tack level: How well it sticks initially. Too low and it won’t hold; too high and it’ll be hard to remove.
- Solvent resistance: How well it withstands paint solvents. Skip this check and expect peeling or dissolving.
- Anti-static claim: Reduces static buildup. Don’t skip to minimize dust attraction.
- Shelf life: How long it’s usable after opening. Miss this and you might waste product.
- Temperature range: Working temp limits. Skip this and performance may suffer.
- Thickness/gauge: Material thickness. Too thin and it tears; too thick and it’s hard to apply.
- Width: Material width. Miss this and you’ll waste time cutting or have gaps.
- Adhesive type: What kind of adhesive is used. Skip this and you might damage surfaces.
Quick rule: Always check datasheets to ensure materials meet your job’s needs.
How to evaluate supplier claims and request test samples
Before committing to a purchase, follow these steps to verify supplier claims and ensure compatibility with your process.
- Request sample rolls: Try before you buy. Don’t skip to avoid costly mistakes.
- Check datasheets: Ensure specs match your needs. Miss this and you might waste time and money.
- Ask about anti-static performance: How well does it reduce static? Skip this and dust may be a problem.
- Inquire about paint compatibility: Will it work with your chosen paint? Don’t skip to avoid adhesion issues.
- Request small trials: Test on a small scale first. Miss this and you might waste material.
- Ask about application methods: Can it be applied as needed? Skip this and application may be difficult.
- Inquire about removal methods: How easy is it to remove? Don’t skip to avoid damage to surfaces.
- Check lead times: When can they deliver? Miss this and your project might be delayed.
Quick rule: Always verify supplier claims and test materials before committing to a purchase.
Conclusion
Choosing the right masking approach and controlling static dust is essential for a clean finish, durable results, and a safer project overall. Take a practical, top‑down approach: test first on a small area, then follow a simple workflow that keeps overspray out of unintended surfaces and reduces dust migration.
Start with a practical check: test a hidden patch, pick masking film or paper based on your project and coating, set up anti‑static steps and proper adhesives, seal edges to prevent bleed, apply with steady, controlled pressure, manage airflow to avoid blowing dust, and perform a visual check and light test before full application. Do these in that rough order and you’ll catch issues early and keep the job moving.
Common mistakes to avoid are rushing to mask with cheap material, skipping the small‑area test, and neglecting edge seals or proper cling methods. Don’t skip PPE or ventilation, and don’t lean on makeshift fixes if a surface shows dust or static cling. If in doubt about large areas, unusual contours, or high‑gloss finishes, pause and reassess.
If the project grows beyond a manageable scope or you’re dealing with demanding finishes, call a professional instead of forcing it. With the right prep and care, you’ll finish with clean lines, minimal post‑coat touch‑ups, and a measure of confidence that the job was done safely and right. Stay deliberate, stay safe, and take pride in the result.
FAQ
Is plastic masking or paper masking better for overspray with static control?
Plastic generally offers better splash resistance and easier removal, but it can generate more static dust if it rubs on dry surfaces. Paper is kinder to surfaces and can reduce static buildup, but it may tear or lift at edges. Check the product label and manufacturer instructions for static properties and recommended uses.
What should I look for in anti-static or surface-treated masking options?
Look for mentions of anti-static or static-dissipative features on the label. Remember that coatings can wear off with handling, so test a small area first. If in doubt, compare options and follow the manufacturer’s adhesion and removal guidance.
How do I prevent overspray from seeping under edges?
Seal edges with good tape technique and overlap slightly. Keep masking pressed firmly along the surface and avoid gaps where spray can creep in. If edge lifting occurs, re-tape and check for surface dust that may reduce adhesion.
How should I clean up and dispose of used masking materials to avoid releasing dust?
Bag or seal used masking materials before moving them across the job site. Do not shake out the material; you’ll kick up dust. Follow local rules for disposal or recycling and keep used materials away from fresh finishes until you’re sure they won’t transfer dust.