
Introduction
This guide shows how to patch stucco when the metal lath under it is rusting. You’ll assess the damage, remove deteriorated material, and prepare the surface for repair. Keep the work conservative and follow safety and building guidance as you go.
Cutback limits depend on the substrate and structure, so check manufacturer instructions and local codes for what you can remove. Choose fasteners that resist corrosion and are compatible with the lath, and follow the product instructions for installation. Rebuild with the proper patch material and finish coat, then cure as recommended and in accordance with local rules.
Key takeaways
- Assess damage thoroughly, document lath corrosion, and plan protective removal limits safely.
- Cutback limits: remove damaged stucco and lath per substrate integrity, not guesswork.
- Use corrosion-resistant fasteners and consider matching metal thickness to substrate.
- Rebuild lath with continuous inspection for rust pockets and proper coupling.
- Scratch, brown, and finish coats must cure in clean conditions and protect from moisture.
- Install flashing and drainage paths; monitor for moisture intrusion during cure.
Table of Contents
- Introduction
- Key takeaways
- Assessing the Damage and Scope of Work
- Cutback Limits — How Much Stucco and Lath to Remove
- Tools and Materials Checklist for the Repair
- Fastener Choices and Corrosion-Resistance Strategies
- Rebuilding the Lath and Substrate Layers
- Stucco Application: Scratch, Brown, and Finish Layers
- Visual Checkpoints and Quality Control During Repair
- Corrosion Prevention, Flashing, and Long-Term Maintenance
- Conclusion
- FAQ
Assessing the Damage and Scope of Work
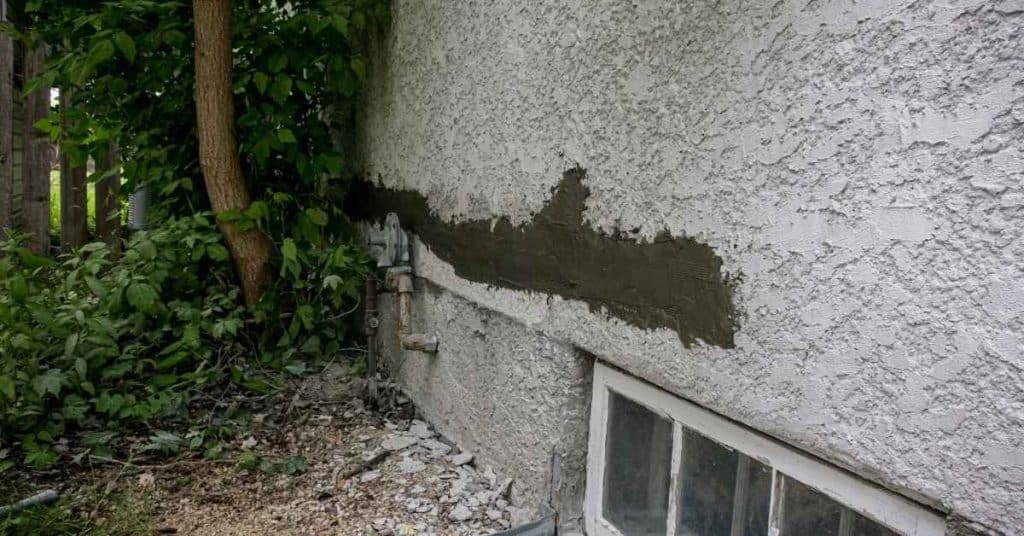
Begin by looking for signs that rust has spread beyond the surface. Look for loose or bulging stucco and any softness behind the finish. Note if metal lath shows through or if framing appears compromised.
Decide whether the issue is isolated or widespread by checking for consistent rust patterns around openings, joints, and edges. Use your observations to determine if lath, fasteners, or backing may need replacement. When in doubt, verify with manufacturer guidelines or local building codes to confirm scope requirements.
Visual inspection checklist
Before you start any repair work, use this checklist to assess the damage visually. It’s quick and helps you understand the scope of the job.
- Rust staining: Look for brown or orange stains on the stucco surface. These indicate rusting lath or fasteners beneath.
- Failed stucco: Check for areas where the stucco has fallen off, crumbled, or is missing entirely.
- Bulges: Inspect for any swelling or bulging in the stucco. This could indicate a problem with the lath or backing.
- Cracks: Look for cracks, especially those that are wide or growing. They may indicate structural issues.
- Efflorescence: White, powdery deposits on the surface can signal moisture problems.
- Water damage: Check for signs of water damage, such as discoloration or soft spots in the stucco.
- Delaminations: These are areas where the stucco is peeling away from the backing. They’re often visible but may require probing to confirm.
- Photograph: Document all findings with clear, close-up photos. This helps you track progress and makes it easier to explain issues to professionals if needed.
Quick rule: If you find any of these signs, don’t skip them. They’re your first clue about what’s going on beneath the surface.
Probing and non-destructive testing
Once you’ve done a visual inspection, it’s time to probe the stucco to find out what’s happening beneath the surface. Safety first: wear safety glasses and gloves.
Use a stiff-bladed tool like a flathead screwdriver or a probing tool designed for this purpose. Gently push into the stucco at intervals of about 6 inches, listening and feeling for changes in resistance. If you hit something soft or hollow-sounding, you’ve found a problem area.
For non-destructive testing, use a magnetic pick-up tool to find rusted fasteners. Pass it over the surface; if it sticks, there’s rust beneath. You can also use a moisture meter to check for excess moisture, which could indicate a leak or other water issue.
Once you’ve mapped out the damaged area, mark it clearly. This helps you know where to cut more stucco and keeps you from damaging good areas.
When to engage a structural or building-envelope pro
While many stucco repairs can be done by a DIY homeowner, there are times when you need professional help. Here’s when to call in the experts.
Rot: If you find rot in the lath, fasteners, or backing, it’s time to call a pro. Rot indicates a moisture problem that may require structural repairs and waterproofing.
Structural movement: If you notice cracks that are growing or bulges that are increasing in size, there could be structural movement. This is a job for a structural engineer.
Large delaminations: While small delaminations can often be repaired by a homeowner, large ones may require professional intervention. They could indicate a serious problem with the backing or lath.
Unknown substrate: If you’re not sure what’s behind your stucco (like if it was added over an existing wall), it’s best to have a pro take a look before you start cutting into it. They can help ensure that your repair is safe and effective.
Cutback Limits — How Much Stucco and Lath to Remove
Use sound material as your boundary and cut back only to clean, solid edges. Mark the recession line where the finish sits on sound substrate. Avoid over-removing by testing for integrity at each step.
Consider how far into the wall you must go to reach corrosion-free lath or backing. Plan cutback to expose clean metal and intact sheathing without creating new openings. If you aren’t sure about required limits, check product instructions or local rules for patch depths.
Determining the safe cutback edge
The key to a successful patch is cutting back to solid, well-bonded stucco and non-corroded lath or fasteners. Here’s how:
1. Probe the area using a flathead screwdriver or a similar tool. Tap gently to listen for hollow spots indicating delamination.
2. Once you’ve found solid stucco, mark it with a pencil. This is your cutback edge.
3. To feather the edges for better bonding, score the stucco with a utility knife at an angle, creating a 45-degree bevel about 1-2 inches back from your marked edge.
Partial patch versus full-area replacement decisions
Deciding between a partial patch, section rebuild, or full-area replacement depends on several factors:
1. Extent of corrosion: If rusting is limited to a small area (less than 2 sq ft), a partial patch may suffice. Larger areas might require a section rebuild or full replacement.
2. Flashing continuity: Check if the flashing under the damaged stucco is still intact and continuous. If not, consider a larger repair to reinstall proper flashing.
3. Finish match difficulty: Assess how well you can match the existing finish with your patch. If it’s challenging, consider a section rebuild or full replacement for a consistent look.
Tools and Materials Checklist for the Repair
Gather basic demolition tools, protective gear, and a mixing container. Include a proper trowel set and a drill with a mixing bit. Have a utility knife handy for clean edges.
Stock fasteners, appropriate replacement lath, and patching materials. Don’t forget cleaning supplies, drop cloths, and a waste container. For any item, verify compatibility with your substrate and local requirements from labels or manuals.
Demolition and cutting tools
Before you start, gather these tools to safely remove the damaged stucco and lath. Use this checklist to ensure you’re prepared.
- Reciprocating saw: Cuts through stucco and nails. Skip it? You’ll struggle with manual cutting.
- Angle grinder with wire cup: Removes loose stucco quickly. Without it, you’ll spend more time scraping.
- Hammer and cold chisel: Breaks up concrete and removes fasteners. Don’t skip; you’ll need to remove old fasteners.
- Scraper or putty knife: Removes remaining stucco. Skip it? You’ll have a rough surface for new application.
- Safety glasses: Protects eyes from debris. Don’t skip; safety first!
- Dust mask or respirator: Filters out harmful dust. Skip it? You’ll inhale dangerous particles.
- Work gloves: Protects hands from cuts and scrapes. Without them, you’re asking for injuries.
- Ear protection: Reduces noise from power tools. Don’t skip; prolonged exposure causes hearing damage.
Quick rule: Always wear appropriate PPE when using power tools to minimize risks.
Replacement materials and consumables
Here’s a list of materials you’ll need for the repair. Check each item off before starting your project.
- Lath: Choose galvanized or stainless steel to prevent future rusting. Skip it? You’re setting yourself up for another repair soon.
- Mortar mix: Use a Type N or Type S mortar for best results. Don’t skip; using the wrong mix can lead to cracks and failures.
- Bonding agent: Apply this before mixing mortar to improve adhesion. Skip it? You’ll risk delamination over time.
- Corrosion-resistant fasteners: Use stainless steel or galvanized screws and nails. Don’t skip; rust will weaken these fasteners, leading to failure.
- Stucco mix: Match the existing finish as closely as possible. Skip it? You’ll have an obvious patch that stands out.
- Finishing tools: Trowel, float, and darby for applying and finishing stucco. Don’t skip; you need these to achieve a smooth, professional-looking surface.
- Expansion joint material: Use backer rod and caulk to create expansion joints. Skip it? You’ll risk cracking due to movement.
Quick rule: Always match the existing finish as closely as possible for a seamless repair.
Fastener Choices and Corrosion-Resistance Strategies
Compare fastener materials for potential corrosion resistance and compatibility with lath and backing. Consider coatings or stainless options where moisture is a concern. Avoid mixing incompatible metals to reduce galvanic corrosion.
Choose fasteners that match the substrate and required embedment depth. If you are unsure, consult manufacturer instructions or local code guidance to confirm suitability and installation practices. Remember to verify any performance claims on labels or data sheets before proceeding.
Fastener materials explained
The right fasteners make all the difference. They hold your patch together and resist corrosion. Here’s what you need to know:
- Stainless Steel: Corrosion-resistant, ideal for coastal areas or where de-icing salts are used. Look for 304 or 316 grade. Avoid in high heat applications.
- Hot-Dip Galvanized: Inexpensive, good protection against rust. Not suitable for direct contact with alkaline materials like stucco. Use with a barrier coat.
- Aluminum: Lightweight, won’t corrode but can bend or break. Good for non-structural repairs. Avoid in high-traffic areas.
- Plastic: Cheap, no corrosion issues. Weak holding power, use only where strength isn’t critical.
- Galvanized with Zinc-rich Paint: Extra protection against rust. More expensive but lasts longer. Ideal for harsh environments.
Fastener selection considerations (length, type, spacing)
The right fasteners aren’t just about material. You need the right size and type too.
Length: Fasteners must penetrate into solid backing – usually 1/2″ to 3/4″. Check local codes or manufacturer instructions for exact lengths.
Type: Match your lath type. For wire lath, use staples or nails. For expanded metal, use screws with a countersunk head.
Spacing: Generally, fasteners should be no more than 6″ to 8″ apart. Again, check local codes or manufacturer instructions for exact spacing.
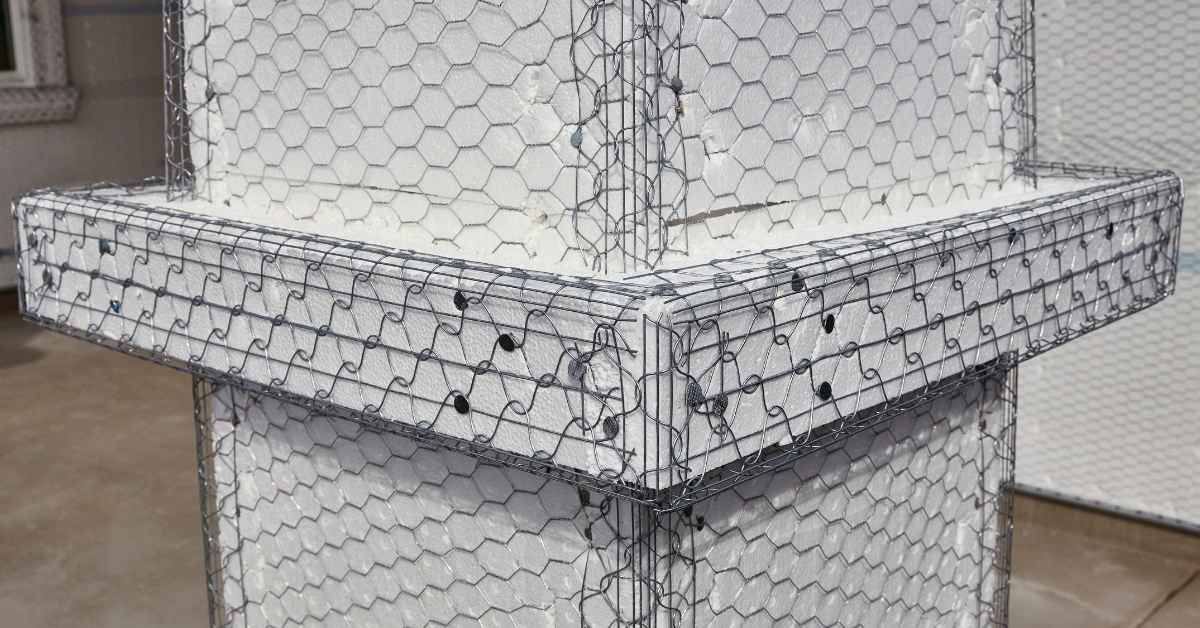
Rebuilding the Lath and Substrate Layers
Carefully remove rusted lath and inspect the sheathing or framing underneath. Address any rot or deterioration before installing new materials. Plan for weather-resistive barriers and proper flashings as you rebuild.
Install new lath and secure it according to the substrate and climate conditions. Ensure the new layer integrates with existing edges and openings without gaps. If unsure about requirements, check manufacturer guidance or local building codes for installation steps.
Metal Lath Replacement and Alternatives
When it comes to replacing rusted metal lath, you’ve got options. Traditional metal lath is still a solid choice for durability and strength. But consider these:
Fiberglass Mesh: Lightweight, non-corrosive, and easy to install. It’s great for new construction or over existing lath. But it might not be as strong in high-wind areas.
Paper-Backed Systems: These are quick and easy to apply, often coming pre-scored for easy cutting. They’re good for small repairs but may not hold up as well in larger areas or harsh climates.
Choose based on your needs: metal for strength, fiberglass for ease of use, paper-backed for speed and small repairs.
Overlaps, Fastening Pattern, and Tying Into Existing Work
When installing new lath, overlap the old by at least 6 inches. Stagger joints like bricks to avoid weak spots.
For fasteners, use a pattern, not a grid. Start at one corner, space rows about 4-6 inches apart, and stagger columns. This spreads stress evenly across the lath and wall.
To tie into existing work, match your new lath’s overlap with the old’s edge. Use fasteners every 2-3 inches along this joint to ensure a solid bond.
Work in sections, securing one before moving on to the next. This keeps everything tight and prevents warping.
Stucco Application: Scratch, Brown, and Finish Layers
Describe the typical multi-coat approach used for a durable patch and how to tie into existing stucco. Focus on achieving good bonding without excessive build or feathering. Be mindful of avoiding thin spots that may crack later.
Use appropriate mixing ratios and setting times as guidelines, but verify exact specs on the product label or data sheet. Control thickness to maintain the appearance and performance of the surrounding wall. If in doubt, consult the manufacturer instructions or local code requirements.
Bonding, mixing, and layer build-up
First things first, check your bonding agent. It’s the glue that holds your layers together. Follow the manufacturer’s instructions for the right mix ratio.
Mortar mix consistency is crucial. You want it like peanut butter – not too runny, not too thick. Check the label or ask at the store if you’re unsure. Too thin and it’ll slide off; too thick and it won’t stick.
Now, let’s build those layers. Start with a solid base. Check base compaction – it should be firm, no give. Then, apply your bonding agent. Don’t skimp, but don’t drown it either.
The scratch coat goes on next. It’s called that because you’ll scratch it to improve adhesion for the brown coat. Apply it at about 3/8″ thick. Let it cure a bit before scratching – follow the product label for timing.
The brown coat is your middle layer, usually around 1/4″ thick. It’s called ‘brown’ because it’s often tinted to help spot any imperfections before you finish. Apply it when the scratch coat is ready – again, check the label.
Finish matching and texture blending
When you’re ready to finish your stucco repair, the goal is to make it look like it was never touched. Here’s how:
First, check the existing stucco. You need to match its color and texture. Use a small sample of the old stucco for reference. If you can’t get a good match, consider using a universal gray or off-white that blends with most colors.
Now, let’s talk about texture blending. Stucco has a unique look due to its application process. To mimic this, use a trowel or brush to create similar texture lines in your repair area. Start from the edge and work your way in, feathering out the strokes to blend with the existing stucco.
For the final touch, feather the edges. Use a damp sponge or cloth to lightly wipe the outer edges of your repair. This softens the line between new and old, making the repair less noticeable. Remember, you’re not trying to hide the repair; you’re trying to make it look like part of the whole.
Visual Checkpoints and Quality Control During Repair
Set inspection points at substrate prep, bonding, and each coat application. Look for clean edges, proper adhesion, and no loose material. Note any signs of water intrusion or future cracking risk.
Evaluate the patch for uniform texture and color match before finishing. Confirm that fasteners and lath are secure and corrosion-free. Always verify requirements with product labels or local building guidance to ensure code compliance.
Pre-close inspection points
Before applying the next coat, ensure everything is ready to prevent issues down the line.
- Secure lath: Check that all metal lath is securely fastened. Any loose pieces can cause problems later on.
- Bond breaker locations: Verify bond breakers are in place to prevent moisture buildup and damage.
- Flashing intact: Inspect flashing around windows, doors, and other openings to ensure waterproofing.
- Weather barrier continuity: Check that the weather barrier is continuous and undamaged to protect from elements.
- Lath alignment: Ensure lath is properly aligned for even stucco application.
- Substrate cleanliness: Confirm substrate is clean and free of debris for proper adhesion.
- Proper drainage: Check that drainage planes are intact to prevent water buildup behind the stucco.
- Fastener integrity: Ensure fasteners are secure and not rusted or damaged.
Quick rule: A thorough pre-close inspection ensures a solid foundation for your next coat.
Final inspection and acceptance criteria
Once the repair is complete, use this checklist to ensure it meets standards and document for future maintenance.
- No hollow spots: Tap the stucco with a hammer. A dull thud indicates proper density; a hollow sound means more material is needed.
- Uniform texture: Check that the texture matches the existing stucco for a seamless repair.
- Proper drainage: Ensure water can drain away from the repaired area to prevent moisture buildup.
- No cracks or gaps: Inspect for any visible cracks or gaps that could allow water intrusion.
- Flashing intact: Re-check flashing around openings to ensure it’s still secure and functioning properly.
- Document repair: Take photos, note materials used, and record the date of completion for future reference.
- Test waterproofing: Lightly spray the area with water to test its resistance to moisture.
Quick rule: A thorough final inspection ensures your repair is durable and long-lasting.
Corrosion Prevention, Flashing, and Long-Term Maintenance
Explain moisture control strategies and the role of proper flashing in long-term performance. Emphasize selection of corrosion-resistant materials in vulnerable areas. Consider how drainage and airflow affect durability.
Plan for a maintenance routine that includes periodic checks for signs of rust or moisture ingress. Use manufacturer instructions and local rules to refine your approach and ensure lasting results. When in doubt, verify details on product data sheets or code references.
Flashing and drainage plane details
When rebuilding your stucco, it’s crucial to manage moisture properly. That starts with checking and integrating flashing, weep screeds, and the drainage plane.
Check where your existing flashing ends. It should terminate at least 4″ above grade or the finished surface. If not, extend it during rebuild.
Install weep screeds at the bottom of each wall to allow trapped moisture to escape. And ensure your drainage plane – usually a housewrap or felt paper – is intact and extends beyond the lath.
Inspection schedule and touch-up tips
Regular inspections help catch any issues early. Here’s a simple checklist to follow:
- Annually, in spring: Check for cracks or holes where water can enter.
- After heavy rain: Inspect for water stains or dampness inside.
- Every 3-5 years: Inspect fasteners and lath for signs of corrosion. Replace if necessary.
- When repainting: Check for any bubbling or flaking paint, which could indicate moisture trapped beneath.
- After winter thaw: Look for any damage caused by freezing water.
- Before and after storms: Ensure no debris has blocked weep holes or damaged the stucco.
- If you notice: Any of these signs, address them promptly to prevent larger failures.
- Quick rule: Regular touch-ups – like filling small cracks with elastomeric caulk – can prevent bigger problems down the line.
Conclusion
Taking this repair to a solid, lasting finish hinges on careful prep, correct fasteners, and a clean rebuild that respects moisture paths. When you finish, the surface should look sound, resist corrosion, and stay durable for years to come.
Next, follow these simple, practical steps in order: confirm the extent of damage and set a clear scope, remove only what you must while protecting the intact structure, gather the right corrosion-resistant fasteners and mesh, rebuild the lath and substrate in a solid, true plane, apply the scratch, brown, and finish coats with proper curing and joints, and perform visual checkpoints as you go to catch issues before they compound. Do a small trial area first if you’re unsure, then scale up methodically.
Common mistakes to avoid include over-removing stucco or lath, using improper fasteners or failing to seal around flashing, and skipping the quality-control checks that catch misalignment or insufficient adhesion. Keep safety at the center: wear eye protection, gloves, and a mask as needed; work in dry, moderate weather; test each step on a small area before broad application; and keep water out of the structure during repairs.
If you run into persistent rust, uncertain fastener compatibility, or moisture intrusion beyond your comfort level, don’t push through. A professional can save time and prevent costly damage. With careful planning and steady hands, you can complete a repair that stands up to the elements and looks right from the ground up.
FAQ
How do I know if the lath is seriously rusted and needs cutting back?
Look for flaking metal, soft spots, and obvious corrosion at openings or joints. If the lath behind the stucco looks rusty or damaged, plan to remove and replace that area. Always verify with the manufacturer instructions or local guidance before proceeding.
What fasteners should I choose to replace rusted lath?
Use corrosion-resistant fasteners recommended for stucco projects. Check the product label or manufacturer instructions for acceptable materials (stainless or specially coated options). If in doubt, confirm with the supplier or local building guidance.
How should I determine how much stucco and lath to remove (cutback limits)?
Remove only the damaged area and a clean margin beyond visible rust. Use safe judgment to avoid exposing sound work unnecessarily. Always reference the cutback guidance on product labels or manufacturer instructions and follow local rules.
What are the key steps to safely rebuild the lath and substrate after removal?
Install a solid substrate with fresh lath according to the system you’re using. Ensure proper anchorage and alignment, and review flashing details to prevent moisture intrusion. Consult the manufacturer instructions if you’re unsure about layering or fastener spacing.