
Introduction
Control joints are planned gaps in concrete that you hide with layout tricks to look intentional.
This article covers simple, hands-on steps you can follow on your own slab without fancy equipment. Think lines, patterns, and edges that camouflage joints while staying within manufacturer instructions and local rules.
Start by choosing a location that follows the slab’s footprint and access needs. Prepare the site with clean, level ground, proper subgrade, and a sound curing plan before you pour. When installing joints, match the joint type and depth to what the product label and local rules allow, and plan cut lines to feel intentional rather than random.
Key takeaways
- Choose joint placement early during layout to minimize later adjustments and patches.
- Budget for hidden joints by coordinating with substrate, finishes, and access points.
- Plan surface treatments that match wear areas to reduce conspicuous seams.
- Install joints with proper control spacing and rated materials per manufacturer.
- Inspect safety: wear eye protection and mask when dusting or grinding joints.
- Conduct site prep, grading, and moisture control before embedding concealment materials.
Table of Contents
- Introduction
- Key takeaways
- Why Control Joints Matter for Performance and Appearance
- Control Joint Types and Placement Considerations
- Surface Materials and Finishes That Change Joint Visibility
- Layout Tricks That Make Joints Look Intentional
- Decorative Treatments and Concealment Materials
- Tools, Materials Checklist and Specs to Plan for
- Ensuring Structural Integrity While Concealing Joints
- Planning, Cost Drivers, and Maintenance Best Practices
- Conclusion
- FAQ
Why Control Joints Matter for Performance and Appearance
Control joints serve a structural purpose in concrete slabs, accommodating thermal expansion and contraction, shrinkage, and restraint. Concealment strategies must respect these movements to avoid triggering cracks or safety hazards. Improper concealment can undermine long-term performance.
Joints influence crack control, differential movement, and load transfer, so any concealment approach should not impede genuine slab movement or create new stress concentrations. Visual options should preserve function, not disguise it as a fix for movement. Plan joint location, decide between reveal or flush treatments, and align spacing with slab size and usage to look intentional without masking movement. Drainage and moisture management matter too; ensure concealment does not disrupt slope, grading, or water paths, and consider sealants and backer materials that allow proper egress. Safety, maintenance, and code considerations should guide design choices to minimize trip hazards and keep joints accessible for inspections and repairs.
Structural function of control joints
Control joints serve a crucial purpose in concrete slabs. They’re designed to manage natural movements that occur due to temperature changes and curing shrinkage.
Thermal expansion and contraction: Concrete expands when heated and contracts when cooled. Control joints allow these movements without causing the slab to crack or buckle.
Shrinkage: As concrete cures, it shrinks slightly. Control joints help relieve this stress, preventing random cracking.
Typically, control joints are needed where slabs meet walls, change direction, or at regular intervals across large expanses to manage these movements effectively.
Aesthetic conflict: when joints look accidental
Control joints can often appear unsightly, drawing unwanted attention. This happens when they’re placed haphazardly or don’t align with the slab’s design.
Placement: Joints that seem random or are too close together can make a slab look poorly planned.
Alignment: Misaligned joints can create a disjointed, chaotic appearance. They should be placed in line with the slab’s edges or other design elements.
To change this perception, intentional design is key. Planning joint placement to complement the slab’s layout and dimensions can make them appear deliberate rather than accidental.
Control Joint Types and Placement Considerations
Define the main joint types: contraction, expansion or isolation, and saw or formed joints. Each type has typical crack behavior and specific visual cues you can recognize on a slab to plan concealment strategies. Understand how these cues guide placement and appearance.
Placement logic depends on slab design, edge conditions like curbs and walls, and project constraints such as budget and season timing. These factors influence spacing, alignment with motifs, and how easy concealment will be. Check applicable local codes and engineering standards for exact specs, and document coordination with a structural engineer when needed. Practical layout tricks include aligning joints with architectural lines, using color and texture transitions at joints, and integrating joints into decorative patterns or subtle reveals. Use a planning checklist to calculate spacing, mark locations early, and coordinate with subtrades while planning for expansion gaps near edges and future maintenance. Avoid common pitfalls by not placing joints near doors or high-traffic zones and by preventing over-segmentation.
How joint type affects layout decisions
Control joints come in three main types: contraction, expansion/isolation, and saw/formed. Each has its own crack behavior and visual cues.
Contraction joints are used in continuous slabs to control where cracking occurs. They’re ideal for large areas with no interruptions. To hide them, align with architectural lines or use color/texture transitions.
Expansion/isolation joints separate different parts of a slab. They’re great for isolated elements like steps or landings. Here, you can integrate the joint into decorative patterns or create subtle reveals to make it appear intentional.
Planning joint locations (what to check)
Before laying out joints, use this checklist to ensure optimal placement and concealment.
- Slab thickness: Thicker slabs need wider joints. Check ACI 302.1R for guidelines.
- Reinforcement: Joints should cut through reinforcement to control cracking. Verify with your engineer.
- Pours: Plan joint locations based on pour sizes and sequences.
- Drainage: Ensure joints don’t interfere with drainage patterns.
- Sightlines: Align joints with architectural lines or motifs to make them less noticeable.
- Edge conditions: Leave expansion gaps near edges and avoid placing joints under door thresholds.
- Project constraints: Consider budget, build-season timing, and other project-specific factors.
- Engineering standards: Check local codes and ACI guidelines for exact joint specifications.
Quick rule: Always coordinate with your structural engineer to ensure joints are placed correctly and safely.
Surface Materials and Finishes That Change Joint Visibility
Concrete, overlays, pavers, tile, and coatings each interact with joint visibility through texture, color, and seam width. Texture depth and finish style (broomed, troweled, brushed) can camouflage or emphasize joints. Consider how these elements affect perceived joint prominence.
Color choices influence contrast; subtle or matched tones reduce the visual impact of joints. Seam strategies, including width, alignment, and staggering, help joints read as intentional design. Each material brings trade-offs in durability, maintenance, slip resistance, and installation complexity, so weigh them against your concealment goals. A quick decision framework can guide material selection based on the desired hidden joints effect and budget, while keeping in mind compatibility with sealants and finishes.
How different materials reveal or hide joints
Material choices significantly impact how visible control joints become. Rigid, monolithic materials like concrete slabs behave differently than segmented systems like pavers.
- Concrete: Uniform appearance, but rigid nature can lead to cracking if not properly jointed.
- Overlays: Flexible, can bridge minor cracks. Choose thin sets with good bond strength to avoid delamination at joints.
- Pavers: Segmented system allows for movement and reduces stress on joints. Ensure proper base and sand bedding for stability.
- Tile: Similar to pavers, but requires precise installation and strong mortar to prevent joint failure.
- Coatings: Flexible, can hide minor imperfections. Choose breathable coatings to avoid blistering at joints.
Finish choices that minimize contrast
Color blending and textured finishes help reduce the visual prominence of control joints. Consider these options:
Blended colors: Match joint filler color to surface for minimal contrast. Avoid stark contrasts that highlight joints.
Aggregate exposure: Exposed aggregate finishes can camouflage joints, especially when the aggregate matches the joint material.
Textured finishes: Broomed or brushed finishes create a consistent texture across surfaces and joints, minimizing their appearance.
Layout Tricks That Make Joints Look Intentional
Start by mapping sightlines and design axes from typical viewing angles, then align control joints with walls, edges, or landscape features to create a deliberate rhythm. This helps joints feel like part of the plan rather than an afterthought.
Choose a joint pattern (grid, running bond, or herringbone) and consider rotating or offsetting slab bays to establish a visual flow that complements color and texture changes. Plan joint alignment with architectural lines so joints intersect borders or fencing lines as part of the design language. Apply camouflage and finishing touches like color-matched scoring, subtle textures, or edge bands to blend joints or make them a feature. Before pouring, draft a layout plan, mock it on paper or digitally, test sightlines from key vantage points, and adjust spacing, pattern, or orientation accordingly.
Align joints with architectural and landscape lines
When laying out control joints, look around your site. See those walls, fences, planting beds? They’re your friends.
Line up your joint layout with these features. It’s like drawing a line from one to the next. Suddenly, those joints aren’t random cracks. They’re part of the design.
Pro tip: Start at a corner or edge and work outwards. That way, you’ll create a rhythm that feels intentional.
Use patterning and score lines
Think of your concrete slab as a big canvas. You can paint patterns on it with those joints.
Try a grid pattern, like bricks in a wall. Or run them diagonally for a herringbone look. Decorative scoring can add another layer too. It’s like adding lines to a drawing.
Pro tip: Keep your patterns consistent. That way, the joints will blend right into the surface.
Control sightlines and focal points
Where you put those joints matters. You want them to look like they belong, not like they’re interrupting something important.
Place joints away from direct view. If you’ve got a nice fountain or sculpture, don’t put a joint right in front of it. Let the joint lead the eye to that focal point instead.
Use natural breaks too. If there’s a big tree or a change in terrain, let the joint follow that line. It’ll look like it was meant to be there.

Decorative Treatments and Concealment Materials
Quickly consider when concealment is appropriate: aesthetics versus maintenance, climate, and foot traffic. Visual strategy should address color, texture, and pattern alignment to minimize joint visibility without sacrificing function.
Material options include colored or painted sealants, stone or metal inlays, joint strips, decorative grouts, and planted or aggregate joints. Each option has pros and cons, plus typical longevity considerations. Plan installation sequencing so treatments align with sealants, concrete cure stages, and joint movement allowances, ensuring compatibility with primers and sealants. Maintenance will require cleaning, UV resistance, and reapplication intervals. Weigh upfront costs, outdoor durability, slip resistance, and any impact on future joint maintenance or structural assessments.
Colored sealants and inlaid strips
Use color-matched or contrasting sealants to make joints a feature, not a flaw. It’s like drawing attention to your scar instead of trying to hide it.
Pro tip: Match the sealant color to nearby surfaces for a seamless look, or go bold with a contrasting color to make joints pop.
Thin metal or stone strips can be inlaid into the joint. This adds texture and draws the eye away from the fact that it’s a control joint. It’s like wearing a nice watch – you’re not hiding your wrist, you’re accentuating it.
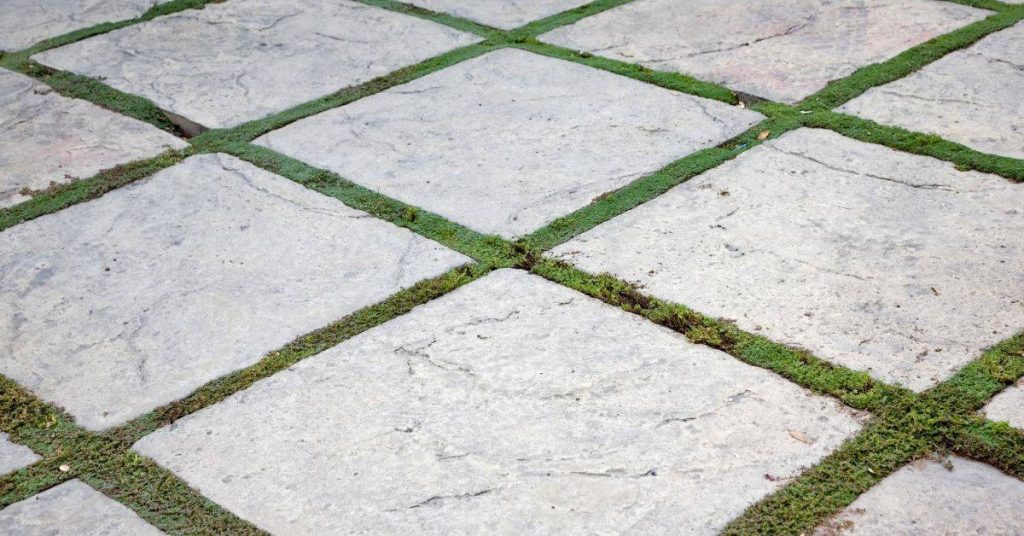
Living and soft joints (gravel, turf, groundcover)
Permeable infills like gravel or small stones allow water to drain while giving the joint a softer look. It’s like giving your concrete a little bit of hair instead of a bald, smooth surface.
Planting grass, moss, or other low-growing plants in the joints can really soften their appearance. Just make sure they’re not growing so much that they interfere with the joint’s movement.
Remember: These living joints need some TLC – water them regularly and keep weeds at bay.
Removable covers and trim solutions
Metal or polymer covers can be used to hide joints, but they need space to accommodate joint movement. It’s like giving your joint a little breathing room.
These covers are great for areas with high foot traffic or where you want extra protection from wear and tear. But remember, they’ll need periodic cleaning and may require replacement over time.
Note: Make sure these covers don’t interfere with drainage – water needs a way out too.
Tools, Materials Checklist and Specs to Plan for
Outline core tool categories: sawing (dry or wet, blade types), finishing (trowels, floats), measuring (laser level, chalk lines, calipers), sealing (penetrating vs surface sealers), plus safety gear and dust control.
Materials checklist should include bulk components and joint-related products, sealants, curing compounds, forms or templates, and backup consumables. Check concrete mix standards, joint spacing and depth guidelines, surface texture requirements for slip resistance, and chemistry compatibility with sealants and coatings. Document references from local codes and manufacturer data sheets. For workflow, plan pre-project measurements, layout joint lines, develop a cutting plan with timing, and prepare templates to ensure consistent joint depth. Include a testing and inspection step before sealing and plan whether to rent or buy tools, with a plan for dust management and on-site calibration.
Essential tools and equipment
Before you start, make sure you have the right tools for layout, sawing, finishing, and sealing. Here’s a checklist to help you plan or hire appropriately.
- Layout: Tape measure, chalk line, laser level – to ensure accurate joint spacing and depth
- Sawing: Concrete saw (dry/wet), diamond blades – for clean cuts; wrong blade can cause damage or slow progress
- Finishing: Trowels (straight edge, finishing), floats – to achieve desired surface texture and minimize joint visibility
- Sealing: Sealant applicator gun, sealant brushes – for even application; wrong tool can cause waste or poor results
- Safety: Safety glasses, work gloves, hearing protection – to protect from debris and noise
- PPE: Hard hat, steel-toed boots, high-visibility vest – for jobsite safety
- Dust mitigation: Dust collection system, vacuum – to control dust; improper use can cause health issues and mess
- Miscellaneous: Extension cords, power source (generator) – for tool operation; lack of power can halt progress
Quick rule: Always check tools before starting. Faulty tools waste time and money.
Material specs and standards explained
Understanding material specifications and standards ensures your concrete joints look good and last long. Here’s what to check:
- Concrete mix: Slump, air entrainment, strength – check ACI 211 for standard mixes; wrong mix can cause cracking or poor performance
- Joint-related products: Control joints, routing bits, saw blades – ensure compatibility with your concrete type and tools
- Sealants and sealers: Movement capability, UV resistance – check manufacturer data sheets; wrong product can cause joint failure or discoloration
- Curing compounds: Compatibility with your concrete mix – wrong compound can cause surface issues
- Forms or guide templates: Size, material – ensure they match your desired joint size and won’t damage the surface
- Local codes: Joint spacing, depth guidelines – check with local building department; non-compliance can lead to fines or rework
- Surface texture requirements: Slip resistance – ensure your finish meets safety standards
- Backup consumables: Water, release agents – have enough on hand; running out can cause delays or poor results
Quick rule: Always check material compatibility. Incompatible materials can ruin your work.
Ensuring Structural Integrity While Concealing Joints
Focus on preserving joint movement and load performance by using backer rods, flexible sealants, and correct depths and widths. Avoid rigid fillers that can crack or transfer stress.
Provide sizing and placement guidance tailored to slab thickness and expected movement, noting where concealed joints are appropriate and where they should be avoided. Compare backer rod types and sealant chemistries, considering UV and weather exposure and compatibility with adjacent finishes. Discuss visual concealment strategies like aligned joints with surface textures, color-matched sealants, decorative trims, or micro-grooves, while keeping joints accessible for maintenance. When in doubt, consult a structural engineer and reference codes or guidelines, then outline a maintenance plan including re-sealing intervals and replacement triggers.
Choosing Flexible Fillers and Backer Rods
When it comes to hiding control joints, you need materials that can move with the concrete. Here’s what to look for:
Flexible Sealants: Silicone and polyurethane sealants are your best bets. They stretch and compress without cracking.
Backer Rods: Foam backer rods provide good support, but they can degrade over time. Polymer rods last longer and maintain their shape better.
When Concealment Methods Conflict with Movement Needs
Some joint concealment methods can restrict movement, causing stress on the concrete. Here’s how to avoid that:
Rigid Fillers: Avoid using rigid fillers like grout or mortar. They don’t flex and can cause cracking if the joint moves.
Decorative Trims: If you’re using metal or wood trims, ensure they’re securely attached but allow for movement. Use expansion joints in long runs to accommodate expansion and contraction.
Micro-Grooves: Be careful with micro-grooves. While they can hide joints, if they’re too narrow, they can restrict movement and cause stress. Make sure they’re wide enough to allow for joint movement.
Planning, Cost Drivers, and Maintenance Best Practices
Outline a planning timeline from assessment and design to execution, with milestones for layout decisions, curing windows, and long-term maintenance.
Identify main cost drivers such as materials, sawcutting, decorative inlays, and the potential need for professional design. Describe visual strategies to hide joints through layout options, pattern disruption, color matching, and texture variation, while preserving performance. Cover materials and workmanship choices, including compatibility with concrete mix, curing methods, slip resistance, and stain or epoxy longevity. Develop a maintenance plan with routine cleaning, sealing schedules, crack monitoring, and reapplication of inlays or treatments. Finally, include risk checks and decision filters related to environmental conditions, substrate prep, and the choice between DIY feasibility and professional help.
What affects cost and when to hire pros
Custom inlays, specialty sealants, and structural changes can hike up your budget. Here’s what to consider:
Custom inlays or intricate patterns boost the price due to increased labor and material costs. Pre-made options are cheaper but may not offer the same level of personalization.
Specialty sealants, like UV-stable or high-gloss options, come at a premium. They’re worth it if you live in harsh climates or want an extra-wow factor, but standard sealants can save you money.
Structural changes, like adjusting joint spacing or depth, may require a concrete contractor or engineer. If you’re unsure about structural integrity, always consult a pro to avoid costly mistakes.
Maintenance checklist and longevity tips
Regular upkeep keeps your joints looking good and functioning well. Use this checklist:
- Annual Inspection: Check for cracks, chips, or peeling sealants.
- Cleaning: Remove dirt and debris every 6 months to prevent staining and joint deterioration.
- Sealant Reapplication: Every 3-5 years, depending on traffic and weather exposure. Neglect this, and water can seep in, causing damage.
- Crack Monitoring: Keep an eye out for hairline cracks that could widen over time.
- Inlay/Strip Replacement: If they’re damaged or worn, replace them to maintain the joint’s appearance and function.
- Grout Touch-up: Fill any gaps or voids in grouted joints to prevent water intrusion.
- Edge Treatment: Ensure edges are properly sealed to prevent moisture wicking.
- Temperature Checks: In extreme heat or cold, check for signs of joint distress due to thermal expansion/contraction.
Quick rule: The key to longevity is consistent, routine care. Don’t let small issues turn into big problems.
Conclusion
Getting the joints right is about safety, durability, and a clean look. Plan, test, and protect the edges so the joints perform as designed and stay visually intentional.
First, measure and mark the joints, choose the right joint type and placement, pick surface materials and finishes that hide or reveal joints on purpose, test the layout on a small area, and gather the tools and materials you’ll need. Check the structural notes, factor in cost drivers and maintenance, and run through a simple sequence so you know what to do next before you commit to permanent work.
Common mistakes to avoid are hiding joints without checking movement, skipping the small-area test, and pairing incompatible materials. Always wear proper safety gear, work in dry conditions, and respect movement gaps. Don’t force a finish or sealant into a joint that needs room to move, and don’t rush critical steps like alignment and curing—the wrong move can ruin the whole surface.
If structural concerns pop up or joint movement seems unpredictable, call a professional instead of forcing a DIY fix. With careful planning and steady steps, you can finish with confidence and keep the project on track. Stay practical, stay safe, and move forward one deliberate step at a time.
FAQ
How do I choose the right location for control joints so they look intentional?
Place joints where natural sightlines break. Think about seams between large panels, doorways, and edges where the eye already rests. Don’t rely on random spots—mark a clean grid or pattern before any pour or set, and keep joints consistent across surfaces.
What should I plan in site preparation and excavation before installing joints?
Prepare flat, clean subgrades and remove debris that can telegraph through the finish. Check that the base is compacted and level so joints sit true, not sunken or raised. Follow manufacturer guidance for any joint inserts or edge treatments you intend to use.
How do I install control joints without ruining the look or the slab?
Install joints at the planned locations with the right tools or inserts, and keep their depth and width consistent with the surface material. Don’t oversize or skip edges—misplaced joints show up as ugly cracks or reveal subpar work. Verify alignment and finish around joints so they read as designed, not as a mistake.
What maintenance steps help keep joints visually hidden and durable?
Seal joints and surrounding surfaces as recommended by the product labels to slow water ingress and staining. Clean regularly and address any crack movement early, before it widens. If you notice changes, check the joint system instructions or local guidelines for the best repair approach.