
Introduction
The money line is a primary reference line you establish from a starting edge to guide tile layout. It helps you keep the pattern centered and saves adjustments later. Check your layout with straightedge checks and confirm your starting points before you set adhesive.
To find it, pick a clean starting edge, snap a chalk line, and extend it parallel to the other walls. Verify with your room dimensions and any door thresholds, adjusting as needed. Follow the line as you lay tiles and regularly recheck against room corners to stay on track.
Key takeaways
- Define the money line as your primary reference for straight tile layout.
- Measure twice, snap lines accurately, and check perpendiculars to walls.
- Choose money line type based on pattern; adjust for grout lines.
- Dry-lay tiles first along the money line to verify fits.
- Include safety checks: wear eye protection when snapping and cutting.
- Account for irregular rooms and obstacles by extending the line where needed.
Table of Contents
- Introduction
- Key takeaways
- What the “Money Line” Is and Why It Matters
- Planning the Layout: Measuring and Site Assessment
- Choosing the Best Money Line for Different Tile Patterns
- Tools, Materials, and Visual Checkpoints
- Step-by-Step: Marking and Snapping the Money Line
- Adjusting for Real-World Conditions: Irregular Rooms and Obstacles
- Laying Out Tile from the Money Line: Dry-Lay and Full Installation Tips
- Troubleshooting Common Money Line Mistakes
- Conclusion
- FAQ
What the “Money Line” Is and Why It Matters
The money line is a dedicated reference line used for tile layout. It differs from a standard center line in that it anchors symmetry and visual balance across a room. Use it to align patterns, reduce waste, and create a clear focal point for the layout.
Practically, a money line guides where tile starts and how patterns radiate from a known reference. It helps you maintain consistent grout lines and avoid drift as you lay subsequent rows. Always verify that the line fits the room’s features and your chosen pattern through a quick dry run before adhesive goes down.
Definition and key characteristics
The ‘money line’ is your primary reference for laying out tiles. It’s like the backbone of your layout, guiding you to a symmetrical, efficient result.
Unlike a standard center line that divides the room equally, the money line considers the overall dimensions and the size of your tiles. It ensures you start from the right point, reducing waste and creating a balanced look.
When to use it? Always! Whether you’re tiling a small bathroom or a large kitchen floor, the money line is your best friend.
Common problems it solves
The money line helps you avoid common layout pitfalls. For instance, starting from the wrong point can lead to narrow edge cuts on one side of the room, wasting tiles and creating an unbalanced look.
Without a money line, your focal tile (like a fireplace or vanity) might end up off-center, throwing off the whole room’s balance. The money line ensures it’s perfectly placed.
It also helps maintain even grout lines throughout the room. Without it, you could end up with wider grout lines in some areas, which can look sloppy and unprofessional.
Planning the Layout: Measuring and Site Assessment
Start with careful room measurements and a note of door swings, cabinet edges, and fixture placements. Map any irregularities early so you can plan the money line around them. A solid plan saves trips back to adjust later.
Identify high-visibility sight lines that influence the money line choice, such as entry doors or large wall planes. Check for obstacles that might shift the perceived center and plan adjustments before you mark anything. Use a product label or installation guide to confirm any room-specific rules you need to follow.
Taking accurate room measurements
Start by measuring the length and width of your room. These dimensions are crucial for determining the size of your tiles and how many you’ll need.
But wait, don’t stop there. Measure diagonally across the room too. This helps ensure that your room is square. If the diagonal measurements aren’t equal, you might have a problem with your walls being out of square.
Pro tip: Always double-check your measurements by measuring twice in each direction and averaging the results.
Identifying focal points and obstructions
Now, let’s find those features that’ll guide your money line. Start with doors – they’re usually the first thing you see when entering a room.
Next, locate sinks, showers, or other fixtures. You’ll want to align your tiles with these, especially if they’re in the center of the wall. Also, note any obstructions like pipes or wires that might interfere with your layout.
Remember: The money line should flow smoothly from one feature to another, avoiding any awkward breaks or gaps.
Choosing the Best Money Line for Different Tile Patterns
Straight-set starts with a simple reference that runs straight across the room, ensuring even borders. Brick or running bond patterns may benefit from a staggered money line that complements the joint layout. Diagonal patterns often require a line that aligns with the overall diagonal flow rather than the room’s walls.
Herringbone and large-format tiles demand extra thought on line placement to preserve symmetry and minimize tile cuts. Visualize how each pattern will appear from typical viewing angles and test a quick dry layout before setting adhesive. When in doubt, check the tile manufacturer or a professional guide for pattern-specific advice.
Straight-set and grid patterns
For straight-set installations, the money line should be placed either at the center of the room or offset to create balanced edge cuts.
Centered money lines work best when your room’s width and length are equal. This ensures that each tile cut on the edges is mirrored on the opposite side.
If your room isn’t square, consider an offset money line. Measure one-third of the shorter dimension from the wall, then snap a chalk line across the room. This helps distribute the cuts evenly and reduces waste.
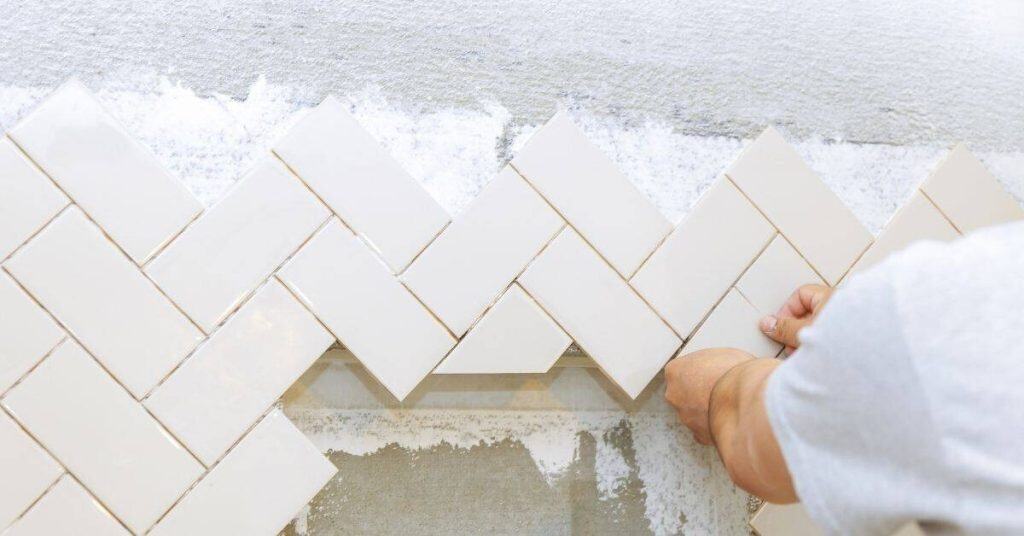
Diagonal, herringbone, and specialty patterns
When laying tiles diagonally or using repeat patterns like herringbone, the money line needs careful placement to maintain consistent tile interceptions.
For diagonal layouts, start at a corner and work outwards. The money line should be positioned so that each diagonal row has an equal number of full tiles and cuts.
With herringbone patterns, the money line should bisect the room, allowing for mirror-image cuts on either side. Start from the center and work your way out to ensure consistent spacing between tiles.
Tools, Materials, and Visual Checkpoints
Gather a chalk line, straight edge, tape measure, markers, a level, and a pencil. Have a straight reference string or laser line if your room has twists. Include tiles, spacers, and a marker for any offset notes you’ll need on the substrate.
Visual checkpoints include confirming that the line sits true across key walls, that corners aren’t pulling the line out of plumb, and that pattern transitions align with plan. Before you cut or lay, recheck the reference line against the actual room features and your intended pattern with the manufacturer instructions handy.
Tools and materials checklist
Before you start laying tile, make sure you have all the necessary tools and materials. This checklist will help you stay organized and avoid mid-project trips to the hardware store.
- Chalk line: To snap straight lines on the floor.
- Laser level: For precise horizontal and vertical lines.
- Tape measure: To take accurate measurements.
- Straightedge: To draw long, straight lines.
- Carpenter square: To ensure 90-degree angles.
- Spacers: To maintain even grout lines.
- Plywood templates: For complex or irregular patterns.
- Marking pencils: To mark reference lines and layout points.
Quick rule: Always double-check your tools before starting. A faulty tool can ruin your layout.
Visual checkpoints to confirm alignment
Before you start cutting and laying tile, perform these quick visual checks to ensure your layout is square, level, and aligned with the room’s features.
- Dry-lay mockup: Lay out full tiles on the floor to check pattern, scale, and fit.
- Test rows from money line: Start laying tile from your reference lines to ensure they’re accurate.
- Sight-line checks from entry: Stand at the door and look along sight lines to ensure they’re straight and balanced.
- Check corners: Ensure all corners are square using a carpenter’s square.
- Level check: Use a level to ensure your layout is horizontal.
Quick rule: The more checks you do now, the fewer problems you’ll find later.

Step-by-Step: Marking and Snapping the Money Line
Set your reference at a consistent height and align it with the room’s longest straight feature. Snap the chalk line along this reference to create the money line. Transfer the line to the substrate using a straightedge to score or mark clearly.
When floors aren’t perfectly level, note the highest and lowest points and choose a starting edge that minimizes noticeable shifts. Use your square to verify perpendiculars to walls and document any offsets for later checks against the tile sheet.
Step-by-Step Process
The following steps guide you through marking and snapping the money line, ensuring a straight, accurate layout for your tile installation.
- Preparation: Clear the area, ensure safety by turning off power to nearby outlets, and gather tools (chalk line, tape measure, laser level or chalk box, etc.).
- Find room center: Measure room length and width. Mark the halfway point on both sides.
- Choose a baseline: Select one of the longer walls as your starting point. Mark it at the midpoint.
- Snap the line: Using your chosen tool (chalk line or laser), snap a line from your midpoint mark to the opposite wall’s midpoint, ensuring it’s straight and square.
- Check accuracy: Verify that your line is true by measuring along its length. Make adjustments if necessary.
- Transfer offsets: Mark offset lines for tile size using a T-square or straight edge, ensuring they’re parallel to the money line.
- Clean up: Remove any excess chalk or marks before starting tile installation.
Establishing a Baseline and Center Points
Finding the room’s center and selecting a suitable baseline are crucial for creating an accurate, balanced tile layout.
To find the room’s center, measure its length and width. Mark the halfway point on both sides. These marks will help you create a symmetrical pattern.
Choose your baseline wisely. For most layouts, using one of the longer walls as your starting point works best. Mark this wall at its midpoint to begin your layout.
Pro tip: Consider any focal points or obstructions in the room when choosing a baseline and planning your pattern.
Using Chalk Lines and Lasers to Snap the Line
Chalk lines and laser levels are both effective tools for snapping a straight line. Each has its pros and cons.
Chalk lines: Inexpensive, easy to use, but may require more manual effort to keep the line straight over long distances or uneven surfaces.
Laser levels: Provide precise, accurate lines with minimal effort. However, they can be more expensive and may require batteries or a power source.
To transfer lines across bumps or thresholds, use a combination of tools. For example, snap a chalk line along the floor, then use a laser level to project the line up onto the wall.
Ensuring your line is square involves using a T-square or straight edge to check for perpendicularity at regular intervals while snapping your line.
Adjusting for Real-World Conditions: Irregular Rooms and Obstacles
In non-square rooms, adapt the money line to the dominant visual axis and let practical symmetry guide the final placement. Around built-ins or transitions, plan a line that won’t interpolate awkwardly across features. Use flexible planning to minimize awkward cuts.
If walls are out of plumb or floors slope, document the variance and maintain a consistent reference from the most visible edge. Check with local rules or manufacturer guidance if you need to account for substrate tolerances or movement joints.
Dealing with out-of-square rooms
Rooms aren’t always perfect squares. Don’t let that throw you off. Here’s how to adapt your money line:
First, find the longest wall and make that your starting point. It’ll give you the most full tiles.
Now, measure from each corner to this wall. If they’re not equal, take the average. That’s your new centerline. Snap your chalk line here.
For visual sides, start from a focal point or doorway. Make sure your pattern looks balanced and symmetrical from there.
Working around cabinets, thresholds, and fixtures
Built-ins, transitions, and fixtures can mess with your layout. Here’s how to work around them:
For cabinets, shift your money line so you end up with full or half tiles at the visible edge. This creates a clean look.
With thresholds, snap your line just past it, then measure back to ensure full tiles on both sides. Use a transition strip if needed.
For fixtures, like toilets or sinks, work around them. If you can’t, shift the money line slightly to accommodate partial tiles at the base.
Laying Out Tile from the Money Line: Dry-Lay and Full Installation Tips
Begin with a dry-lay from the money line to confirm pattern continuity and grout joint consistency. Visualize how the first row progresses and adjust as needed before committing adhesive. Use the line to guide each subsequent course for consistent alignment.
Once satisfied with the dry layout, proceed to full installation while maintaining the reference. Periodically recheck spacing and line integrity as you work toward cutting and fitting edge tiles.
Dry-lay mockup and evaluating edge cuts
Before you start gluing tiles, lay out a few rows without mortar. This is your dry-lay.
Check if the pattern looks balanced. If it doesn’t, adjust your layout until it does. Remember, every tile should touch at least three others for stability.
Now, measure and mark where you’ll need to cut tiles to fit against walls. Use these measurements to make your cuts before applying adhesive.
Maintaining reference during adhesive setting
Once you’ve laid out your tiles, keep that money line in place while the mortar cures. Here’s how:
Use temporary spacers, battens, or small wedges to hold your tiles in place along the money line. These will keep your layout straight and true as the adhesive sets.
Don’t skimp on these supports. They’re crucial for maintaining that perfect alignment you’ve worked so hard to achieve.
Troubleshooting Common Money Line Mistakes
Common errors include shifted lines, cumulative offset, and uneven grout spacing that throw off the entire layout. Identify these issues early by rechecking the reference across multiple walls and corners. Look for discrepancies in pattern alignment as you lay the first few tiles.
Corrective actions include re-marking the line, adjusting layout references, and performing spot checks at key transitions. Prevent recurrence by documenting the line position and validating it against the chosen pattern before each major step.
Correcting a misaligned money line mid-job
If you notice your money line is off, don’t panic. First, stop laying tiles. You’ll need to re-anchor the line.
Remove any tiles that are already laid using the incorrect line. Be careful not to damage them; you can reuse them later. Now, reset your baseline and center points, as explained earlier in this guide. Then, re-snap your chalk lines and laser guides. Double-check your measurements to ensure accuracy.
If the misalignment is significant, you might need to remove more tiles. Take your time, and work carefully to minimize damage. Once you’ve corrected the line, dry-lay a few tiles to confirm the new layout looks right before proceeding with full installation.
Preventing cumulative error across large areas
Mistakes can add up over a large tiling area, leading to uneven grout lines and an unprofessional finish. Here’s how to avoid this:
- Periodic re-checks: Every 10-15 tiles, double-check your measurements and ensure you’re still on track.
- Break the field into zones: Divide your tiling area into smaller sections. Start each section from your money line to maintain accuracy.
- Recalibrate references: If you’ve moved tools or changed positions, re-establish your baseline and center points before continuing.
- Avoid relying on previous tiles: Don’t use laid tiles as a guide for the next row. This can introduce errors that accumulate over time.
By following these steps, you’ll minimize cumulative error and ensure your tiling job looks professional throughout the entire area.
Conclusion
One main idea stands out: nail the money line now and you protect safety, durability, and a clean look for years to come. If you lock in the right reference and follow through, the rest of the install goes smoother and costs stay down.
Start with a simple, natural check: choose the line for your pattern, confirm measurements, snap the line, run a dry-lay to test, adjust for walls and obstacles, and then lock in final marks before you lay tile. After that, work from the line through full installation, keeping the surface protected and rechecking level and alignment as you go.
Common traps to avoid are easy to miss: misplacing the line or failing to verify irregular room edges, skipping the dry-lay test, and rushing the final layout without rechecking for level and intersections. Remember to test small areas first, respect substrate and moisture needs, and stop if anything looks off—safety first.
If the room is very irregular, plumbing or vent obstacles exist, or you’re dealing with a complex pattern or substantial substrate issues, consider calling a professional. When you follow the line with discipline and keep to these steps, you’ll finish with a straight, durable tile layout and a look you can be proud of. You’ve got this.
FAQ
How do I verify the money line stays true when the room isn’t perfectly square?
Double-check with a simple diagonal measurement from opposite corners to confirm the line aligns with the overall floor. If you see a big mismatch, recheck your initial setup and adjust the line endpoints before proceeding.
What should I do if there are doorways, cabinets, or other obstacles in the path of the line?
Plan temporary break points for the line around obstacles and extend or shift the line after the obstruction is cleared. Mark clearly where the line changes direction so you don’t lose reference later.
How can I safely transfer the money line from a chalk line or string to the actual tile layout?
Use a tool that won’t move easily, like a pencil or marker that won’t smudge. Re-check the line after snapping or chalking to confirm it still reflects the intended layout before laying tile.
What should I check if the floor surface seems uneven or untrue after I snap the line?
Inspect with a level or straightedge and note high or low spots. If you find big variances, grind, level, or build up to bring the surface closer to true, then re-mark the line before continuing.