
Introduction
Cutting concrete is the process of scoring or slicing through a concrete surface with the right saw and blade. Plan your cut on a marked line, choose the appropriate blade and depth, and work from edge to edge. Keep the work area safe and protected, and follow manufacturer instructions for your tool.
Always set stop points to control how deep the cut and to avoid hitting rebar or embedded features. Make controlled passes, let the blade do the work, and pause to clear dust and debris as needed. Check local rules and product labels for any limits, and err on the side of conservative depths if unsure.
Key takeaways
- Plan cut lines around joints, rebar, and load paths to reduce damage.
- Check utility lines and call for marking before any blade contact.
- Use a suitable blade and shielded dust control for containment.
- Clamp or brace formwork securely to prevent movement during cutting.
- Stop cutting immediately if blade binds, grinds, or vibrations worsen noticeably.
- Clean debris frequently and inspect for cracks or edge spalling after cuts.
Table of Contents
- Introduction
- Key takeaways
- Quick Overview and Deciding Whether to Cut Concrete
- Tools and Materials Checklist
- Preparing the Site and Safety Checks
- Step-by-Step Cutting Methods
- Stop Points — When to Halt Cutting and Reassess
- Handling Reinforcement and Obstacles Safely
- Troubleshooting Common Problems and Quality Control
- Cleanup, Disposal, Finishing, and Aftercare
- Conclusion
- FAQ
Quick Overview and Deciding Whether to Cut Concrete
Concrete cutting is a common task tied to control joints, repair work, and removing sections. It helps prep slabs for joints, widen door openings, or remove damaged areas with minimal impact. Understanding the purpose guides whether a DIY approach fits the job or if a pro should handle it.
Know the main cut types you might encounter, from shallow scoring to deep full-depth cuts. Decide based on scope, complexity, and any hidden risks like nearby utilities or structural elements. If in doubt, check the label, manufacturer instructions, or local requirements before proceeding.
Types of cuts and typical use cases
A concrete cut’s type determines its purpose. Here are the main ones:
Scoring: Light, shallow cuts for creating control joints to prevent random cracking. Use a concrete saw with a diamond blade at low speed.
Partial-depth cuts: Cuts that go halfway through concrete’s thickness. Ideal for creating expansion joints or removing small sections. Use a saw with a deep-cutting blade.
Full-depth cuts: Go all the way through concrete. Needed for demolition, repairs, or creating large openings. Requires heavy-duty equipment like road saws or wire saws.
Plunge cuts: Start in the middle of a slab, not at its edge. Useful when removing isolated sections. Begin with a pilot hole to guide the blade.
Demolition cuts: Make strategic cuts to break concrete into manageable pieces for removal. Follow a grid pattern and use heavy equipment.
DIY vs professional work: risk and cost considerations
Before you grab your saw, consider these factors:
Deep structural cuts can weaken your home’s foundation. Pros have the know-how to avoid this. If you’re unsure, call one.
Extensive reinforced concrete needs careful planning. Pros can X-ray or scan for rebar before cutting. DIYers risk damaging steel and voiding warranties.
Unknown buried utilities pose serious risks. Hire professionals who use locating services to protect yourself from costly repairs and safety hazards.
Cost-wise, DIY saves money but requires investment in tools. Pros bring experience, equipment, and liability insurance. Weigh the pros and cons based on your project’s scope and complexity.
Tools and Materials Checklist
Gather the core tools you’ll need for most DIY cuts: a saw suited to concrete, blades designed for the material, a cutting guide, and a means to capture dust. Include PPE, measuring tools, and a way to mark lines clearly. Have a way to secure the work area and support waste collection as you cut.
Always verify compatibility and capacity by reading the tool manual and labels. If a blade, guard, or attachment has a limit, choose a model that matches the cut type and site conditions. When in doubt, compare labels or datasheets to avoid overloading equipment.
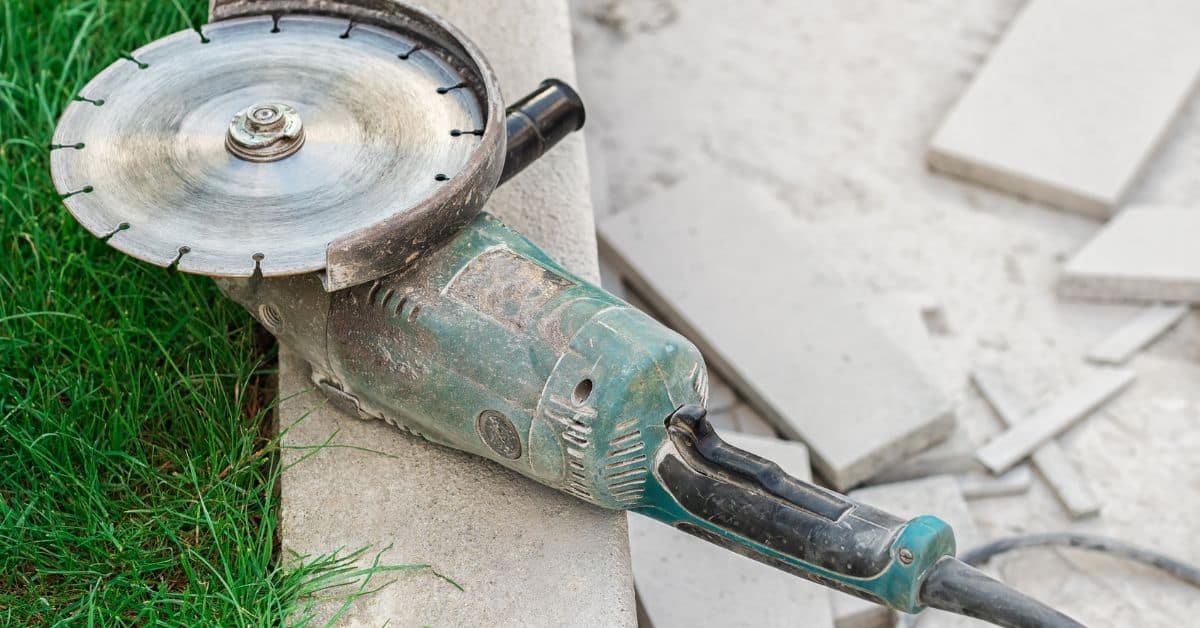
Saw and blade options explained
Before you start cutting, choose the right saw and blade for your job. This checklist helps you select the best tools for different concrete types and site conditions.
- Handheld grinder: Use for small cuts and tight spaces. Check if it’s powerful enough (at least 5000 RPM).
- Walk-behind saw: Ideal for large, flat surfaces. Ensure it has enough power (at least 115V) and a suitable blade.
- Masonry saw: Great for cutting through reinforcement. Check if it’s powerful enough (at least 2000W).
- Wet saw: Best for precision cuts. Make sure it has a water supply connection.
- Diamond blades: Use on hard concrete. Check the blade’s grit size and segment count.
- Abrasive blades: Suitable for soft concrete. Ensure they’re compatible with your saw.
- Blade thickness: Match it to the cut depth needed. Too thin can cause breakage, too thick may not cut deep enough.
- Blade diameter: Choose based on the saw’s compatibility and the cut size required.
Quick rule: Always check manufacturer labels and tool manuals for compatibility and capacity.
Personal protective equipment and dust control
Safety first! Use this checklist to protect yourself from hazards and control dust during concrete cutting.
- Respirator: Wear a NIOSH-approved one for protection against silica dust. Check if it fits properly.
- Eye protection: Use safety glasses or goggles with side shields. Ensure they’re compatible with your respirator.
- Ear protection: Wear earplugs or earmuffs to protect against noise. Check the noise reduction rating (NRR).
- Gloves: Use cut-resistant gloves for handling tools and materials. Check if they’re durable enough.
- Knee protection: Wear kneepads for comfort during prolonged periods on the ground. Ensure they fit well.
- Wet cutting: Use water to suppress dust when possible. Connect your saw to a water supply.
- HEPA vacuum: Use one with a suitable airflow rate (at least 100 CFM) for dust collection.
- Containment methods: Use tarps or barriers to contain dust and prevent it from spreading.
Quick rule: Never compromise on safety. Always use appropriate PPE and dust control measures.
Supporting gear and consumables
These non-powered items are essential for a smooth concrete cutting job. Use this checklist to ensure you have everything you need.
- Chalk line: Use for marking cut lines accurately. Check if the chalk is visible enough on your surface.
- Measuring tools: Have a tape measure and square for precise measurements. Ensure they’re in good working condition.
- Water source and hoses: For wet cutting, have a water supply and suitable hose length. Check if the hose can withstand high pressure.
- Marking paint: Use it to mark cut lines clearly. Ensure it’s compatible with your surface.
- Wedges: Use them to support cuts and prevent blade binding. Check if they’re sturdy enough.
- Replacement blades or discs: Have extras on hand for when blades wear out or break. Ensure they match your saw’s requirements.
Quick rule: Regularly inspect and maintain your tools and gear to ensure they’re in good working condition.
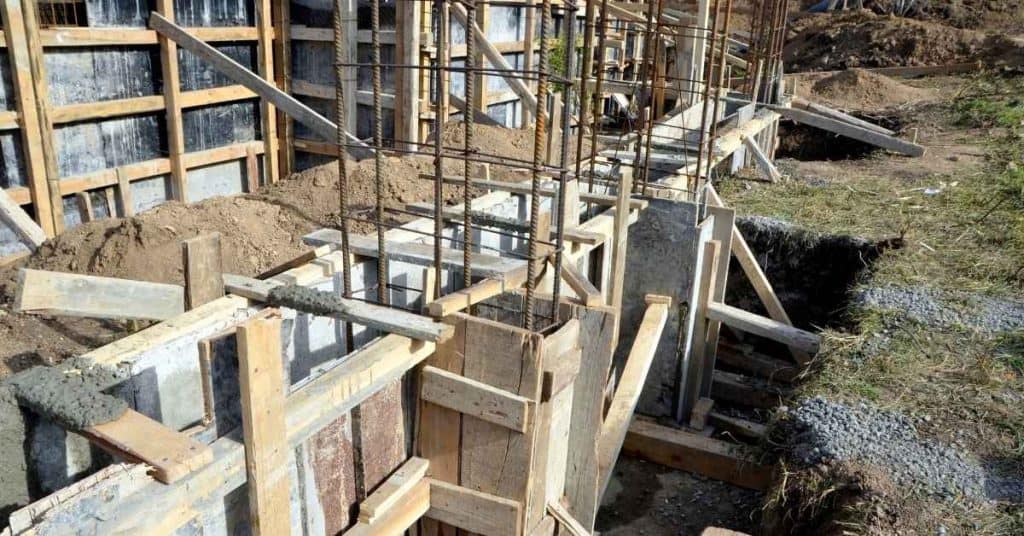
Preparing the Site and Safety Checks
Start by securing the work area to prevent bystanders from entering during cutting. Mark the cut lines precisely and remove trip hazards so you don’t stumble into the blade. Protect nearby structures and landscaping from dust and debris as part of a clean setup.
Always confirm permits and utility Locates before cutting. Double-check any easements or restrictions that might affect the cut, and keep a fire extinguisher or first aid kit on hand. Plan for safe egress in case you need to stop abruptly.
Marking, measuring, and visual checkpoints
Before you start cutting, lay out your cuts accurately to avoid mistakes. Follow this checklist:
- Chalk line: Use a chalk line to snap a straight line along your cut path.
- Straightedge: Check with a straight edge or T-square to ensure your lines are true.
- Reference points: Mark key reference points at each end of the cut and along its length.
- Square corners: Use a square to mark 90-degree angles for clean cuts.
- Measure twice: Double-check your measurements before marking. Cutting too short or long can ruin the slab.
- Check level: Ensure your cut is level if it’s a floor or step.
- Confirm layout: Walk through the area with your eyes closed, feeling for any unexpected bumps or dips that could throw off your cut.
- Avoid power lines: Never mark near overhead power lines to avoid accidental contact during cutting.
Quick rule: Always double-check your layout before making the first cut. It’s easier to adjust a line than fix a mistake in concrete.
Locating utilities, reinforcement, and hidden obstacles
Before you start cutting, locate any utilities, reinforcement, or hidden obstacles to avoid damage and injury. Here’s how:
First, contact your local utility companies to mark their lines. They’ll do it for free. Wait until they’ve marked the area before proceeding.
Next, use a metal detector or ground-penetrating radar (GPR) service to locate any hidden reinforcement or metal objects. If you find unexpected metal or piping, stop immediately and contact a professional to assess the situation.
If you don’t have access to GPR, use a trial probing method: probe the ground along your cut line with a long rod. If it hits something solid, mark it and proceed cautiously or call a pro.
Permits, access, and neighbor considerations
Before you start cutting, check local rules and consider your neighbors to avoid issues:
Permits: Check if you need a permit for your project. Some cuts may require approval from your city or town.
Consider access for your equipment and materials. Make sure you can safely move them into place without damaging property or blocking traffic.
Neighbors: If your work will be noisy, disruptive, or block access to their property, notify your neighbors in advance. Be considerate of their schedules and needs. Also, check if there are any noise/time restrictions in your area that could impact your work.
Step-by-Step Cutting Methods
Set up your saw and guide, then make a shallow starter pass to establish the line. Progressively deepen the cut with controlled passes rather than forcing the blade. Finish with a careful clean edge, adjusting your technique for portable or walk-behind tools as needed.
Focus on method over speed, maintaining a steady pace and keeping the blade perpendicular to the surface. Watch for heat buildup and blade wear, and stop if you notice uneven action or excessive vibration. Keep the line true with consistent feeds and guidance.
Step-by-Step Process
Follow these steps to safely and effectively cut concrete using a walk-behind saw.
- Preparation: Check safety gear, blade condition, and fuel levels. Ensure the site is clear of debris and utilities are marked.
- Marking: Use a chalk line or paint to mark your cut lines clearly and accurately.
- Main Cut: Start at one end, apply steady pressure, and make progressive passes as described below. Keep the blade perpendicular to the surface.
- Finishing: Make final passes to clean up any rough edges or high spots. Check for square and level.
- Cleanup: Disconnect the saw, clear dust with a brush, and store your tools properly.
Scoring and shallow passes to start a straight cut
Making initial shallow cuts helps maintain a straight line and prevents the blade from wandering. Here’s how:
First, use a pencil or chalk to mark your cut line clearly.
Next, set your saw’s depth to just below the surface of the concrete – about 1/8 inch deep. Start at one end of your line and make a single pass, applying steady pressure. This creates a shallow groove that guides subsequent passes.
Do not try to make the full-depth cut in one pass; this can cause the blade to bind or wander off course.
Progressive full-depth cutting technique
Cutting concrete in multiple, progressive passes helps maintain a clean cut and extends blade life. Here’s how:
After scoring the initial shallow groove, increase your saw’s depth to 1/2 inch or 3/4 inch for subsequent passes.
Maintain steady feed pressure as you make each pass, keeping the blade perpendicular to the surface. Check blade alignment and condition after every few passes.
Continue deepening the cut in incremental steps until you reach the desired depth. If your saw allows, adjust the cutting head to tilt slightly for deeper cuts near the end of the pass to ensure a clean bottom edge.
Wet cutting vs dry cutting: when to use each
Both wet and dry cutting have their benefits and trade-offs. Here’s how to choose:
Dry cutting produces more dust but is simpler and doesn’t require a water source. It’s best for small jobs, thin cuts, or when water might cause issues (e.g., freezing temperatures).
Wet cutting suppresses dust, keeps the blade cool, and extends blade life. It’s ideal for large jobs, deep cuts, or when dust control is crucial. However, it requires a water source and produces slurry that needs to be managed.
Always wear appropriate PPE regardless of cutting method. Consider your job site conditions, local regulations, and personal preferences when deciding whether to wet or dry cut.
Stop Points — When to Halt Cutting and Reassess
Stop immediately if you detect a sudden change in resistance or if the blade binds unexpectedly. Any unexpected materials or hidden obstructions require reassessment before continuing. Overheating tools or excessive vibration are clear signs to pause and check alignment and blade condition.
If you lose control or the cut veers off line, halt and re-establish your setup. Use conservative judgment and safety as the priority, then reassess feasibility or switch to a different approach if needed. Do not push through with compromised equipment or a questionable line.
Signs you must stop immediately
Safety’s your top priority. Know these red flags:
Loud metallic scraping. That’s rebar or metal pipe. Stop, locate it, then decide next steps.
Burning smell. Overheating blade? Pull the plug, let it cool.
Sparking. Electric saw on concrete? That’s a fire risk. Unplug, damp down any sparks.
Encountering rebar, pipe, or unknown objects
Hit something hard? Stop and inspect:
- Rebar: Expose it. If you can’t cut safely, call a pro.
- Pipe: Could be water, gas, or drain. Mark it, then get utility locates before proceeding.
- Unknown: Don’t force the cut. Call a specialist to ID and deal with it.
Tool-related stop points: blade wear, overheating, and vibration
Your tools need TLC. Watch for these:
- Glazed blade: It’s dull. Replace it. A new one’s $10-$20.
- Excessive heat: Let the tool cool before resuming. Overheating can damage it.
- Wobble or vibration: Tighten blade, check for imbalance. If persists, pause work, inspect tool.
- Tool stall: Unplug, let it rest. Then try again at lower speed.
- Blade binding: Stop, reverse saw to free blade. Check for debris in cut.
Handling Reinforcement and Obstacles Safely
Cutting near rebar or embedded pipes demands careful planning to avoid damage or injury. Work around obstacles when possible and use appropriate protective measures for utilities. Transition smoothly to new sections to prevent gouges or fracturing of surrounding concrete.
When the situation looks complex, favor conservative approaches and temporary supports. Consider professional consultation for tricky layouts or uncertain utility locations to protect the structure and your crew. Do not attempt aggressive fixes without proper guidance.
Cutting through rebar: techniques and options
When you encounter rebar, don’t force your blade. It’s not designed to cut metal.
First, check if your blade is rated for cutting metal. If not, switch to a metal-cutting blade. They’re designed to handle rebar and other metals.
If you can’t switch blades, try to localize the cut to concrete only. Score and chip away at the concrete around the rebar. Be careful not to damage the rebar itself.
For thick reinforcement or complex situations, consider using mechanical removal methods like a chipping hammer or an angle grinder with a metal-cutting disc. Always check blade limits before attempting. Safety first, buddy.
Avoiding and protecting buried utilities
Hitting a utility line is no joke. It’s dangerous and can cost you a pretty penny. So, let’s avoid it.
- Confirm locations: Before you start cutting, mark out where utilities are located. Call 811 if you’re unsure.
- Use physical barriers: Set up barriers to keep your blade away from marked utility lines.
- Reroute or isolate: If the cut nears a utility line, consider rerouting it or isolating that section with a temporary barrier.
- Communicate: Let neighbors know what you’re doing. They might have info on utilities not marked.
Remember, it’s always better to be safe than sorry. Take your time and plan carefully around buried utilities.
Repairing and finishing edges after encountering obstacles
When you hit an obstacle, it can leave a rough edge. Here’s how to fix that.
First, use a grinding wheel or angle grinder to smooth out the rough spots. Be careful not to create more damage.
Next, apply a concrete patch. Mix it according to the instructions and fill in any gaps or voids left by the obstacle. Let it cure as directed.
Finally, seal the edge. This helps protect the concrete from moisture and further damage. Use a concrete sealer that matches your existing surface.
Troubleshooting Common Problems and Quality Control
Wandering cuts or chipping often point to alignment issues or blade wear. Slow progress may indicate incorrect blade choice, technique, or load. Slurry management matters for visibility and cutting efficiency, so keep debris cleared and lines visible.
Use visual checkpoints to confirm a clean, straight, and level cut. If results aren’t meeting expectations, stop and rethink your technique, tooling, or blade type. When in doubt, pause and verify the setup before proceeding further.
Preventing and fixing chips, spalls, and uneven edges
Chipping occurs when the blade hits the concrete too fast or with too much force. To prevent this:
Support the slab before cutting to distribute pressure evenly.
Use a correctly sized blade for your saw and make multiple shallow passes instead of trying to cut deep in one go.
If chipping occurs, stop immediately. Clean up the area, then use a concrete repair kit or mortar to fill any chips or spalls. Smooth it out with a trowel and let it cure properly.
Slow cutting, blade drag, and glazing solutions
Slow cutting or blade drag can be caused by a dull blade. Check your blade regularly and replace it when necessary.
Incorrect feed rate can also cause slow cutting. Ensure you’re feeding the saw at a steady, even pace.
Glazing happens when water isn’t flowing properly during wet cutting. Make sure your water supply is consistent and that there are no kinks or blockages in the hose.
If your blade starts to overheat, stop immediately. Let it cool down before continuing. If it’s severely overheating, you may need to dress or replace the blade.
Ensuring a straight, true cut: alignment checks
To keep your cut on track:
After scoring, place a straightedge along the groove to check for any deviations. Adjust your saw’s position as needed.
Check that you’re making consistent depth per pass. Use a depth gauge if your saw has one, or mark your desired depth on the saw blade.
Sight down the cut line before starting and during breaks to ensure you’re staying on track. If you see any deviations, adjust your saw’s position accordingly.
Cleanup, Disposal, Finishing, and Aftercare
Tidy up dust and slurry according to local rules and site guidelines. Decide whether waste concrete will be disposed of or repurposed based on local regulations. Proper disposal helps minimize environmental impact and keeps the site safe for the next task.
Finish with sealing joints as recommended and perform tool maintenance to extend life. Follow local disposal rules and manufacturer guidance for any residues or leftover materials. Document post-cut care for future reference and safety.
Managing dust, slurry, and site cleanup
First things first: safety. Wear a respirator to protect against concrete dust. Use a wet vacuum to collect dust and slurry as you cut. This keeps the area clean and reduces airborne particles.
Contain the slurry in a non-reactive container like plastic or stainless steel. Once dry, it can be swept up and disposed of according to local regulations. Always check your city’s environmental guidelines for proper disposal.
Pro tip: Keep the area wet during cleanup to minimize dust. Let the concrete cure before disposing of waste to reduce its volume.
Filling, sealing, and protecting the cut area
After cutting, fill any gaps or joints with a suitable concrete repair material. For small cuts, use an epoxy-based filler. For larger areas, consider a polymer-modified concrete mix.
Apply flexible sealants to prevent water intrusion and protect against freeze-thaw cycles. Use a backer rod for deep joints before applying the sealant.
Remember: Protect newly cut edges from moisture and traffic until they’ve fully cured. You can use formwork or temporary barriers to achieve this.
Tool care and storage after the job
Post-job tool maintenance is crucial for extending their lifespan and ensuring they’re ready when you need them next.
- Clean blades: Remove any concrete buildup using a wire brush. Wipe with a damp cloth, then let dry before storing.
- Inspect saws: Check for any damage or wear on the blade guard and other parts. Tighten loose screws if necessary.
- Store properly: Keep tools in a cool, dry place away from direct sunlight. Use tool-specific storage to prevent damage.
- Check for wear: Inspect blades for signs of excessive wear or chipping. Replace if needed.
- Oil chainsaws (if applicable): Apply bar and chain oil after each use, following the manufacturer’s instructions. This keeps them lubricated and reduces rust.
Conclusion
Cutting concrete right comes down to planning, patience, and protecting what you value—people, edges, and the finished look. When you do it carefully, it stays durable and looks right, and you avoid costly mistakes.
Before you cut, confirm you have the right tools and PPE, map the cut line, test a small area first, set up a stable work surface, and proceed in controlled passes while watching your depth, speed, and dust control; stop if you notice cracks, wire through or rebar interference, or excessive vibration, and reassess before continuing.
Common mistakes to avoid are rushing through a cut, starting without a plan or proper depth, and ignoring safety rules or wind, dust, and noise limits; always verify you’re wearing eye and ear protection, gloves, and a mask, and keep the work area clear of bystanders, utilities, and trip hazards. If anything feels uncertain—especially reinforcement, hidden pipes, or misaligned cuts—pause and reassess; safer to halt than to gamble with damage or injury.
When in doubt, call in a pro for critical cuts, complicated reinforcement, or tight tolerances. Stay methodical, test as you go, and finish with a clean, protected edge—you’ll have a solid result and a job you can trust.
FAQ
How do I choose the right saw blade for cutting concrete?
Check the blade type on the label and match it to your tool. Look for proper diamond or abrasive blades and follow the manufacturer instructions. If in doubt, verify compatibility with your saw and local rules.
What safety steps must I confirm before starting a cut?
Wear eye protection, hearing protection, gloves, and a dust mask. Clear the area, secure the work, and check for utilities with the appropriate detector. Follow the tool’s safety guide and site-specific requirements.
How can I prevent chipping and get a cleaner cut?
Use a guide or straightedge, set the depth to the cut you need, and feed the blade steadily. Keep the blade and dust collection in good condition, and respect any water or cooling recommendations from the blade/tool label.
What should I do if the concrete starts cracking or dusting excessively?
Stop the cut and reassess the layout, reinforcement, and depth. Inspect for hidden rebar or voids and consult the tool’s instructions for next steps. If unsure, pause and verify with the manufacturer or a local pro.