
Introduction
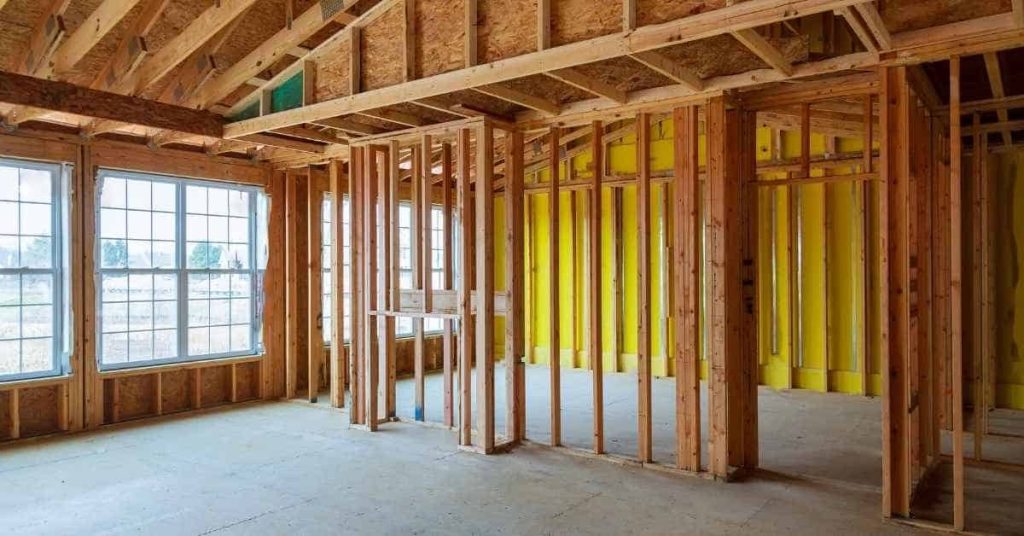
Honeycombing in concrete is gaps or voids that appear where the material didn’t fill around the forms or reinforcement. It often shows up as rough pockets in small walls and can be caused by improper compaction, bad mix proportions, or formwork issues. The big concern is how it affects strength and durability, especially in structural parts of a wall.
In many cases, small honeycombs can be fixed, but larger or deeper pockets may signal a structural problem and require an engineer’s check. Start by assessing the size and location of the voids, then follow the manufacturer or product instructions for patching with a compatible concrete mix and proper compaction and curing. If you’re unsure about the extent, or if the honeycombing is in critical areas, err on the side of caution and consult a pro to evaluate load paths and safety.
Key takeaways
- Define honeycombing: voids in concrete surfaces indicating poor consolidation and formwork gaps.
- Causes include poor compaction, improper mixture, formwork defects, and curing conditions.
- Types and sizes range from small pinpoint voids to larger surface pockets.
- DIY inspection: avoid leaning on walls; check for voids, exposed rebar, and safety hazards.
- Minor repairs: fill shallow voids with patching material and re-compact edges.
- If in doubt about structural impact, call an engineer and follow local code guidance.
Table of Contents
- Introduction
- Key takeaways
- What Is Honeycombing in Concrete Walls?
- Common Causes of Honeycombing
- Types and Severity: Small Vs Medium Vs Large Honeycombs
- DIY Inspection Checklist and Visual Checkpoints
- Repair Methods for Minor Honeycombing (What Homeowners Can Do)
- When Honeycombing Indicates a Structural Issue — Call an Engineer
- Safety, Long-Term Risks, and Cost Implications
- Prevention and Best Practices for New Walls and Future Repairs
- Conclusion
- FAQ
What Is Honeycombing in Concrete Walls?
Honeycombing in small concrete walls refers to voids or cavities that result from incomplete filling or inadequate consolidation. Common causes include poor vibration, cold joints, or gaps in formwork. The issue matters for both appearance and performance, even on small walls.
This section focuses on localized defects in non-structural contexts and not large foundation failures. We’ll distinguish cosmetic honeycomb from deeper voids that can affect strength or long-term durability. Use quick QA checks like exposed aggregate texture, rough or bubbly surfaces, and the tapping test to gauge depth and scope.
Visual characteristics to look for
Honeycombing often leaves telltale signs on the surface of your concrete walls. Keep an eye out for these:
Exposed coarse aggregate: You might see small stones or gravel peeking through the surface, indicating incomplete filling.
Pitting and patchy voids: These look like tiny craters or irregular patches where the concrete is missing or weakened. They’re usually a sign of inadequate consolidation.
How honeycombing differs from cracks, spalling, and surface blowholes
Honeycombing isn’t the only defect you’ll find in concrete. Here’s how it differs from others:
Cracks: Honeycomb voids are usually irregular and scattered, while cracks are linear and often indicate structural issues or settlement.
Spalling: This is when chunks of concrete flake off, exposing the aggregate. It’s typically caused by moisture or freeze-thaw cycles, not incomplete filling like honeycombing.
Surface blowholes: These are small, circular voids on the surface, usually caused by air pockets during pouring. They’re mostly cosmetic and don’t extend deep into the wall.
Common Causes of Honeycombing
Top causes for honeycombing in small walls include poor compaction, segregation, incorrect mix, faulty formwork, and rapid placement. These factors are more likely in small pours and simple projects. Identifying the culprit helps plan appropriate repairs.
Assess severity by looking at void extent, proximity to reinforcement, and evidence of moisture pathways. On-site checks include visual inspection, listening for hollow sounds when tapped, moisture staining, and formwork tightness before finishing. Distinguish honeycombing from surface cracks by texture and void patterns under plaster or patching.
Poor compaction and consolidation
Inadequate vibration or rodding during concrete placement leaves air pockets, leading to honeycombing. This is more likely in small pours where equipment access might be limited.
Signs of under-compaction: Hollow sounds when tapped, visible voids on the surface, and difficulty placing reinforcement due to insufficient concrete beneath.
To detect, use a hammer to tap the wall. If it sounds hollow, you’ve got air pockets. Also, check for any visible gaps or spaces between the aggregate and the formwork.
Mix problems and segregation
An over-wet or poorly graded mix can cause aggregate separation, increasing honeycombing risk. This is more common in small projects where mix design might not be optimized.
Over-wet mixes: Too much water causes the cement to ball up around the aggregates, leaving voids. Poorly graded mixes: Insufficient or oversized aggregates lead to gaps between particles.
To avoid, use proper mix design and maintain correct water-cement ratio. Ensure aggregates are well-graded and properly mixed before adding cement and water.
Formwork and placement errors
Leakage at joints, blocked flow paths, and improper placement sequencing can trap voids in concrete, leading to honeycombing. These issues are more prevalent in small projects with limited resources.
- Joint leakage: Allows concrete to escape, leaving voids behind. Seal formwork joints properly.
- Blocked flow paths: Improperly placed or bundled reinforcement can block concrete flow. Ensure rebar is properly spaced and aligned.
- Improper sequencing: Pouring too fast or not allowing time for concrete to consolidate at the bottom can trap air. Pour slowly, section by section, allowing each to settle before moving on.
- Formwork tightness: Gaps between formwork and supports allow concrete to leak out. Ensure forms are secure and well-supported.
Regularly inspect formwork during placement to catch any issues early. Tighten or repair as needed.
Types and Severity: Small Vs Medium Vs Large Honeycombs
Qualitatively categorize honeycombs as surface/shallower, intermediate, or through-thickness/deep. In small walls, surface cases present as rough patches or voids near the surface, while deeper ones may extend further into the wall.
Measure depth and area as a fraction of wall thickness rather than using fixed numbers. Use simple checklists to estimate depth fraction and honeycomb area. Link each category to typical repairs and note when to escalate to a professional review.
Surface/Shallow Honeycombs (Typically Fixable)
Shallow honeycombs are localized voids that affect only the surface layer of your wall. They’re usually just a cosmetic issue and don’t compromise the structure’s integrity.
You’ll spot them as small, isolated pits on the surface. A quick tap with a hammer should sound solid, not hollow. These are typically fixable by repointing, patching, or sealing.
Key: Shallow honeycombs don’t penetrate more than 20% of the wall’s thickness. Measure depth and area as a percentage to be sure.
Intermediate-Sized Honeycombs (May Need Professional Input)
Intermediate honeycombs penetrate deeper into the wall, affecting a significant portion of the cover. You might see wider voids or small cracks radiating from them.
These could require grout injection to fill the voids and localized reinforcement to strengthen the area. An engineer’s review may be needed if they’re widespread or connected to other issues.
Key: Intermediate honeycombs typically penetrate between 20% and 50% of the wall’s thickness. If you’re unsure, consider consulting a professional.
Deep or Through-Thickness Voids (Structural Risk)
Deep honeycombs are serious. They interrupt reinforcement cover, reduce the wall’s cross-section, and may connect to cracks. You’ll notice wider gaps, visible cracks, or movement over time.
These voids can affect your wall’s structural capacity. An engineer should assess them immediately. Repairs might involve core removal, revised reinforcements, and grouting.
Key: Deep honeycombs penetrate more than 50% of the wall’s thickness. If you find these, don’t attempt repairs yourself – call a professional right away.
DIY Inspection Checklist and Visual Checkpoints
Safety comes first. Define who will inspect, wear PPE, and consider utility shutoffs. Set a clear goal to document defects and assess severity. Decide if a DIY approach is reasonable or if a pro is needed.
Document with photos, a wall map, and notes on crack locations and sizes. Observe moisture cues, staining, and movement. Use defined criteria to determine next steps and what information to gather for professionals.
Tools and materials checklist for inspection
Before you start inspecting, make sure you have the right tools. This list will help you quickly assess your walls.
- Camera: To document defects from multiple angles.
- Flashlight: To check hidden areas and dark corners.
- Sounding hammer: To tap the wall and listen for hollow spots indicating voids or honeycombing.
- Probe (e.g., screwdriver, awl): To gently poke at concrete to check for soft spots or exposed aggregate.
- Tape measure: To record crack lengths and wall dimensions.
- Crack gauge: To measure crack widths accurately.
- Level (bubble level): To check for visible movement or bulging by comparing to a straight line.
- Notebook and pen: To record observations, measurements, and notes.
Quick rule: Having the right tools ensures you gather accurate data for informed decisions about repairs.
Quick field tests: sounding, probing, and mapping
Once you have your tools ready, perform these simple checks to understand the severity of honeycombing.
- Tap test: Gently tap the wall with a sounding hammer. A dull or hollow sound indicates voids or honeycombing.
- Probe test: Use a probe to gently poke at suspected areas. If it goes in easily, there’s likely a void or weak concrete.
- Mapping cracks: Sketch the wall with crack locations and lengths. This helps track changes over time and plan repairs.
- Check for movement: Use a level to check for visible bulging or misaligned doors/windows, which could indicate structural issues.
Quick rule: These tests help you understand the extent of honeycombing and whether DIY repairs are feasible.

Repair Methods for Minor Honeycombing (What Homeowners Can Do)
Minor honeycombing in small walls is typically non-structural and may be tackled with surface cleaning, bonding agents, and patch mortars. Differentiate these from larger voids that require deeper remediation. Always assess scope before starting.
For shallow voids, follow safe steps: clean the area, dry it, apply a bonding agent, and build up with patch mortars in layers. For deeper voids, grout injections or epoxy injections may be needed, with attention to cure times and edge quality. Never exceed your skill level on structural concerns.
Step-by-Step Small-Patch Repair Overview
This concise sequence helps you fix minor honeycombing in small walls.
- Prepare surface: Clean and remove loose material to ensure good bonding. Why: To create a solid base for your repair. Check: Surface should feel rough and sound solid when tapped.
- Apply bonding agent: Use a compatible, high-bond strength adhesive. Why: To improve the bond between old and new concrete. Check: Follow manufacturer’s instructions for application and drying time.
- Fill with repair mortar: Use a patch mortar or repair concrete mix that matches your existing concrete. Why: To ensure even density and strength. Check: Mix according to package instructions and use within the recommended time frame.
- Cure properly: Keep the repaired area moist and cool for at least 7 days. Why: To allow the new concrete to gain full strength. Check: Cover with plastic sheeting or damp cloth, and mist regularly.
Common DIY Mistakes to Avoid
Steer clear of these common pitfalls when repairing minor honeycombing in small walls.
- Using the wrong mortar: Incompatible or poorly mixed mortars can weaken repairs. How to avoid: Match your existing concrete type and mix according to package instructions.
- Inadequate cleaning: Dirt, grease, or loose material undermines repair quality. How to avoid: Thoroughly clean the surface before starting repairs.
- Overbuilding patch depth: Patches that are too thick can crack or delaminate. How to avoid: Build up patches in thin layers, allowing each layer to cure before adding more.
- Ignoring root causes: Failing to address underlying issues like drainage problems can lead to recurring honeycombing. How to avoid: Investigate and fix any contributing factors before making repairs.
By avoiding these common mistakes, you’ll achieve lasting, high-quality repairs.
When Honeycombing Indicates a Structural Issue — Call an Engineer
Red flags include voids affecting reinforcement cover, honeycombing near load-bearing elements, and bulging or leaning walls. Patterned cracks that worsen over time also warrant professional input. Do not rely on DIY fixes in these cases.
A structural engineer will perform on-site inspection, review drawings, and possibly non-destructive tests. Remedies may include professional grouts, injections, reinforcement adjustments, or underpinning. Follow escalation criteria and document observations before contacting a pro.
What engineers will check and test
A structural engineer’s job is to figure out the extent of your honeycomb problem and if it’s causing any structural issues. Here’s what they’ll do:
Site Inspection: They’ll look at the affected area, checking for cracks, bulges, or other signs of damage.
Mapping Defects: They’ll mark out and map all the honeycombs to see their size, shape, and distribution. This helps them understand if it’s a localized issue or something more widespread.
Non-Destructive Testing & Cores: If needed, they might use tools like ground-penetrating radar or take small cores (like tiny cylinders) out of the concrete to see what’s inside. This helps them understand if the honeycombs go deep and affect reinforcement.
Review of Drawings & Loading: They’ll look at your building plans and check how much weight your walls are supposed to hold. This helps them decide if the honeycombs are causing any structural problems.
Possible engineer-specified remediation options
Once an engineer knows what they’re dealing with, they can suggest fixes. Here are some possibilities:
Structural Grout: If the honeycombs are small and not affecting reinforcement, they might use a special grout to fill them in. This strengthens the concrete and prevents further deterioration.
Jacketed Repairs: For larger honeycombs or areas with poor reinforcement cover, they might suggest wrapping the affected area with carbon fiber sheets or other materials. This reinforces the wall and helps distribute loads more evenly.
Added Reinforcement: If the engineer finds that the honeycombs have exposed or weakened reinforcement, they might suggest adding new reinforcement to strengthen the structure.
Partial Replacement: In severe cases, an engineer might recommend replacing entire sections of wall. This is usually a last resort and involves careful planning and coordination.
Safety, Long-Term Risks, and Cost Implications
Immediate concerns involve spalling, falling debris, or exposing reinforcement. These hazards differ from broader structural issues but require attention. Treat any exposed steel as a warning sign.
Long-term risks include corrosion of rebar, moisture-related damage, and accelerated cracking. These can increase maintenance costs and liability over time. Seek evaluation by a licensed professional when indicators arise and document findings for records.
Long-term structural and durability consequences
Honeycombing isn’t just an eyesore. Those persistent voids can cause serious long-term issues.
Corrosion of steel reinforcement is a big concern. Voids reduce concrete’s protective cover, exposing rebar to air and moisture – the perfect recipe for rusting.
As corrosion progresses, it expands, cracking surrounding concrete. This reduces section capacity, weakening your wall over time.
Moreover, honeycombs compromise waterproofing systems. Moisture ingress can lead to freeze-thaw damage, accelerating cracks and further deteriorating the structure.
Cost comparison: DIY fixes vs professional/engineer-led repairs
The cost of fixing honeycombing varies greatly depending on several factors.
Extent and accessibility are key. Small, shallow voids are cheaper to fix than large, deep ones. But if they’re in hard-to-reach places, expect higher labor costs.
Materials and testing also impact cost. DIY fixes can be cheap initially, but may require frequent re-dos due to improper materials or lack of testing. Professionals use better materials and conduct necessary tests, increasing upfront cost but often saving money in the long run.
Engineered solutions can seem pricey, but they’re tailored to your specific situation, ensuring lasting repairs. If you’re unsure, budget for a professional assessment. It could save you from costly mistakes and larger interventions down the line.
Prevention and Best Practices for New Walls and Future Repairs
Pre-pour quality control starts with a sound mix design and a formal concrete ticket. Verify water-cement ratio, aggregate sizes, and air content. Confirm supplier certification where available.
Control vibration, formwork integrity, and orderly placement. Plan pours to minimize cold joints and use staged pours as needed. Document inspections and establish criteria for engineer review if issues appear.
Material specs, standards, and when to request lab tests
The right materials ensure your walls last. Here’s what you need:
- Cement: Used for binding. Look for ASTM C150 type I or II. Cheap options may cause weak bond.
- Sand: Provides volume, strength. Check it’s clean, sharp-edged, and meets ASTM C33 standards. Avoid fine sand for better durability.
- Water: Essential for hydration. Use clean water; contaminated water can cause issues later.
- Admixtures: Enhance properties. Check compatibility with cement and other materials. Common types: accelerators, retarders, air-entraining agents (for freeze-thaw resistance).
- Masonry Cements or Mortars: Pre-mixed for convenience. Choose Type N (general-purpose) or Type S (high-strength) based on your needs. Check strength class and compatibility.
- Concrete Blocks/Bricks: Ensure they meet local building codes. Check for proper curing, as under-cured blocks can cause problems later.
- Grouts & Sealants: For filling joints and sealing cracks. Choose based on joint size, substrate type, and expected exposure conditions. Cheap options may stain or fail prematurely.
Pro tip: Buy materials from reputable suppliers to ensure quality. Store cement in a dry place; wet cement causes weak concrete. Always follow manufacturer’s mixing instructions for best results.
Quality control during placement and curing
Once your concrete’s mixed, it’s time to place it. Here’s what you need to do to ensure a strong, durable result:
Monitor compaction: Concrete needs to be compacted properly to remove air pockets that can turn into voids over time. Use a vibrating screed or a bull float to strike off and consolidate the concrete. Keep an eye on the surface – if it’s not leveling out smoothly, you might need to check base compaction.
Avoid overworking: Too much handling can lead to segregation, where the cement and aggregates separate. This weakens your concrete. So, once you’ve struck off and consolidated, leave it alone until it’s time for finishing.
Seal formwork joints: Formwork joints are a common source of leaks and weak points. Before pouring, make sure all joints are well-sealed with a suitable material like joint sealer or backer rod. This helps prevent water from escaping and ensures your concrete sets properly.
Ensure proper curing: Concrete needs moisture to set properly. After placing, cover it with plastic sheeting or keep it damp using sprinklers or a fine mist. Don’t let it dry out too quickly – this can cause cracks and weak spots. Follow the manufacturer’s instructions for your specific concrete mix.
Conclusion
The bottom line: honeycombing can ruin durability and look if you push past what your wall can safely handle. Handle it with care, test small areas first, and keep safety at the center so you don’t create bigger problems later.
Start with a simple, practical check: visually confirm the extent, note moisture and load conditions, look for cracks or loose mortar, test a discreet patch in a small area, and then follow the minor repair steps you’ve learned before moving to larger work. This keeps you in control and avoids overdoing it in one shot.
Common mistakes to avoid are pushing repairs without a test, using incompatible patch materials or tools, and ignoring safety rules like not securing power or removing more material than needed. Always wear eye and hand protection, work in a well-lit area, and test any repair in a noncritical spot first. If anything feels beyond minor, back off and reassess—safety first.
If you see signs that go beyond small honeycombs—loss of alignment, cracking that moves, or new movement—call an engineer rather than chasing a quick fix. A measured professional assessment can save you time, money, and a lot of damage, and it keeps your project on solid ground.
FAQ
What exactly is honeycombing in concrete and how do I recognize it?
Honeycombing is gaps or voids left in the concrete near the surface, often looking like a honeycomb. It shows up as rough, pitted patches where the mix didn’t fill properly or air pockets formed during placement?
What causes honeycombing, and how can I spot the common signs on site?
Common causes are poor compaction, improper mix proportions, and gaps in formwork. Look for rough surfaces, visible aggregate, and hollow sounds when tapping the wall with a hammer or steel rod.
How does honeycombing affect strength and safety for small patches versus larger areas?
Small, tight honeycombs may be cosmetic and can be repaired without changing load paths. Large or widespread honeycombing can reduce strength and may require professional assessment before preserving or loading the wall.
When should I call a professional, and what should I have ready?
Call an engineer or qualified contractor if honeycombing is extensive, covers critical sections, or repeats across walls. Have photos, wall locations, and any nearby loads or openings ready, plus the wall’s age and existing reinforcement details from the project records. Check manufacturer instructions and local rules for interim steps and repair options.