
Introduction
Cupping is when a wood floor board stands higher at the edges than in the middle, creating a shallow bowl shape across the board. This issue shows up as a curved edge or a noticeable ridge along the boards after moisture changes. It’s a common sight during or after refinishing when damp conditions or uneven moisture balance affect the floor.
Start by locating and addressing any moisture source and giving the space a chance to stabilize before you fix it. Check manufacturer guidance for acceptable moisture content and follow local rules for wood floors; if a board is severely cupped, plan to remove, replace, or re-surface that board after the area dries. When you’re ready to proceed, you’ll typically dry the space, re-sand or refinish as needed, and ensure the subfloor and finish are balanced to prevent quick repeat cupping.
Key takeaways
- Cupping occurs when boards bow with edges higher than centers due to moisture.
- Visible signs: swollen edges, low center, gaps along planks.
- Causes include excess moisture, improper acclimation, leaks, installation issues, humidity.
- Step-by-step fix for cupping: locate source, dry, acclimate, re-sand, reinstall properly.
- Test methods: moisture meter on subfloor and boards; verify stabilization first.
- Safety: shutoff utilities, wear eye and skin protection, vent to reduce dust.
Table of Contents
- Introduction
- Key takeaways
- What Is Cupping, Crowning and Other Common Hardwood Deformations
- How to Spot Signs and Assess Damage Severity
- Root Causes — Moisture, Installation and Maintenance Problems
- Tests and Diagnostics — How to Measure Moisture and Pinpoint Sources
- Step-by-Step Fixes — from Temporary DIY to Full Repairs
- Tools, Materials and Safety Checklist
- Costs, Timelines and When to Call a Professional
- Prevention, Long-Term Maintenance and Alternatives If the Floor Can’t Be Saved
- Conclusion
- FAQ
What Is Cupping, Crowning and Other Common Hardwood Deformations
Cupping, crowning, bowing, and edge lifting are visual cue markers for how a floor has moved. Cupping means the board edges are higher than the center, while crowning shows the center of the board bowing upward. Bowing and edge lifting can appear as the board seems to ripple or pull away from the subfloor in places.
Moisture and mechanical stress create these shapes in different ways. Excess moisture in a room or beneath the floor can drive outward movement; seasonal humidity shifts also play a role. Mechanical stress from misaligned fasteners or movement in the subfloor can push boards into unusual angles. Use a quick diagnostic checklist to identify signs, measure moisture, and decide where to measure—center versus edges—to confirm which deformation you’re dealing with. When moisture exposure occurs, cupping may appear quickly, while crowning can develop as things dry and shift. Quick tests like checking edge swelling or flatness help you gauge severity and the next steps. In short, this guide outlines when to mitigate temporarily or call in a professional depending on refinishing outcomes and safety concerns.
What cupping looks and feels like
Cupping is when your hardwood floor’s edges rise up while the middle sags down. It’s like a bowl shape.
Here’s how to spot it:
Look for: raised edges, concave boards, seams that close up. Run your hand over the boards – you’ll feel the dip in the middle.
Crowning, buckling and gaps — how they differ
Crowning is when your floor’s center humps up. It’s the opposite of cupping.
Buckling is serious – boards lift off the subfloor. You’ll see them raise up in waves or bubbles.
Gaps form when boards shrink due to dryness, exposing spaces between them.
Misidentifying these can lead to wrong repairs: Crowning needs different fixes than cupping. Buckling needs immediate attention. Gaps might need humidification, not just filling.
How to Spot Signs and Assess Damage Severity
This section walks you through a focused inspection to separate cupping, crowning, warping, or gaps from isolated or floor-wide problems. Start by noting whether a single area or multiple rooms show the issue. Determine if the damage is likely localized or systemic before planning repairs.
Follow a step by step routine: visually survey edges, centers, and transitions; test moisture on surface and subfloor; and snap photos with measurements. Look for typical cupping, visible board gaps, nail pops, or raised edges, and note any seasonal patterns or humidity correlations. Use clear severity criteria to decide between minor repairs or major remediation, and flag areas that might need subfloor attention for professional review. Document with consistent data and prepare for the next stage, whether repair, acclimation, or replacement, with reliable notes on substrate conditions and moisture trends.
Step-by-Step Process
This step-by-step guide will walk you through spotting signs of damage and assessing its severity on your concrete surfaces.
- Preparation: Ensure the area is safe. Remove any debris, and wear appropriate safety gear (gloves, safety glasses).
- Visual Inspection: Walk around the concrete surface to spot any visible cracks, chips, or other damage. Look for signs of discoloration or efflorescence.
- Check Crack Width and Length: Measure the width and length of any cracks using a tape measure. Narrow cracks (less than 1/8″) can often be repaired by DIYers, while wider ones may require professional help.
- Inspect Rebar or Wire Mesh: If applicable, check for exposed rebar or wire mesh. Exposed reinforcement is a sign of severe damage and should be addressed immediately by a pro.
- Check for Soft Spots: Use a screwdriver to gently press on the concrete surface. If it feels soft or gives way easily, there may be underlying issues that require professional assessment.
- Moisture Test (optional): If you suspect moisture-related damage, perform a simple moisture test using a hygrometer. This can help determine if water is penetrating the surface.
- Document Findings: Take photos and notes of any damage. This will help you track progress and make informed decisions about repairs.
Pro tip: Always prioritize safety first. If at any point during your inspection you feel unsure or unsafe, stop and consult a professional.
Visual checkpoints and simple measurements
Use this checklist after a heavy rain or when you suspect damage. It helps catch issues early before they become major problems.
- Check for cracks: Inspect the entire concrete surface, including edges and corners. Hairline cracks are normal but wider ones need attention. Use a ruler to measure crack width.
- Look for discoloration: Discolored areas can indicate moisture or chemical damage. Check if the color change is consistent with water stains or other signs of damage.
- Inspect joints and control joints: Ensure they’re properly aligned and not cracked. Misaligned or damaged joints can lead to more extensive cracking.
- Check for delamination: Tap the surface with a hammer. A dull thud instead of a solid sound may indicate delamination, where the concrete is separating from its base.
- Measure flatness: Use a level or laser level to ensure the concrete remains flat. Uneven surfaces can cause drainage issues and tripping hazards.
- Check for efflorescence: A white, powdery substance on the surface can indicate moisture buildup. Scrape off a small amount to check if it’s efflorescence or something else.
- Inspect rebar and wire mesh: If visible, ensure they’re not rusted or damaged. Rusted rebar can cause concrete to crumble over time.
- Take photos and moisture readings: Document the condition of your concrete with photos. Use a moisture meter to check for excessive moisture, which can indicate damage or future problems.
Quick rule: If you find any cracks wider than 1/8 inch (3mm), discoloration, or other signs of damage, take action promptly. Small issues can become big ones if left untreated.
Severity levels and urgency guide
After you’ve done your visual checks and measurements, it’s time to assess the damage severity. This helps you decide whether to monitor, fix now, or call a pro.
Monitor: If cracks are hairline (less than 1/8 inch) and don’t seem to be growing, keep an eye on them. Check every few months for any changes. If they stay the same, you’re likely fine. But if they get bigger or start to look like the next level, act.
Immediate remediation: When cracks are wider than 1/8 inch but less than 1/4 inch, it’s time to fix them. This is when water can start seeping in and causing more damage. Don’t wait; get your repair kit out now.
Call a pro: If cracks are wider than 1/4 inch or you see signs of significant settling (like doors not closing properly, or sloping floors), stop DIY and pick up the phone. These are signs of serious structural issues that need professional attention. Don’t risk it; call a concrete specialist.
Root Causes — Moisture, Installation and Maintenance Problems
Cupping in hardwood floors often traces back to moisture imbalance, with related edge-lift symptoms building as wood gains or loses moisture. Understanding these connections helps set reader expectations for repairs and prevention. The goal is to map moisture shifts to observable board movement.
Core moisture sources include wood moisture content entering the wood, moisture in the subfloor or concrete slabs, ambient humidity, and direct water exposure from spills or leaks. Installation pathways such as improper acclimation, uneven nailing, missing vapor barriers, or insufficient expansion gaps amplify these issues. Maintenance factors like harsh cleaners, high humidity cycles, or recurring water exposure prevent the floor from reaching equilibrium. Use diagnostic checks—wood versus subfloor moisture meters, site RH measurements, and visual cues—to identify problem sources and tailor fixes, whether adjusting acclimation, correcting barriers, improving ventilation, or planning staged refinishing by cause.
Environmental and Seasonal Humidity Changes
Indoor relative humidity swings can cause your hardwood floors to expand or contract unevenly, leading to cupping. In winter, heated air draws moisture from the wood, causing it to shrink. Conversely, in summer, humid air makes the wood swell.
HVAC failures can exacerbate this issue. If your heating or cooling system isn’t maintaining a consistent humidity level (between 35-60%), expect your floors to react.
To mitigate this, ensure your HVAC is functioning properly and consider using a humidifier/dehumidifier during extreme seasons.
Subfloor, Slab and Leak-Related Sources
Moisture from concrete slabs, crawlspaces, basements, slow leaks, appliance plumbing, and condensation can all contribute to your hardwood floor’s woes. If these areas are damp, the moisture will wick up into your wood.
Concrete slabs especially pose a risk due to their large surface area. Even if they seem dry, they might still be holding moisture that’s migrating into your subfloor and ultimately your hardwood.
Regularly inspect these areas for signs of water intrusion or excess dampness. If you find any, address the source promptly to prevent further damage.
Installation and Maintenance Mistakes
Premature installation, inadequate acclimation, wrong adhesives/fasteners, and improper cleaning can all introduce or worsen moisture problems in your hardwood floors.
- Premature installation: Wood needs time to adjust to your home’s environment. Rushing this process can lead to uneven expansion and contraction.
- Inadequate acclimation: Allow wood to sit in your home for at least 72 hours before installing to help it reach equilibrium with your indoor conditions.
- Wrong adhesives/fasteners: Using inappropriate glues or nails can trap moisture, leading to cupping. Always use products recommended by the flooring manufacturer.
- Improper cleaning: Cleaning products that leave a residue can trap moisture and prevent your floors from drying properly.
To avoid these mistakes, follow the manufacturer’s guidelines for installation and maintenance, and always allow enough time for acclimation.
Tests and Diagnostics — How to Measure Moisture and Pinpoint Sources
Moisture issues in wood floors and concrete slabs present as cupping, buckling, or finish failures. Look for quick visual cues that indicate whether moisture is a primary driver before you begin repairs. Homeowners can start with non destructive methods to gauge the situation.
Non destructive tests involve choosing hygrometers (pin or pinless) and interpreting readings for wood floors, the subfloor, and concrete layers. Identify common culprits such as leaks, groundwater vapor, roof or wall leaks, condensation, and vapor barrier problems, then trace sources without invasive tasks. Follow a simple diagnostic workflow: perform a visual survey, check surface moisture, map readings across the zone, repeat over time, and record data for trend analysis. Use the right tools, note calibration, and know when specialist equipment or professional testing is warranted for accurate source pinpointing.
Moisture Meters: Types, Correct Use and Limitations
When it comes to moisture testing, you’ll mainly use two types of meters – pin and pinless.
Pin meters work by driving pins into the wood. They’re great for quick checks but can damage your floor if not used carefully. Use them sparingly and in less visible areas.
Pinless meters use electromagnetic waves to detect moisture. They’re non-destructive, giving you a wider reading area without damaging the surface. However, they might give false readings near metal subfloors or nails.
Always take multiple readings in different spots to get an accurate average. Follow the manufacturer’s guidelines for safe usage and interpretation of results.
Supplemental Diagnostics: Humidity Logs, Infrared and Slab Tests
Sometimes, you might need extra tools to pinpoint moisture sources. Here are a few:
Humidity/Temperature Loggers monitor conditions over time. They’re useful for tracking seasonal changes or identifying intermittent issues.
Infrared Imaging can help spot cold or wet spots that aren’t visible to the naked eye. It’s a non-contact method, making it safe and easy to use.
Concrete Moisture Tests like the Calcium Chloride Test (ASTM F2170) measure slab moisture content. They’re invasive but necessary when dealing with concrete subfloors. If results are high or unclear, consider calling a specialist for further investigation.
Step-by-Step Fixes — from Temporary DIY to Full Repairs
This section lays out a practical action plan that you can follow on a working job site. Start by stopping the moisture source and isolating the area to prevent further cupping or warping. Set expectations for a calm, controlled drying phase.
Next, outline a drying and stabilization plan that fits your space: dehumidification, fans, and ventilation to move moisture evenly. Then assess damage to decide between stabilization, sanding or planing, or full board replacement. Provide repair methods by scenario, from temporary fixes for minor surface lifting to shims or underlayment where appropriate, up to board removal and refastening or plank replacement with matching species and thickness. Verify uniform moisture content before reassembly and refinishing, and plan a proper acclimation period if boards were removed. Keep safety and finish timing in mind to avoid applying stain until the floor is stable.
Step-by-Step Repair Process
This section guides you through a clear, numbered sequence of practical steps for fixing your hardwood floors. From preparation to final checks, these DIY-friendly actions help you tackle the job safely and effectively.
- Preparation: Gather tools (safety glasses, gloves, pry bar, hammer, etc.), cover work area, and ensure proper ventilation.
- Identify damaged boards: Inspect for cupping, crowning, gaps, edge lift, and subfloor condition. Mark them for repair or replacement.
- Main Work: For minor lifting, sand lightly; for shims/underlayment, install under affected boards; for full fixes, remove nails/screws, pry up boards, and replace if necessary.
- Refasten or reinstall: Nail or screw down repaired or replaced boards securely. Ensure they’re level and flush with surrounding floor.
- Cleanup & Final Checks: Remove debris, vacuum dust, verify repairs, and document for future reference. Consider calling a pro if unsure about any step.
Immediate actions and temporary fixes
Stop the moisture source immediately to prevent further damage. Locate and fix leaks, cover or isolate affected areas, and reduce humidity.
Safety first: Turn off power to any electrical outlets near water sources before attempting repairs.
Use fans and dehumidifiers to dry surfaces quickly. Ensure proper ventilation by opening windows or using exhaust fans. Monitor wood moisture levels regularly.
Drying, dehumidification and acclimation process
Controlled drying strategies help prevent further damage while ensuring even moisture content across your floor. Monitor progress closely.
Run dehumidifiers and high-volume fans continuously for 24-72 hours, depending on severity. Ensure proper ventilation to maintain airflow.
Monitoring is key: Use a moisture meter to track wood moisture levels. Aim for 6-9% MC (moisture content) before refinishing or reinstalling boards. Allow acclimation time if boards were removed.
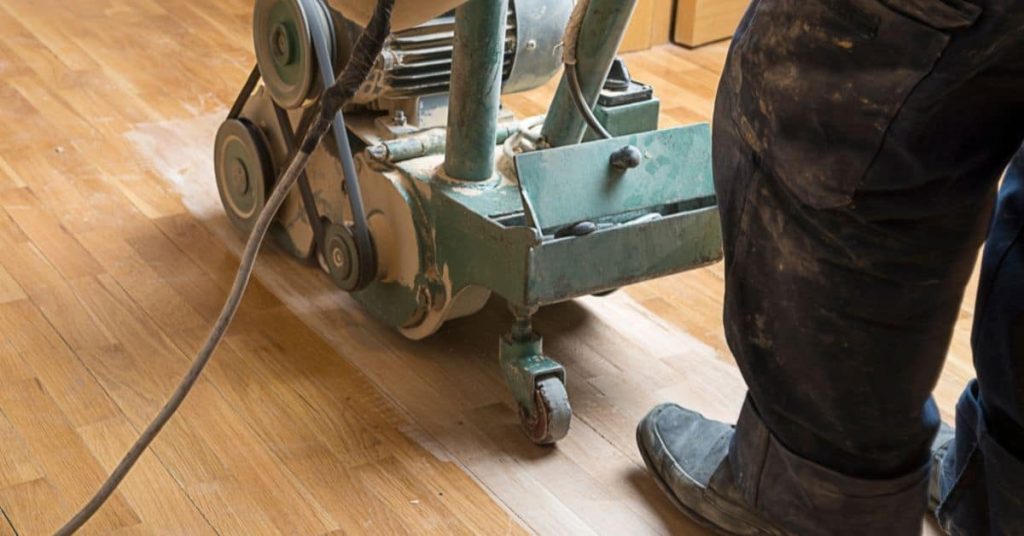
Repair options: sanding, selective board replacement and full refinishing
Choose the right repair method based on damage severity. Sanding and refinishing may suffice for minor issues; selective board replacement or full removal/replacement might be necessary otherwise.
For sanding/planing: Lightly sand cupped or crowned boards to flatten them. Be cautious not to sand through the tongue-and-groove joint.
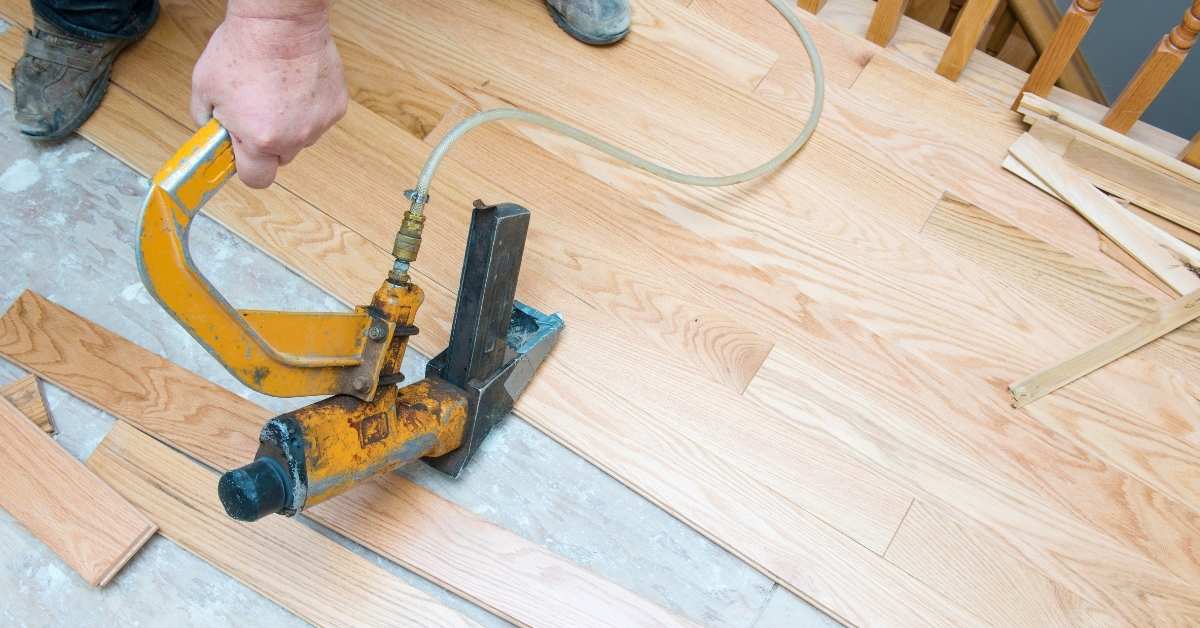
For selective board replacement: Remove and replace individual damaged boards, ensuring they match species, thickness, and grain pattern with surrounding floor.
For full refinishing: Remove all affected boards, repair or replace subfloor if necessary, then reinstall matching boards. Consider calling a pro for extensive work.
Tools, Materials and Safety Checklist
This section lists homeowner-friendly tools, consumables, and PPE needed for common hardwood refinishing and repair tasks, with safety considerations to prevent injuries and minimize dust migration. Use it as a quick reference for planning a project.
Essential tools include a square/level, pry bar, pry knife, putty knives, sanders, sanding disks, a shop vac with HEPA, measuring tape, utility knife, mixing paddle, and a hawk or notched trowel as applicable. Consumables and materials cover dust free abrasives, wood filler, stain or finish options, wood conditioner if needed, sandpaper grits, disposable rags, and protective underlayment. PPE and safety practices emphasize respirators, eye protection, hearing protection, gloves, and appropriate clothing; ensure ventilation and proper dust control. For equipment rental versus purchase, plan where to rent specialized gear and what to buy for repeat use, and factor in setup, calibration, and return timelines. Also include setup steps for dust containment, drop cloths, door protection, cord management, and post task cleanup.
Tools and materials checklist
Before you start diagnosing or repairing your hardwood floors, make sure you have these essential tools and materials on hand.
- Moisture meter: To pinpoint moisture sources. Skipping this can lead to incorrect repairs.
- Hygrometer: To monitor humidity levels. Neglecting this can cause further damage.
- Fans/dehumidifiers: For drying and dehumidification processes.
- Carpentry tools (hammer, pry bar, etc.): For minor repairs and replacements.
- Safety glasses: To protect your eyes from debris.
- Work gloves: To prevent injuries while handling materials.
- Dust masks/respirators: Essential for sanding to avoid inhaling particles.
- Drop cloths/tarps: For protecting areas and containing dust.
Quick rule: Always check your tools and materials before starting any task. Missing something can delay your project or lead to poor results.
Safety, permits and working around finishes/adhesives
Before you begin refinishing or repairing your hardwood floors, ensure you’re aware of these safety measures, permit requirements, and best practices for handling finishes.
- PPE (Personal Protective Equipment): Wear a respirator, safety glasses, work gloves, long sleeves, and slip-resistant footwear. Skipping PPE can lead to injuries or health issues.
- Dust control: Use a HEPA shop vac for sanding to contain dust. Neglecting this can cause damage to your lungs and home.
- Ventilation: Ensure proper ventilation when applying finishes to prevent fume inhalation.
- Permits: Check local requirements for major subfloor work. Skipping permits can result in fines or project delays.
- Finishes/adhesives: Always follow manufacturer’s instructions for handling and application. Improper use can lead to poor results or health hazards.
Quick rule: Never compromise on safety measures. Always prioritize your well-being and the longevity of your project.
Costs, Timelines and When to Call a Professional
Understand the key cost drivers for drying, repairs, and refinishing so you can plan realistically without guesswork. Factor in variables like space size, species, thickness, finish type, and the condition of the floor when discussing estimates. Keep distinctions between DIY material costs and professional labor in mind for budgeting.
Timeline considerations hinge on drying and acclimation periods, readiness for sanding or finish application, and any moisture tests needed. Moisture and damage assessments influence both cost and scheduling, so document results and plan contingencies. When gathering quotes, collect photos, square footage, subfloor type, current finish, and observed issues to present a clear scope. Ask about warranties, lead times, scope of work, and disposal fees to compare bids fairly. In red flag situations with high moisture, extensive cupping, structural concerns, or unusual finishes, a professional can save time and ensure long lasting results.
What influences cost and how to estimate it
The cost of refinishing and repairing hardwood floors varies based on several factors. Here’s what you need to consider:
Scope: Larger areas mean more material and labor, driving up costs.
Materials: Higher-quality woods and finishes increase the price. DIY materials will be cheaper than professional-grade ones.
Access: If rooms are hard to reach or have unique layouts, expect higher labor charges.
Moisture remediation: Equipment rentals or purchases for drying out floors can add to costs. Local rates vary, so get quotes from multiple suppliers.
Labor: Local labor rates significantly impact the total cost. Get at least three itemized quotes to compare apples to apples.
When to hire a pro and what to expect from estimates
While DIY refinishing can save you money, there are times when hiring a professional is crucial. Here’s when:
Widespread moisture: If your floors show signs of extensive moisture damage, it’s best to call in the pros. They have specialized equipment and expertise to handle these issues.
Structural issues: Warping, cupping, or other structural problems may require professional intervention to ensure the longevity of your repairs.
Complex subfloor remediation: If your subfloor needs significant repair or replacement, it’s wise to hire a pro. They can assess and address these issues properly.
When getting estimates, ask about:
– Warranty coverage for labor and materials
– Lead times for the project
– The exact scope of work they’ll perform
– Any disposal fees they may charge
Prevention, Long-Term Maintenance and Alternatives If the Floor Can’t Be Saved
Assessing salvageability means weighing subfloor integrity, cupping or warping severity, and bond strength to decide whether refinishing is viable. If the floor can’t be saved, plan a replacement strategy early to minimize disruption. Use quick criteria to guide the decision process and protect investments.
Establish a proactive maintenance schedule that fits real life: regular cleaning, humidity checks, and a possible yearly refinishing cycle if feasible. Control indoor humidity with ventilation strategies and seasonal adjustments, using humidification or dehumidification as needed. For replacements, evaluate durable options like engineered hardwood with a thicker wear layer, click lock vinyl, high quality laminate, or moisture resistant tiles, and note their installation notes and lifespans. Plan transitions with sustainability in mind, including possible material salvage and steps to limit downtime during a project.
Routine maintenance and environmental controls
Maintaining your hardwood floor is like caring for a fine piece of furniture. Regular cleaning, humidity control, and HVAC maintenance will keep it looking great and performing well.
Humidity targets: Keep indoor relative humidity (RH) between 45-60% year-round to prevent expansion and contraction. Use a hygrometer to monitor levels.
Cleaning habits: Sweep or vacuum regularly to remove dirt, dust, and grit that can act like sandpaper on your floor’s finish. Spot clean spills promptly with a mild cleaner designed for hardwoods.
HVAC maintenance: Schedule regular service for your heating and cooling systems to ensure they’re running efficiently and maintaining proper humidity levels.
Long-term monitoring and care plan
A proactive approach to floor care means catching potential issues early and extending the life of your hardwoods.
Seasonal checks: Inspect your floor quarterly for signs of warping, cupping, or excessive gaps. Check under furniture and in less-trafficked areas where damage may go unnoticed.
Moisture logging: Use a data logger to track humidity levels over time. This will help you understand how your home’s environment changes with the seasons and adjust accordingly.
Refresh/refinish timeline: Plan to refinish or refresh your floor every 5-10 years, depending on wear and tear. Regular maintenance will extend this timeline, but don’t wait until your floor looks worn before addressing it.
Replacement and alternative flooring solutions
When refinishing is no longer an option, consider these durable alternatives to replace your hardwood floor.
Engineered hardwood: With a thicker wear layer than solid hardwood, engineered options can be sanded and refinished multiple times. They’re also more dimensionally stable than solids.
Vinyl plank: Luxury vinyl planks (LVP) are water-resistant, durable, and mimic the look of hardwoods. They’re easy to install and maintain, with lifespans up to 20 years or more.
Tile: Porcelain or ceramic tiles are highly moisture-resistant and durable. They’re not as warm underfoot as wood but offer a wide range of styles and colors. Expect a lifespan of 50+ years with proper installation and care.
Conclusion
Your floor can be brought back to solid, good-looking condition when you tackle the moisture, installation and maintenance issues head-on and follow a clear plan. Safety and careful testing keep you from making costly mistakes and irreversible damage.
Start by confirming moisture sources in the area and nearby zones, then assess damage with simple tests and measurements. Check in a small, inconspicuous spot first, document what you find, and decide if you can DIY with temporary fixes or if a full repair is needed. Then follow a practical flow: stop the problem from spreading, fix or isolate the source, choose a repair path that matches the damage, test the outcome, and recheck moisture levels before sealing or refinishing. Always work step by step and keep a spare material and tool plan in mind so you don’t rush and ruin the floor.
Common mistakes are trying to hide cupping or crowning with quick DIY patches, skipping moisture testing, and rushing refinishing without stabilizing the subfloor first. Always dry and acclimate the area, use the right tools for the job, and wear proper safety gear. Measure moisture with the recommended method, seal fixes to prevent new leaks, and verify results before proceeding. If the damage is widespread, moisture is persistent, or the floor can’t be stabilized, call a professional rather than pushing on and risking more material loss or higher costs.
When to call in a pro is clear: you see ongoing moisture, structural movement, or you’re unsure about the source and cannot confidently isolate it. If you’re beyond a temporary fix or the board replacement would require specialized equipment, get expert help. Stay patient, stay safe, and you’ll restore both the look and the lifespan of the hardwood—one careful step at a time.
FAQ
What is wood floor cupping and how does it differ from other deformations?
Cupping is when the edges of a plank rise higher than the center, forming a trough. It’s usually caused by moisture imbalance, not by humidity alone. It looks like a shallow bowl across the board, not a bend along the length.
What are the visible signs of cupping I should look for?
You’ll see the edges higher than the middle, gaps along seams, and sometimes raised ridges near walls. Planks may feel springy or hollow when you walk on them. Warping often starts at moisture sources like under sinks or around doors.
What causes cupping and how can I identify the moisture sources?
Moisture under the floor, leaks, or high humidity can push edges up. Look for water stains, damp subfloor, or condensation under cabinets and appliances. Use manufacturer guidance for moisture tests and check for sources that deliver ongoing moisture.
How do I fix cupping step by step as a DIY homeowner?
First, locate and stop the moisture source. Next, dry the area and let the subfloor acclimate. If cupping is mild, you may be able to sand and refinish after it’s dry; if severe, plan for professional removal or panel replacement.