
Introduction
Acclimating flooring means letting the material adjust to the room conditions before installation. This isn’t a one-size-fits-all rule; temperature and humidity matter, but accuracy comes from checking the product labels and your actual home conditions. Rushed or misreading the room can lead to gaps, warping, or squeaks after install.
To avoid the “False Acclimation” trap, verify that the flooring is allowed to sit in the actual room for a realistic period and monitor the conditions. Make sure the subfloor is clean, dry, and properly sealed per product instructions before laying anything. If in doubt, consult the manufacturer’s guidelines and your local rules to determine what to check and for how long.
Key takeaways
- Ensure subfloor is clean, dry, and sealed per manufacturer before acclimation.
- Bring flooring and accessories to room conditions before installation starts.
- Avoid false acclimation by verifying actual subfloor moisture and material conditioning.
- Monitor temperature and humidity during acclimation with calibrated instruments, document readings.
- Follow sealing methods for subfloors to prevent moisture migration and instability.
- Include basic safety: wear PPE, avoid trip hazards, ventilate and observe heat sources.
Table of Contents
- Introduction
- Key takeaways
- Why Proper Acclimation Matters
- Pre-Install Planning and Climate Control
- Step-by-Step: Proper Acclimation Process
- The “False Acclimation” Trap — How It Happens and How to Avoid It
- Temperature and Humidity Targets by Floor Type
- Testing, Monitoring, and Visual Checkpoints
- Tools, Materials Checklist and Safety Precautions
- Cost Implications, Planning Ahead, and Long-Term Maintenance
- Conclusion
- FAQ
Why Proper Acclimation Matters
Wood and engineered floors react to moisture and temperature by changing size and shape, so check the material moisture content and room readings before you bring boards into the install area. Measure the subfloor moisture, read the product label or technical sheet for target moisture ranges, and keep a log of those values.
Getting acclimation right prevents visible failures like gaps, cupping, or crowning and reduces the chance of early finish or adhesive problems that cost time and money. If you skip or fake acclimation, expect callbacks, warranty headaches, and replacement work that’s avoidable with straightforward checks and stable storage.
How wood and natural materials respond to moisture and temperature
Material choices greatly affect how flooring responds to moisture and temperature.
- Wood: Expands in humidity, contracts when dry. Hygroscopic – absorbs/desorbs water. Seasonal changes matter.
- Bamboo: Similar to wood but more stable due to manufacturing process. Still expands/contracts with moisture.
- Cork: Expands and contracts less than wood/bamboo due to closed-cell structure. Still affected by humidity.
- Laminate: Stable in size but can delaminate or warp if exposed to excessive moisture. Avoid high-humidity areas without underlayment.
- Tile: Minimal expansion/contraction, but can crack if subfloor moves excessively due to moisture changes.
Typical installation failures from poor acclimation
Improper acclimation leads to various installation failures:
Gapping: Floors shrink due to dry conditions, leaving gaps between planks.
Cupping: Boards curl upwards at the edges due to uneven moisture distribution. Can cause tripping hazards and weak points for damage.
Buckling: Boards lift off the subfloor due to excessive moisture underneath, leading to a wavy appearance and potential structural issues.
These failures can void warranties and lead to costly repairs or reinstallation. Always follow manufacturer guidelines for acclimation.
Pre-Install Planning and Climate Control
Set stable indoor conditions and a clear schedule before materials arrive; plan HVAC run times, where to place dehumidifiers or heaters, and how you’ll monitor temperature and humidity during the whole acclimation window. Walk the rooms to seal drafts, locate power for equipment, and note any moisture sources or cold floors that need fixing first.
A predictable environment keeps readings honest and prevents last-minute rushes that force shortcuts you’ll regret. Relying on a quick snapshot or turning on a heater for an hour can mask problems and lead to failed installs, so document your plan and stick to it.
Set target temperature and RH — what to aim for
The ideal indoor conditions for acclimating flooring typically fall within a range of 35-55% relative humidity (RH) and a temperature band between 60-80°F (15-27°C). However, always check with the manufacturer first, as product-specific limits may vary.
To maintain these conditions during acclimation and curing, you’ll need to control both temperature and humidity. This might involve using heating or cooling systems, along with dehumidifiers or humidifiers.
Remember: Flooring materials are sensitive to extreme temperatures and high humidity levels. Keeping them within the recommended ranges ensures they acclimate properly and reduces the risk of installation failures.
Prepare the room and equipment (HVAC, dehumidifiers, hygrometers)
Before starting acclimation, ensure your room is ready with the right equipment to monitor and control conditions.
- HVAC system: Use your home’s heating, ventilation, and air conditioning system to maintain a stable temperature. Set it to run continuously at the target temperature during acclimation.
- Portable dehumidifiers/humidifiers: If needed, use these to control humidity levels. Rentals are available for around $30-$50 per day.
- Hygrometers (moisture meters): Purchase or rent multiple hygrometers ($10-$20 each) to monitor RH at different locations in the room.
- Thermometers: Use these to verify temperature readings from your HVAC system and ensure consistency throughout the room.
- Tape measure: Measure your room’s dimensions accurately to calculate how many square feet of flooring you’ll need, helping you order the right amount.
Scheduling and staging deliveries
Timing delivery is crucial for proper acclimation. Have your flooring delivered a few days before installation to allow it to adjust to the indoor conditions.
Stage boxes: Arrange them in a single layer, evenly spaced, and away from walls or other obstacles that could trap heat or moisture. Keep them off direct sunlight to prevent temperature fluctuations.
Consider your room’s layout and traffic patterns when staging deliveries. Ensure boxes don’t block walkways or doorways, making it difficult for you or installers to move around safely.
Weather protection: If outdoor conditions are extreme (e.g., heavy rain, snow, or high temperatures), consider having the flooring delivered directly into the room where it will be installed. This minimizes its exposure to harsh weather conditions that could affect acclimation.
Step-by-Step: Proper Acclimation Process
Follow a repeatable workflow from delivery to sign-off: inspect cartons at arrival, confirm product type and visible condition, stage bundles by room, and only start acclimation when the install room is at target conditions noted on the product data sheet. Use a hygrometer and thermometer to log readings, and a moisture meter where the manufacturer requires it.
Doing the steps in order — staged delivery, unopened storage until the clock starts, periodic checks, and a final stabilization reading — gives you objective pass/fail results. Skipping rotation, ignoring mid-point checks, or installing before readings stabilize invites dimensional failure and lost warranty coverage.
Step-by-Step Process
Follow this clear, numbered sequence to properly acclimate your flooring from start to finish. This ensures dimensional stability and a successful installation.
- Inspect packaging for moisture protection and check product type, width, thickness, and subfloor condition before bringing materials indoors.
- Keep materials in their packaging until the acclimation period starts. Group by room or zone and avoid stacking beyond recommended heights to promote uniform air exposure.
- Establish a standard timeline (e.g., 48–72 hours for many products) and rotate bundles or open packaging as specified by the manufacturer.
- Monitor temperature and relative humidity using a thermometer/hygrometer, and check moisture content with a calibrated meter where applicable. Document initial readings and set acceptable fluctuation limits.
- Perform mid-point checks and final verification only after readings stabilize within targets. Confirm sustained environmental conditions for a defined period before installation.
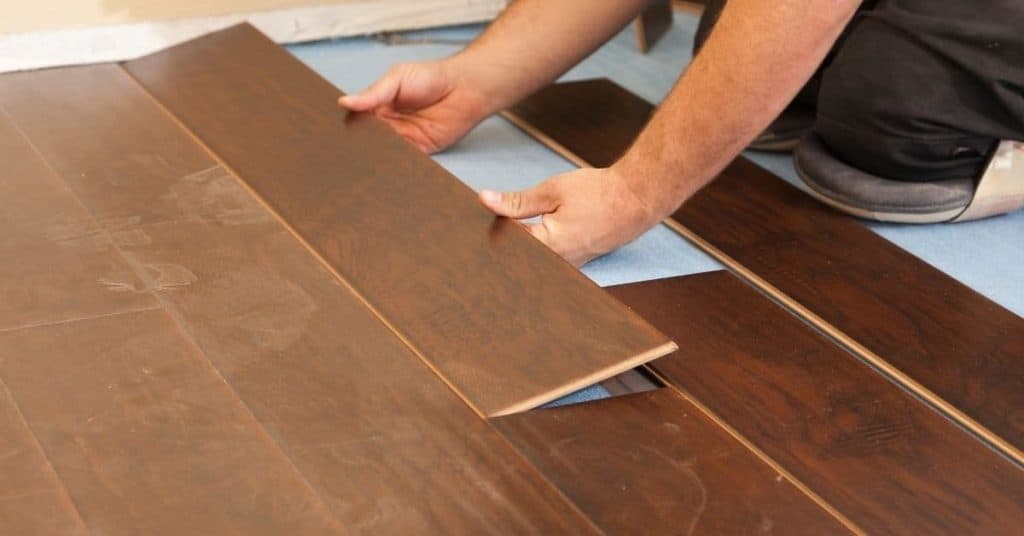
Unbox, Cross-Stack and Provide Airflow
Safely unbox your flooring materials to allow for proper air circulation around the planks. This helps them acclimate evenly to the room’s environment.
Cross-stack pallets or boxes by alternating their direction to create spaces between layers. This promotes airflow and prevents moisture buildup.
Do not leave boxes sealed in a conditioned space, as this can lead to false acclimation and moisture-related issues during installation.
Measure Moisture Content and Compare to Subfloor
Use a calibrated moisture meter or manufacturer-specified tests to confirm that the boards’ moisture content is within acceptable limits compared to the subfloor or ambient conditions.
Check both the flooring materials and the subfloor to ensure they are compatible in terms of moisture content. This helps prevent installation failures due to excessive moisture differences.
Note: Some products may require specific testing methods, such as the ASTM F2170 standard for wood flooring. Always follow manufacturer guidelines.
Criteria for Ending Acclimation and Starting Install
Determine when acclimation is complete by considering stable readings over time, manufacturer tolerances, and practical signs that the materials have adapted to the environment.
Readings should remain within acceptable fluctuation limits (e.g., ±2–3% RH) for a specified duration. Consult the manufacturer’s guidelines for specific tolerances.
Practical signs of completed acclimation include consistent readings, no visible moisture on the materials’ surface, and no warping or cupping of the planks.
The “False Acclimation” Trap — How It Happens and How to Avoid It
False acclimation looks like a stable room but hides problems: short-term HVAC runs, a single hygrometer in the wrong spot, or opening just a few cartons while leaving the rest in a cold garage. Verify material moisture content, run repeated readings in different spots, and compare subfloor tests to the product’s required range.
Trusting a one-time reading or visual cues often leads to swelling, adhesive issues, or boards that move after install. If readings or the feel of boards don’t match expectations, pause, re-measure, and follow a documented checklist before continuing.
Examples of false acclimation practices
DIY homeowners often fall into the ‘false acclimation’ trap by taking shortcuts. Here are some examples:
Leaving sealed boxes in conditioned warehouses: Just because it’s climate-controlled doesn’t mean your flooring is acclimating properly. It needs airflow.
Short 24-hour ‘acclimation’ in uncontrolled spaces: A day isn’t enough, especially if the room temperature and humidity fluctuate.
Staging near a heat source: Heat can dry out flooring too quickly, leading to warping. Keep your materials away from direct heat sources.
Verification steps to prove true acclimation
To ensure your flooring is truly acclimated, follow these objective checks:
Repeated moisture readings: Check the moisture content of your flooring and subfloor at least twice a day. Consistency is key.
Room RH stability: Use a hygrometer to monitor relative humidity. It should stay within the target range (30-50% for most woods) for 72 hours straight.
Observed dimensional stability of sample boards: Lay out some boards and watch them. If they warp, cup, or twist, they’re not ready yet.
Temperature and Humidity Targets by Floor Type
Different floor types react differently; solid wood is the most sensitive, engineered less so, and waterproof-core products behave yet differently. Check the manufacturer’s guidance for the specific material you bought and use those target temperature and humidity ranges as your baseline for acclimation.
Treat each product on its own terms: don’t assume a single rule fits all materials or seasons. If your subfloor or ambient readings sit outside the product’s stated window, delay the install or use climate control until you’re within the acceptable range and can document it.
Solid (solid-sawn) wood
Solid wood flooring is the most sensitive to humidity and temperature changes. It expands and contracts with moisture content, so careful acclimation is crucial.
Target in-situ conditions: 60-80°F (15-27°C) and 30-50% RH for at least 7 days before installation. Always follow manufacturer tolerances.
Solid wood needs longer acclimation periods due to its thickness and reactivity. Monitor moisture content regularly, aiming for a difference of no more than 2% between the floor and subfloor.
Engineered hardwood and multi-ply products
Engineered floors are more stable than solid wood but still require acclimation. The core material, adhesive, and installation method can affect performance.
Target in-situ conditions: 60-80°F (15-27°C) and 30-50% RH for at least 4 days before installation. Some manufacturers may require longer periods.
Engineered floors can be less reactive to humidity swings, but proper acclimation ensures a successful install. Check manufacturer guidelines for specific products.
Bamboo and specialty natural products
Bamboo flooring is dense and can vary in behavior based on its origin and processing method. It’s generally more stable than solid wood but less so than engineered hardwood.
Target in-situ conditions: 60-80°F (15-27°C) and 30-50% RH for at least 4 days before installation. Always check manufacturer guidelines for specific products.
Bamboo can be sensitive to humidity changes, especially if it’s not properly acclimated. Monitor moisture content regularly during the acclimation process.
Testing, Monitoring, and Visual Checkpoints
Put tests on a schedule: baseline subfloor moisture and material readings before acclimation, midpoint checks, and final verification before installation starts. Use calibrated tools where required, record values with time stamps, and photograph key readings and the staged bundles for your records.
Regular monitoring catches drift early and gives you objective evidence if something goes wrong. If you see readings move outside your acceptable band, stop work, troubleshoot (more drying, different equipment, or a pause) and update the log before resuming.
Moisture testing methods explained
Before you start acclimating your flooring, understand the different moisture testing methods to ensure accurate readings.
- Pin meters: Easy to use, measure surface moisture. Ideal for quick checks on wood and concrete.
- Non-pin meters: No direct contact, useful for hard-to-reach areas. Less accurate than pin meters.
- Calcium chloride test: Measures slab moisture content over 72 hours. Follow manufacturer’s instructions.
- In-slab testing: Drill holes to measure moisture deep within the slab. Time-consuming but most accurate.
- Manufacturer-preferred tests: Always follow flooring manufacturer’s recommended test methods and calibration.
Quick rule: Use pin meters for quick checks, calcium chloride or in-slab testing for concrete slabs. Always follow manufacturer guidelines.
Visual and physical checkpoints during and after install
Regularly inspect your flooring installation to catch issues early and maintain quality.
- Gaps: Check for consistent expansion gaps (1/2″-3/4″) between boards and walls. Too small or too large gaps can cause problems.
- Cupping: Look for edges higher than the middle, indicating excess moisture. Pause installation if found.
- Adhesive squeeze-out: Ensure adhesive isn’t oozing between boards. Excess adhesive can cause issues during sanding and finishing.
- Finish glaze: Check for even finish application, no missed spots or over-application.
- Expansion gaps at doors: Ensure proper expansion gaps (1/2″-3/4″) around door jambs to prevent binding.
Quick rule: Inspect daily during installation. Pause and remediate any issues found to maintain flooring integrity.
Tools, Materials Checklist and Safety Precautions
Gather the right tools: a reliable hygrometer, a moisture meter appropriate for the floor type, a thermometer, and basic climate-control gear like dehumidifiers or heaters plus extension cords and power access. Also collect PPE, floor protection, and the manufacturer’s installation instructions so you don’t rely on memory open to interpretation.
Using the right kit protects the material and the people handling it and gives you credible measurements for warranty or dispute situations. If you don’t have a specific tool or are unsure which meter setting to use, check the product documentation or rent calibrated equipment rather than guessing.
Tools & Materials Checklist
Before you start acclimating your flooring, make sure you have all the necessary tools and materials on hand. This will help ensure a smooth process and prevent delays.
- Hygrometers: To monitor relative humidity levels.
- Moisture meters (pin & pinless): To check subfloor moisture content and prevent installation on wet surfaces.
- Infrared thermometer: To measure surface temperatures accurately.
- Vapor barriers/underlayments: To prevent moisture from the slab below from affecting your flooring.
- Dehumidifiers/humidifiers: To control humidity levels in the room as needed.
- Pallets/risers for cross-stacking: To allow air to circulate around your flooring stacks during acclimation.
- Manufacturer-recommended adhesives: Always use the adhesive specified by the manufacturer to ensure compatibility and proper bonding.
Quick rule: Double-check your list before starting. Missing items can lead to improper acclimation or installation delays.
Safety, Storage, and Handling Best Practices
Proper safety measures and handling techniques are crucial for protecting both you and your flooring throughout the acclimation and installation process.
- PPE (Personal Protective Equipment): Wear gloves, eye protection, and a respirator or dust mask to protect against debris and chemicals.
- Safe manual lifting: Use proper lifting techniques to prevent injury when moving flooring boxes or materials.
- Storage off the slab: Keep your flooring off direct contact with the concrete slab to prevent moisture transfer.
- Avoid sunlight: Store and acclimate your flooring in a cool, shaded area away from direct sunlight to prevent temperature fluctuations.
- Ventilation for adhesives & sealers: Ensure proper ventilation when using adhesives and sealants to avoid inhaling harmful fumes.
Quick rule: Always prioritize safety. Improper handling or storage can lead to damaged flooring, injuries, or even health issues.
Cost Implications, Planning Ahead, and Long-Term Maintenance
Acclimation takes time and sometimes adds climate-control costs up front, so factor those into your schedule and budget before committing to an install date. Consider cheaper fixes like sealing drafts or renting a dehumidifier for the required window instead of improvising when materials arrive.
Spending a little on proper acclimation lowers the chance of shrinkage, gap repairs, or premature refinishing later. Keep a simple maintenance routine and seasonal checks documented so the floor stays within its expected performance and you protect any warranty coverage.
Budget-friendly strategies and cost trade-offs
Upfront costs can be managed with smart planning. Rent climate-control equipment like dehumidifiers or humidifiers instead of buying new. This keeps your budget in check while ensuring proper acclimation.
Staging shipments is another cost-effective strategy. Deliver materials just before installation to minimize storage time and reduce the need for extended acclimation periods.
Investing in proper testing – like moisture meters and RH monitors – might seem expensive, but it’s a small price to pay compared to costly repairs down the line due to hidden moisture issues.
Long-term maintenance to preserve acclimation benefits
Maintaining stable indoor relative humidity (RH) and temperature is key. Aim for the ideal RH ranges we discussed earlier, based on your flooring type.
Promptly repair any leaks or spills to prevent moisture buildup. Regular seasonal checks help catch potential issues early. In winter, keep indoor RH above 30% to prevent excessive dryness; in summer, maintain it below 60% to avoid excess humidity.
Don’t hesitate to consult professionals if you notice signs of warping, cupping, or excessive gaps. They can provide tailored advice and interventions to protect your flooring’s longevity.
Conclusion
Proper acclimation is the foundation of a safe, durable floor install. Do it right and you reduce gaps, squeaks, warping, and costly callbacks.
Check this in plain terms: set the site climate to the target range, verify the material type and moisture behavior, run a controlled acclimation test, document the readings, and monitor daily until the floor is ready to install. Do this in order, and stay cautious with every step. Readings are critical for decision points, not guesses.
Common mistakes to avoid are rushing ahead without stable humidity and temperature, skipping a small-area test, and misreading the targets or timing. Safety rules are simple: control the environment first, use proper PPE, vent and shield to prevent damage, and never force a floor to acclimate beyond recommended limits. If you notice persistent moisture, uneven readings, or a questionable subfloor, pause and call a professional—better to pay a bit now than replace a floor later. Stay steady, stay deliberate, and you’ll finish with a floor that looks good and lasts long.
FAQ
How do I properly acclimate flooring for a DIY install, and what factors should I watch?
Let the flooring sit in the installation area with the same conditions it will be installed in. Keep it off the floor and in its packaging until you’re ready to lay it. Check the manufacturer’s instructions for any special handling notes.
What temperature and humidity range should I target, and how do I maintain it during installation?
Follow the product label or datasheet for targets and note any climate-control steps the manufacturer recommends. Use a reliable thermometer and hygrometer in the room. If conditions drift, adjust HVAC or use portable humidifiers/dehumidifiers as needed, based on the guidance from the product you’re using.
What common mistakes happen during acclimation, and how can I avoid them?
Avoid leaving flooring out in a different space, stacking too tightly, or laying items too soon after moving them. Don’t ignore subfloor conditions or moisture issues that were not surfaced before work begins. Always verify with the product’s instructions and your local rules if in doubt.
How should I seal or prepare subfloors before installing on different substrates?
Seal or treat any concrete, wood, or existing underlayment per the substrate’s requirements and the flooring brand. Ensure the surface is clean, dry, and even, following manufacturer guidance. If you’re unsure about a substrate, check the product label and local guidelines before proceeding.